2008 MERCEDES-BENZ CLS COUPE light
[x] Cancel search: lightPage 93 of 329
Seat belts
90
already secured, the
< seat belt warning
lamp lights up for six seconds after the engine
has been started. The < seat belt warning
lamp then goes out if both the driver and the
front passenger have fastened their seat belt.
i Further information about the < seat
belt warning lamp (Y page 249). Belt height adjustment
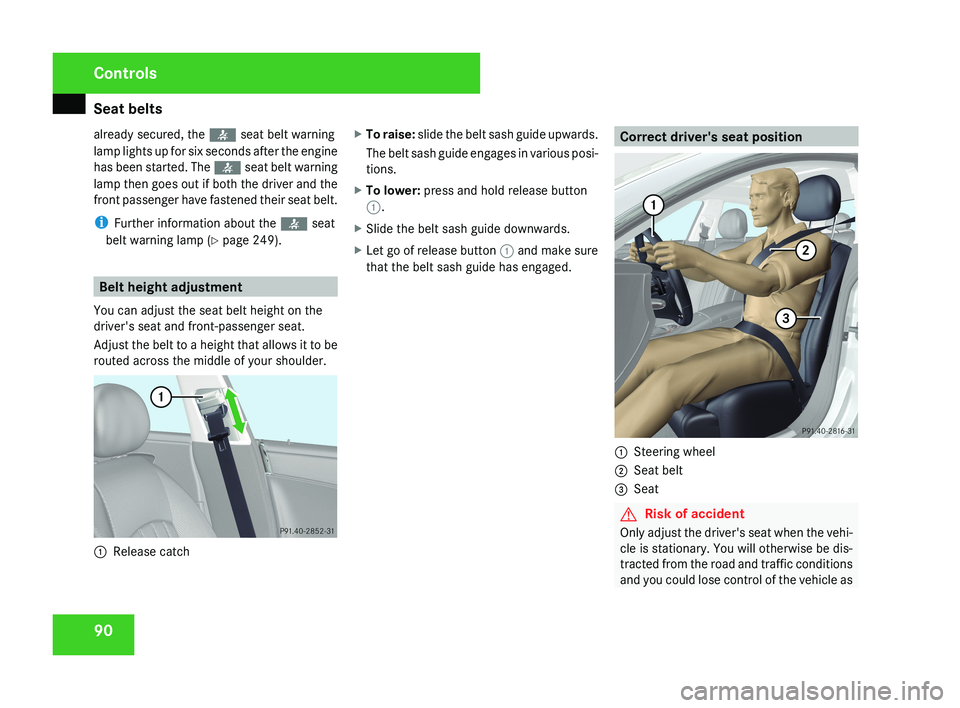
You can adjust the seat belt height on the
driver's seat and front-passenger seat.
Adjust the belt to a height that allows it to be
routed across the middle of your shoulder.1 Release catch X
To raise: slide the belt sash guide upwards.
The belt sash guide engages in various posi-
tions.
X To lower: press and hold release button
1.
X Slide the belt sash guide downwards.
X Let go of release button 1 and make sure
that the belt sash guide has engaged.
Correct driver's seat position
1 Steering wheel
2 Seat belt
3 Seat
G Risk of accident
Only adjust the driver's seat when the vehi-
cle is stationary. You will otherwise be dis-
tracted from the road and traffic conditions
and you could lose control of the vehicle as
Controls
219_AKB; 2; 4, en-GB
mkalafa,
2007-11-13T09:28:36+01:00 - Seite 90
Page 94 of 329
Lights
91a result of the seat moving. This could
cause an accident.
G
Risk of accident
Only adjust the steering wheel when the
vehicle is stationary and do not pull away
until the steering wheel adjustment mech-
anism is locked in position. You might oth-
erwise drive without the steering wheel
adjustment mechanism being locked in
position.
As a result you could be distracted
from road and traffic conditions by an unex-
pected movement of the steering wheel
and thereby cause an accident.
However, the steerability of the vehicle is
not affected.
X Check whether seat 3 and the head
restraint are adjusted properly
(Y page 75).
Make sure that:
R
you
are as far away from the driver's front
airbag as possible
R you are sitting in a normal upright posi-
tion
R you can fasten the seat belt properly
R you have moved the backrest to an
almost vertical position R
you have set the seat angle so that your
thighs are gently supported
R you can depress the pedals properly
R you have adjusted the head restraint so
that the back of your head is supported
at eye level by the central area of the
head restraint
X Check whether steering wheel 1
is adjus-
ted properly (Y page 81).
Make sure that:
R you can hold the steering wheel with your
arms slightly bent
R you can move your legs freely
R you can see all the displays in the instru-
ment cluster clearly
X Check whether you have fastened seat belt
2 properly
(Y page 88).
It should:
R fit snugly across your body
R be routed across the middle of your
shoulder
R routed in your pelvic area across the hip
joints Lights
Light switch
For
reasons of safety, Mercedes-Benz recom-
mends that you drive with the lights switched
on even during the daytime. In some coun-
tries, daytime use of headlamps varies due to
legal requirements and self-imposed obliga-
tions. In these countries, dipped-beam head-
lamps are switched on when the ignition is
switched on.
i If you drive in countries in which traffic
drives on the opposite side of the road to
the country where the vehicle is registered,
oncoming traffic may be dazzled by the
asymmetrical dipped-beam headlamps.
Have the headlamps changed to symmet-
rical dipped beam when driving in these
countries. You can obtain information
about this from any Mercedes-Benz Service
Centre. Controls
219_AKB; 2; 4, en-GB
mkalafa,
2007-11-13T09:28:36+01:00 - Seite 91
Page 95 of 329
Lights
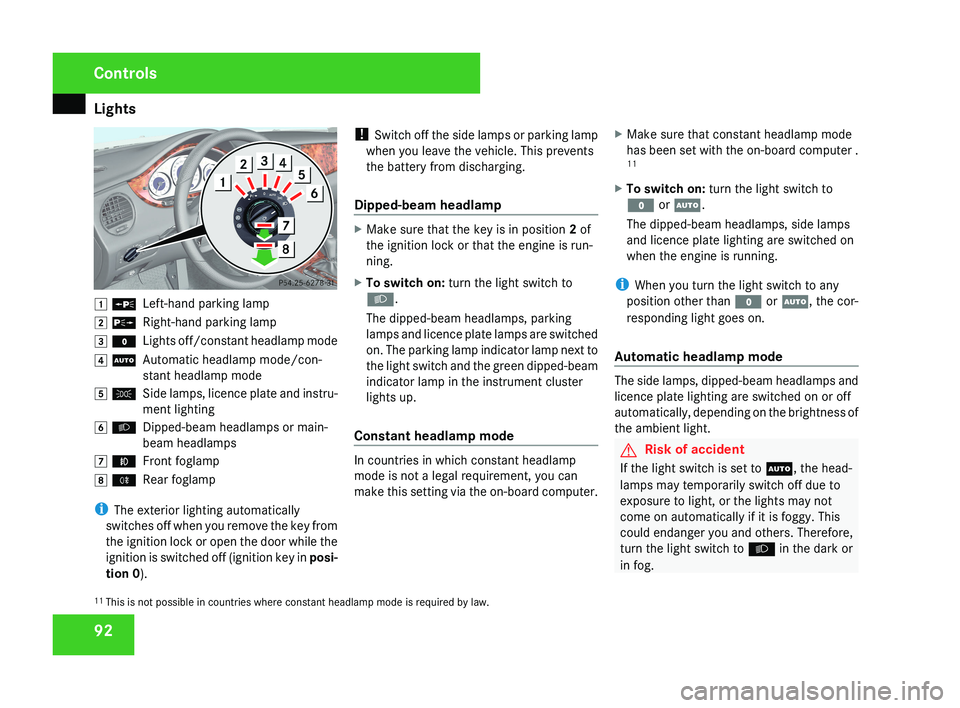
92$ a
Left-hand parking lamp
% g Right-hand parking lamp
& M Lights off/constant headlamp mode
( U Automatic headlamp mode/con-
stant headlamp mode
) C Side lamps, licence plate and instru-
ment lighting
* B Dipped-beam headlamps or main-
beam headlamps
, ¥ Front foglamp
. † Rear foglamp
i The exterior lighting automatically
switches off when you remove the key from
the ignition lock or open the door while the
ignition is switched off (ignition key in posi-
tion 0 ). !
Switch off the side lamps or parking lamp
when you leave the vehicle. This prevents
the battery from discharging.
Dipped-beam headlamp
X Make sure that the key is in position 2 of
the ignition lock or that the engine is run-
ning.
X To switch on: turn the light switch to
B.
The dipped-beam headlamps, parking
lamps and licence plate lamps are switched
on. The parking lamp indicator lamp next to
the light switch and the green dipped-beam
indicator lamp in the instrument cluster
lights up.
Constant headlamp mode
In countries in which constant headlamp
mode is not a legal requirement, you can
make this setting via the on-board computer. X
Make sure that constant headlamp mode
has been set with the on-board computer .
11
X To switch on: turn the light switch to
M or U.
The dipped-beam headlamps, side lamps
and licence plate lighting are switched on
when the engine is running.
i When you turn the light switch to any
position other than M or U, the cor-
responding light goes on.
Automatic headlamp mode
The side lamps, dipped-beam headlamps and
licence plate lighting are switched on or off
automatically, depending on the brightness of
the ambient light.
G Risk of accident
If the light switch is set to U, the head-
lamps may temporarily switch off due to
exposure to light, or the lights may not
come on automatically if it is foggy. This
could endanger you and others. Therefore,
turn the light switch to B in the dark or
in fog.
11 This is not possible in countries where constant headlamp mode is required by law.
Controls
219_AKB; 2; 4, en-GB
mkalafa,
2007-11-13T09:28:36+01:00 - Seite 92
Page 96 of 329
Lights
93The automatic headlamp feature is only an
aid.
The driver is responsible for the vehicle
lighting at all times. G
Risk of accident
When it is dark or foggy, turn the light
switch quickly from U to B. You
could otherwise cause an accident if the
headlamps were to switch off temporarily.
X To switch on: turn the light switch to
U.
The side lamps are switched on and off
automatically when the key is in position
1 in the ignition lock.
The dipped-beam headlamps, side lamps
and licence plate lighting are switched on
automatically when the engine is running.
When the dipped-beam headlamps are
switched
on, the indicator lamp next to the
light switch and the green dipped-beam
indicator lamp in the instrument cluster
light up. Front foglamps/rear foglamp G
Risk of accident
If you suspect that driving conditions will be
foggy, turn the light switch to B before
you start your journey. Otherwise, your
vehicle may not be visible and you could
therefore endanger yourself and others. G
Risk of accident
When it is dark or foggy, turn the light
switch quickly from U to B. You
could otherwise cause an accident if the
headlamps were to switch off temporarily.
i When the light switch is set to U you
cannot switch on the front or rear fog-
lamps.
X Make sure that the key is in position 2 in
the ignition lock.
X To switch on the front foglamps: turn
the
light switch to the B or C position.
X Pull the light switch out to the first stop.
The ¥ green indicator lamp next to the
light switch lights up. X
To switch on the rear foglamp: turn the
light switch to the B position.
X Pull the light switch out to the second stop.
The †
yellow indicator lamp next to the
light switch lights up.
X To switch off the front foglamps/rear
foglamp: push in the light switch to the
stop.
The
corresponding indicator lamp goes out. Controls
219_AKB; 2; 4, en-GB
mkalafa,
2007-11-13T09:28:36+01:00 - Seite 93
Page 97 of 329
Lights
94 Combination switch (turn signals,
main-beam headlamps and headlamp
flasher)
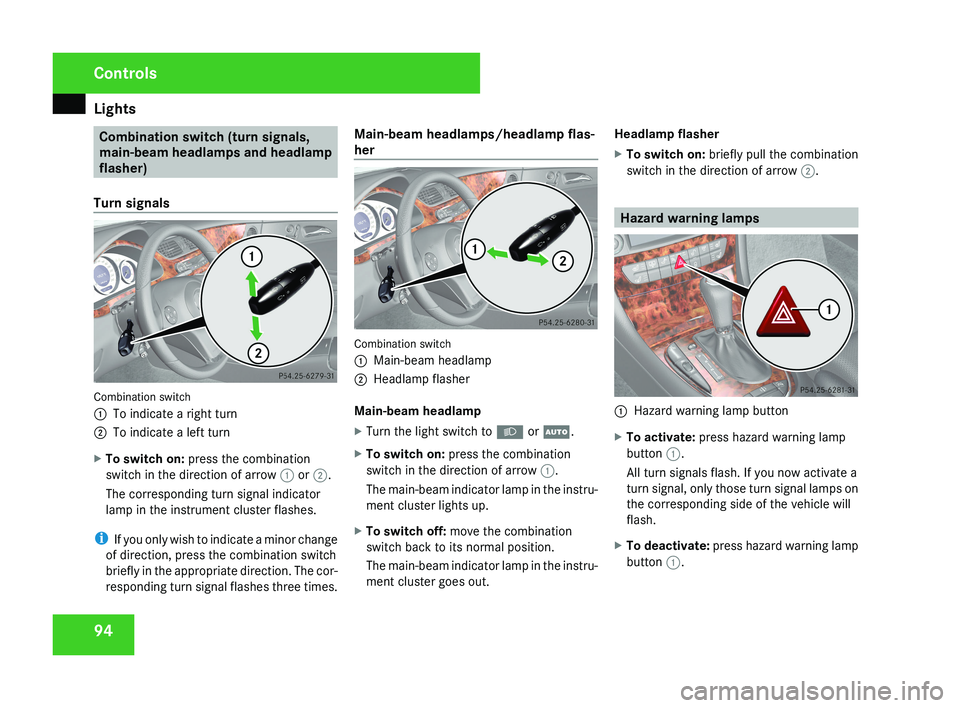
Turn signals Combination switch
1
To indicate a right turn
2 To indicate a left turn
X To switch on: press the combination
switch in the direction of arrow 1 or 2.
The corresponding turn signal indicator
lamp in the instrument cluster flashes.
i If you only wish to indicate a minor change
of direction, press the combination switch
briefly in the appropriate direction. The cor-
responding turn signal flashes three times. Main-beam headlamps/headlamp flas-
her
Combination switch
1
Main-beam headlamp
2 Headlamp flasher
Main-beam headlamp
X Turn the light switch to B or U.
X To switch on: press the combination
switch in the direction of arrow 1.
The main-beam indicator lamp in the instru-
ment cluster lights up.
X To switch off: move the combination
switch back to its normal position.
The main-beam indicator lamp in the instru-
ment cluster goes out. Headlamp flasher
X
To switch on: briefly pull the combination
switch in the direction of arrow 2. Hazard warning lamps
1
Hazard warning lamp button
X To activate: press hazard warning lamp
button 1.
All turn signals flash. If you now activate a
turn signal, only those turn signal lamps on
the corresponding side of the vehicle will
flash.
X To deactivate: press hazard warning lamp
button 1. Controls
219_AKB; 2; 4, en-GB
mkalafa,
2007-11-13T09:28:36+01:00 - Seite 94
Page 98 of 329
Lights
95Adjusting the headlamp range (vehi-
cles with halogen headlamps)
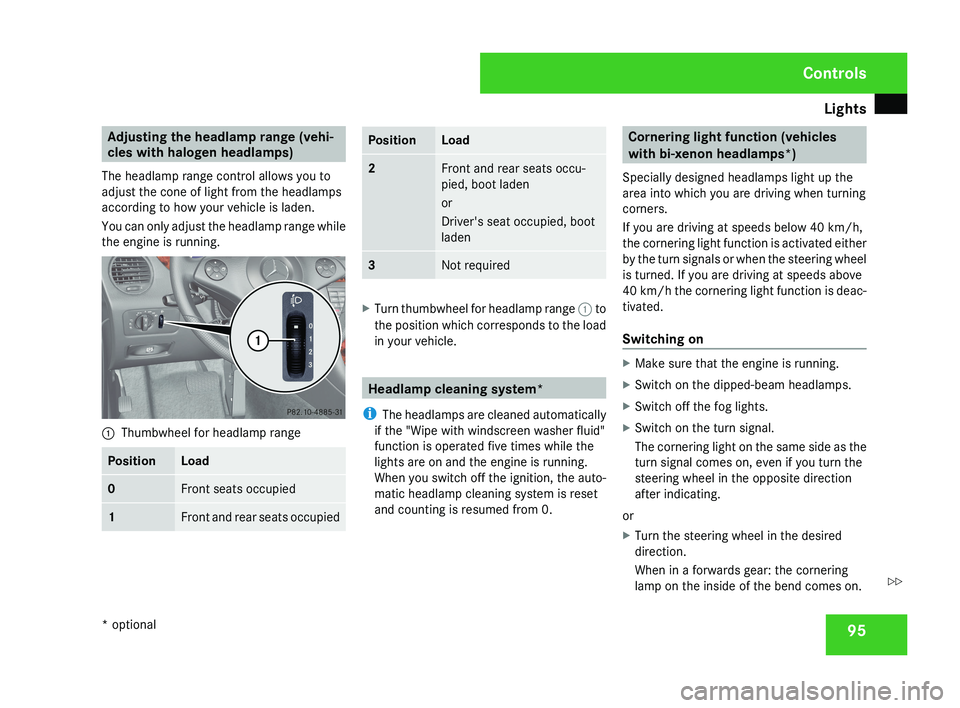
The headlamp range control allows you to
adjust the cone of light from the headlamps
according to how your vehicle is laden.
You can only adjust the headlamp range while
the engine is running.1 Thumbwheel for headlamp range
PositionLoad
0Front seats occupied
1Front and rear seats occupied
PositionLoad
2Front and rear seats occu-
pied, boot laden
or
Driver's seat occupied, boot
laden
3Not required
X
Turn thumbwheel for headlamp range 1 to
the position which corresponds to the load
in your vehicle.
Headlamp cleaning system*
i The headlamps are cleaned automatically
if the "Wipe with windscreen washer fluid"
function is operated five times while the
lights are on and the engine is running.
When you switch off the ignition, the auto-
matic headlamp cleaning system is reset
and counting is resumed from 0.
Cornering light function (vehicles
with bi-xenon headlamps*)
Specially designed headlamps light up the
area into which you are driving when turning
corners.
If you are driving at speeds below 40 km/h,
the cornering light function is activated either
by the turn signals or when the steering wheel
is turned. If you are driving at speeds above
40 km/h the cornering light function is deac-
tivated.
Switching on
X Make sure that the engine is running.
X Switch on the dipped-beam headlamps.
X Switch off the fog lights.
X Switch on the turn signal.
The cornering light on the same side as the
turn signal comes on, even if you turn the
steering wheel in the opposite direction
after indicating.
or
X Turn the steering wheel in the desired
direction.
When in a forwards gear: the cornering
lamp on the inside of the bend comes on.
Controls
* optional
219_AKB; 2; 4, en-GB
mkalafa,
2007-11-13T09:28:36+01:00 - Seite 95
Z
Page 99 of 329
Lights
96When in reverse gear: the cornering light on
the outside of the bend comes on.
Switching off X
Switch off the turn signal.
i The cornering light is activated until you
turn the steering wheel back to the straight-
ahead position and the turn signal switches
off. The cornering light may remain lit for a
short time, but no more than three minutes.
It then goes out, even if the turn signal is
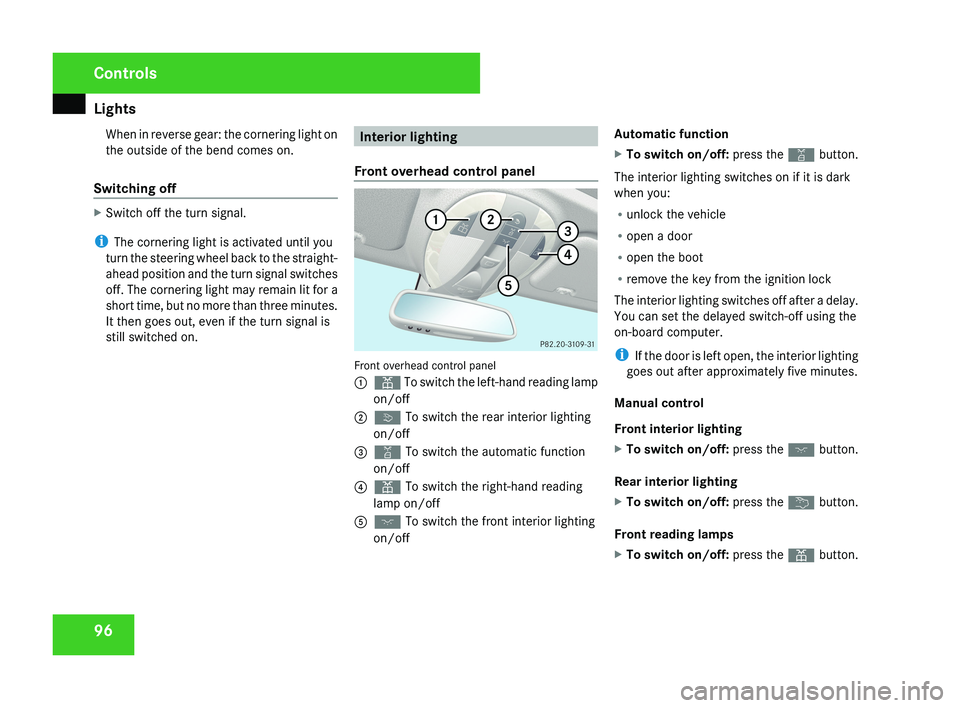
still switched on. Interior lighting
Front overhead control panel Front overhead control panel
1
X To switch the left-hand reading lamp
on/off
2 ò To switch the rear interior lighting
on/off
3 ¡ To switch the automatic function
on/off
4 X To switch the right-hand reading
lamp on/off
5 ð To switch the front interior lighting
on/off Automatic function
X
To switch on/off: press the ¡ button.
The interior lighting switches on if it is dark
when you:
R unlock the vehicle
R open a door
R open the boot
R remove the key from the ignition lock
The interior lighting switches off after a delay.
You can set the delayed switch-off using the
on-board computer.
i If the door is left open, the interior lighting
goes out after approximately five minutes.
Manual control
Front interior lighting
X To switch on/off: press the ð button.
Rear interior lighting
X To switch on/off: press the ¦ button.
Front reading lamps
X To switch on/off: press the X button. Controls
219_AKB; 2; 4, en-GB
mkalafa,
2007-11-13T09:28:36+01:00 - Seite 96
Page 102 of 329
Side windows
99G
Risk of injury
Do not leave children unsupervised in the
vehicle, even if they are secured in a child
restraint system. The children could:
R be seriously or even fatally injured on
parts of the vehicle
R be seriously or even fatally injured by
prolonged exposure to extremely high or
extremely low temperatures
If children open a door, they could:
R seriously or even fatally injure other peo-
ple
R get out of the vehicle, thereby injuring
themselves or be seriously or even fatally
injured by a passing vehicle
Activate the child-proof locks if children are
travelling in the vehicle. They could other-
wise open doors or windows while the vehi-
cle is in motion and thereby injure them-
selves or others.
i It is also possible to open and close the
side windows from the outside using the
"Summer opening" (Y page 100) and "Con-
venience closing" (Y page 100) features
respectively. You can disable the controls for the rear
side windows from the driver's seat
(Y page 49).
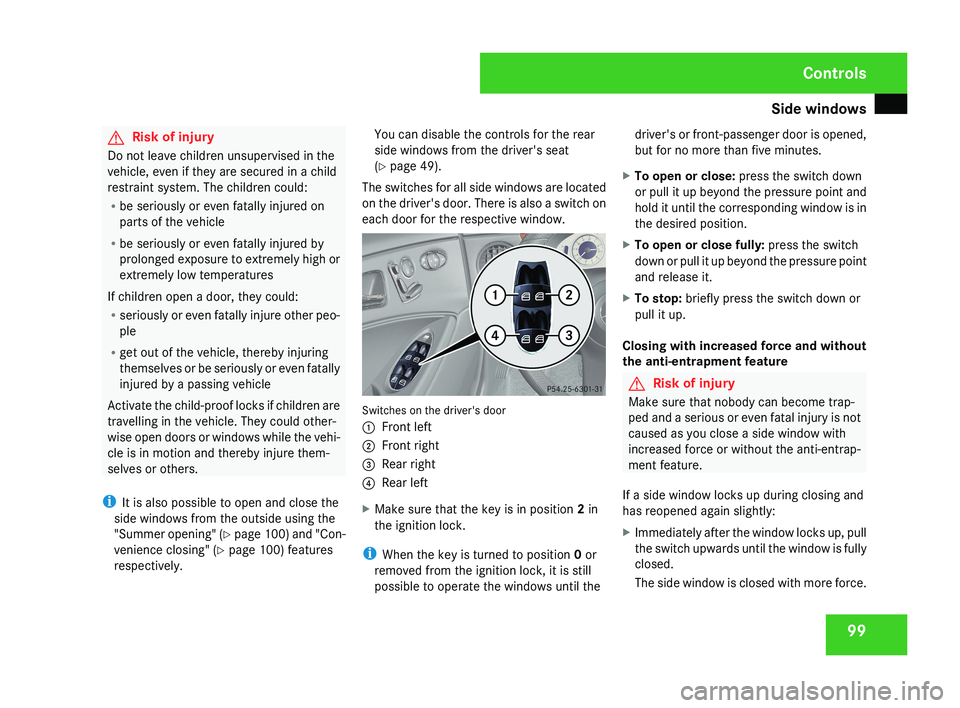
The switches for all side windows are located
on the driver's door. There is also a switch on
each door for the respective window.Switches on the driver's door
1 Front left
2 Front right
3 Rear right
4 Rear left
X Make sure that the key is in position 2 in
the ignition lock.
i When the key is turned to position 0 or
removed from the ignition lock, it is still
possible to operate the windows until the driver's or front-passenger door is opened,
but for no more than five minutes.
X To open or close: press the switch down
or pull it up beyond the pressure point and
hold it until the corresponding window is in
the desired position.
X To open or close fully: press the switch
down or pull it up beyond the pressure point
and release it.
X To stop: briefly press the switch down or
pull it up.
Closing with increased force and without
the anti-entrapment feature
G Risk of injury
Make sure that nobody can become trap-
ped and a serious or even fatal injury is not
caused as you close a side window with
increased force or without the anti-entrap-
ment feature.
If a side window locks up during closing and
has reopened again slightly:
X Immediately after the window locks up, pull
the switch upwards until the window is fully
closed.
The side window is closed with more force.
Controls
219_AKB; 2; 4, en-GB
mkalafa,
2007-11-13T09:28:36+01:00 - Seite 99