2008 MERCEDES-BENZ CLS COUPE child restraint
[x] Cancel search: child restraintPage 89 of 329
Memory functions*
86
X
Make sure that button 2 for the exterior
mirror on the front-passenger side is
pressed.
X Engage reverse gear.
The exterior mirror on the front-passenger
side moves to the stored parking position.
The exterior mirror on the front-passenger
side moves back to its original position:
R as soon as you exceed a speed of
10 km/h
R about ten seconds after you have disen-
gaged reverse gear
R if you press button 1 for the exterior mir-
ror on the driver's side Memory functions*
Storing settings
You can store up to three different settings
using the memory button.
The following settings are stored as a single
memory preset:
R Position of the seat, backrest and head
restraint
R Dynamic driving seat*: activated/deacti-
vated
R Driver's side: steering-wheel position
R Driver's side: position of the exterior mir-
rors on the driver's and front-passenger
sides G
Risk of injury
The memory function can also be used
when the key has been removed. For this
reason, children should never be left unsu-
pervised in the vehicle. They could other-
wise become trapped when moving the
seat or the steering wheel. G
Risk of accident
Only activate the memory function on the
driver’s side when the vehicle is stationary.
You could otherwise be distracted from the traffic conditions by the steering wheel and
seat moving of their own accord, and as a
result cause an accident.
! If PRE-SAFE ®
* has been activated, the
front-passenger seat is moved to a more
favourable position. When you move the
seat, make sure that there are no objects
in the footwell or behind the seats. Other-
wise, you could damage the seats and the
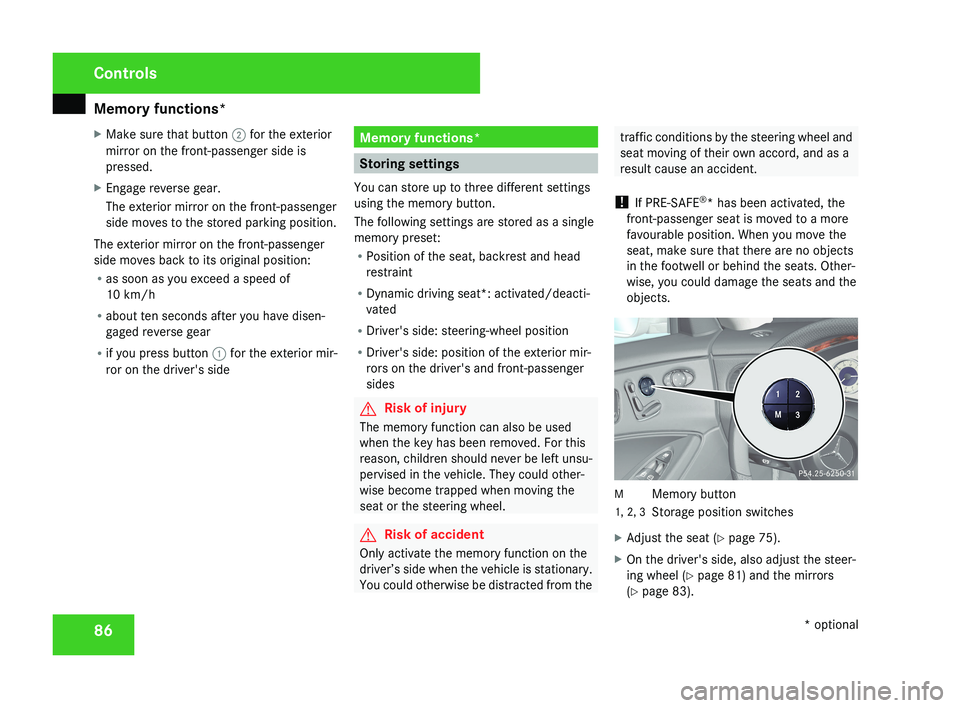
objects.M Memory button
1, 2, 3 Storage position switches
X Adjust the seat ( Y page 75).
X On the driver's side, also adjust the steer-
ing wheel ( Y page 81) and the mirrors
(Y page 83).
Controls
* optional
219_AKB; 2; 4, en-GB
mkalafa,
2007-11-13T09:28:36+01:00 - Seite 86
Page 91 of 329
Seat belts
88 Seat belts
Seat belts are the most effective means of
restraining the movement of vehicle occu-
pants in the event of an accident. This
reduces
the risk of vehicle occupants coming
into contact with the vehicle interior. Wearing seat belts
G
Risk of injury
A seat belt which is not worn correctly, or
which
has not been engaged in the seat belt
buckle correctly, cannot perform its inten-
ded protective function. Under certain cir-
cumstances this could cause severe or
even fatal injuries.
Make sure that all occupants – in particular,
pregnant women – wear their seat belt cor-
rectly at all times.
R The seat belt must pass closely over your
body and must not be twisted. You
should therefore avoid wearing bulky
clothing (e.g. a winter coat). The shoulder
belt section must be routed across the
middle of your shoulder – on no account
across your neck or under your arm – and
pulled tight against your upper body. The
lap belt must always pass across your lap as low down as possible, i.e. over your
hip joints – not across your abdomen. If
necessary, push down the belt strap
slightly
and then retighten it in the roll-up
direction.
R Do not route the belt strap across sharp
or fragile objects, especially if these are
located on or in your clothing, e.g. spec-
tacles, pencils, keys, etc. The seat belt
strap could be damaged and tear in an
accident and you or other vehicle occu-
pants could be injured.
R Only one person should use each seat
belt at any one time. Children must never
travel sitting on the lap of other occu-
pants. It would not be possible to restrain
the child in the event of a sudden change
in direction, braking or an accident. This
could result in severe or even fatal inju-
ries to the child and other occupants.
R Persons less than 1.50 m tall cannot
wear the seat belts correctly. For this
reason, secure persons less than 1.50 m
tall in specially designed, suitable
restraint systems.
R Children less than 1.50 m tall or under
12 years of age cannot wear the seat
belts properly. Therefore, always secure these children in suitable child restraint
systems on suitable vehicle seats. You
can find more information under "Chil-
dren in the vehicle" in the "Safety" sec-
tion of the Owner's Manual. Follow the
manufacturer's installation instructions
when fitting the child restraint system.
R Do
not secure any objects with a seat belt
if the seat belt is also being used by one
of the vehicle's occupants. G
Risk of injury
The seat belt does not offer the intended
level of protection unless the backrest is
almost vertical. Under certain circumstan-
ces this could cause severe or even fatal
injuries.
Before starting a journey, make sure that
the seat is properly adjusted and that the
backrest is almost vertical. G
Risk of injury
A dirty or damaged seat belt or a seat belt
that has been subjected to a load in an
accident or modified no longer offers the
intended level of protection. Under certain
circumstances this could cause severe or
even fatal injuries. Controls
219_AKB; 2; 4, en-GB
mkalafa,
2007-11-13T09:28:36+01:00 - Seite 88
Page 102 of 329
Side windows
99G
Risk of injury
Do not leave children unsupervised in the
vehicle, even if they are secured in a child
restraint system. The children could:
R be seriously or even fatally injured on
parts of the vehicle
R be seriously or even fatally injured by
prolonged exposure to extremely high or
extremely low temperatures
If children open a door, they could:
R seriously or even fatally injure other peo-
ple
R get out of the vehicle, thereby injuring
themselves or be seriously or even fatally
injured by a passing vehicle
Activate the child-proof locks if children are
travelling in the vehicle. They could other-
wise open doors or windows while the vehi-
cle is in motion and thereby injure them-
selves or others.
i It is also possible to open and close the
side windows from the outside using the
"Summer opening" (Y page 100) and "Con-
venience closing" (Y page 100) features
respectively. You can disable the controls for the rear
side windows from the driver's seat
(Y page 49).
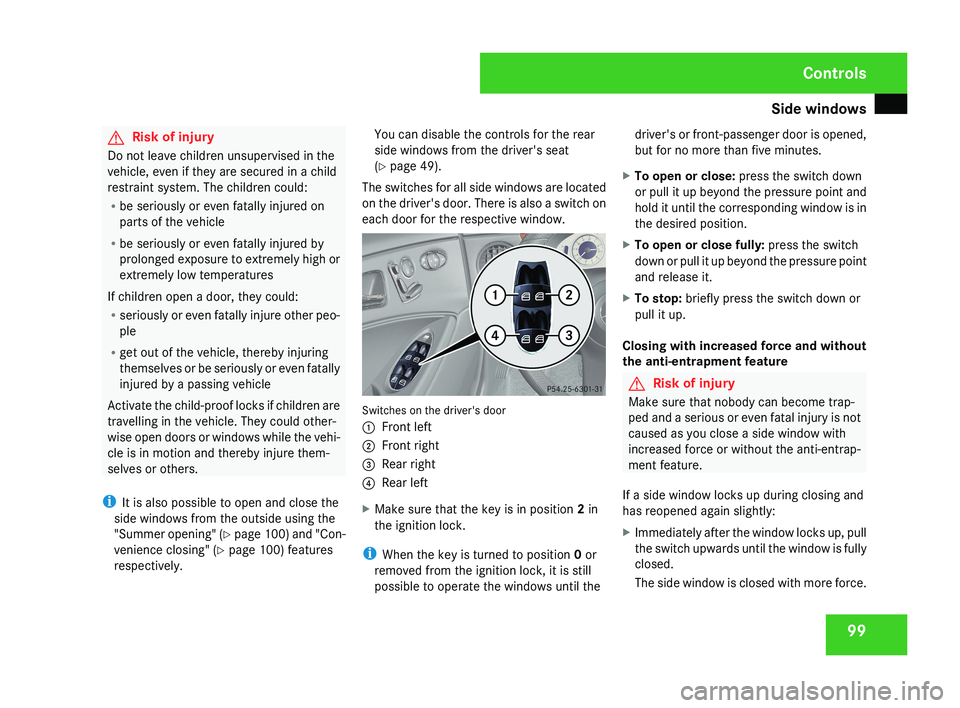
The switches for all side windows are located
on the driver's door. There is also a switch on
each door for the respective window.Switches on the driver's door
1 Front left
2 Front right
3 Rear right
4 Rear left
X Make sure that the key is in position 2 in
the ignition lock.
i When the key is turned to position 0 or
removed from the ignition lock, it is still
possible to operate the windows until the driver's or front-passenger door is opened,
but for no more than five minutes.
X To open or close: press the switch down
or pull it up beyond the pressure point and
hold it until the corresponding window is in
the desired position.
X To open or close fully: press the switch
down or pull it up beyond the pressure point
and release it.
X To stop: briefly press the switch down or
pull it up.
Closing with increased force and without
the anti-entrapment feature
G Risk of injury
Make sure that nobody can become trap-
ped and a serious or even fatal injury is not
caused as you close a side window with
increased force or without the anti-entrap-
ment feature.
If a side window locks up during closing and
has reopened again slightly:
X Immediately after the window locks up, pull
the switch upwards until the window is fully
closed.
The side window is closed with more force.
Controls
219_AKB; 2; 4, en-GB
mkalafa,
2007-11-13T09:28:36+01:00 - Seite 99
Page 131 of 329
On-board computer
128
X
Press the j button to select Auxiliary
heat..
X Press the æ or ç button to select
one of the three switch-on times or Timer
off (auxiliary heating switched off).
When
a switch-on time is selected, the yel-
low indicator lamp lights up in the auxiliary
heating button.
X Press the j, è or ÿ button to
select a different display.
Changing the switch-on time for the
auxiliary heating* This function is only displayed if you have
selected
a switch-on time. Here you can enter
the time at which the auxiliary heating is to
be switched on.
X Press the è
or · button to select the
Settings... menu.
X Press the j
button to call up the selec-
tion of submenus.
X Press the æ
or ç button to select the
Heater submenu.
X Press the j
button to select Switch-on
time X Set hours. X
Press the æ or ç button to set the
hour.
X Press the j
button to select Switch-on
time X Set minutes.
X Press the æ or ç button to set the
minutes.
After changing from one menu to another
the new time setting is stored. The yellow
indicator lamp lights up on the button for
the
auxiliary heating on the centre console.
X Press the j, è or ÿ button to
select a different display.
Activating or deactivating the easy-
entry/exit feature* i
For more information on the easy-entry/
exit feature, see ( Y page 83). G
Risk of injury
When the easy-entry/exit feature is active,
the
steering wheel moves. There is a risk of
occupants becoming trapped. Before acti-
vating the easy-entry/exit feature, make
sure that nobody can become trapped.
Do not leave children unsupervised in the
vehicle, even if they are secured in a child restraint system. The children could open
the driver's door and thereby unintention-
ally activate the easy-entry/exit feature
and become trapped.
X Press the è
or · button to select the
Settings... menu.
X Press the j
button to call up the selec-
tion of submenus.
X Press the æ
or ç button to select the
Convenience submenu.
X Press the j button to select the EASY-
ENTRY system.
X Press the æ or ç button to activate
or deactivate the EASY-ENTRY system.
X Press the j, è or ÿ button to
select a different display.
Activating or deactivating the fold-in
mirrors when locking*
function The
Fold
in mirrors when locking func-
tion allows you to determine whether the
exterior mirrors should fold in when you lock
the vehicle. When you switch on the ignition,
the exterior mirrors fold out again. Controls
* optional
219_AKB; 2; 4, en-GB
mkalafa,
2007-11-13T09:28:36+01:00 - Seite 128
Page 272 of 329
Changing the batteries
269Resetting triggered NECK-PRO head
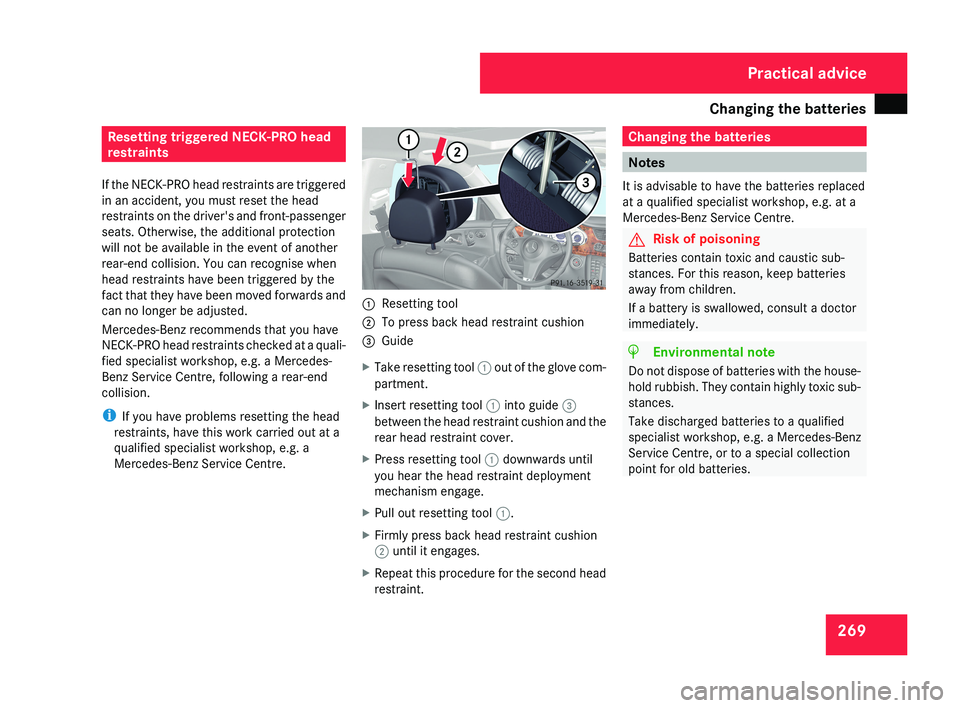
restraints
If the NECK-PRO head restraints are triggered
in an accident, you must reset the head
restraints on the driver's and front-passenger
seats. Otherwise, the additional protection
will not be available in the event of another
rear-end collision. You can recognise when
head restraints have been triggered by the
fact that they have been moved forwards and
can no longer be adjusted.
Mercedes-Benz recommends that you have
NECK-PRO head restraints checked at a quali-
fied specialist workshop, e.g. a Mercedes-
Benz Service Centre, following a rear-end
collision.
i If you have problems resetting the head
restraints, have this work carried out at a
qualified specialist workshop, e.g. a
Mercedes-Benz Service Centre.1 Resetting tool
2 To press back head restraint cushion
3 Guide
X Take resetting tool 1 out of the glove com-
partment.
X Insert resetting tool 1 into guide 3
between the head restraint cushion and the
rear head restraint cover.
X Press resetting tool 1 downwards until
you hear the head restraint deployment
mechanism engage.
X Pull out resetting tool 1.
X Firmly press back head restraint cushion
2 until it engages.
X Repeat this procedure for the second head
restraint.
Changing the batteries
Notes
It is advisable to have the batteries replaced
at a qualified specialist workshop, e.g. at a
Mercedes-Benz Service Centre.
G Risk of poisoning
Batteries contain toxic and caustic sub-
stances. For this reason, keep batteries
away from children.
If a battery is swallowed, consult a doctor
immediately.
H Environmental note
Do not dispose of batteries with the house-
hold rubbish. They contain highly toxic sub-
stances.
Take discharged batteries to a qualified
specialist workshop, e.g. a Mercedes-Benz
Service Centre, or to a special collection
point for old batteries.
Practical advice
219_AKB; 2; 4, en-GB
mkalafa,
2007-11-13T09:28:36+01:00 - Seite 269