2008 MERCEDES-BENZ CLS COUPE sensor
[x] Cancel search: sensorPage 55 of 329
Occupant safety
52 inflated, the child could be seriously or even
fatally injured.
Proceed as follows:
R
Do not use a rearward-facing child
restraint system on the front-passenger
seat.
R Fit a rearward-facing child restraint sys-
tem on a suitable rear seat.
or
R Only use a forward-facing child seat on
the front-passenger seat and move the
front-passenger seat to its rearmost
position.
R Have the automatic child seat recogni-
tion checked at a qualified specialist
workshop. To ensure that the automatic child seat rec-
ognition on the front-passenger seat func-
tions correctly, never place objects (such
as a cushion) under the child restraint sys-
tem. The entire base of the child restraint
system
must always be resting on the seat
cushion. An incorrectly fitted child restraint
system cannot perform its intended pro-
tective function in the event of an accident,
and could even lead to injuries.
i The windowbag, the sidebag and the belt
tensioner on the front-passenger side are
still active even if the front-passenger front
airbag is disabled. G
Risk of injury
Do not place items of electronic equipment
on the front-passenger seat, e.g.:
R laptops, if switched on
R mobile phones
R cards with transponders, e.g. ski passes
or access passes
Signals from electronic equipment can
cause interference in the automatic child
seat recognition sensor system. This can
lead to a system malfunction. This may
cause the 5 PASSENGER AIRBAG OFF
warning lamp to light up without there
being
a child seat with automatic child seat
recognition fitted. This means the front-
passenger airbag is not deployed during an
accident. It is also possible that the
5 PASSENGER AIRBAG OFF warning
lamp will not light up if you turn the key in
the ignition lock to position 2.Safety
219_AKB; 2; 4, en-GB
mkalafa,
2007-11-13T09:28:36+01:00 - Seite 52
Page 65 of 329
Anti-theft systems
62 Tow-away protection*
An audible and visual alarm is triggered if your
vehicle's angle of inclination is altered while
tow-away protection is primed. This happens
if the vehicle is jacked up on one side, for
example.
Priming tow-away protection X
Lock the vehicle using the key. On vehicles
with KEYLESS GO*, the locking button on
the door handle/boot lid can also be used.
Tow-away protection is primed after
approximately 30 seconds.
To deactivate tow-away protection When you unlock your vehicle using the key
or KEYLESS GO*, tow-away protection is
automatically deactivated.
Deactivate tow-away protection manually to
prevent a false alarm if your vehicle:
R
is being transported
R is being loaded, e.g. onto a ferry or car
transporter
R is being parked on a movable surface, e.g.
split-level garages 1
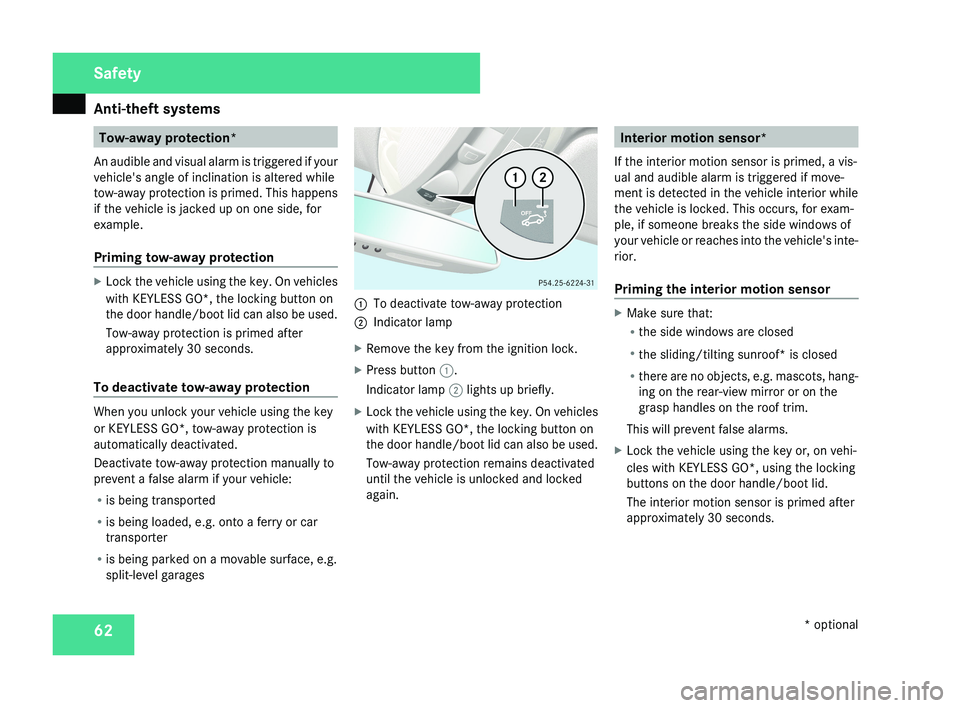
To deactivate tow-away protection
2 Indicator lamp
X Remove the key from the ignition lock.
X Press button 1.
Indicator lamp 2 lights up briefly.
X Lock the vehicle using the key. On vehicles
with KEYLESS GO*, the locking button on
the door handle/boot lid can also be used.
Tow-away protection remains deactivated
until the vehicle is unlocked and locked
again. Interior motion sensor*
If the interior motion sensor is primed, a vis-
ual and audible alarm is triggered if move-
ment is detected in the vehicle interior while
the vehicle is locked. This occurs, for exam-
ple, if someone breaks the side windows of
your vehicle or reaches into the vehicle's inte-
rior.
Priming the interior motion sensor X
Make sure that:
R
the side windows are closed
R the sliding/tilting sunroof* is closed
R there are no objects, e.g. mascots, hang-
ing on the rear-view mirror or on the
grasp handles on the roof trim.
This will prevent false alarms.
X Lock the vehicle using the key or, on vehi-
cles with KEYLESS GO*, using the locking
buttons on the door handle/boot lid.
The interior motion sensor is primed after
approximately 30 seconds. Safety
* optional
219_AKB; 2; 4, en-GB
mkalafa,
2007-11-13T09:28:36+01:00 - Seite 62
Page 66 of 329
Anti-theft systems
63
To deactivate the interior motion sen-
sor To prevent a false alarm, deactivate the inte-
rior motion sensor if you lock your vehicle and
R
people or animals remain in the vehicle
R the windows remain open
R the sliding/tilting sunroof* remains open 1
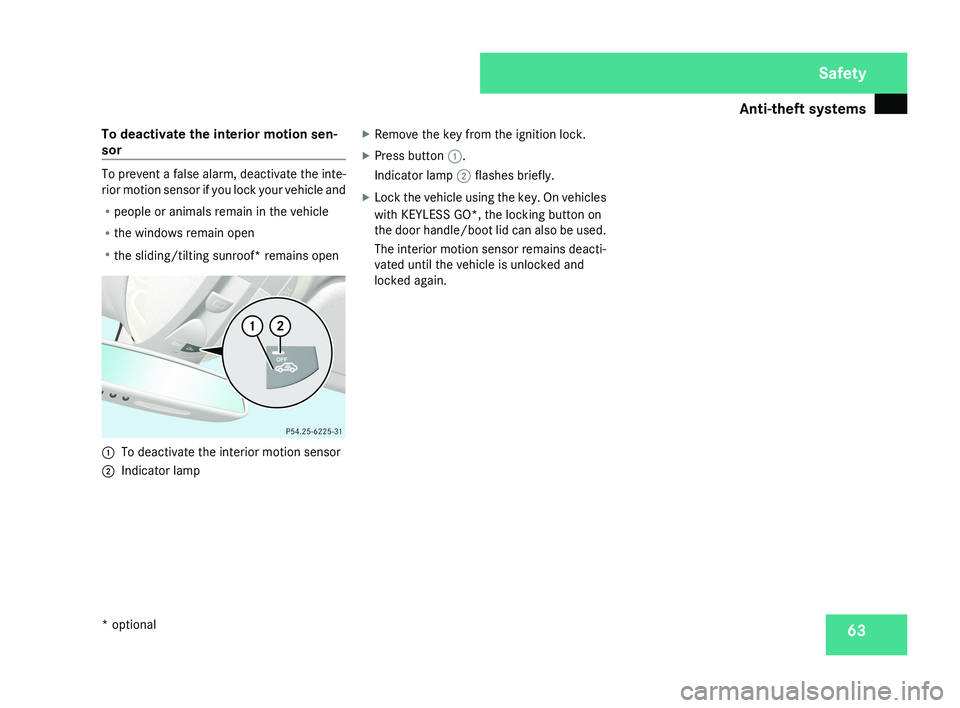
To deactivate the interior motion sensor
2 Indicator lamp X
Remove the key from the ignition lock.
X Press button 1.
Indicator lamp 2 flashes briefly.
X Lock the vehicle using the key. On vehicles
with KEYLESS GO*, the locking button on
the door handle/boot lid can also be used.
The interior motion sensor remains deacti-
vated until the vehicle is unlocked and
locked again. Safety
* optional
219_AKB; 2; 4, en-GB
mkalafa,
2007-11-13T09:28:36+01:00 - Seite 63
Page 88 of 329
Mirrors
85
R
The exterior mirrors fold in automatically as
soon as you lock the vehicle from the out-
side.
R The exterior mirrors fold out again auto-
matically as soon as you unlock the vehicle
and then open the driver's or front-
passenger door.
i If you have activated this function and fold
in the exterior mirrors using button 1, they
will not be folded out automatically. You
can then only fold out the exterior mirrors
using button 1. Automatic anti-dazzle mirrors*
The rear-view mirror and the exterior mirror
on the driver's side automatically go into anti-
dazzle mode if the ignition is switched on and
incident light from headlamps strikes the sen-
sor in the rear-view mirror.
The mirrors do not go into anti-dazzle mode if
reverse gear is engaged and the interior light-
ing is switched on. G
Risk of accident
If the incident light from headlamps cannot
strike the sensor in the rear-view mirror, for
instance when the rear window blind* is extended, the mirrors' automatic anti-daz-
zle function will not operate.
Incident light could then dazzle you. This
may prevent you from observing the traffic
conditions, thereby causing an accident. In
this case, adjust the rear-view mirror man-
ually.
G
Risk of injury
Electrolyte may escape if the glass in an
automatic anti-dazzle mirror breaks.
Electrolyte is an aggressive irritant and
must not be allowed to come into contact
with your skin, eyes or respiratory organs.
If electrolyte comes into contact with your
eyes or skin, rinse thoroughly with clean
water immediately. Consult a doctor if nec-
essary.
! If electrolyte comes into contact with the
vehicle paintwork, immediately rinse off
the undried liquid completely with clean
water. It will otherwise result in damage to
the paintwork. Parking aid*
The exterior mirror on the front-passenger
side moves into the parking position as soon
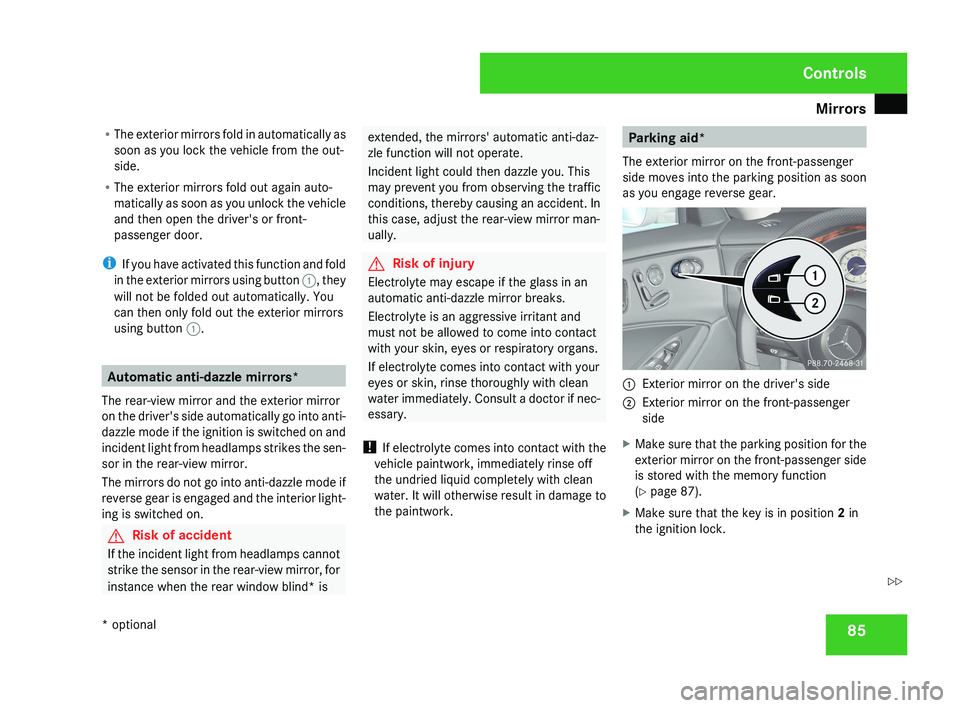
as you engage reverse gear.1 Exterior mirror on the driver's side
2 Exterior mirror on the front-passenger
side
X Make sure that the parking position for the
exterior mirror on the front-passenger side
is stored with the memory function
(Y page 87).
X Make sure that the key is in position 2 in
the ignition lock.
Controls
* optional
219_AKB; 2; 4, en-GB
mkalafa,
2007-11-13T09:28:36+01:00 - Seite 85
Z
Page 100 of 329
Windscreen wipers
97
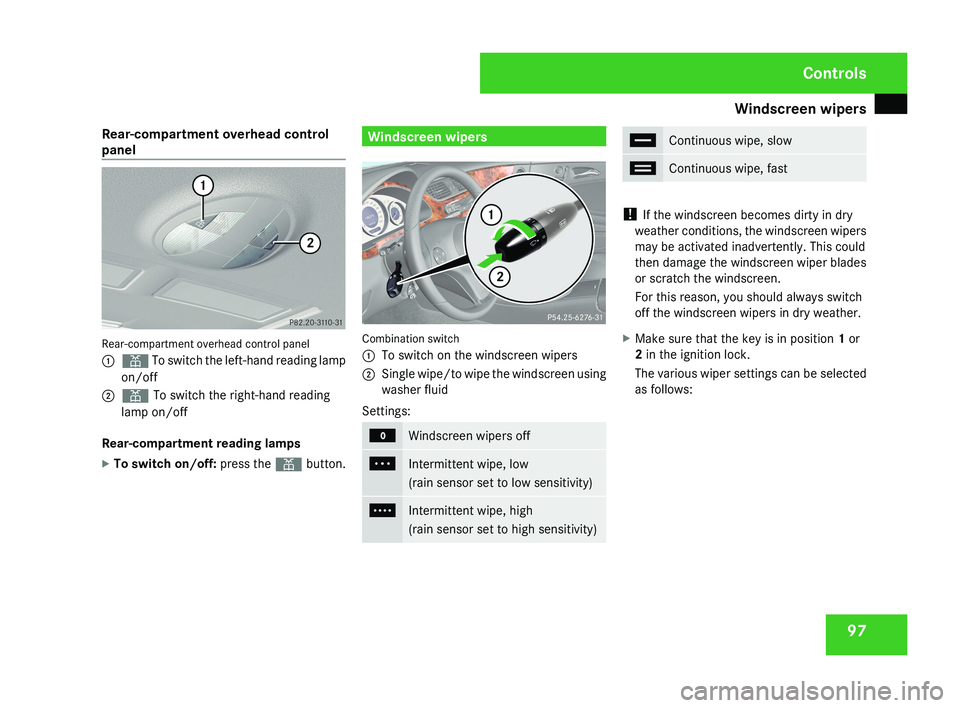
Rear-compartment overhead control
panel
Rear-compartment overhead control panel
1
X To switch the left-hand reading lamp
on/off
2 X To switch the right-hand reading
lamp on/off
Rear-compartment reading lamps
X To switch on/off: press the X button. Windscreen wipers
Combination switch
1
To switch on the windscreen wipers
2 Single wipe/to wipe the windscreen using
washer fluid
Settings: M
Windscreen wipers off
U
Intermittent wipe, low
(rain sensor set to low sensitivity)
V
Intermittent wipe, high
(rain sensor set to high sensitivity) u
Continuous wipe, slow
t
Continuous wipe, fast
!
If the windscreen becomes dirty in dry
weather conditions, the windscreen wipers
may be activated inadvertently. This could
then damage the windscreen wiper blades
or scratch the windscreen.
For this reason, you should always switch
off the windscreen wipers in dry weather.
X Make sure that the key is in position 1 or
2 in the ignition lock.
The various wiper settings can be selected
as follows: Controls
219_AKB; 2; 4, en-GB
mkalafa,
2007-11-13T09:28:36+01:00 - Seite 97
Page 101 of 329
Side windows
98 Single wipe
X Briefly press the combination switch to the
pressure point in the direction of arrow
2. Wiping with washer fluid
X Press the combination switch beyond the
pressure point in the direction of arrow
2. Intermittent wipe/rain sensor
X Turn the combination switch in the direc-
tion of arrow 1 to position U or V.
The rain sensor is activated. The appropri-
ate wiping frequency is set automatically
according to the intensity of the rain. Continuous wipe
X Depending on the intensity of the rain, turn
the combination switch in the direction of
arrow 1 to position u or t. Switching off the windscreen wipers
X Turn the combination switch to position
M. Side windows
Opening/closing the side windows
G
Risk of injury
Make sure that nobody can become trap-
ped between the side window and the door
frame as a side window is opened. Do not
touch or lean against the side window dur-
ing the opening procedure. You could
become trapped between the side window
and the door frame as the window moves
down. If danger threatens, release the
switch or pull the switch upwards to close
the side window again. G
Risk of injury
Make sure that nobody can become trap-
ped as you close a side window. If danger
threatens, release the switch or press the
switch
a second time to open the side win-
dow again. G
Risk of injury
Never leave children unsupervised in the
vehicle.
Always take the key with you when
leaving the vehicle, even if you only leave it
for a short time. Controls
219_AKB; 2; 4, en-GB
mkalafa,
2007-11-13T09:28:36+01:00 - Seite 98
Page 139 of 329
Driving systems
136 R
when changing to a lane with faster mov-
ing traffic
R in complex driving situations or where
the lanes are diverted, e.g. in motorway
roadworks
Distronic cannot take account of weather
conditions. Deactivate, or do not activate,
Distronic:
R if the roads are slippery, snow-covered or
icy. The wheels could lose their grip
under braking or acceleration. The vehi-
cle could start to skid.
R if the sensors are dirty or there is poor
visibility, e.g. due to snow, rain or fog.
Distance control may be impaired.
Always pay attention to traffic conditions
even when Distronic is activated. You may
not otherwise recognise dangers in time,
could cause an accident and injure yourself
and others.
If there is no vehicle in front, Distronic oper-
ates in the same way as cruise control. Dis-
tronic functions in the 30 km/h to 180 km/
h range. G
Risk of accident
Distronic brakes your vehicle at a maximum
of 2 m/s 2
depending on its speed. This cor-
responds to approximately 20% of your
vehicle's maximum braking power. You
must also apply the brakes yourself if this
braking power is not sufficient to avoid a
collision.
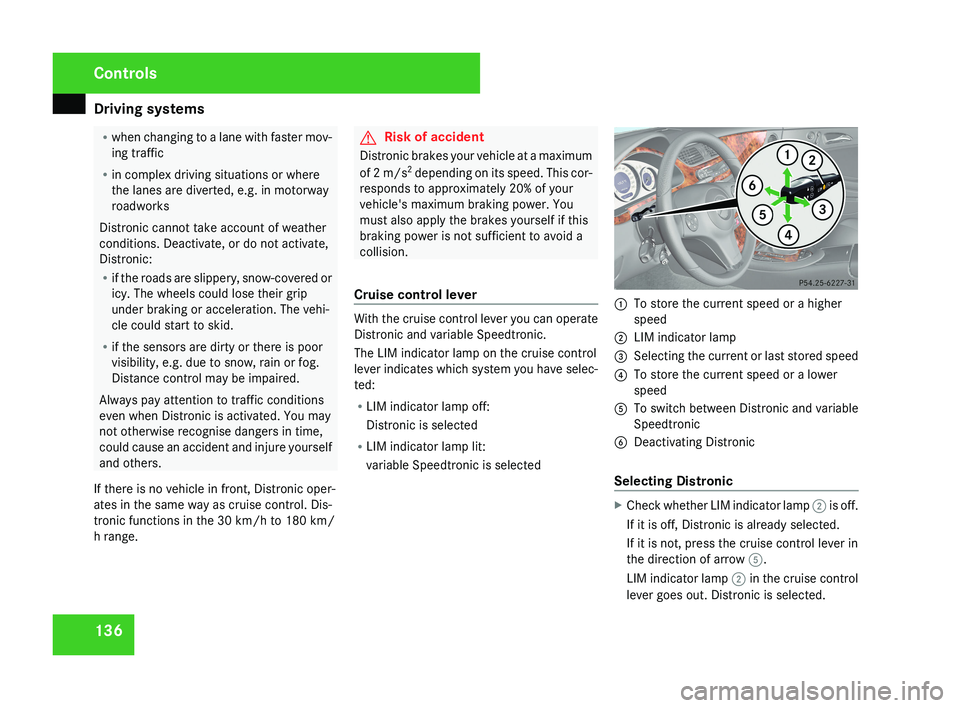
Cruise control lever With the cruise control lever you can operate
Distronic and variable Speedtronic.
The LIM indicator lamp on the cruise control
lever indicates which system you have selec-
ted:
R
LIM indicator lamp off:
Distronic is selected
R LIM indicator lamp lit:
variable Speedtronic is selected 1
To store the current speed or a higher
speed
2 LIM indicator lamp
3 Selecting the current or last stored speed
4 To store the current speed or a lower
speed
5 To switch between Distronic and variable
Speedtronic
6 Deactivating Distronic
Selecting Distronic X
Check whether LIM indicator lamp 2 is off.
If it is off, Distronic is already selected.
If it is not, press the cruise control lever in
the direction of arrow 5.
LIM indicator lamp 2 in the cruise control
lever goes out. Distronic is selected. Controls
219_AKB; 2; 4, en-GB
mkalafa,
2007-11-13T09:28:36+01:00 - Seite 136
Page 151 of 329
Driving systems
148 Parktronic*
G
Risk of accident
Parktronic is only an aid and may not detect
all obstacles. It does not relieve you of the
responsibility to pay attention.
You are always responsible for safety and
must continue to pay attention to your
immediate surroundings when parking and
manoeuvring. You could otherwise endan-
ger yourself and others. G
Risk of injury
Make sure that no persons or animals are
in the manoeuvring range. Otherwise, they
could be injured.
Parktronic is an electronic parking aid. It indi-
cates visually and audibly the distance
between your vehicle and an object.
Parktronic is automatically activated when
you switch on the ignition and release the
parking brake.
Parktronic is deactivated at speeds above
18 km/h. It is reactivated at lower speeds.
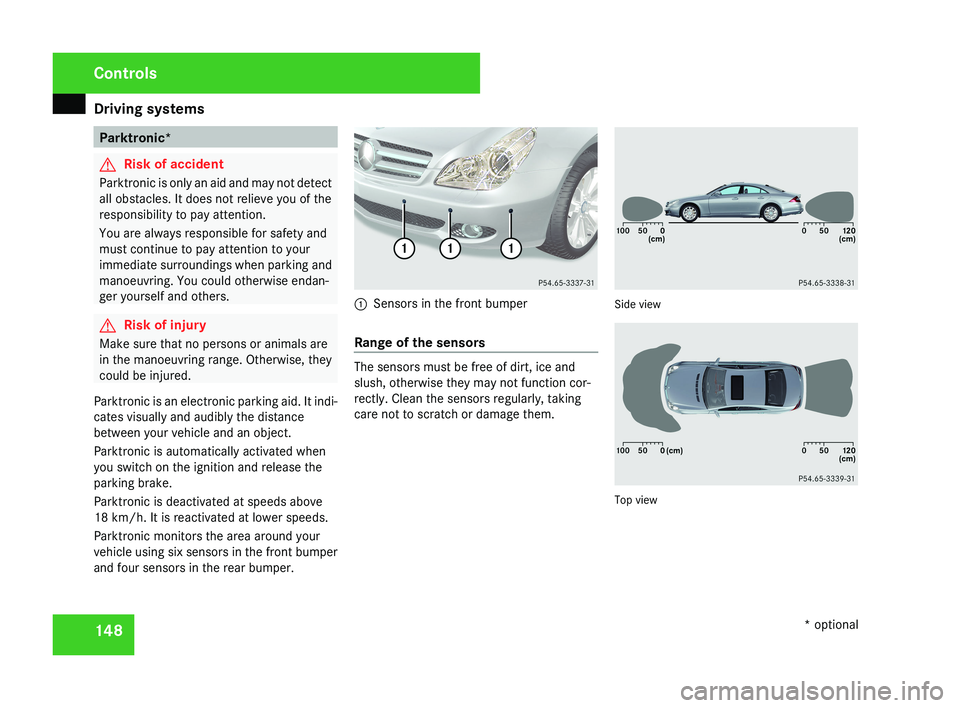
Parktronic monitors the area around your
vehicle using six sensors in the front bumper
and four sensors in the rear bumper.1 Sensors in the front bumper
Range of the sensors
The sensors must be free of dirt, ice and
slush, otherwise they may not function cor-
rectly. Clean the sensors regularly, taking
care not to scratch or damage them.
Side view
Top view
Controls
* optional
219_AKB; 2; 4, en-GB
mkalafa,
2007-11-13T09:28:36+01:00 - Seite 148