2008 MERCEDES-BENZ CLS COUPE heating
[x] Cancel search: heatingPage 38 of 329
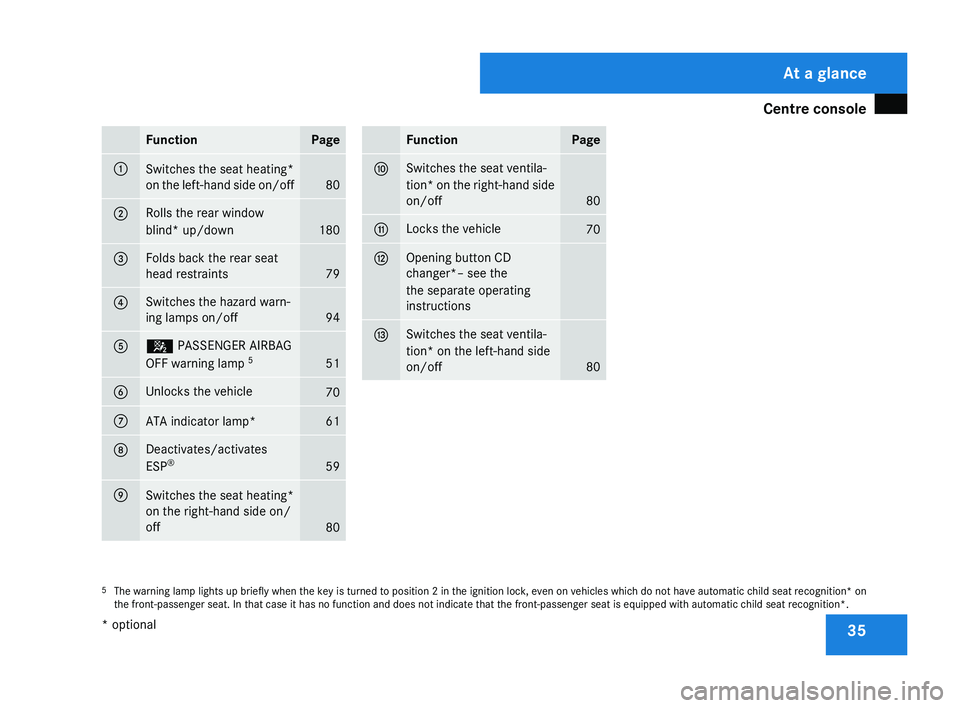
Centre console
35Function Page
1
Switches the seat heating*
on the left-hand side on/off
80
2 Rolls the rear window
blind* up/down
180
3 Folds back the rear seat
head restraints
79
4 Switches the hazard warn-
ing lamps on/off
94
5 5 PASSENGER AIRBAG
OFF warning lamp
5 51
6 Unlocks the vehicle
70
7
ATA indicator lamp* 61
8 Deactivates/activates
ESP
® 59
9
Switches the seat heating*
on the right-hand side on/
off
80 Function Page
a Switches the seat ventila-
tion* on the right-hand side
on/off
80
b Locks the vehicle
70
c Opening button CD
changer*– see the
the separate operating
instructions
d Switches the seat ventila-
tion* on the left-hand side
on/off
80
5
The warning lamp lights up briefly when the key is turned to position 2 in the ignition lock, even on vehicles which do not have automatic child seat recognition* on
the front-passenger seat. In that case it has no function and does not indicate that the front-passenger seat is equipped with automatic child seat recognition*. At a glance
* optional
219_AKB; 2; 4, en-GB
mkalafa,
2007-11-13T09:28:36+01:00 - Seite 35
Page 83 of 329
Seats
80
3
Massage function
4 Upper back support
5 Lumbar region support
6 Seat cushion length
X To activate/deactivate: press button 1.
The indicator lamp in the button lights up/
goes out.
When switched on, the message Driving
dynamics seat adjustment appears in
the multi-function display for five seconds.
Massage function (PULSE) The massage function helps you to prevent
muscle tension on long journeys.
X
Press button 3.
The indicator lamp in the button lights up.
The air cushions in the lumbar region
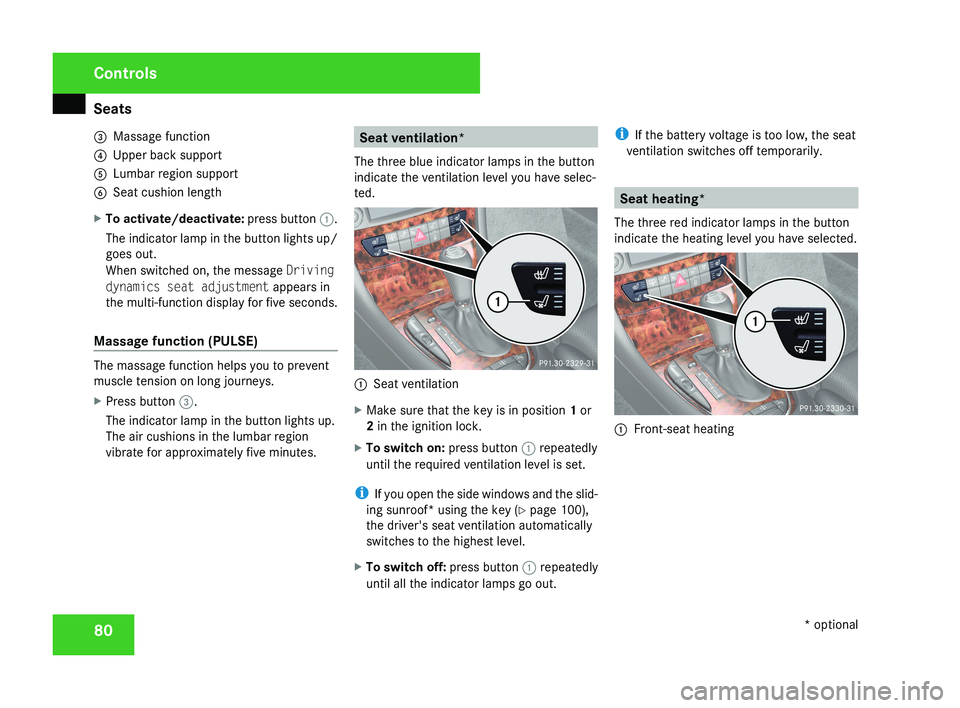
vibrate for approximately five minutes. Seat ventilation*
The three blue indicator lamps in the button
indicate the ventilation level you have selec-
ted. 1
Seat ventilation
X Make sure that the key is in position 1 or
2 in the ignition lock.
X To switch on: press button 1 repeatedly
until the required ventilation level is set.
i If you open the side windows and the slid-
ing sunroof* using the key ( Y page 100),
the driver's seat ventilation automatically
switches to the highest level.
X To switch off: press button 1 repeatedly
until all the indicator lamps go out. i
If the battery voltage is too low, the seat
ventilation switches off temporarily. Seat heating*
The three red indicator lamps in the button
indicate the heating level you have selected. 1
Front-seat heating Controls
* optional
219_AKB; 2; 4, en-GB
mkalafa,
2007-11-13T09:28:36+01:00 - Seite 80
Page 84 of 329
Steering wheel
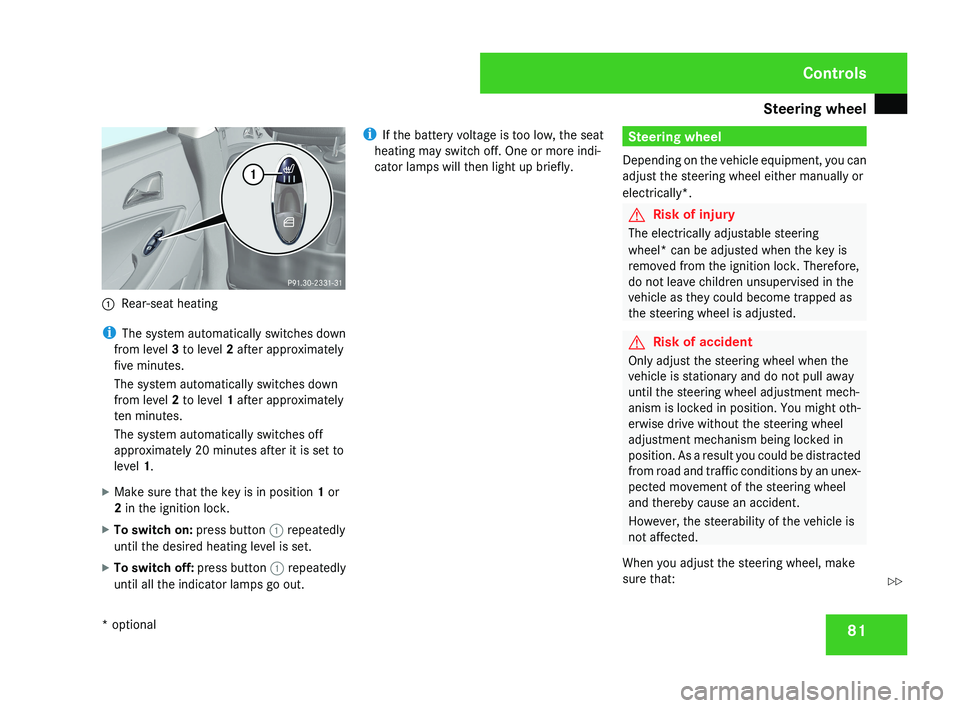
811
Rear-seat heating
i The system automatically switches down
from level 3 to level 2 after approximately
five minutes.
The system automatically switches down
from level 2 to level 1 after approximately
ten minutes.
The system automatically switches off
approximately 20 minutes after it is set to
level 1.
X Make sure that the key is in position 1 or
2 in the ignition lock.
X To switch on: press button 1 repeatedly
until the desired heating level is set.
X To switch off: press button 1 repeatedly
until all the indicator lamps go out. i
If the battery voltage is too low, the seat
heating may switch off. One or more indi-
cator lamps will then light up briefly.
Steering wheel
Depending on the vehicle equipment, you can
adjust the steering wheel either manually or
electrically*.
G Risk of injury
The electrically adjustable steering
wheel* can be adjusted when the key is
removed from the ignition lock. Therefore,
do not leave children unsupervised in the
vehicle as they could become trapped as
the steering wheel is adjusted.
G Risk of accident
Only adjust the steering wheel when the
vehicle is stationary and do not pull away
until the steering wheel adjustment mech-
anism is locked in position. You might oth-
erwise drive without the steering wheel
adjustment mechanism being locked in
position. As a result you could be distracted
from road and traffic conditions by an unex-
pected movement of the steering wheel
and thereby cause an accident.
However, the steerability of the vehicle is
not affected.
When you adjust the steering wheel, make
sure that:
Controls
* optional
219_AKB; 2; 4, en-GB
mkalafa,
2007-11-13T09:28:36+01:00 - Seite 81
Z
Page 85 of 329
Steering wheel
82
R
the steering wheel can be reached with
your arms slightly bent
R you can move your legs freely
R you can see all the displays in the instru-
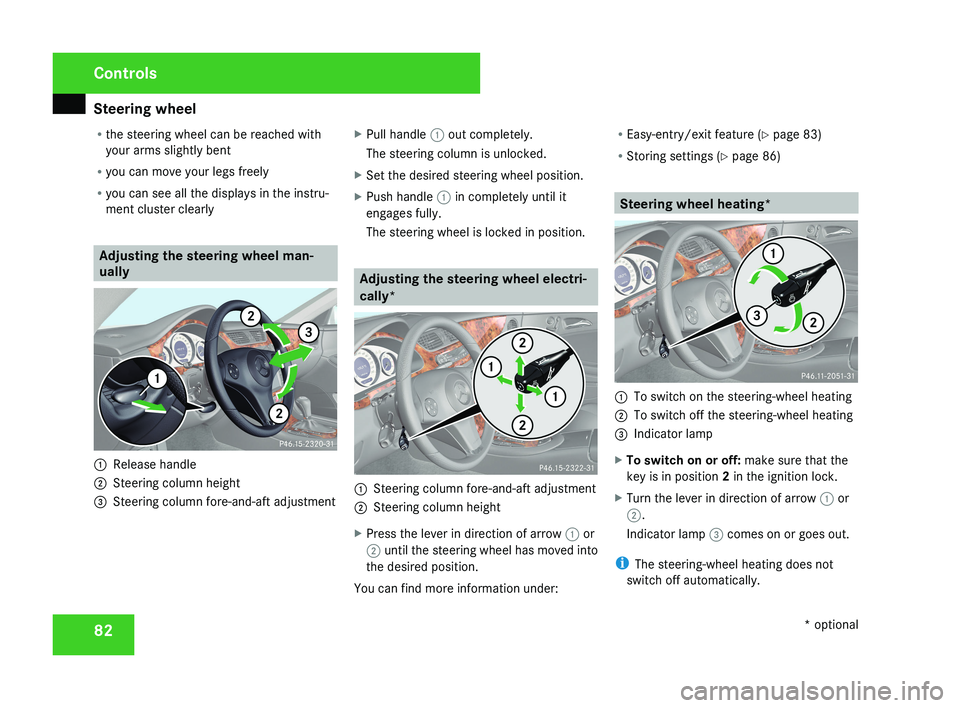
ment cluster clearly Adjusting the steering wheel man-
ually1
Release handle
2 Steering column height
3 Steering column fore-and-aft adjustment X
Pull handle 1 out completely.
The steering column is unlocked.
X Set the desired steering wheel position.
X Push handle 1 in completely until it
engages fully.
The steering wheel is locked in position.
Adjusting the steering wheel electri-
cally*
1 Steering column fore-and-aft adjustment
2 Steering column height
X Press the lever in direction of arrow 1 or
2 until the steering wheel has moved into
the desired position.
You can find more information under: R
Easy-entry/exit feature ( Y page 83)
R Storing settings ( Y page 86)
Steering wheel heating*
1
To switch on the steering-wheel heating
2 To switch off the steering-wheel heating
3 Indicator lamp
X To switch on or off: make sure that the
key is in position 2 in the ignition lock.
X Turn the lever in direction of arrow 1 or
2.
Indicator lamp 3 comes on or goes out.
i The steering-wheel heating does not
switch off automatically.
Controls
* optional
219_AKB; 2; 4, en-GB
mkalafa,
2007-11-13T09:28:36+01:00 - Seite 82
Page 126 of 329
On-board computer
123Vehicle submenu
R
Permanent Speedtronic (Y page 144)
R Automatic locking feature ( Y page 127)Heater* submenu
R
Selecting
the switch-on time for the aux-
iliary heating* ( Y page 127)
R Changing the switch-on time for the aux-
iliary heating* ( Y page 128) Convenience submenu*
R
Easy-entry/exit feature* ( Y page 128)
R Fold in mirrors when locking the vehi-
cle* ( Y page 128) Dynamic driving seat* submenu
R
Settings for the driver's and front-
passenger seat ( Y page 129) Selecting the unit of measurement for
distance
The selected unit of measurement for dis-
tance applies to:
R
the total distance recorder and the trip
meter
R the trip computer
R the digital speedometer 18
R cruise control
R Speedtronic
R Distronic*
X Press the è
or · button to select the
Settings... menu.
X Press the j
button to call up the selec-
tion of submenus.
X Press the æ
or ç button to select the
Inst. cluster submenu.
X Press the j button to select Display
unit Speed-/odometer. X
Press the æ or ç button to select
km (kilometres) or miles as the unit of
measurement for distance.
X Press the j, è or ÿ button to
select a different display.
Selecting the language X
Press the è
or · button to select the
Settings... menu.
X Press the j
button to call up the selec-
tion of submenus.
X Press the æ
or ç button to select the
Inst. cluster submenu.
X Press the j button to select Lan-
guage.
X Press the æ or ç button to select a
language:
R Deutsch
R English
R Français
R Italiano
R Español
R Nederlands
18 Vehicles for the United Kingdom: the digital speedometer always displays
km/h. Controls
* optional
219_AKB; 2; 4, en-GB
mkalafa,
2007-11-13T09:28:36+01:00 - Seite 123 Z
Page 130 of 329
On-board computer
127
X
Press the æ or ç button to select the
Lighting submenu.
X Press the j button to select Interior
lighting delayed switch-off.
X Press the æ or ç button to activate
or deactivate the Interior lighting
delayed switch-off feature.
X Press the j, è or ÿ button to
select a different display.
Activating/deactivating the automatic
door locking feature The Automatic door locking feature
allows you to set whether your vehicle will
lock centrally from a speed of about
15 km/h
upwards.
i For more information on the automatic
locking feature, see ( Y page 69).
X Press the è
or · button to select the
Settings... menu.
X Press the j
button to call up the selec-
tion of submenus.
X Press the æ
or ç button to select the
Vehicle submenu. X
Press the j
button to select Automatic
door locking.
X Press the æ or ç button to switch
the Automatic door locking feature on
or off.
X Press the j, è or ÿ button to
select a different display.
Selecting the switch-on time for the
auxiliary heating* This function is only available if the vehicle
has an auxiliary heating system.
The
Auxiliary
heat. function allows you to
select three switch-on times. You can set the
exact switch-on time using the other func-
tions in the Heater submenu.
The auxiliary heating adopts the Thermatic or
4-zone Thermotronic* temperature setting.
The minimum and maximum temperature set-
tings for the auxiliary heating are 20 † and
24 † respectively.
You can switch off the auxiliary heating by
using the remote control or the auxiliary heat-
ing button on the centre console.
The auxiliary heating is switched off automat-
ically after 50 minutes. This time can be
changed. To do this, visit a qualified specialist workshop, e.g. a Mercedes-Benz Service
Centre. G
Risk of fire and poisoning
The operation of the auxiliary heating pro-
duces hot, toxic exhaust fumes. The fuel
vapours produced during refuelling could
ignite on the hot exhaust system.
Do not switch on the auxiliary heating at
filling stations or in enclosed spaces, for
instance,
a garage, if there is no air extrac-
tion system.
You could otherwise endanger yourself and
others.
The Auxiliary heat. function can be called
up directly.
X Turn the key to position 1
or 2 in the ignition
lock.
X Press the button for the auxiliary heating on
the centre console
(Y page 166).
or
X Press the è
or · button to select the
Settings... menu.
X Press the j
button to call up the selec-
tion of submenus.
X Press the æ
or ç button to select the
Heater submenu. Controls
* optional
219_AKB; 2; 4, en-GB
mkalafa,
2007-11-13T09:28:36+01:00 - Seite 127 Z
Page 131 of 329
On-board computer
128
X
Press the j button to select Auxiliary
heat..
X Press the æ or ç button to select
one of the three switch-on times or Timer
off (auxiliary heating switched off).
When
a switch-on time is selected, the yel-
low indicator lamp lights up in the auxiliary
heating button.
X Press the j, è or ÿ button to
select a different display.
Changing the switch-on time for the
auxiliary heating* This function is only displayed if you have
selected
a switch-on time. Here you can enter
the time at which the auxiliary heating is to
be switched on.
X Press the è
or · button to select the
Settings... menu.
X Press the j
button to call up the selec-
tion of submenus.
X Press the æ
or ç button to select the
Heater submenu.
X Press the j
button to select Switch-on
time X Set hours. X
Press the æ or ç button to set the
hour.
X Press the j
button to select Switch-on
time X Set minutes.
X Press the æ or ç button to set the
minutes.
After changing from one menu to another
the new time setting is stored. The yellow
indicator lamp lights up on the button for
the
auxiliary heating on the centre console.
X Press the j, è or ÿ button to
select a different display.
Activating or deactivating the easy-
entry/exit feature* i
For more information on the easy-entry/
exit feature, see ( Y page 83). G
Risk of injury
When the easy-entry/exit feature is active,
the
steering wheel moves. There is a risk of
occupants becoming trapped. Before acti-
vating the easy-entry/exit feature, make
sure that nobody can become trapped.
Do not leave children unsupervised in the
vehicle, even if they are secured in a child restraint system. The children could open
the driver's door and thereby unintention-
ally activate the easy-entry/exit feature
and become trapped.
X Press the è
or · button to select the
Settings... menu.
X Press the j
button to call up the selec-
tion of submenus.
X Press the æ
or ç button to select the
Convenience submenu.
X Press the j button to select the EASY-
ENTRY system.
X Press the æ or ç button to activate
or deactivate the EASY-ENTRY system.
X Press the j, è or ÿ button to
select a different display.
Activating or deactivating the fold-in
mirrors when locking*
function The
Fold
in mirrors when locking func-
tion allows you to determine whether the
exterior mirrors should fold in when you lock
the vehicle. When you switch on the ignition,
the exterior mirrors fold out again. Controls
* optional
219_AKB; 2; 4, en-GB
mkalafa,
2007-11-13T09:28:36+01:00 - Seite 128
Page 135 of 329
Driving systems
132
X
Press the s button to call up the most
recently dialled number in the redial mem-
ory.
X Press the j or k button to select the
desired name or number.
X Press the s button to start dialling. Driving systems
Your vehicle's driving systems are described
on the following pages:
R Cruise
control, Distronic* and Speedtronic,
which you can use to control the speed of
the vehicle
R HOLD, which makes pulling away easier,
particularly on steep uphill gradients
R Vehicle level setting and Airmatic DC*,
which can be used to adjust your vehicle's
chassis
R Parktronic*, which assists you in parking
and manoeuvring
The ABS, BAS, adaptive brake lights, ESP ®
,
EBV (electronic brake-power distribution) and
ADAPTIVE BRAKE driving safety systems are
described in the "Driving safety systems" sec-
tion (Y page 57). Cruise control
Cruise control maintains a constant road
speed
for you. It brakes automatically in order
to avoid exceeding the set speed. On long and
steep downhill gradients, especially if the
vehicle is laden, you must select shift range
1, 2 or 3 in good time. In this way you will
make use of the braking effect of the engine,
which relieves the load on the brake system
and prevents the brakes from overheating
and wearing too quickly. G
Risk of accident
Do not change down for additional engine
braking on a slippery road surface. This
could cause the drive wheels to lose their
grip and the vehicle could skid.
Use
cruise control only if road and traffic con-
ditions make it appropriate to maintain a
steady speed for a prolonged period. You can
store any road speed above 30 km/h. G
Risk of accident
Cruise control
cannot take account of road
and traffic conditions.
Always pay attention to traffic conditions
even when cruise control is activated. Controls
* optional
219_AKB; 2; 4, en-GB
mkalafa,
2007-11-13T09:28:36+01:00 - Seite 132