Page 442 of 509
.
�Take vehicle tool kit tray and vehicle
jack out of trunk (
�page 420")
441 Practical hints
Flat tire
Mounting the Minispare wheel
Preparing the vehicle
�Prepare the vehicle as described
(
�page 440).
�Take vehicle tool kit tray and vehicle
jack out of trunk (
�page 420).
�Take the Minispare wheel from the
wheel well under the trunk floor
(
�page 422).Lifting the vehicle
Warning!G
When jacking up the vehicle, only use the
jack which has been specifically approved
by Mercedes-Benz for your vehicle.
The jack is designed exclusively for jacking
up the vehicle at the jack take-up brackets
built into both sides of the vehicle. Make
sure the jack arm is fully seated in the jack
take-up bracket.
The jack is intended only for lifting the
vehicle briefly for wheel changes. It is not
suited for performing maintenance work
under the vehicle. To help avoid personal
injury, use the jack only to lift the vehicle
during a wheel change.
Never get beneath the vehicle while it is sup-
ported by the jack. Keep hands and feet
away from the area under the lifted vehicle.
Always lower the vehicle onto sufficient
capacity jackstands before working under
the vehicle.
Always firmly set the parking brake and
block wheels with wheel chocks or other
sizeable objects before raising vehicle with
jack. Do not release the parking brake while
the vehicle is raised.
Make sure that the ground on which the
vehicle is standing and where you place the
jack is solid, level and not slippery. If neces-
sary, use a large underlay. On slippery
surfaces, such as tiled floors, you should
use a non-slip underlay, for example a
rubber mat.
Do not use wooden blocks or similar objects
to support the jack. Otherwise the jack may
not be able to achieve its load-bearing
capacity if it is not at its full height.
Be certain that the jack is always vertical
(plumb line) when in use, especially on hills.
Always try to use the jack on level surface.
Never start the engine when the vehicle is
raised.
Also observe the notes on the jack.
Page 446 of 509

445 Practical hints
Flat tire
�Guide the Minispare wheel onto the
wheel hub and push it on.
�Insert wheel bolts and tighten them
slightly.
Lowering the vehicle
�Lower vehicle by turning crank
counterclockwise until vehicle is
resting fully on its own weight.
�Remove the jack.1 - 5 Wheel bolts
6 Wheel wrench
�Tighten the five wheel bolts evenly,
following the diagonal sequence
illustrated (1 to 5), until all bolts are
tight. Observe a tightening torque of
96 lb-ft (130 Nm).
Before storing the jack, it should be fully
collapsed, with handle folded in (storage
position).
�Store the jack and the other vehicle
tools in the designated storage space
underneath the trunk floor
(
�page 420).
Warning!G
Have the tightening torque checked after
changing a wheel. The wheels could come
loose if they are not tightened to a torque of
96 lb-ft (130 Nm).
iVehicles with TPMS (USA only):
Do not activate the tire inflation pressure
monitor (
�page 344) until a full size wheel/tire
with functioning sensor has been placed back
into service on the vehicle.
Page 456 of 509
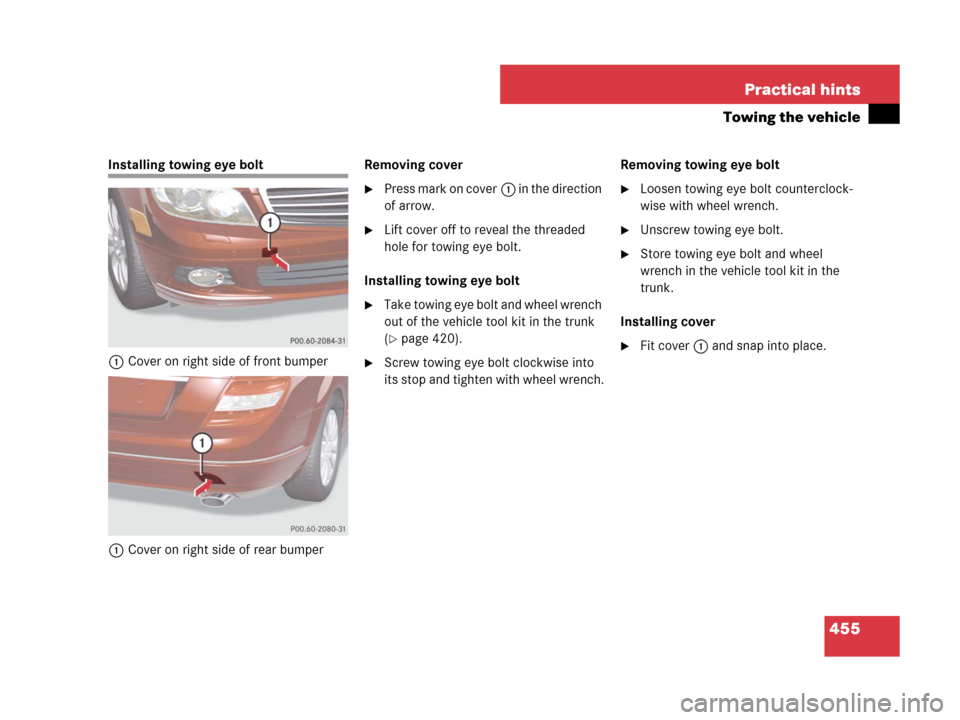
455 Practical hints
Towing the vehicle
Installing towing eye bolt
1Cover on right side of front bumper
1Cover on right side of rear bumperRemoving cover
�Press mark on cover1 in the direction
of arrow.
�Lift cover off to reveal the threaded
hole for towing eye bolt.
Installing towing eye bolt
�Take towing eye bolt and wheel wrench
out of the vehicle tool kit in the trunk
(
�page 420).
�Screw towing eye bolt clockwise into
its stop and tighten with wheel wrench.Removing towing eye bolt
�Loosen towing eye bolt counterclock-
wise with wheel wrench.
�Unscrew towing eye bolt.
�Store towing eye bolt and wheel
wrench in the vehicle tool kit in the
trunk.
Installing cover
�Fit cover1 and snap into place.
Page 457 of 509
 and
systems secured by that fuse will stop op-")
456 Practical hints
Fuses
The electrical fuses in your vehicle serve to
switch off malfunctioning power circuits.
If a fuse is blown, the component(s) and
systems secured by that fuse will stop op-
erating.If a newly inserted fuse blows again, have
the cause determined and rectified at an
authorized Mercedes-Benz Center.
A fuse chart explains the fuse allocation
and fuse amperages. It is located in the
main fuse box in the passenger compart-
ment (
�page 457).
The electrical fuses are located in different
fuse boxes:
�Fuse box in passenger compartment
(
�page 457)
�Fuse box in engine compartment
(
�page 457)
�Fuse box in trunk (�page 458)Before replacing fuses:
�Depress the parking brake
(
�page 134).
�Make sure the manual transmission is
in Neutral (
�page 136), automatic
transmission* is set to P (
�page 140).
The gear position indicator in the ta-
chometer display should be on P.
�Turn off all electrical consumers.
�Turn off the engine (�page 134).
�Remove the SmartKey from the starter
switch.
Vehicles with KEYLESS-GO*
(Canada only):
�Open the driver’s door.
Warning!G
Only use fuses approved by Mercedes-Benz
with the specified amperage for the system
in question and do not attempt to repair or
bridge a blown fuse. Using other than ap-
proved fuses or using repaired or bridged
fuses may cause an overload leading to a
fire, and/or cause damage to electrical
components and/or systems. Have the
cause determined and remedied at an au-
thorized Mercedes-Benz Center.
iA blown fuse must be replaced by an appro-
priate spare fuse (recognizable by its color or the
fuse rating given on the fuse) of the amperage
recommended in the fuse chart.
Any Mercedes-Benz Center will be glad to advise
you on this subject.
!Switch off the vehicle’s internal electrical
functions (
�page 448) when you are working on
the fuses.
iIn case of a blown fuse contact Roadside
Assistance or an authorized Mercedes-Benz
Center.
Page 459 of 509
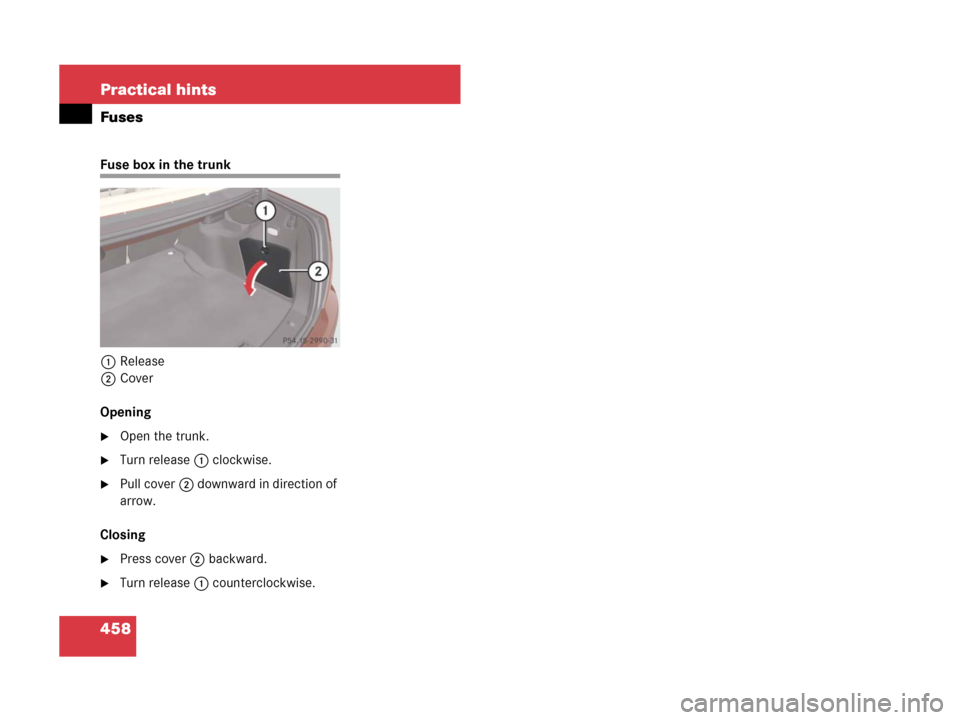
458 Practical hints
Fuses
Fuse box in the trunk
1Release
2Cover
Opening
�Open the trunk.
�Turn release1 clockwise.
�Pull cover2 downward in direction of
arrow.
Closing
�Press cover2 backward.
�Turn release1 counterclockwise.
Page 476 of 509
475 Technical data
Main dimensions and weights
Weights
ModelC 300 Sport
C 300 4MATIC Sport
C 350 SportC 3501
1Canada only.
C 350 4MATIC1C 230 4MATIC1
C 230 4MATIC Sport1
Overall vehicle length182.3 in (4 630 mm)182.3 in (4 630 mm)180.6 in (4 586 mm)
Overall vehicle width (exterior
rear view mirrors folded out)79.5 in (2 020 mm)79.5 in (2 020 mm)79.5 in (2 020 mm)
Overall vehicle width (exterior
rear view mirrors folded in)69.7 in (1770 mm)69.7 in (1770 mm)69.7 in (1770 mm)
Overall vehicle height56.3 in (1 429 mm)57.0 in (1 448 mm)57.1 in (1 449 mm)
Wheelbase124.6 in (2 760 mm)124.6 in (2 760 mm)124.6 in (2 760 mm)
Track, front60.4 in (1 533 mm)60.4 in (1 533 mm)60.4 in (1 533 mm)
Track, rear59.6 in (1 514 mm)60.5 in (1 536 mm)60.5 in (1 536 mm)
Max. roof load 220 lb (100 kg)
Max. trunk load220 lb (100 kg)
Page 490 of 509
 192
Telephone* (Audio system) 222
Brake assist system (BAS) 60
Brake fluid 324, 478, 480
Brake lamp
High mounted 431
Replacing bulbs 431, 436
Brake pads
M")
489 Index
Bluetooth®
Settings (Audio system) 192
Telephone* (Audio system) 222
Brake assist system (BAS) 60
Brake fluid 324, 478, 480
Brake lamp
High mounted 431
Replacing bulbs 431, 436
Brake pads
Message in display 399
Brake warning lamp 27
Brakes 312
Warning lamp 27, 376
Break-in period 310
Bulbs, replacing see Replacing bulbsC
California retail buyers and lessees,
important notice for 11
Can holder see Cup holder
Capacities and recommended
fuel/lubricants 476
Cargo area see Trunk
Carpets, Cleaning and care of 371
Catalytic converter 319
CD
CD changer* 208
CD player 160, 208
MP3 playback options 220
MP3, selecting a track 219
Playback options 220
Selecting a track 219
Submenu overview 208
CD changer* 208
CD player 160, 208
Centigrade see Temperature display
mode 167
Central locking
Automatic 80, 173
Locking/unlocking from inside 81
Locking/unlocking switches 81
Central locking/unlocking switches 80Certification label 462
Change of address or ownership 12
Checking tire pressure electronically
Tire Pressure Monitoring System
(TPMS), (USA only) 344
Children in the vehicle 51
Air bags 51
Front passenger front air bag off
indicator lamp 45, 385
Infant and child restraint systems 51
LATCH-type child seat anchors 55
Override switch for rear door window
operation 57
Tether attachment points 54
Cigarette lighter 292
Climate control system 250, 259
3-zone automatic climate control
(Canada only) 259
Air conditioning, Cooling 258, 267
Air distribution 254, 263
Air recirculation mode 257, 265
Air volume 254, 263
Air volume, rear 268
Automatic mode 253
Deactivating/Reactivating 252
Defrosting 264
Page 493 of 509
 95, 174
EBP 61
Elec")
492 Index
Dual-zone automatic climate control
Maximum cooling MAX COOL 256
Dual-zone automatic climate control see
Climate control system
E
Easy-entry/exit feature*
(Canada only) 95, 174
EBP 61
Electrical fuses see Fuses
Electrical outlet
Glove box 293
Rear passenger compartment 293
Electrical system, Technical Data 473
Electronic Brake Proportioning see EBP
Electronic Stability Program see ESP
®
Electronic traction system 63
Emergency call system 295
Emergency calls, Tele Aid* 296
Emergency operation (Limp-Home
Mode) 146Emergency operations
Gear selector lever*, Unlocking 426
Locking the vehicle 424
Releasing from inside 271
Remote door lock* 302
Remote door unlock* 301
Unlocking the trunk 425
Unlocking the vehicle 424
Emergency tensioning device see ETD
Emergency, In case of
Battery, Jump starting 451
First aid kit 420
Flat tire 440
Fuses 456
Instrument cluster, Indicator
lamps 374–383
Roadside Assistance 12
Roadside Assistance* (Tele
Aid*) 299
Towing the vehicle 453
Emission control 320
Emission control information label 463
Emission control system warranties 10Engine
Adding engine oil 328
Belt layout 464
Cleaning 366
Compartment 325
Coolant 329, 478, 484
Malfunction indicator lamp 27, 378
Number 462, 463
Oil 327, 476, 480
Residual heat and ventilation 266
Starting 127
Technical data 465
Turning off 134
Engine coolant see Coolant
Engine oil 327
Adding 328
Additives 480
Checking level (Dipstick) 327
Consumption 327
Dipstick 327
Filler neck 327, 328
Recommended engine oils and oil
filters 476