Page 275 of 509
274 Controls in detail
Power tilt/sliding sunroof
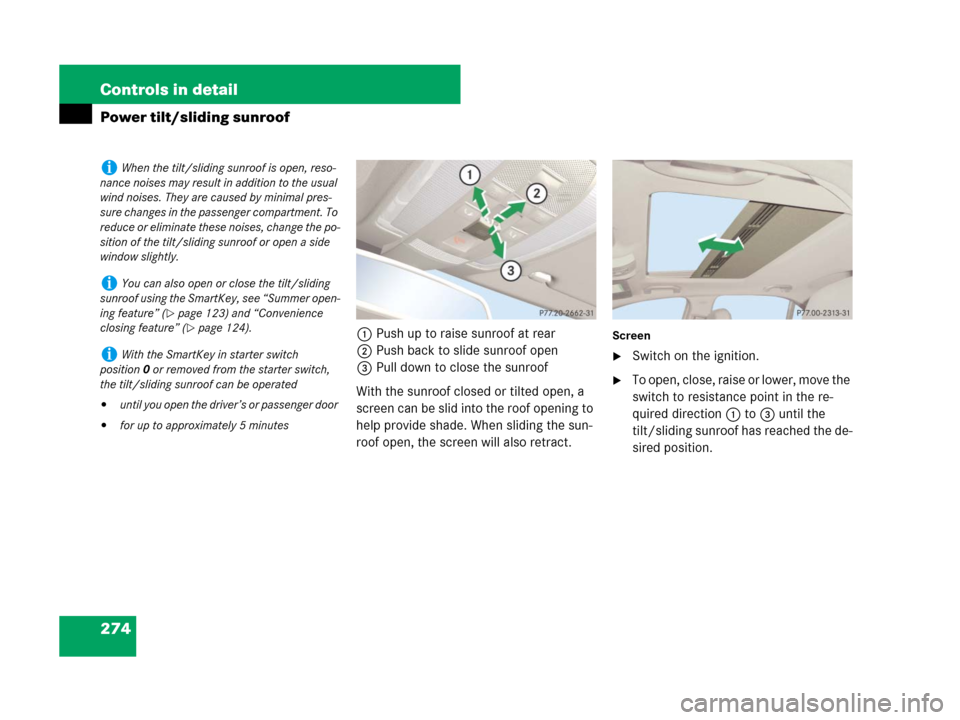
1Push up to raise sunroof at rear
2Push back to slide sunroof open
3Pull down to close the sunroof
With the sunroof closed or tilted open, a
screen can be slid into the roof opening to
help provide shade. When sliding the sun-
roof open, the screen will also retract.Screen
�Switch on the ignition.
�To open, close, raise or lower, move the
switch to resistance point in the re-
quired direction1to3 until the
tilt/sliding sunroof has reached the de-
sired position.
iWhen the tilt/sliding sunroof is open, reso-
nance noises may result in addition to the usual
wind noises. They are caused by minimal pres-
sure changes in the passenger compartment. To
reduce or eliminate these noises, change the po-
sition of the tilt/sliding sunroof or open a side
window slightly.
iYou can also open or close the tilt/sliding
sunroof using the SmartKey, see “Summer open-
ing feature” (
�page 123) and “Convenience
closing feature” (
�page 124).
iWith the SmartKey in starter switch
position0 or removed from the starter switch,
the tilt/sliding sunroof can be operated
�until you open the driver’s or passenger door
�for up to approximately 5 minutes
Page 276 of 509
275 Controls in detail
Power tilt/sliding sunroof
�Express-operation: To open, close,
raise or lower, move the switch past
the resistance point in the required
direction1to3 and release.
The tilt/sliding sunroof opens or closes
completely.
�Stopping during Express-opening/
closing: Move the switch in any direc-
tion.
Synchronizing
The tilt/sliding sunroof must be synchro-
nized
�after the tilt/sliding sunroof has been
closed manually
�if the tilt/sliding sunroof can only be
opened with a jerking motion
�after a malfunction
�Switch on the ignition (�page 82).
�Press and hold the sunroof switch in
the direction of arrow1 until the
tilt/sliding sunroof is fully raised at the
rear.
�Keep holding the sunroof switch in the
direction of arrow1 for approximately
1 second.
�Check the Express-operation feature
(
�page 275).
If the tilt/sliding sunroof opens com-
pletely, the sunroof is synchronized.
Otherwise repeat the above steps.
iIf the movement of the tilt/sliding sunroof is
blocked during the closing procedure, the sun-
roof will stop and reopen slightly.
!Do not open the tilt/sliding sunroof com-
pletely if it is not aligned. Otherwise you could
damage the tilt/sliding sunroof.
Page 277 of 509
276 Controls in detail
Panorama roof with power tilt/sliding panel*
Roller sunblinds
The roller sunblinds are designed to pro-
tect you from excessive sunlight streaming
in through the panorama roof with power
tilt/sliding panel.
The front roller sunblind only operates with
the tilt/sliding panel closed. The front and
rear roller sunblind cannot be operated in-
dividually.
�Switch on the ignition.Operating roller sunblinds
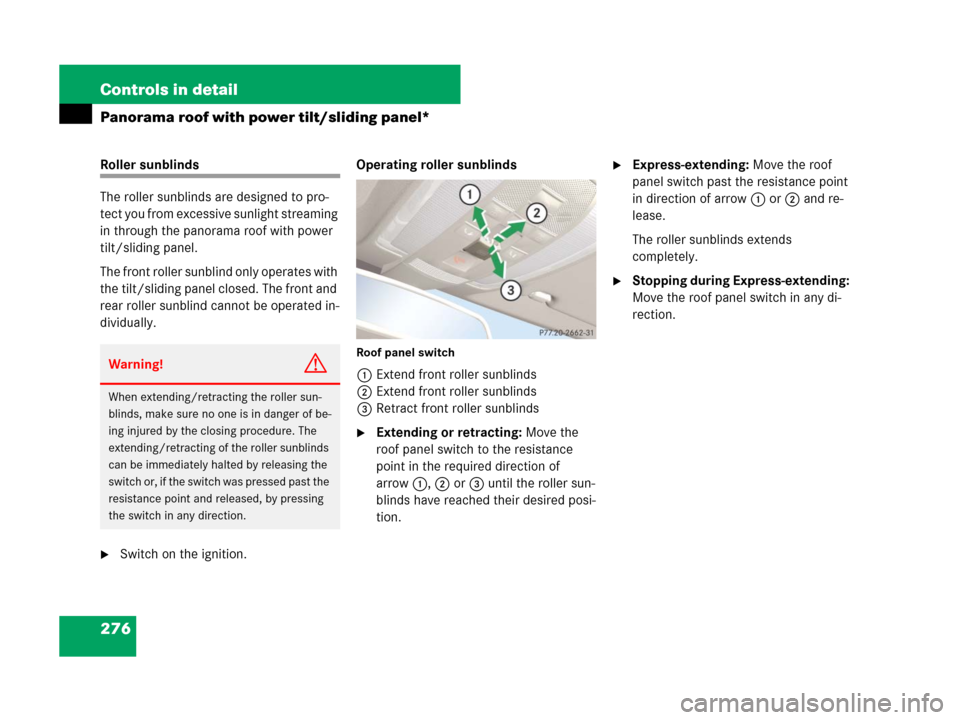
Roof panel switch
1Extend front roller sunblinds
2Extend front roller sunblinds
3Retract front roller sunblinds
�Extending or retracting: Move the
roof panel switch to the resistance
point in the required direction of
arrow1, 2 or3 until the roller sun-
blinds have reached their desired posi-
tion.
�Express-extending: Move the roof
panel switch past the resistance point
in direction of arrow1 or 2 and re-
lease.
The roller sunblinds extends
completely.
�Stopping during Express-extending:
Move the roof panel switch in any di-
rection.
Warning!G
When extending/retracting the roller sun-
blinds, make sure no one is in danger of be-
ing injured by the closing procedure. The
extending/retracting of the roller sunblinds
can be immediately halted by releasing the
switch or, if the switch was pressed past the
resistance point and released, by pressing
the switch in any direction.
Page 278 of 509
277 Controls in detail
Panorama roof with power tilt/sliding panel*
Opening and closing panorama roof
with power tilt/sliding panel
The tilt/sliding panel only operates with
the roller sunblinds extended.
Warning!G
When opening or closing the tilt/sliding pan-
el, make sure there is no danger of anyone
being harmed by the opening or closing pro-
cedure.
The opening procedure of the tilt/sliding
panel can be immediately halted by releas-
ing the switch or, if the switch was moved
past the resistance point and released, by
moving the switch in any direction.
The closing procedure of the tilt/sliding
panel can be immediately halted by releas-
ing the switch.
The panorama roof with power tilt/sliding
panel is made out of glass. In the event of an
accident, the glass may shatter. This may re-
sult in an opening in the roof.
In a vehicle rollover, occupants not wearing
their seat belts or not wearing them properly
may be thrown out of the opening.
Such an opening also presents a potential
for injury for occupants wearing their seat
belts properly as entire body parts or por-
tions of them may protrude from the pas-
senger compartment.
When leaving the vehicle, always remove the
SmartKey or SmartKey with KEYLESS-GO*
from the starter switch, take it with you, and
lock the vehicle. Do not leave children
unattended in the vehicle, or with access to
an unlocked vehicle. A child’s unsupervised
access to a vehicle could result in an acci-
dent and/or serious personal injury.
!To avoid damaging the seals, do not trans-
port any objects with sharp edges which can
stick out of the tilt/sliding panel.
Do not open the tilt/sliding panel if there is snow
or ice on the roof, as this could result in malfunc-
tions.
!Please keep in mind that weather conditions
can sometimes change rapidly. Make sure to
close the tilt/sliding panel when leaving the ve-
hicle. If water enters the vehicle interior, vehicle
electronics could be damaged which is not cov-
ered by the Mercedes-Benz Limited Warranty.
iWhen the panorama roof with power
tilt/sliding panel is open, resonance noises may
result in addition to the usual wind noises. They
are caused by minimal pressure changes in the
passenger compartment. To reduce or eliminate
these noises, change the position of the panora-
ma roof with power tilt/sliding panel or open a
side window slightly.
iYou can also open or close the tilt/sliding
panel using the SmartKey, see “Summer open-
ing feature” (
�page 123) and “Convenience
closing feature” (
�page 124).
��
Page 279 of 509
278 Controls in detail
Panorama roof with power tilt/sliding panel*
Roof panel switch
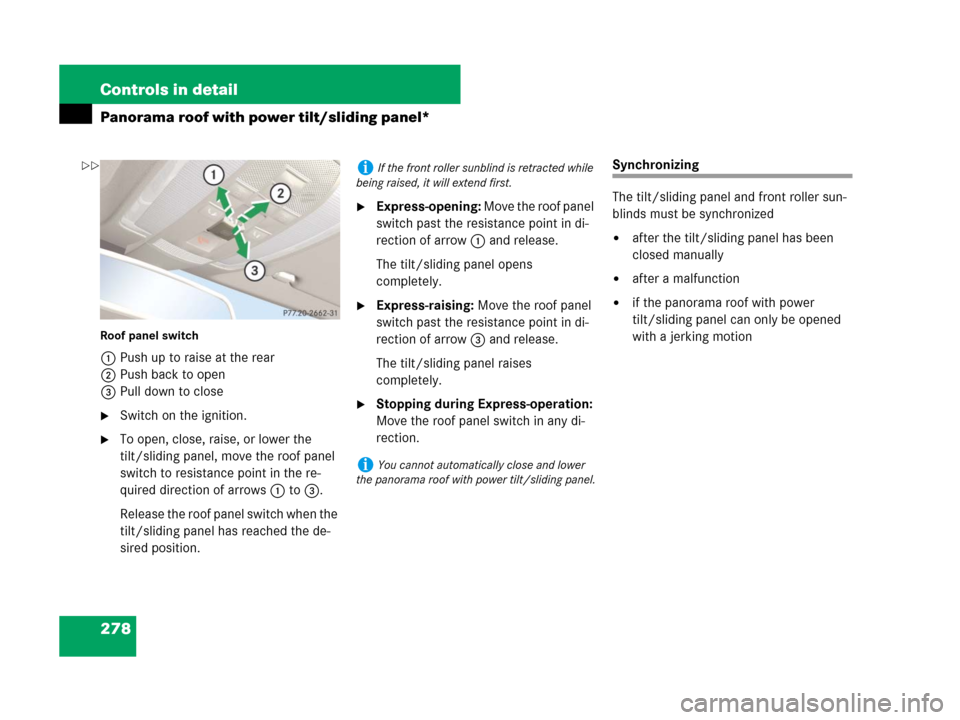
1Push up to raise at the rear
2Push back to open
3Pull down to close
�Switch on the ignition.
�To open, close, raise, or lower the
tilt/sliding panel, move the roof panel
switch to resistance point in the re-
quired direction of arrows1 to3.
Release the roof panel switch when the
tilt/sliding panel has reached the de-
sired position.
�Express-opening: Move the roof panel
switch past the resistance point in di-
rection of arrow1 and release.
The tilt/sliding panel opens
completely.
�Express-raising: Move the roof panel
switch past the resistance point in di-
rection of arrow3 and release.
The tilt/sliding panel raises
completely.
�Stopping during Express-operation:
Move the roof panel switch in any di-
rection.
Synchronizing
The tilt/sliding panel and front roller sun-
blinds must be synchronized
�after the tilt/sliding panel has been
closed manually
�after a malfunction
�if the panorama roof with power
tilt/sliding panel can only be opened
with a jerking motion
iIf the front roller sunblind is retracted while
being raised, it will extend first.
iYou cannot automatically close and lower
the panorama roof with power tilt/sliding panel.
��
Page 280 of 509
279 Controls in detail
Panorama roof with power tilt/sliding panel*
Tilt/sliding panel and roller sunblind
�Switch on the ignition.
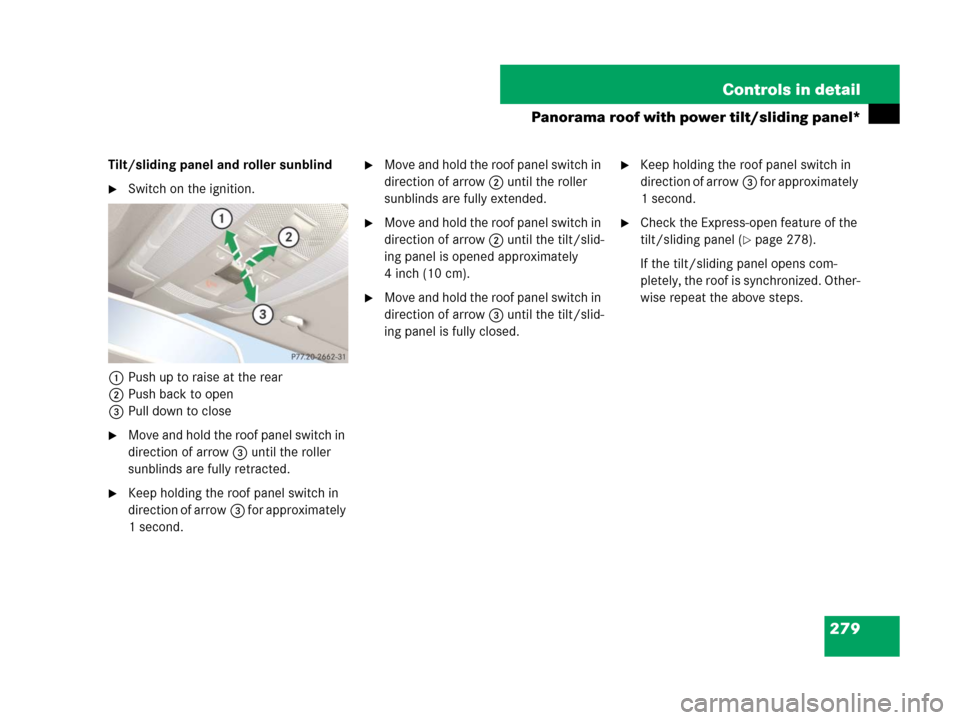
1Push up to raise at the rear
2Push back to open
3Pull down to close
�Move and hold the roof panel switch in
direction of arrow3 until the roller
sunblinds are fully retracted.
�Keep holding the roof panel switch in
direction of arrow3 for approximately
1 second.
�Move and hold the roof panel switch in
direction of arrow2 until the roller
sunblinds are fully extended.
�Move and hold the roof panel switch in
direction of arrow2 until the tilt/slid-
ing panel is opened approximately
4 inch (10 cm).
�Move and hold the roof panel switch in
direction of arrow3 until the tilt/slid-
ing panel is fully closed.
�Keep holding the roof panel switch in
direction of arrow3 for approximately
1 second.
�Check the Express-open feature of the
tilt/sliding panel (
�page 278).
If the tilt/sliding panel opens com-
pletely, the roof is synchronized. Other-
wise repeat the above steps.
Page 281 of 509
280 Controls in detail
Loading and storing
Roof rack*
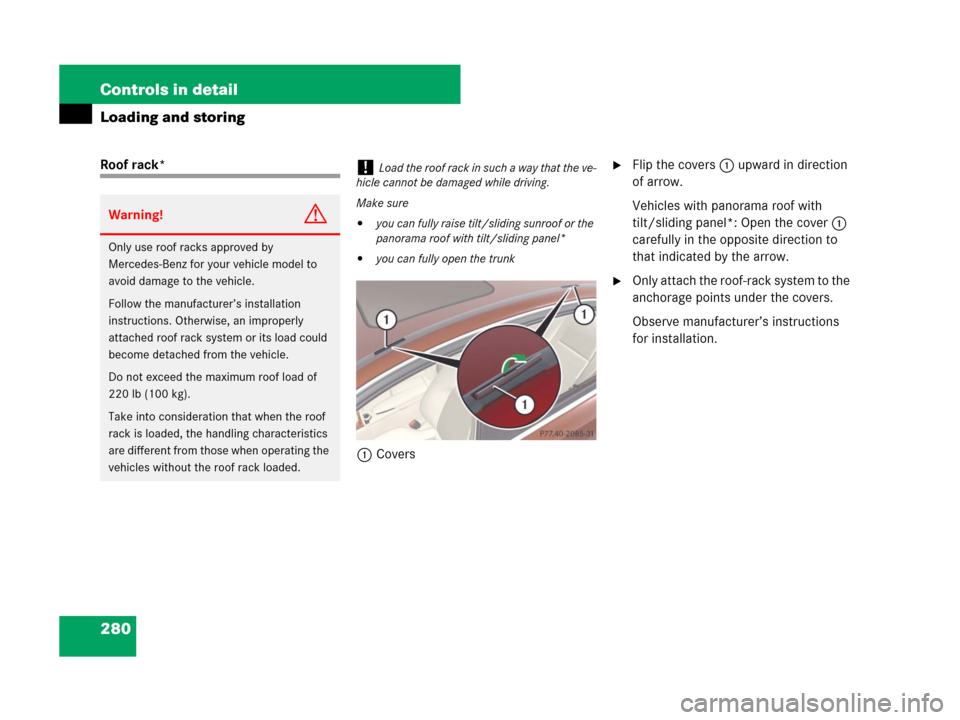
1Covers�Flip the covers1 upward in direction
of arrow.
Vehicles with panorama roof with
tilt/sliding panel*: Open the cover 1
carefully in the opposite direction to
that indicated by the arrow.
�Only attach the roof-rack system to the
anchorage points under the covers.
Observe manufacturer’s instructions
for installation.
Warning!G
Only use roof racks approved by
Mercedes-Benz for your vehicle model to
avoid damage to the vehicle.
Follow the manufacturer’s installation
instructions. Otherwise, an improperly
attached roof rack system or its load could
become detached from the vehicle.
Do not exceed the maximum roof load of
220 lb (100 kg).
Take into consideration that when the roof
rack is loaded, the handling characteristics
are different from those when operating the
vehicles without the roof rack loaded.
!Load the roof rack in such a way that the ve-
hicle cannot be damaged while driving.
Make sure
�you can fully raise tilt/sliding sunroof or the
panorama roof with tilt/sliding panel*
�you can fully open the trunk
Page 282 of 509
281 Controls in detail
Loading and storing
Split rear bench seat*
To expand the cargo area, you can fold
down the left and right rear seat backrests.
The two sections can be folded down
separately.Folding the backrest forward
The release handles1 is located in the
trunk.
1Release handle
�Open the trunk.
�Pull on left and/or right release
handle1.
�Fully retract the head restraints
(
�page 89).
�If necessary, pull the driver's and/or
front-passenger seat forward.2Rear seat backrests
�Fold rear seat backrests2 forward.
Warning!G
When expanding the luggage compartment,
always fold the seat cushions fully forward.
Unless you are transporting cargo, the back-
rests must remain properly locked in the up-
right position.
In an accident, during hard braking or sud-
den maneuvers, loose items will be thrown
around inside the vehicle, and cause injury
to vehicle occupants unless the items are
securely fastened in the vehicle.