Page 163 of 509

162 Controls in detail
Control system
Dialing a number from the phone book
If your telephone is ready to receive calls,
you may select and dial a number from the
phone book at any time.
�Press ( or & to select the Tel
menu.
�Log on to the network (�page 193).
�Press % or $ or # to switch
to the phone book.
The stored names are displayed in
ascending alphabetical order.
�Press % or $ to select the de-
sired name.1Name from the phone book
�Press s or # to start dialing.
If several entries are present for the
same name, they are all shown.
�Press % or $ to select the
desired entry.
�Press s or # to start dialing.The message
Connecting call… ap-
pears on the multifunction display, as
well as the dialed telephone number or
name as long as it is stored in the
phone book.
The dialed number is saved in the “Di-
aled numbers” list.
Once a connection has been estab-
lished, the name appears on the multi-
function display, provided that it has
been stored in the phone book, other-
wise the dialed telephone number ap-
pears.
iFor using the phone book of the audio sys-
tem you can import business cards (vCards)
from external Bluetooth
® phones into your audio
system's phone book (
�page 233).
iIf you press and hold % or $ for
more than 1 second, the system scrolls
rapidly through the list of names.
If you press and hold % or $ for more than
4 seconds, the control system shows the first
four entries of the letter next used. Release the
button to stop the quick search. The search
stops automatically at the end of the list.
iIf you do not want to dial from the phone
book, press t or L. The message
Ready
again appears in the multifunction display.
Page 164 of 509

163 Controls in detail
Control system
Redialing
The control system stores ten of the last
dialed phone numbers. This eliminates the
need to search through your entire phone
book.
�Log on to the network (�page 193).
�Press s to switch to the number
and/or name last dialed in the redial
memory.
�Press % or $ to select the de-
sired number and/or name.
�Press s or # to start dialing.
Once a connection has been estab-
lished, the name appears in the multi-
function display, provided that it has
been stored in the phone book, other-
wise the dialed telephone number ap-
pears.Answering a call
When your telephone is ready to receive
calls, you can answer a call at any time.
When you are in the
Tel menu, you will see
the following message on the multifunc-
tion display:
�Presssto take the call.Ending a call or rejecting an incoming
call
You can end a call or reject an incoming
call at any time.
�Presst to end or reject a call.
iThe caller’s number appears only if it is
transmitted.
The caller’s name appears only if the number and
the name are stored in the phone book.
Page 165 of 509

�ac")
164 Controls in detail
Control system
Service menu
The
Service menu is used for
�calling up messages
�checking tire inflation pressure elec-
tronically with the TPMS (standard on
U.S. vehicles)
�activating Run Flat Indicator (standard
on Canada vehicles)
�calling up the maintenance service in-
dicator displayCalling up vehicle malfunction, warning
and system status messages stored in
memory
Use the vehicle status message memory
menu to scan malfunction and warning
messages that may be stored in the
system. Such messages appear in the
multifunction display and are based on
conditions or system status the vehicle’s
system has recorded.
The vehicle status message memory menu
only appears if there are any messages
stored.
Warning!G
Malfunction and warning messages are only
indicated for certain systems and are inten-
tionally not very detailed. The malfunction
and warning messages are simply a remind-
er with respect to the operation of certain
systems and do not replace the owner’s
and/or driver’s responsibility to maintain
the vehicle’s operating safety by having all
required maintenance and safety checks
performed on the vehicle and by bringing
the vehicle to an authorized Mercedes-Benz
Center to address the malfunction and
warning messages (
�page 387).
Page 166 of 509

165 Controls in detail
Control system
�Press ( or & to select the
Service menu.
If conditions have occurred causing status
messages to be recorded, the number of
messages appears in the multifunction
display:
1Number of messages
�Press % or $ to select the mes-
sage.
�Press # to confirm.
The stored messages will now be
displayed in the order in which they
have occurred.
�Use % or $ to scroll through the
messages.Checking tire inflation pressure
For information about checking tire infla-
tion pressure (
�page 339).
Activating Run Flat Indicator
(Canada only)
For information about activating Run Flat
Indicator (
�page 342).
Calling up the maintenance service
indicator display
For information about calling up the main-
tenance service indicator display
(
�page 362).
Settings menu
In the
Settings menu there are two
functions:
�The function Reset to factory
settings
, with which you can reset all
the settings to the original factory
settings.
�A collection of submenus with which
you can make individual settings for
your vehicle.
iSee the “Practical hints” section for mal-
function and warning messages (
�page 387).
iIf you turn the SmartKey in the starter
switch to position0 and then back to position2,
all messages will be deleted from the message
memory.
Page 167 of 509

166 Controls in detail
Control system
Resetting all settings
You can reset most of the functions of the
submenus to the factory settings.
�Press ( or & to select the
Settings menu.
�Press % or $ to select the
Factory settings function.
�Press #.
The menu
Reset to factory settings
No/Yes
appears in the multifunction
display.
�Press % or $ to select Yes or No.
Select
Yes if you want to reset to facto-
ry settings.
�Press # to confirm.
The confirmation message appears in
the multifunction display.
The functions of the submenus will re-
set to factory settings.
Submenus in the Settings menu
�Press ( or & to select the Set-
tings
menu.
�Press % or $ to select a sub-
menu.The submenus are arranged by hierarchy.
Scroll down with%, scroll up
with$.
With the selection marker on the desired
submenu, use the# to access the indi-
vidual functions within that submenu.
Once within the submenu, you can use
the$ to move to the next function or
the% to move to the previous function
within that submenu.
The table below shows what settings can
be changed within the various submenus.
Detailed instructions on making individual
settings can be found on the following
pages.
iFor safety reasons, the following function
are not reset while driving:
�the Headlamp mode function in the Light-
ing
submenu
Page 168 of 509
167 Controls in detail
Control system
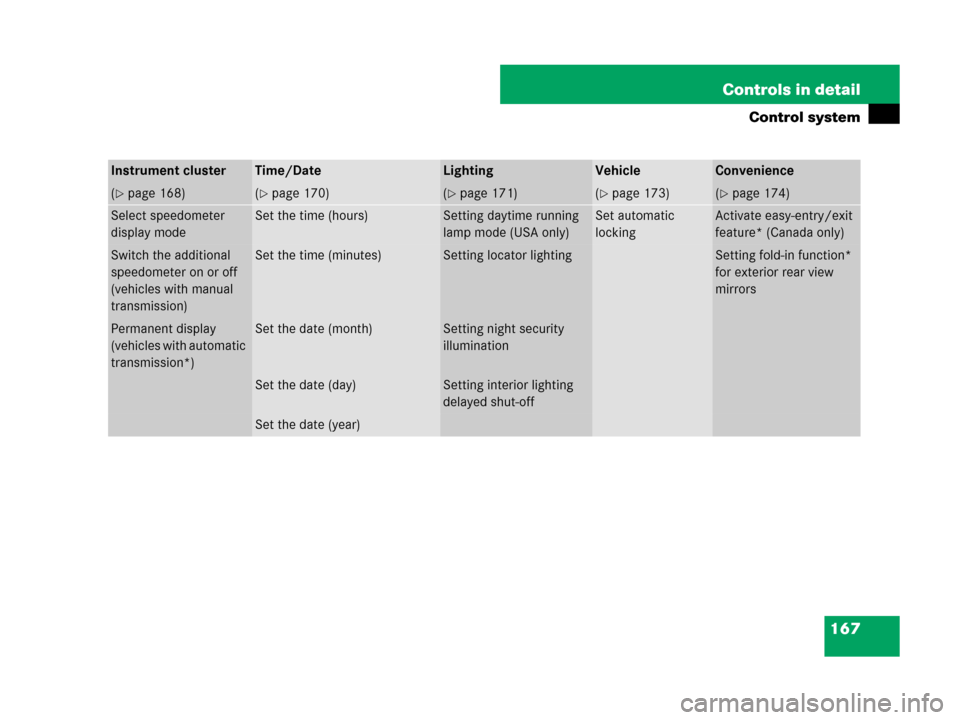
Instrument clusterTime/DateLightingVehicleConvenience
(�page 168)(�page 170)(�page 171)(�page 173)(�page 174)
Select speedometer
display modeSet the time (hours)Setting daytime running
lamp mode (USA only)Set automatic
lockingActivate easy-entry/exit
feature* (Canada only)
Switch the additional
speedometer on or off
(vehicles with manual
transmission)Set the time (minutes)Setting locator lightingSetting fold-in function*
for exterior rear view
mirrors
Permanent display
(vehicles with automatic
transmission*)Set the date (month)Setting night security
illumination
Set the date (day)Setting interior lighting
delayed shut-off
Set the date (year)
Page 169 of 509

168 Controls in detail
Control system
Instrument cluster submenu
Access the
Instr. Cluster submenu via
the
Settings menu. Use the Instr. Clus-
ter
submenu to change the instrument
cluster display settings.
The following functions are available:
Select speedometer display mode
�Press % or $ to select the
Instr. Cluster submenu.
�Press #.
�Press % or $ to select Display
Unit Speed-/odometer
function.The selection marker is on the current
setting.
�Press % or $ to set speedome-
ter unit to
km ormiles.
�Press # to confirm the setting.
The selected display unit is valid for:
�Odometer and trip odometer
�Trip computer
�Digital speedometer in the trip menu
�Cruise controlSelect language
Selecting the language for the multifunc-
tion display is only possible with the Audio
system (
�page 193) or with COMAND*.
Vehicles with COMAND*: Refer to sepa-
rate operating instructions.
The language select in the Audio system or
COMAND* is also used for the displays
and messages in the multifunction display.
Available languages:
�German
�English
�Spanish
�French
�Italian
FunctionPage
Select speedometer display
mode168
Switch the additional speedome-
ter on or off (vehicles with manu-
al transmission)169
Permanent display (vehicles with
automatic transmission*)169
Page 170 of 509

You can have an additional digital speed-
ometer shown on the multifunction dis-
pl")
169 Controls in detail
Control system
Showing or hiding additional
speedometer (vehicles with manual
transmission)
You can have an additional digital speed-
ometer shown on the multifunction dis-
play. The speed is shown in the unit of
kilometers/hour (USA) or miles/hour
(Canada).
�Press % or $ to select the
Instr. Cluster submenu.
�Press #.
�Press % or $ to select the Addi-
tional Speedometer
function.
�Press #.
The current setting is shown.
�Press # again if you would like to
change the current status.Depending on the previous status, the
additional speedometer will be
switched
On orOff.
Permanent display (vehicles with auto-
matic transmission*)
You can use the
Permanent Display func-
tion to choose to display either the outside
temperature or the speed in kilometers
(USA) or miles (Canada) permanently.
�Press % or $ to select the
Instr. Cluster submenu.
�Press #.
�Press % or $ to select the Per-
manent Display
function.
�Press #.
The current setting
Outside tempera-
ture
orSpeedometer (km/h)
(USA)/
Speedometer (miles) (Canada)
is shown.
�Press # again if you would like to
change the current status.
Depending on the previous status, the
Permanent Display will be switched
between
Outside temperature or
Speedometer (km/h) (USA)/Speedome-
ter (miles)
(Canada).
The selected display is then shown
continuously in the lower display.