Page 372 of 509

371 Operation
Vehicle care
Audio display
�If you need to clean the audio display
screen, use a standard microfiber cloth
and cleaning agent for TFT/LCD dis-
plays. After cleaning, dry and polish the
screen with a dry microfiber cloth.Steering wheel
�Wipe with a damp cloth and dry thor-
oughly or clean with Mercedes-Benz
approved Leather Care.
Carpets
�Use Mercedes-Benz approved Carpet
and Fabric Care for cleaning the car-
pets.Headliner and shelf below rear window
�Use a soft bristle brush or a dry-sham-
poo cleaner in case of excessive dirt.
Seat belts
�Only use clear, lukewarm water and
soap.
!You must switch off the audio display and al-
low it to cool prior to cleaning.
!Do not use thinners containing alcohol,
petrol or abrasive cleaning agents. These can
damage or even destroy the audio display
screen.
!The webbing must not be treated with
chemical cleaning agents. Do not dry the web-
bing at temperatures above 176°F (80°C) or in
direct sunlight.
Warning!G
Do not bleach or dye seat belts as this may
severely weaken them. In a crash they may
not be able to provide adequate protection.
Page 410 of 509
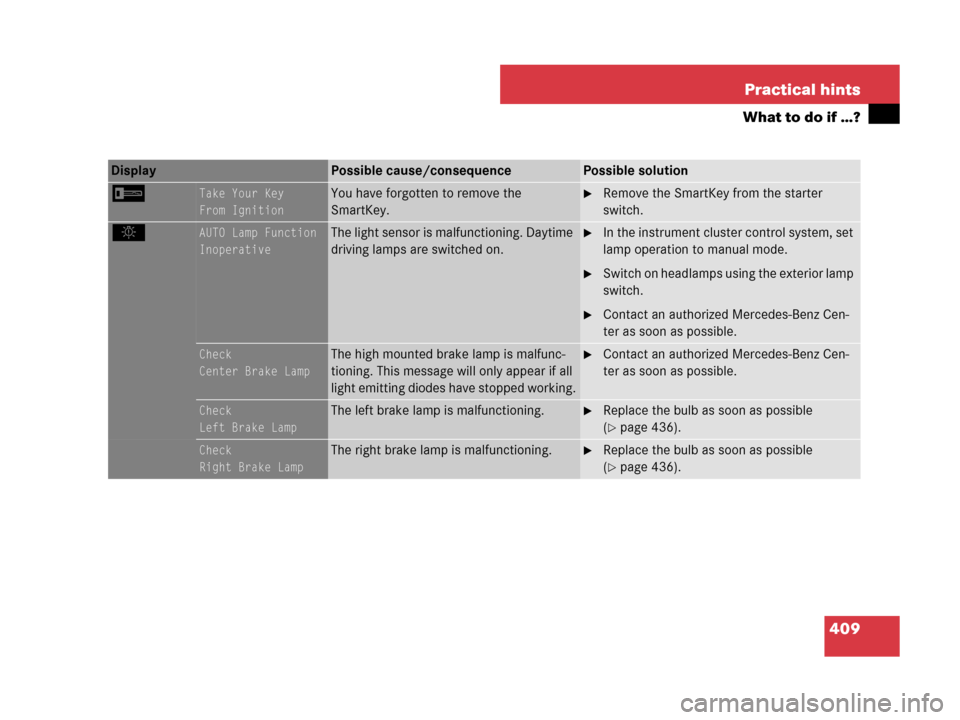
409 Practical hints
What to do if …?
ITake Your Key
From IgnitionYou have forgotten to remove the
SmartKey.�Remove the SmartKey from the starter
switch.
.AUTO Lamp Function
InoperativeThe light sensor is malfunctioning. Daytime
driving lamps are switched on.�In the instrument cluster control system, set
lamp operation to manual mode.
�Switch on headlamps using the exterior lamp
switch.
�Contact an authorized Mercedes-Benz Cen-
ter as soon as possible.
Check
Center Brake LampThe high mounted brake lamp is malfunc-
tioning. This message will only appear if all
light emitting diodes have stopped working.�Contact an authorized Mercedes-Benz Cen-
ter as soon as possible.
Check
Left Brake LampThe left brake lamp is malfunctioning.�Replace the bulb as soon as possible
(
�page 436).
Check
Right Brake LampThe right brake lamp is malfunctioning.�Replace the bulb as soon as possible
(
�page 436).
Display Possible cause/consequencePossible solution
Page 411 of 509

410 Practical hints
What to do if …?
Display Possible cause/consequencePossible solution
.Check Left
Cornering LightThe left-hand corner-illuminating lamp is
malfunctioning.�Contact an authorized Mercedes-Benz
Center as soon as possible.
Check Right
Cornering LightThe right-hand corner-illuminating lamp is
malfunctioning.�Contact an authorized Mercedes-Benz
Center as soon as possible.
Check
Left Fog LampThe left front fog lamp is malfunctioning.�Contact an authorized Mercedes-Benz Cen-
ter as soon as possible.
Check
Right Fog LampThe right front fog lamp is malfunctioning.�Contact an authorized Mercedes-Benz Cen-
ter as soon as possible.
Check
Rear Left
Fog LampThe left rear fog lamp is malfunctioning.�Contact an authorized Mercedes-Benz Cen-
ter as soon as possible.
Check
Left High BeamThe left high beam lamp is malfunctioning.�Replace the bulb as soon as possible
(
�page 433).
Check
Right High BeamThe right high beam lamp is malfunctioning.�Replace the bulb as soon as possible
(
�page 433).
Page 415 of 509
414 Practical hints
What to do if …?
Display Possible cause/consequencePossible solution
.Check
Left Mirror
Turn SignalThe turn signal in the left exterior rear view
mirror is malfunctioning. This message will
only appear if all light emitting diodes have
stopped working.�Have the LEDs replaced as soon as possible.
Check
Right Mirror
Turn SignalThe turn signal in the right exterior rear view
mirror is malfunctioning. This message will
only appear if all light emitting diodes have
stopped working.�Have the LEDs replaced as soon as possible.
Switch Off LightsYou are getting out of the vehicle and the
lights are still switched on.�Switch off the headlamps (�page 108).
Turn Lights Off
Or
Remove KeyThe exterior lamp switch is set to * and
you have forgotten to take out the
SmartKey. The parking lamps remain
switched on.�Switch off the headlamps (�page 108).
or
�Remove the SmartKey from the starter
switch.
Page 431 of 509
430 Practical hints
Replacing bulbs
Safe vehicle operation depends on proper
exterior lighting and signaling. It is there-
fore essential that all bulbs and lamp
assemblies are in good working order at all
times.Correct headlamp adjustment is extremely
important. Have headlamps checked and
readjusted at regular intervals and when a
bulb has been replaced. See an authorized
Mercedes-Benz Center for headlamp
adjustment.iIf the headlamps or front fog lamps are
fogged up on the inside as a result of high
humidity, driving the vehicle a distance with the
lights on should clear up the fogging.
iBackup bulbs will be brought into use when
lamps malfunction. Read and observe the mes-
sages in the multifunction display (
�page 413).
Page 433 of 509

432 Practical hints
Replacing bulbs
Notes on bulb replacement
�Only use 12 volt bulbs of the same type
and with the specified watt rating.
�Switch lights off before changing a bulb
to prevent short circuits.
�Always use a clean lint-free cloth when
handling bulbs.
�Your hands should be dry and free of oil
and grease.
�If the newly installed bulb does not
come on, visit an authorized
Mercedes-Benz Center.Have the LEDs and bulbs for the following
lamps replaced at an authorized
Mercedes-Benz Center.
�Additional turn signal lamps in the exte-
rior rear view mirrors
�High mounted brake lamp
�Bi-Xenon* lamps
�Front fog lamps
�Front side marker lamps
�License plate lamps
Replacing bulbs for front lamps
Before you start to replace a bulb for a
front lamp, do the following first:
�Turn the exterior lamp switch to
positionM (
�page 108).
�Open the hood (�page 325).
Warning!G
Keep bulbs out of reach of children.
Bulbs and bulb sockets can be very hot. Al-
low the lamp to cool down before changing
a bulb.
Halogen lamps contain pressurized gas. A
bulb can explode if you:
�touch or move it when hot
�drop the bulb
�scratch the bulb
Wear eye and hand protection.
Because of high voltage in Xenon lamps, it is
dangerous to replace the bulb or repair the
lamp and its components. We recommend
that you have such work done by a qualified
technician.!Do not replace the LEDs yourself. You could
otherwise damage the LEDs or parts of the
vehicle. Only have the LEDs replaced at an au-
thorized Mercedes-Benz Center.
Page 438 of 509

437 Practical hints
Replacing bulbs
Tail lamp unit
�Open trunk lid.
�For driver side: Lift up the bottom and
pull out the trim panel covering the
driver side rear light.
�For passenger side: Open the fuse box
in the trunk (
�page 458).
1Tabs
2Connector
�Disconnect electrical connector2.
�Pull tabs1 in direction of arrows.
�Remove the bulb carrier.1Side marker lamp
2Rear fog lamp (driver’s side)/Side
marker lamp
3Backup lamp
4Brake lamp/tail lamp
5Parking and standing lamp, brake
lamp/tail lamp
6Turn signal lamp
�Press gently onto the respective bulb
and turn counterclockwise out of its
bulb socket.
Side marker lamp1: Turn the bulb
socket on backside of tail lamp unit
counterclockwise and removes side
marker lamp1 with bulb socket
�Press the new bulb gently into its bulb
socket and turn clockwise until it
engages.
Side marker lamp1: Turn the new
bulb with socket on backside of tail
lamp unit clockwise until it engages.
�Reinstall the bulb carrier.
Let tabs1 (
�page 437) engage.
�Connect the electrical connector2
(
�page 437) until it engage.
�Reinstall trim panel.
License plate lamp
Since replacing the license plate lamp
bulbs is a technically highly demanding
process, we recommend you have the li-
cense plate lamp bulbs replaced at an au-
thorized Mercedes-Benz Center.
Page 443 of 509

442 Practical hints
Flat tire
�Prevent the vehicle from rolling away
by blocking wheels with wheel chocks
or other sizeable objects.
One wheel chock is included with the
vehicle tool kit (
�page 422).
Changing wheel on a level surface
Changing rear wheel on passenger side
(Example illustration)
�Place the wheel chock in front of and
another sizeable object behind the
wheel that is diagonally opposite to the
wheel being changed.Changing wheel on a slight decline
Always try lifting the vehicle using the jack
on a level surface. However, should
circumstances require you to do so on a
slight decline, place the wheel chock and
another sizeable object as follows:
Changing wheel on passenger side
(Example illustration)
�Place wheel chock (or another sizeable
object) in front of both wheels on the
side opposite to the side on which the
wheel is to be changed.Changing wheel on a slight incline
Always try lifting the vehicle using the jack
on a level surface. However, should
circumstances require you to do so on a
slight incline, place the wheel chock and
another sizeable object as follows:
Changing wheel on passenger side
(Example illustration)
�Place wheel chock (or another sizeable
object) behind both wheels on the side
opposite to the side on which the wheel
is to be changed.