Page 295 of 509
294 Controls in detail
Useful features
Floormats*
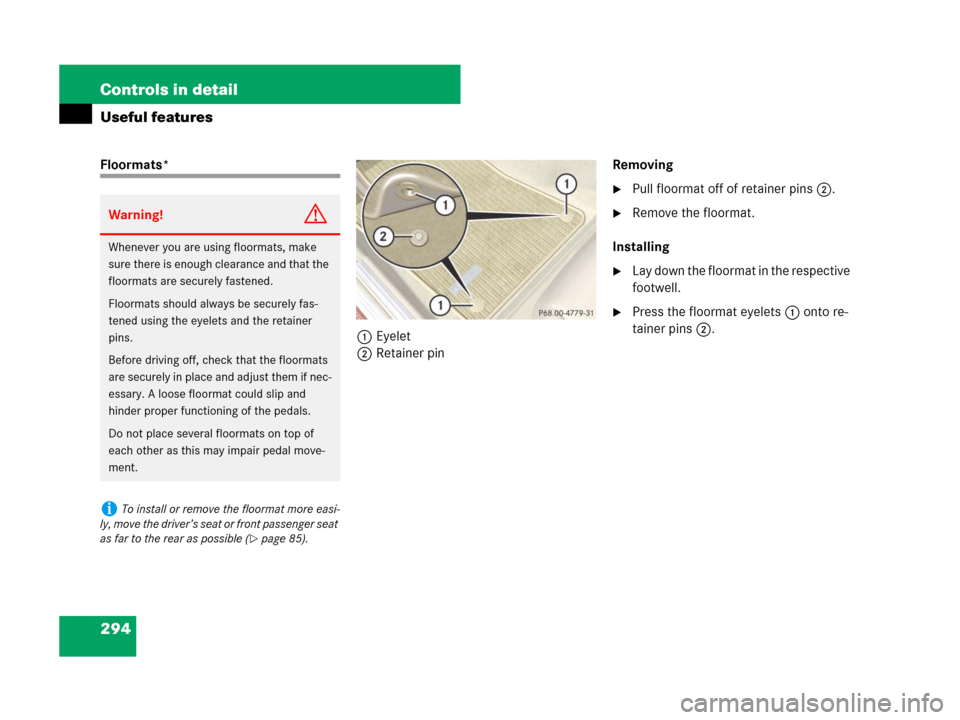
1Eyelet
2Retainer pinRemoving
�Pull floormat off of retainer pins2.
�Remove the floormat.
Installing
�Lay down the floormat in the respective
footwell.
�Press the floormat eyelets1 onto re-
tainer pins2.
Warning!G
Whenever you are using floormats, make
sure there is enough clearance and that the
floormats are securely fastened.
Floormats should always be securely fas-
tened using the eyelets and the retainer
pins.
Before driving off, check that the floormats
are securely in place and adjust them if nec-
essary. A loose floormat could slip and
hinder proper functioning of the pedals.
Do not place several floormats on top of
each other as this may impair pedal move-
ment.
iTo install or remove the floormat more easi-
ly, move the driver’s seat or front passenger seat
as far to the rear as possible (
�page 85).
Page 319 of 509
.
Standing waterPassenger compartment
Driving abroad
Abroad, there is an extensive
Mer")
318 Operation
Driving instructions
For more information on winter driving, see
“Winter driving” (
�page 360).
Standing waterPassenger compartment
Driving abroad
Abroad, there is an extensive
Mercedes-Benz service network at your
disposal. If you plan to drive into areas
which are not listed in the index of your
Mercedes-Benz Center directory, you
should request pertinent information from
an authorized Mercedes-Benz Center.
Warning!G
If the vehicle becomes stuck in snow, make
sure that snow is kept clear of the exhaust
pipe and from around the vehicle while the
engine is running. Otherwise, deadly carbon
monoxide (CO) gases may enter vehicle in-
terior resulting in unconsciousness and
death.
To assure sufficient fresh air ventilation,
open a window slightly on the side of the ve-
hicle not facing the wind.
Warning!G
The outside temperature indicator is not de-
signed to serve as an ice-warning device and
is therefore unsuitable for that purpose. In-
dicated temperatures just above the freez-
ing point do not guarantee that the road
surface is free of ice.
!Do not drive through flooded areas or water
of unknown depth. Before driving through water,
determine its depth. Never accelerate before
driving into water. The bow wave could force wa-
ter into the engine and auxiliary equipment, thus
damaging them.
If you must drive through standing water, drive
slowly to prevent water from entering the pas-
senger compartment or the engine compart-
ment. Water in these areas could cause damage
to electrical components or wiring of the engine
or transmission, or could result in water being in-
gested by the engine through the air intake caus-
ing severe internal engine damage. Any such
damage is not covered by the Mercedes-Benz
Limited Warranty.
Warning!G
Always fasten items being carried as secure-
ly as possible.
In an accident, during hard braking or sud-
den maneuvers, loose items will be thrown
around inside the vehicle, and cause injury
to vehicle occupants unless the items are
securely fastened in the vehicle.
The trunk is the preferred place to carry
objects.
Page 327 of 509

326 Operation
Engine compartment
The hood lock release lever is located to
the left of the steering wheel under the
dashboard.
1Release lever
�Pull release lever 1 downwards.
The hood is unlocked.2Lever for opening the hood
�Push lever2 under the hood upwards.
�Pull up on the hood and then release it.
The hood will be automatically held
open at shoulder height by gas-filled
struts. Closing
�Let the hood drop from a height of ap-
proximately 1 ft (30 cm).
The hood will lock audibly.
�Check to make sure the hood is fully
closed.
If you can raise the hood at a point
above the headlamps, then it is not
properly closed. Open it again and let it
drop with somewhat greater force.
!To avoid damage to the windshield wipers or
hood, never open the hood if the wiper arms are
folded forward away from the windshield.
Warning!G
When closing the hood, use extreme caution
not to catch hands or fingers.
Be careful that you do not close the hood on
anyone.
Make sure the hood is securely engaged be-
fore driving off. Do not continue driving if the
hood can no longer engage after an acci-
dent, for example. The hood could otherwise
come loose while the vehicle is in motion
and endanger you and/or others.
Page 396 of 509

395 Practical hints
What to do if …?
Display Possible cause/consequencePossible solution
Front Passenger
Airbag Enabled
See Operator’s Manu-
alFront passenger front air bag is
activated while driving even
though a child, small individual,
or object below the system’s
weight threshold is on the front
passenger seat, or the front pas-
senger seat is empty. Objects
on the seat or forces acting on
the seat may make the system
sense supplemental weight.Stop the vehicle in a safe location as soon as possible and check the front
passenger seat for the following:
�Switch off the ignition (�page 82).
�Remove child and child restraint from front passenger seat and properly
secure the child in rear seat employing the child restraint if necessary.
�Make sure no objects which apply forces to the seat are present (e.g.
objects such as books, briefcases etc. lodged behind or around the
seat, head restraints pushing against roof, etc.). The system may recog-
nize such forces as supplemental weight and sense that an occupant on
the front passenger seat is of a greater weight than actually present.
�Keep the seat unoccupied, close the front passenger door and switch
on the ignition (
�page 82).
Monitor the
5/indicator lamp right of the instrument cluster
(
�page 45) and the multifunction display in the instrument cluster
(
�page 151) for the following:
(Continued on next page)
Page 424 of 509
423 Practical hints
Where will I find ...?
Removing the Minispare wheel
�Remove vehicle tool kit1
(
�page 421).
�Turn luggage bowl2 counterclock-
wise and remove it.
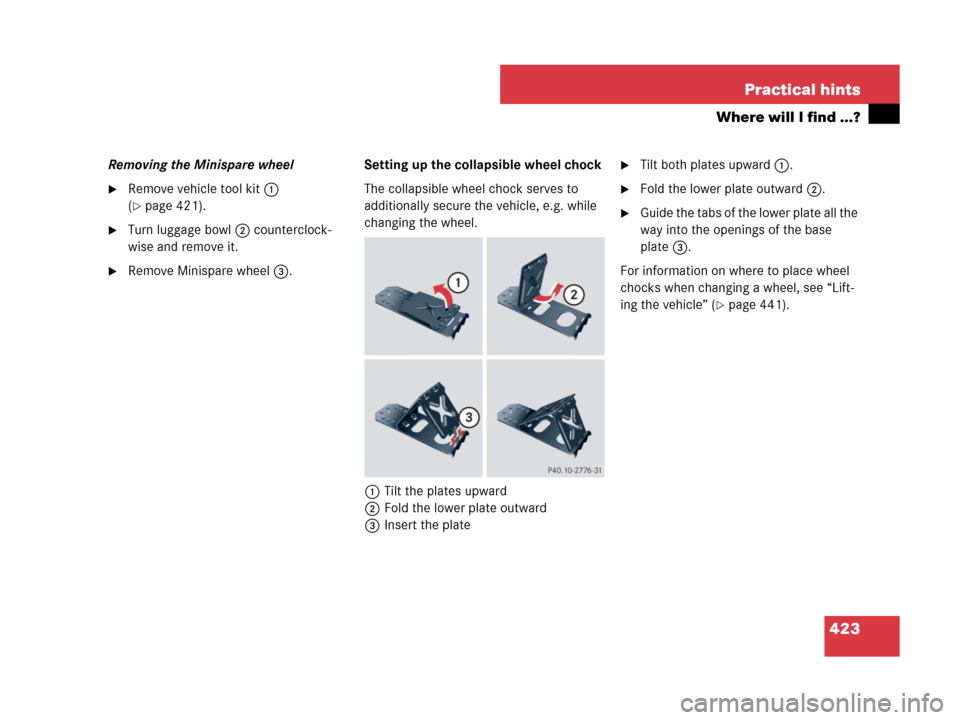
�Remove Minispare wheel3.Setting up the collapsible wheel chock
The collapsible wheel chock serves to
additionally secure the vehicle, e.g. while
changing the wheel.
1Tilt the plates upward
2Fold the lower plate outward
3Insert the plate
�Tilt both plates upward1.
�Fold the lower plate outward2.
�Guide the tabs of the lower plate all the
way into the openings of the base
plate3.
For information on where to place wheel
chocks when changing a wheel, see “Lift-
ing the vehicle” (
�page 441).
Page 448 of 509

447 Practical hints
Battery
1Filter box
2Clamps
�Removing filter box: Release
clamps2.
�Remove filter box.
�Installing filter box: Insert filter box
properly.
�Secure it with clamps2.
Warning!G
Failure to follow these instructions can re-
sult in severe injury or death.
Observe all safety instructions and
precautions when handling automotive
batteries (
�page 446).
Never lean over batteries while connecting,
you might get injured.
Battery fluid contains sulfuric acid. Do not
allow this fluid to come in contact with eyes,
skin or clothing. In case it does, immediately
flush affected area with water and seek
medical help if necessary.
A battery will also produce hydrogen gas,
which is flammable and explosive. Keep
flames or sparks away from battery, avoid
improper connection of jumper cables,
smoking, etc.
!Never loosen or detach battery terminal
clamps while the engine is running or the
SmartKey is in the starter switch. Otherwise the
alternator and other electronic components
could be severely damaged.
Have the battery checked regularly at an autho-
rized Mercedes-Benz Center.
Refer to Maintenance Booklet for maintenance
intervals or contact an authorized
Mercedes-Benz Center for further information.
Warning!G
Do not place metal objects on the battery as
this could result in a short circuit.
Use leak-proof batteries only to avoid the
risk of acid burns in the event of an
accident.
!Do not connect any consumers directly to
the battery or it will be discharged.
Page 450 of 509

449 Practical hints
Battery
Removing the battery
�Remove the screw securing the
battery.
�Remove the battery support and
bracket.
�Pull out the battery ventilation hose4
from the battery (depending on battery
arrangement in your vehicle model, the
ventilation hose is located either on the
left or right side of the battery).
�Take out the battery.
Charging and reinstalling the battery�Charge battery in accordance with the
instructions of the battery charger
manufacturer.
�Reinstall the charged battery. Follow
the previously described steps in
reverse order.
iFor your convenience, have the starter bat-
tery removed by a Mercedes-Benz Center.
Warning!G
Never charge a battery while still installed in
the vehicle unless the accessory battery
charge unit approved by Mercedes-Benz is
being used. Gases may escape during charg-
ing and cause explosions that may result in
paint damage, corrosion or personal injury.
An accessory battery charge unit specially
adapted for Mercedes-Benz vehicles and
tested and approved by Mercedes-Benz is
available, permitting the charging of the bat-
tery in its installed position. Contact an au-
thorized Mercedes-Benz Center for
information and availability. Charge battery
in accordance with the separate instruc-
tions for the accessory battery charger.
!Only use charging devices with a maximum
charging voltage of 14.8 V.
!The battery, its filler caps and the ventilation
hose
4 must always be securely installed when
the vehicle is in operation.
Page 457 of 509
 and
systems secured by that fuse will stop op-")
456 Practical hints
Fuses
The electrical fuses in your vehicle serve to
switch off malfunctioning power circuits.
If a fuse is blown, the component(s) and
systems secured by that fuse will stop op-
erating.If a newly inserted fuse blows again, have
the cause determined and rectified at an
authorized Mercedes-Benz Center.
A fuse chart explains the fuse allocation
and fuse amperages. It is located in the
main fuse box in the passenger compart-
ment (
�page 457).
The electrical fuses are located in different
fuse boxes:
�Fuse box in passenger compartment
(
�page 457)
�Fuse box in engine compartment
(
�page 457)
�Fuse box in trunk (�page 458)Before replacing fuses:
�Depress the parking brake
(
�page 134).
�Make sure the manual transmission is
in Neutral (
�page 136), automatic
transmission* is set to P (
�page 140).
The gear position indicator in the ta-
chometer display should be on P.
�Turn off all electrical consumers.
�Turn off the engine (�page 134).
�Remove the SmartKey from the starter
switch.
Vehicles with KEYLESS-GO*
(Canada only):
�Open the driver’s door.
Warning!G
Only use fuses approved by Mercedes-Benz
with the specified amperage for the system
in question and do not attempt to repair or
bridge a blown fuse. Using other than ap-
proved fuses or using repaired or bridged
fuses may cause an overload leading to a
fire, and/or cause damage to electrical
components and/or systems. Have the
cause determined and remedied at an au-
thorized Mercedes-Benz Center.
iA blown fuse must be replaced by an appro-
priate spare fuse (recognizable by its color or the
fuse rating given on the fuse) of the amperage
recommended in the fuse chart.
Any Mercedes-Benz Center will be glad to advise
you on this subject.
!Switch off the vehicle’s internal electrical
functions (
�page 448) when you are working on
the fuses.
iIn case of a blown fuse contact Roadside
Assistance or an authorized Mercedes-Benz
Center.