Page 181 of 509

180 Controls in detail
Audio system
Audio display
The audio display has a protective cover.Audio display cover
1Opening button�Opening: Press opening button1.
The audio display cover opens, the au-
dio display is visible, and the audio sys-
tem switched on.
�Closing: Press the audio display cover
down until it engages.
If the audio system is still switched on,
you can continue to listen to the radio
or a CD and operate the device via the
buttons on the audio control panel.
!Do not place any objects on the cover of the
audio display. This may obstruct the movement
when the cover is being opened/closed. The
cover could be damaged. Do not place any ob-
jects in front of the audio display and/or secure
any objects to the audio display itself. The audio
display could be damaged.
Avoid touching the audio display at all times. The
display has a very sensitive high-gloss surface,
there is a risk of it being scratched. Do not press
directly in the display face. Otherwise, the audio
display will be damaged.
iFor information about cleaning and care of
the audio display, see “Audio display”
(
�page 371).
iYou cannot operate the audio system via the
audio controller when the protective cover is
closed.
Page 229 of 509

228 Controls in detail
Audio system
With keypad on audio control unit:
�Entering passcode: Press the desired
numbers on the keypad.
�Confirming passcode: Press
buttons or buttonô in the au-
dio control unit to confirm.
�Deleting digits: Briefly press
buttonî in the audio control unit to
delete one number, or press and hold
buttonî to delete all entered num-
bers.
�Canceling entry: Press buttoní in
the center console (
�page 184).Entering passcode into the telephone
If a Bluetooth
® connection is established
successfully, you will be prompted to enter
a code into the telephone (see the operat-
ing instructions for the telephone).
�Enter the same passcode on the tele-
phone as you did on the audio system.
The device is authorized. You can now
make calls via the audio system hands-free
device using the authorized telephone.External authorization
If the audio system cannot find your tele-
phone, this may be due to special security
settings on your telephone. In this case,
you can check whether, conversely, your
telephone can find the audio system. The
audio systems Bluetooth® device name is
“MB Bluetooth”.
�h � Tel � Phone List � Update
�
Options � External Authoriza-
tion
.
�Start Bluetooth® search procedure on
the telephone (see the operating in-
structions for the telephone).
�Select the audio system (“MB Blue-
tooth”).
�When prompted to do so, enter the
passcode on the telephone and then on
the audio system.
iYou may need to enter a confirmation once
you have entered the passcode on your phone.
Check your phone display.
If the message
Authorization Procedure
Unsuccessful
appears on the audio system
display, you may have exceeded the preset peri-
od for authorization. Repeat the process.
Page 243 of 509
 or 5 mph increments
(past resistance point)
(Canada: 1 km/h or 10 km/h)")
242 Controls in detail
Driving systems
1Setting current or higher speed
Adjustment in 1 mph increments (to re-
sistance point) or 5 mph increments
(past resistance point)
(Canada: 1 km/h or 10 km/h)
2Setting current or lower speed
Adjustment in 1 mph increments (to re-
sistance point) or 5 mph increments
(past resistance point)
(Canada: 1 km/h or 10 km/h)
3Cancel cruise control
4Resume to last set speedActivating cruise control
You can activate the cruise control if the
vehicle speed is above 20 mph (30 km/h).
In the following cases you cannot activate
the cruise control:
�when you brake
�the vehicle is secured with the parking
brake
�Vehicles with automatic transmission*:
when the gear selector lever is set to
positionP, R, or N
�when ESP® is switched offSetting current speed
�Accelerate or decelerate to the desired
speed.
�Briefly lift the cruise control lever in
direction of arrow1 or depress in
direction of arrow2.
The current speed is set.
�Remove your foot from the accelerator
pedal.
The cruise control is activated.
�The last set speed appears in the
multifunction display for approxi-
mately 5 seconds.
�The corresponding speedometer
segments from the selected speed
to the vehicle maximum speed in
the multifunction display are illumi-
nated.iThe vehicle speed displayed in the speedom-
eter can briefly vary from the speed setting for
the cruise control system.
Page 282 of 509
281 Controls in detail
Loading and storing
Split rear bench seat*
To expand the cargo area, you can fold
down the left and right rear seat backrests.
The two sections can be folded down
separately.Folding the backrest forward
The release handles1 is located in the
trunk.
1Release handle
�Open the trunk.
�Pull on left and/or right release
handle1.
�Fully retract the head restraints
(
�page 89).
�If necessary, pull the driver's and/or
front-passenger seat forward.2Rear seat backrests
�Fold rear seat backrests2 forward.
Warning!G
When expanding the luggage compartment,
always fold the seat cushions fully forward.
Unless you are transporting cargo, the back-
rests must remain properly locked in the up-
right position.
In an accident, during hard braking or sud-
den maneuvers, loose items will be thrown
around inside the vehicle, and cause injury
to vehicle occupants unless the items are
securely fastened in the vehicle.
Page 283 of 509

282 Controls in detail
Loading and storing
Setting up rear seat backrest
1Rear seat backrests
�Fold backrest1 rearward until it en-
gages.
�Check for secure locking by pushing
and pulling on the backrest.
Loading instructions
The total load weight including vehicle
occupants and luggage/cargo should not
exceed the load limit or vehicle capacity
weight as indicated on the corresponding
placard located on the driver’s door B-pillar
(
�page 334).
The handling characteristics of a fully load-
ed vehicle depend greatly on the load dis-
tribution. It is therefore recommended to
load the vehicle according to the illustra-
tions shown, with the heaviest items being
placed towards the front of the vehicle.
!Take care not to clamp the seat belt.
Warning!G
Always lock backrest in its upright position
when rear seat bench is occupied, or the ex-
tended trunk compartment is not in use.
Check for secure locking by pushing and
pulling on the backrest.
In an accident, during hard braking or sud-
den maneuvers, loose items will be thrown
around inside the vehicle, and cause injury
to vehicle occupants unless the items are
securely fastened in the vehicle.
To help avoid personal injury during a colli-
sion or sudden maneuver, exercise care
when transporting cargo.
iTo prevent unauthorized persons from ac-
cess to the trunk, always lock backrest in its up-
right position.
Page 284 of 509

283 Controls in detail
Loading and storing
Always place items being carried against
front or rear seat backrests, and fasten
them as securely as possible.
The heaviest portion of the cargo should al-
ways be kept as low as possible since it in-
fluences the handling characteristics of
the vehicle.Storage compartments
Warning!G
Always fasten items being carried as secure-
ly as possible using cargo tie-down hooks
and fastening materials appropriate for the
weight and size of the load.
In an accident, during hard braking or sud-
den maneuvers, loose items will be thrown
around inside the vehicle and can cause in-
jury to vehicle occupants unless the items
are securely fastened in the vehicle.
To help avoid personal injury during a colli-
sion or sudden maneuver, exercise care
when transporting cargo. Put luggage or car-
go in the trunk if possible.
Do not pile luggage or cargo higher than the
seat backs. Do not place anything on the
rear-window shelf.
Never drive vehicle with trunk open. Deadly
carbon monoxide (CO) gases may enter ve-
hicle interior resulting in unconsciousness
and death.
iThe trunk is the preferred place to carry ob-
jects.
The enlarged cargo area should only be used for
items which do not fit in the trunk alone.
Warning!G
To help avoid personal injury during a colli-
sion or sudden maneuver, exercise care
when storing objects in the vehicle. Put lug-
gage or cargo in the trunk if possible. Do not
pile luggage or cargo higher than the seat
backs.
Parcel nets cannot secure hard or heavy ob-
jects.
Keep compartment lids closed. This will help
to prevent stored objects from being thrown
about and injuring vehicle occupants during
�braking
�vehicle maneuvers or
�an accident.
iAn overview of the storage compartments
can be found on (
�page 22).
Page 289 of 509
288 Controls in detail
Loading and storing
�Closing: Open the armrest storage
compartment.
�Swing cup holder2 backward until it
engaged.
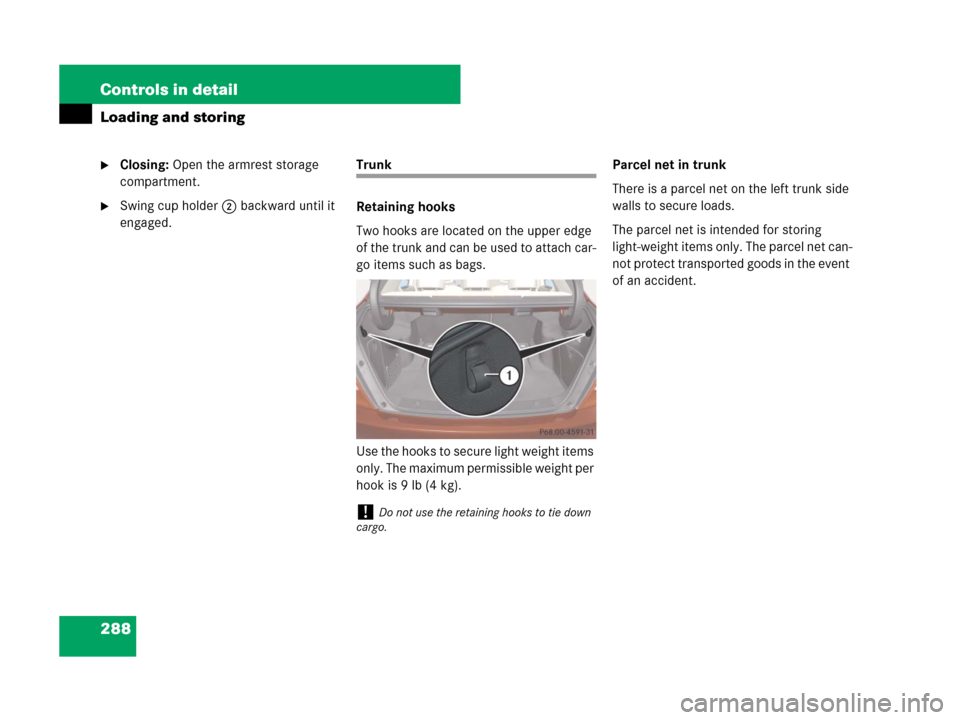
Trunk
Retaining hooks
Two hooks are located on the upper edge
of the trunk and can be used to attach car-
go items such as bags.
Use the hooks to secure light weight items
only. The maximum permissible weight per
hook is 9 lb (4 kg).Parcel net in trunk
There is a parcel net on the left trunk side
walls to secure loads.
The parcel net is intended for storing
light-weight items only. The parcel net can-
not protect transported goods in the event
of an accident.
!Do not use the retaining hooks to tie down
cargo.
Page 292 of 509
291 Controls in detail
Useful features
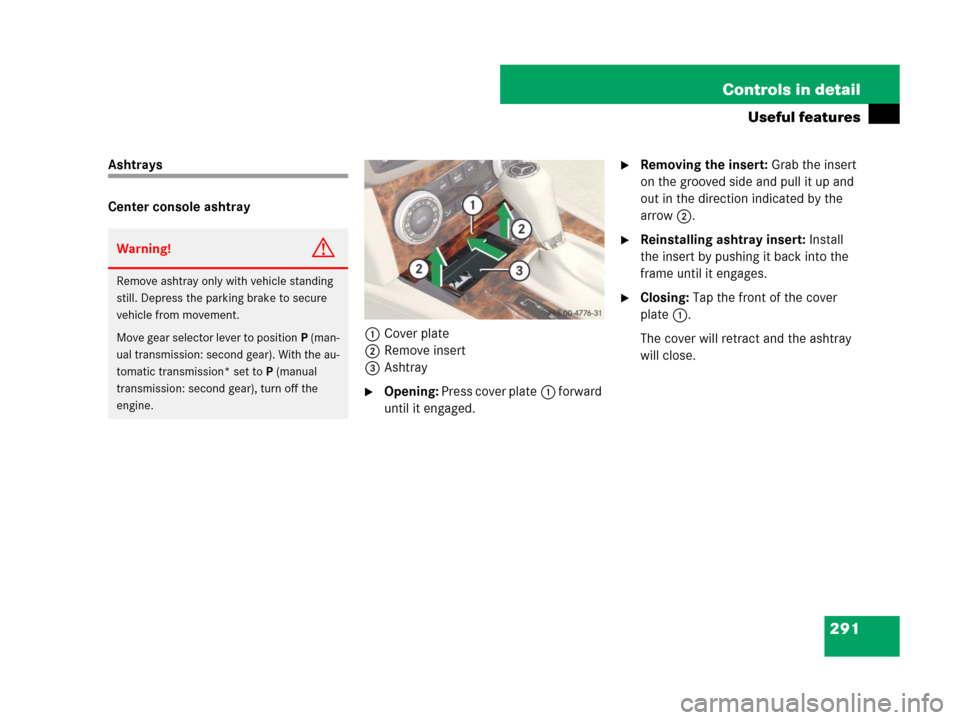
Ashtrays
Center console ashtray
1Cover plate
2Remove insert
3Ashtray
�Opening: Press cover plate1 forward
until it engaged.
�Removing the insert: Grab the insert
on the grooved side and pull it up and
out in the direction indicated by the
arrow2.
�Reinstalling ashtray insert: Install
the insert by pushing it back into the
frame until it engages.
�Closing: Tap the front of the cover
plate1.
The cover will retract and the ashtray
will close.
Warning!G
Remove ashtray only with vehicle standing
still. Depress the parking brake to secure
vehicle from movement.
Move gear selector lever to positionP (man-
ual transmission: second gear). With the au-
tomatic transmission* set toP (manual
transmission: second gear), turn off the
engine.