2008 MERCEDES-BENZ A-CLASS HATCHBACK warning
[x] Cancel search: warningPage 165 of 305

Features
162 objects being thrown around the vehicle
interior in the event of sharp braking, a sud-
den change in direction or an accident.
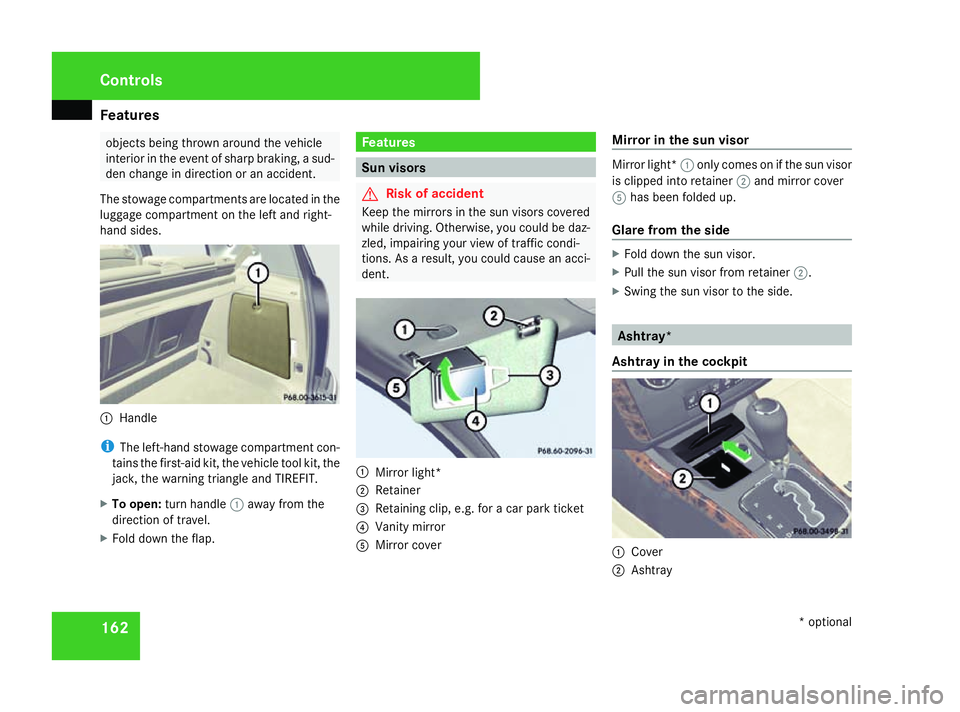
The stowage compartments are located in the
luggage compartment on the left and right-
hand sides. 1
Handle
i The left-hand stowage compartment con-
tains the first-aid kit, the vehicle tool kit, the
jack, the warning triangle and TIREFIT.
X To open: turn handle 1away from the
direction of travel.
X Fold down the flap. Features
Sun visors
G
Risk of accident
Keep the mirrors in the sun visors covered
while driving. Otherwise, you could be daz-
zled, impairing your view of traffic condi-
tions. As a result, you could cause an acci-
dent. 1
Mirror light*
2 Retainer
3 Retaining clip, e.g. for a car park ticket
4 Vanity mirror
5 Mirror cover Mirror in the sun visor Mirror light*
1only comes on if the sun visor
is clipped into retainer 2and mirror cover
5 has been folded up.
Glare from the side X
Fold down the sun visor.
X Pull the sun visor from retainer 2.
X Swing the sun visor to the side. Ashtray*
Ashtray in the cockpit 1
Cover
2 Ashtray Cont
rols
* optional
169_AKB; 2; 4, en-GB
wdomann,
Version: 2.10.6
2008-07-16T08:52:06+02:00 - Seite 162 Dateiname: 6515_0315_02_buchblock.pdf; preflight
Page 181 of 305

Tyres and wheels
178 MOExtended run-flat system*
The MOExtended run-flat system allows you
to continue driving the vehicle even when one
or more tyres lose all air pressure.
The MOExtended run-flat system may only be
used in combination with the tyre pressure
loss warning system and only on wheels spe-
cifically tested and approved by Mercedes-
Benz.
i Vehicles with MOExtended run-flat sys-
tem are not equipped with the TIREFIT
kit* 24
.
Therefore, it is recommended that you
equip your vehicle additionally with the
TIREFIT kit* when fitting tyres that do not
feature run-flat properties, e.g. winter
tyres.
i A TIREFIT kit* is available from any quali-
fied specialist workshop, e.g. a Mercedes-
Benz Service Centre.
You will find notes on driving with a flat tyre
in the "Practical advice" section
(Y page 262). Tyr
e tread G
Risk of accident
Bear in mind that:
R tyre grip decreases rapidly on wet roads
when the tread depth is less than 3 mm.
Thus, you should replace tyres that have
insufficient tread.
R winter tyres should be replaced when the
tread depth is 4 mm or less as they will
no longer provide adequate grip.
R the tread on a tyre may not wear evenly.
Thus, you should regularly check the
tread depth and the condition of the
tread across the entire width of all tyres.
If necessary, turn the steering wheel so
that you can see the tyre tread more eas-
ily.
Otherwise, you could lose control of the
vehicle and cause an accident due to the
reduced grip of the tyres on the road. Tyre pressures
i You will find a table of tyre pressures for
various operating conditions on the inside
of your vehicle's fuel filler flap.
The valid value for the spare wheel* is sta-
ted on the spare wheel and in the technical
data section. G
Risk of accident
Tyre pressure that is either too high or too
low has a negative effect on the vehicle’s
driving safety, which could lead you to
cause an accident. Therefore, you should
regularly check the pressure of all your
tyres (including the spare tyre *), particu-
larly prior to long trips, and correct the
pressure as necessary.
To test tyre pressure, use a suitable pressure
gauge. The outer appearance of a tyre does
not permit any reliable conclusion about the
tyre pressure. G
Risk of accident
Should the tyre pressure drop repeatedly:
24 Only for certain countries. Operation
* optional
169_AKB; 2; 4, en-GB
wdomann
,V ersion: 2.10.6
2008-07-16T08:52:06+02:00 - Seite 178 Dateiname: 6515_0315_02_buchblock.pdf; preflight
Page 182 of 305

Tyres and wheels
179R
Check the tyre for foreign bodies.
R Check whether the wheel is losing air or
the valve is leaking.
Tyre pressure that is too low has a negative
effect on the vehicle’s active safety, which
could lead to your causing an accident.
Tyre pressure changes by approximately
0.1 bar for every 10 °C change in ambient
temperature.
If you measure the tyre pressure in enclosed
spaces where the temperature differs from
the outside temperature, you will have to cor-
rect the measured value accordingly.
When the vehicle is driven, the tyre tempera-
ture, and with it the tyre pressure, will
increase depending on the road speed and
the load on the tyres.
Therefore, you should only correct tyre pres-
sures when the tyres are cold.
The pressure of warm tyres should only be
corrected if it is too low for the current oper-
ating conditions. Driving with tyre pressure that is too high or
too low can:
R
shorten the service life of the tyres
R increase the likelihood of tyre damage
R have a negative effect on handling charac-
teristics (e.g. by causing aquaplaning)
i The tyre pressure values given for low
loads are minimum values which offer you
good ride comfort characteristics.
However, you can also use the values given
for higher loads. These are permissible and
will not adversely affect the running of the
vehicle. H
Environmental note
Check the tyre pressure regularly, at least
every 14 days. Tyre pressure loss warning system
While the vehicle is in motion, the tyre pres-
sure loss warning system monitors the set
tyre pressure using the rotational speed of
the wheels. This enables the system to detect
significant pressure loss in a tyre. If the speed
of rotation of a wheel changes as a result of
a loss of pressure, a corresponding warning
message will appear in the multi-function dis-
play. G
Risk of accident
The tyre pressure loss warning system does
not warn you of an incorrectly set tyre pres-
sure. The table on the inside of the fuel filler
flap will help you decide whether the tyre
pressures should be corrected.
The tyre pressure loss warning system does
not replace the need to regularly check
your vehicle's tyre pressures, since an even
loss of pressure on several tyres at the
same time cannot be detected by the tyre
pressure loss warning system.
The tyre pressure loss warning system is
not able to warn you of a sudden loss of
pressure, e.g. if the tyre is penetrated by a
foreign object.
In the event of a sudden loss of pressure,
bring the vehicle to a halt by braking care- Operation
169_AKB; 2; 4, en-GB
wdomann,
Version: 2.10.6 2008-07-16T08:52:06+02:00 - Seite 179 ZDateiname: 6515_0315_02_buchblock.pdf; preflight
Page 183 of 305

Tyres and wheels
180 fully. Do not make any sudden steering
movements when doing so.
The function of the tyre pressure loss warning
system is limited or delayed if:
R snow chains are fitted to your vehicle's
tyres.
R road conditions are wintry.
R you are driving on sand or gravel.
R you adopt a very sporty driving style (cor-
nering at high speeds or driving with high
rates of acceleration).
R you are towing a very heavy or large trailer.
R you are driving with a heavy load (in the
vehicle or on the roof).
Restarting the tyre pressure loss warn-
ing system Restart the tyre pressure loss warning system
if you have:
R changed the tyre pressure
R changed the wheels or tyres
R fitted new wheels or tyres
X Before restarting, consult the table of tyre
pressures on the inside of the fuel filler flap
to ensure that the tyre pressure in all four tyres is set correctly for the operating con-
ditions concerned.
X Also observe the notes in the section on
tyre pressures ( Ypage 178). G
Risk of accident
The tyre pressure loss warning system can
only give reliable warnings if you have set
the correct tyre pressure.
If an incorrect tyre pressure is set, these
incorrect values will be monitored.
A tyre with insufficient pressure results in
vehicle instability when driving, thus
increasing the risk of an accident.
X Make sure that the key is in position
2(Y page 62) in the ignition lock.
You will see the following message on the
standard screen of the multi-function dis-
play (Y page 100)
X Press korj to select the tyre pres-
sure function:
Run Flat Indicator active
Menu: R-Button
X Press the reset button on the left of the
instrument cluster.
The following message appears in the
multi-function display: Restart Run Flat Indicat.? Yes Can-
cel
If you wish to confirm the restart:
X Press the æbutton.
The following message appears in the
multi-function display:
Run Flat Indicator restarted
After a teach-in period, the tyre pressure
loss warning system will monitor the set
tyre pressures of all four tyres.
If you wish to cancel the restart:
X Press the çbutton.
or
X Wait until the message
Restart Run Flat Indicator?
Yes Cancel disappears.
The tyre pressure values stored at the last
restart will continue to be monitored. Operation
169_AKB; 2; 4, en-GB
wdomann,
Version: 2.10.6
2008-07-16T08:52:06+02:00 - Seite 180 Dateiname: 6515_0315_02_buchblock.pdf; preflight
Page 184 of 305

Winter driving
181Interchanging the wheels
G
Risk of accident
Interchange the front and rear wheels only
if they have the same dimensions: for exam-
ple size, offset, etc.
After every wheel interchange/change,
have the tightening torque checked at a
qualified specialist workshop that has the
necessary specialist knowledge and tools
to carry out the work required. Mercedes-
Benz recommends that you use a
Mercedes-Benz Service Centre for this pur-
pose. In particular, work relevant to safety
or on safety-related systems must be car-
ried out at a qualified specialist workshop.
The wheels could work loose if they are not
tightened to a torque of 130 Nm.
For safety reasons, Mercedes-Benz recom-
mends that you only use wheel bolts of the
correct size which have been approved for
Mercedes-Benz vehicles.
The wear patterns on the front and rear tyres
differ, depending on the operating conditions.
Interchange the wheels before a clear wear
pattern has formed on the tyres. Front tyres
typically wear more on the shoulders and the
rear tyres in the centre. Interchange the wheels every 5,000 km to
10,000 km depending on the degree of tyre
wear, provided that the vehicle has the same
size front and rear tyres. Do not reverse the
direction of tyre rotation.
Clean the contact surfaces of the wheel and
the brake disc thoroughly every time a wheel
is changed. Check the tyre pressure and, if
necessary, restart the tyre pressure loss
warning system. Winter driving
Points to remember
Have your vehicle winterproofed at a qualified
specialist workshop, e.g. at a Mercedes-Benz
Service Centre, at the onset of winter. Winter tyres
Use winter tyres at temperatures below +7 °C
and on snow or ice-covered roads. Only then
can the effect of the ABS and ESP ®
driving
systems be ensured in winter too.
Use winter tyres of the same make and tread
on all wheels to maintain safe handling char-
acteristics. G
Risk of accident
Winter tyres with a tread depth of less than
4 mm must be replaced immediately. They
are no longer suitable for winter use and
can no longer provide sufficient grip. This
could cause you to lose control of your
vehicle and cause an accident.
Always observe the maximum permitted
speed specified for the winter tyres you have
fitted. If you fit winter tyres which have a
lower maximum permitted speed than that of
the vehicle, affix an appropriate warning sign Operation
169_AKB; 2; 4, en-GB
wdomann,
Version: 2.10.6 2008-07-16T08:52:06+02:00 - Seite 181 ZDateiname: 6515_0315_02_buchblock.pdf; preflight
Page 195 of 305

Care
192
time during which the battery is disconnec-
ted.
Maintaining the time-dependent service
schedule:
X Note down the service due date displayed
before disconnecting the battery.
or
X Subtract the battery disconnection periods
from the service date shown on the display
after reconnecting the battery. Fading out the service message
X
Press reset button 1. Service due date exceeded
The multi-function display shows one of the
following messages:
Service A overdue by .. days
Service A overdue by .. km
You will also hear a warning tone.
A qualified specialist workshop, e.g. a
Mercedes-Benz Service Centre, will reset the
ASSYST PLUS service indicator after the nec-
essary service work has been carried out.
i If you fail to have the service performed
by the specified date, you may be violating
applicable laws. Your warranty may be inva-
lidated and goodwill settlements may be
refused. Calling up the service due date
Use the buttons on the multi-function steer-
ing wheel.
X Switch on the ignition.
X Press the èorÿ button to select the
standard display (Y page 103).
X Press the jork button to select the
service information.
The multi-function display shows the
9 symbol and the service due date. Care
Notes on care
Regular and proper care maintains the value
of your vehicle.
i It is advisable to use Mercedes-Benz care
products.
Scratches, corrosive deposits, areas affected
by corrosion and damage caused by inade-
quate care cannot always be completely
repaired. In such cases, visit a qualified spe-
cialist workshop immediately, e.g. a
Mercedes-Benz Service Centre.
Repair damage caused by loose chippings
and remove the following substances imme-
diately, whilst avoiding rubbing too hard:
R Soak insect remains with insect remover
and rinse off afterwards.
R Soak bird droppings with water and rinse
off afterwards.
R Remove tree resin, oils, fuels and greases
by rubbing gently with a cloth soaked in
petroleum ether or lighter fluid.
R Use silicone remover to remove wax.
R Use tar remover to remove tar stains. Operation
169_AKB; 2; 4, en-GB
wdomann,
Version: 2.10.6
2008-07-16T08:52:06+02:00 - Seite 192 Dateiname: 6515_0315_02_buchblock.pdf; preflight
Page 203 of 305

Where will I find...?
200 Where will I find...?
Vehicle tool kit, TIREFIT kit, jack, first-
aid kit, warning triangle and folding
wheel chock
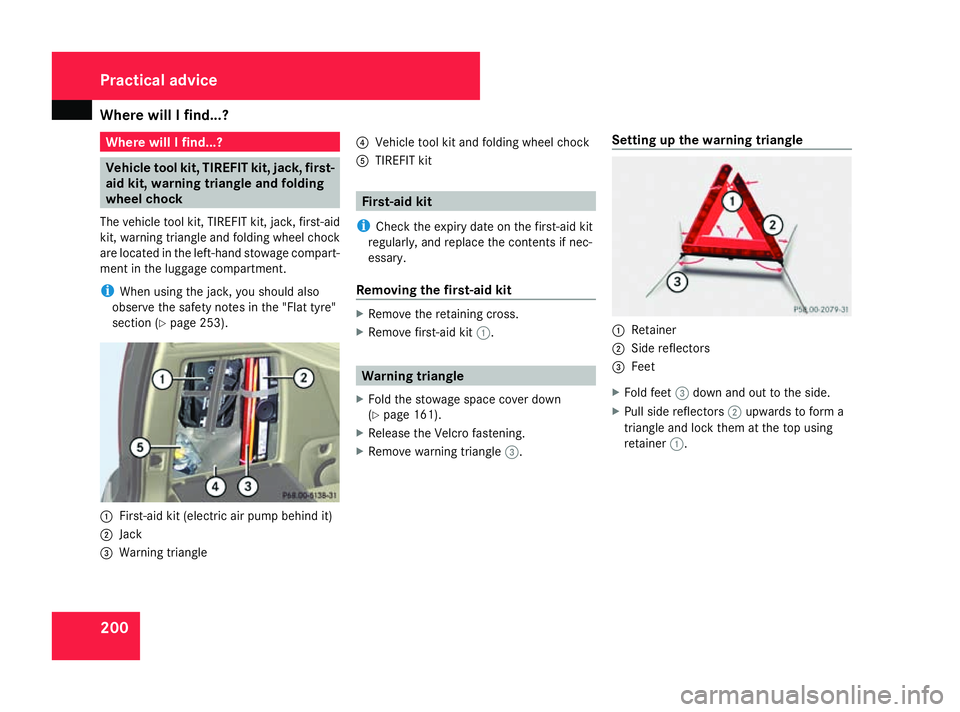
The vehicle tool kit, TIREFIT kit, jack, first-aid
kit, warning triangle and folding wheel chock
are located in the left-hand stowage compart-
ment in the luggage compartment.
i When using the jack, you should also
observe the safety notes in the "Flat tyre"
section (Y page 253). 1
First-aid kit (electric air pump behind it)
2 Jack
3 Warning triangle 4
Vehicle tool kit and folding wheel chock
5 TIREFIT kit First-aid kit
i Check the expiry date on the first-aid kit
regularly, and replace the contents if nec-
essary.
Removing the first-aid kit X
Remove the retaining cross.
X Remove first-aid kit 1. Warning triangle
X Fold the stowage space cover down
(Y page 161).
X Release the Velcro fastening.
X Remove warning triangle 3.Setting up the warning triangle 1
Retainer
2 Side reflectors
3 Feet
X Fold feet 3down and out to the side.
X Pull side reflectors 2upwards to form a
triangle and lock them at the top using
retainer 1. Practical advice
169_AKB; 2; 4, en-GB
wdomann,
Version: 2.10.6
2008-07-16T08:52:06+02:00 - Seite 200 Dateiname: 6515_0315_02_buchblock.pdf; preflight
Page 205 of 305

Display
messages 202
Vehi
cles without ECO start/stop func-
tion* 1
Retaining screw
2 Spare wheel/"Minispare" emergency
spare wheel
All vehicles X
Turn retaining screw 1anti-clockwise.
i Vehicles with a subwoofer mounted in the
emergency spare wheel:
You must observe the information labels on
the subwoofer when removing it.
X Remove spare wheel/"Minispare" emer-
gency spare wheel 2. Display messages
Notes
The on-board computer shows warnings or
malfunctions in the multi-function display.
Certain display messages are accompanied
by a warning tone or a continuous tone.
The multi-function display shows high-priority
display messages in red. In the following
tables, these display messages are printed in
red.
Please respond in accordance with the dis-
play messages and follow the additional
notes in this Owner's Manual. G
Risk of accident
No further messages can be displayed if the
instrument cluster and/or the multi-func-
tion display fails.
This means that you will not see information
about the driving situation, such as the
speed, outside temperature, warning/indi-
cator lamps, display messages or system
failures. The vehicle's handling character-
istics may be affected. Adjust your driving
style and speed accordingly.
Immediately consult a qualified specialist
workshop which has the necessary special- ist knowledge and tools to carry out the
work required. Mercedes-Benz recom-
mends that you use a Mercedes-Benz
Service Centre for this purpose. In particu-
lar, work relevant to safety or on safety-
related systems must be carried out at a
qualified specialist workshop.
The following tables contain all the display
messages.
Hiding display messages After a few seconds, the on-board computer
automatically hides some low priority display
messages. Other messages remain visible in
the multi-function display until you hide them
yourself.
Some high priority display messages cannot
be hidden. The multi-function display shows
these messages continuously until the cau-
ses of the messages have been remedied.
Use the buttons on the multi-function steer-
ing wheel.
X
Use the è,·,jork button
to select another display.
The on-board computer saves certain dis-
play messages in the message memory
(Y page 106). Practical advice
* optional
169_AKB; 2; 4, en-GB
wdomann
,V ersion: 2.10.6
2008-07-16T08:52:06+02:00 - Seite 202 Dateiname: 6515_0315_02_buchblock.pdf; preflight