2008 MERCEDES-BENZ A-CLASS HATCHBACK door lock
[x] Cancel search: door lockPage 68 of 305

Seats
65Adjusting the seat electrically*
1
Head restraint height
2 Backrest angle
3 Seat fore-and-aft adjustment
4 Seat cushion angle
5 Seat height
X Make sure that the key is in position 1or
2 in the ignition lock or that the respective
door is open.
Seat fore-and-aft adjustment X
Slide the button forwards or back in the
direction of arrow 3. Seat height X
Slide the button up or down in the direction
of arrow 5.
Seat cushion angle Adjust the angle so that your thighs are gently
supported.
X
Slide the button up or down in the direction
of arrow 4.
Backrest angle X
Slide the button forwards or back in the
direction of arrow 2.
Head restraint height G
Risk of injury
Make sure that the central area of the head
restraint supports the back of your head at
about eye level. You could seriously injure
your neck if your head is not correctly sup-
ported by the head restraint in the event of
an accident. Never travel without a cor-
rectly adjusted and engaged head restraint. X
Slide the button up or down in the direction
of arrow 1.
Head restraint angle X
Push or pull the upper edge of the head
restraint in the direction of the arrow. Controls
* optional
169_AKB; 2; 4, en-GB
wdomann,
Version: 2.10.6 2008-07-16T08:52:06+02:00 - Seite 65 ZDateiname: 6515_0315_02_buchblock.pdf; preflight
Page 70 of 305
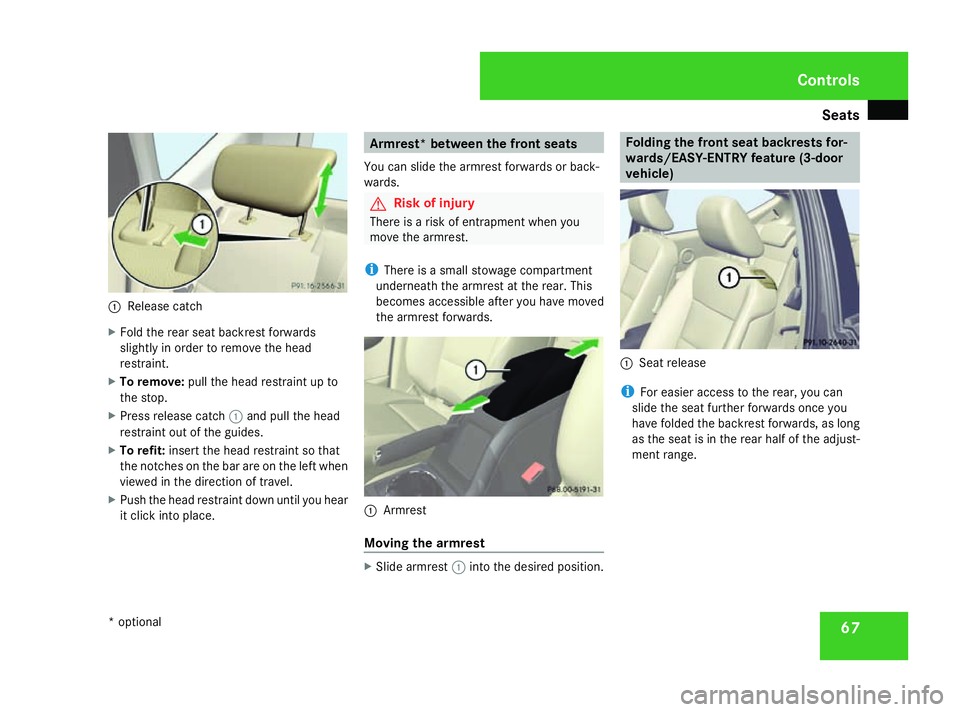
Seats
671
Release catch
X Fold the rear seat backrest forwards
slightly in order to remove the head
restraint.
X To remove: pull the head restraint up to
the stop.
X Press release catch 1and pull the head
restraint out of the guides.
X To refit: insert the head restraint so that
the notches on the bar are on the left when
viewed in the direction of travel.
X Push the head restraint down until you hear
it click into place. Armrest* between the front seats
You can slide the armrest forwards or back-
wards. G
Risk of injury
There is a risk of entrapment when you
move the armrest.
i There is a small stowage compartment
underneath the armrest at the rear. This
becomes accessible after you have moved
the armrest forwards. 1
Armrest
Moving the armrest X
Slide armrest 1into the desired position. Folding the front seat backrests for-
wards/EASY-ENTRY feature (3-door
vehicle) 1
Seat release
i For easier access to the rear, you can
slide the seat further forwards once you
have folded the backrest forwards, as long
as the seat is in the rear half of the adjust-
ment range. Controls
* optional
169_AKB; 2; 4, en-GB
wdomann,
Version: 2.10.6 2008-07-16T08:52:06+02:00 - Seite 67 ZDateiname: 6515_0315_02_buchblock.pdf; preflight
Page 75 of 305

Mirrors
72ror is set to a position which provides you
with a good overview of traffic conditions.
Folding the exterior mirrors in or out
electrically* 1
To fold the exterior mirrors in or out
X Make sure that the key is in position 1or
2 in the ignition lock.
X Briefly press button 1.
Both exterior mirrors fold in or out.
i Make sure that the exterior mirrors are
always folded out fully while the vehicle is
in motion; otherwise, they may vibrate. Resetting the exterior mirrors If the battery has been disconnected or has
become discharged, the exterior mirrors
must be reset. If this is not done, the exterior
mirrors will not fold in when you select the
"Fold in mirrors when locking" function in the
on-board computer (Y
page 111).
X Make sure that the key is in position 1in
the ignition lock.
X Briefly press button 1.
Folding the exterior mirrors in or out
automatically* If the "Fold in mirrors when locking" function
is activated in the on-board computer
(Y
page 111):
R the exterior mirrors fold in automatically as
soon as you lock the vehicle from the out-
side.
R The exterior mirrors fold out again auto-
matically as soon as you unlock the vehicle
and then open the driver's or front-
passenger door.
i If you have activated this function and fold
in the exterior mirrors using button 1, they
will not be folded out automatically. You can only fold out the exterior mirrors again
using button
1. Controls
* optional
169_AKB; 2; 4, en-GB
wdomann,
Version: 2.10.6
2008-07-16T08:52:06+02:00 - Seite 72 Dateiname: 6515_0315_02_buchblock.pdf; preflight
Page 76 of 305
Seat belts
73Seat belts
Wearing seat belts
Seat belts are the most effective means of
restraining the movement of vehicle occu-
pants in the event of an accident. This
reduces the risk of vehicle occupants coming
into contact with the vehicle interior. G
Risk of injury
A seat belt which is not worn correctly, or
which has not been engaged in the seat belt
buckle correctly, cannot perform its inten-
ded protective function. Under certain cir-
cumstances this could cause severe or
even fatal injuries.
Make sure that all occupants – in particular,
pregnant women – wear their seat belt cor-
rectly at all times.
R The seat belt must pass closely over your
body and must not be twisted. You
should therefore avoid wearing bulky
clothing (e.g. a winter coat). The shoulder
belt section must be routed across the
middle of your shoulder – on no account
across your neck or under your arm – and
pulled tight against your upper body. The
lap belt must always pass across your lap
as low down as possible, i.e. over your hip joints – not across your abdomen. If
necessary, push down the belt strap
slightly and then retighten it in the roll-up
direction.
R 3-door vehicle: the swivelling belt guide
must be in the correct position.
R Do not route the belt strap across sharp
or fragile objects, especially if these are
located on or in your clothing, e.g. spec-
tacles, pencils, keys, etc. The seat belt
strap could be damaged and tear in an
accident and you or other vehicle occu-
pants could be injured.
R Only one person should use each seat
belt at any one time. Children must never
travel sitting on the lap of other occu-
pants. It would not be possible to restrain
the child in the event of a sudden change
in direction, braking or an accident. This
could result in severe or even fatal inju-
ries to the child and other occupants.
R Persons less than 1.50 m tall cannot
wear the seat belts correctly. For this
reason, secure persons less than 1.50 m
tall in specially designed, suitable
restraint systems. R
Children less than 1.50 m tall or under
12 years of age cannot wear the seat
belts properly. Therefore, always secure
these children in suitable child restraint
systems on suitable vehicle seats. You
can find more information under "Chil-
dren in the vehicle" in the "Safety" sec-
tion of the Owner's Manual. Follow the
manufacturer's installation instructions
when fitting the child restraint system.
R Do not secure any objects with a seat belt
if the seat belt is also being used by one
of the vehicle's occupants. G
Risk of injury
The seat belt does not offer the intended
level of protection unless the backrest is
almost vertical. Under certain circumstan-
ces this could cause severe or even fatal
injuries.
Before starting a journey, make sure that
the seat is properly adjusted and that the
backrest is almost vertical. G
Risk of injury
A dirty or damaged seat belt or a seat belt
that has been subjected to a load in an
accident or modified no longer offers the Controls
169_AKB; 2; 4, en-GB
wdomann,
Version: 2.10.6 2008-07-16T08:52:06+02:00 - Seite 73 ZDateiname: 6515_0315_02_buchblock.pdf; preflight
Page 77 of 305
Seat belts
74 intended level of protection. Under certain
circumstances this could cause severe or
even fatal injuries.
For this reason, check regularly that the
seat belts are not damaged or dirty.
Always have damaged seat belts or seat
belts that have been subjected to a load in
an accident replaced at a qualified special-
ist workshop. Choose a qualified specialist
workshop which has the necessary special-
ist knowledge and tools for the work
required. Mercedes-Benz recommends
that you use a Mercedes-Benz Service
Centre for this purpose.
For safety reasons, Mercedes-Benz recom-
mends that you only use seat belts which
have been approved by Mercedes-Benz for
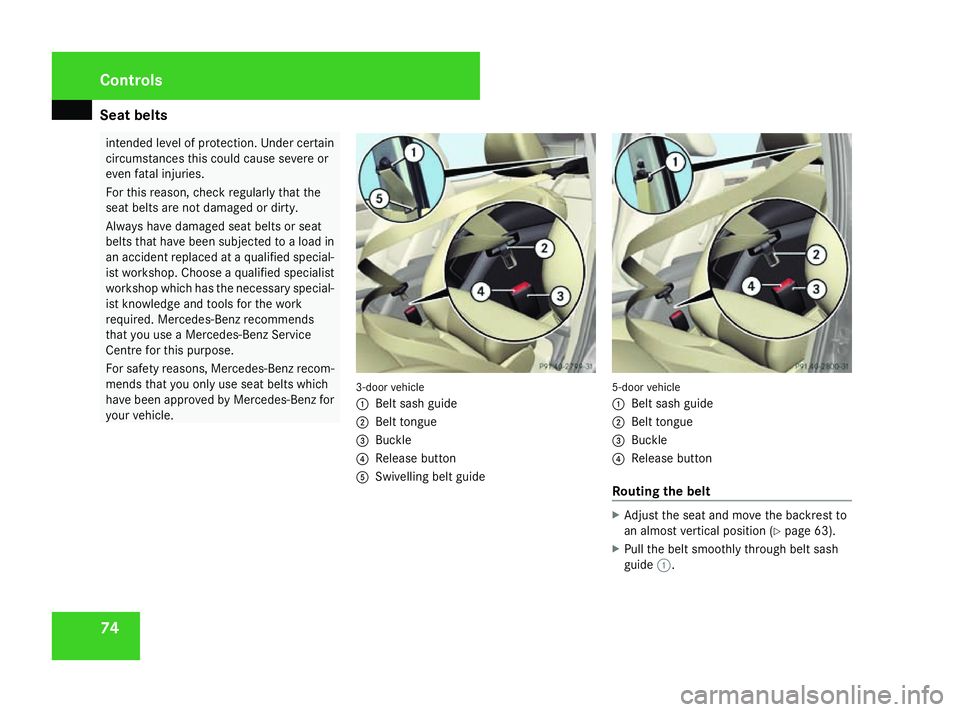
your vehicle. 3-door vehicle
1
Belt sash guide
2 Belt tongue
3 Buckle
4 Release button
5 Swivelling belt guide 5-door vehicle
1
Belt sash guide
2 Belt tongue
3 Buckle
4 Release button
Routing the belt X
Adjust the seat and move the backrest to
an almost vertical position (Y page 63).
X Pull the belt smoothly through belt sash
guide 1. Controls
169_AKB; 2; 4, en-GB
wdomann,
Version: 2.10.6
2008-07-16T08:52:06+02:00 - Seite 74 Dateiname: 6515_0315_02_buchblock.pdf; preflight
Page 78 of 305
Seat belts
75
X
Route the belt over the centre of the shoul-
der without twisting it.
X Engage belt tongue 2into buckle 3.
X 5-door vehicle: if necessary, adjust the
belt to the appropriate height
(Y page 75).
X 3-door vehicles: make sure that swivelling
belt guide 5is in the correct position.
X All: if necessary, pull upwards on the shoul-
der section of the belt to tighten the belt
across your body.
Routing the belt X
Press release button 4and guide belt
tongue 2back towards belt sash guide
1. Belt warning for driver and front
passenger
The < seat belt warning lamp in the instru-
ment cluster reminds you that all passengers
should fasten their seat belts. It may light up
continuously or flash. Additionally, there may
be a warning tone.
The < seat belt warning lamp goes out and
the acoustic signal ceases as soon as the
driver and passenger have fastened their seat
belts.
For certain countries only: regardless of
whether the driver or the front passenger
already have their seat belt fastened, the
< seat belt warning lamp lights up for six
seconds after the engine has been started. It
then goes out when the driver and front
passenger have already fastened their seat
belts.
i Further information about the
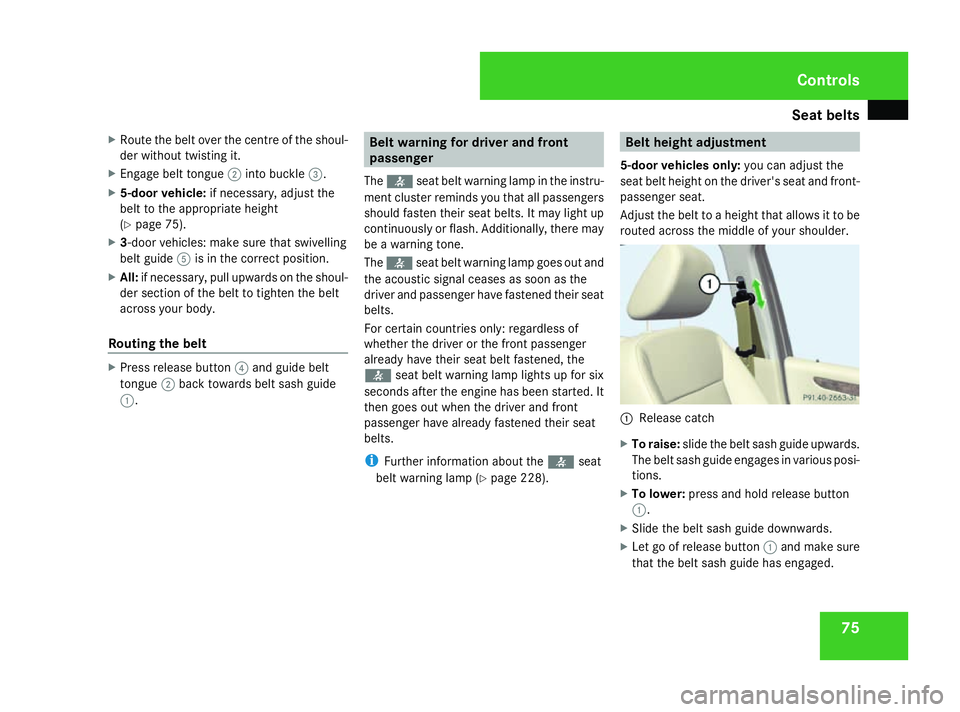
5-door vehicles only: you can adjust the
seat belt height on the driver's seat and front-
passenger seat.
Adjust the belt to a height that allows it to be
routed across the middle of your shoulder. 1
Release catch
X To raise: slide the belt sash guide upwards.
The belt sash guide engages in various posi-
tions.
X To lower: press and hold release button
1.
X Slide the belt sash guide downwards.
X Let go of release button 1and make sure
that the belt sash guide has engaged. Controls
169_AKB; 2; 4, en-GB
wdomann,
Version: 2.10.6
2008-07-16T08:52:06+02:00 - Seite 75 ZDateiname: 6515_0315_02_buchblock.pdf; preflight
Page 81 of 305
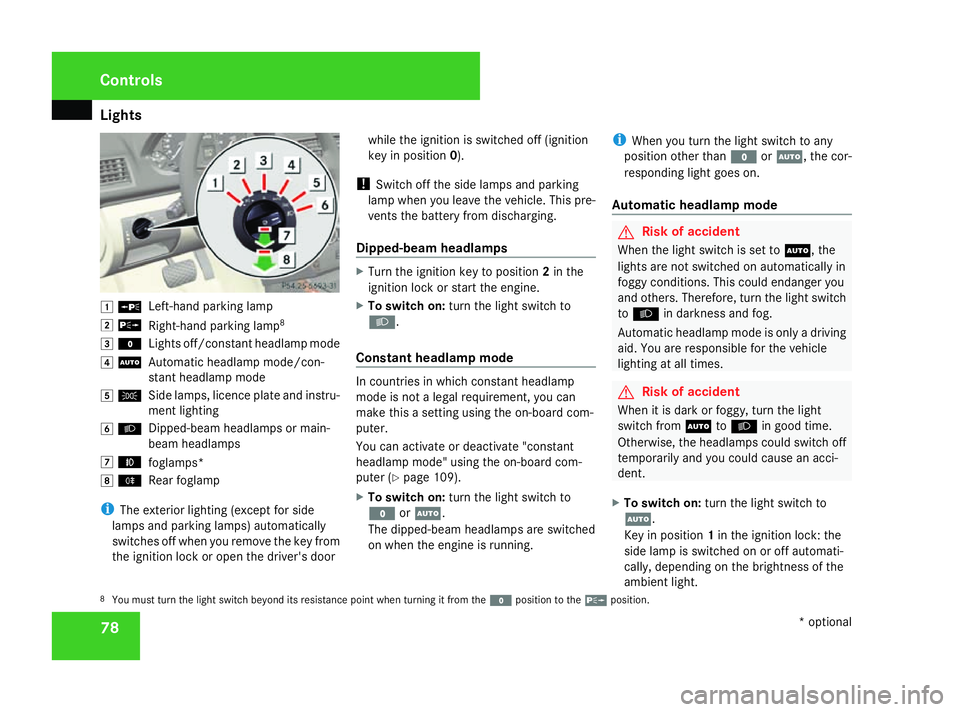
Lights
78$
a
Left-hand parking lamp
% g
Right-hand parking lamp 8
& M
Lights off/constant headlamp mode
( U
Automatic headlamp mode/con-
stant headlamp mode
) C
Side lamps, licence plate and instru-
ment lighting
* B
Dipped-beam headlamps or main-
beam headlamps
, ¥
foglamps*
. †
Rear foglamp
i The exterior lighting (except for side
lamps and parking lamps) automatically
switches off when you remove the key from
the ignition lock or open the driver's door while the ignition is switched off (ignition
key in position
0).
! Switch off the side lamps and parking
lamp when you leave the vehicle. This pre-
vents the battery from discharging.
Dipped-beam headlamps X
Turn the ignition key to position 2in the
ignition lock or start the engine.
X To switch on: turn the light switch to
B.
Constant headlamp mode In countries in which constant headlamp
mode is not a legal requirement, you can
make this a setting using the on-board com-
puter.
You can activate or deactivate "constant
headlamp mode" using the on-board com-
puter (Y
page 109).
X To switch on: turn the light switch to
M orU.
The dipped-beam headlamps are switched
on when the engine is running. i
When you turn the light switch to any
position other than MorU, the cor-
responding light goes on.
Automatic headlamp mode G
Risk of accident
When the light switch is set to U, the
lights are not switched on automatically in
foggy conditions. This could endanger you
and others. Therefore, turn the light switch
to B in darkness and fog.
Automatic headlamp mode is only a driving
aid. You are responsible for the vehicle
lighting at all times. G
Risk of accident
When it is dark or foggy, turn the light
switch from UtoB in good time.
Otherwise, the headlamps could switch off
temporarily and you could cause an acci-
dent.
X To switch on: turn the light switch to
U.
Key in position 1in the ignition lock: the
side lamp is switched on or off automati-
cally, depending on the brightness of the
ambient light.
8 You must turn the light switch beyond its resistance point when turning it from the Mposition to the gposition. Controls
* optional
169_AKB; 2; 4, en-GB
wdomann
, Version: 2.10.6
2008-07-16T08:52:06+02:00 - Seite 78 Dateiname: 6515_0315_02_buchblock.pdf; preflight
Page 86 of 305

Windscreen wipers
83
cle, open a door or remove the key from the
ignition lock.
The interior lighting switches off after a delay.
You can set the delayed switch-off using the
on-board computer (Y page 110). If the door
is left open, the interior lighting goes out after
approximately five minutes.
Emergency accident lighting If the interior lighting is set to automatic, the
interior lighting is activated automatically if
the vehicle is involved in an accident.
X To deactivate: press the hazard warning
lamp button (Y page 80).
or
X Lock and then unlock the vehicle using the
key. Windscreen wipers
Switching the windscreen wipers on/
off
Combination switch
1 To switch on the windscreen wipers
2 Single wipe/to wipe the windscreen using
washer fluid
Settings: 0
Windscreen wipers off
I
Intermittent wipe
II
Continuous wipe, slow
III
Continuous wipe, fast
!
Vehicles with a rain sensor*: If the windscreen becomes dirty in dry
weather conditions, the windscreen wipers
may be activated inadvertently. This could
then damage the windscreen wiper blades
or scratch the windscreen.
For this reason, you should always switch
off the windscreen wipers in dry weather.
X Turn the key to position 1or 2in the ignition
lock.
X Turn the combination switch to the corre-
sponding position. Rear window wiper
Combination switch
1
Switch
% To wipe with washer fluid Controls
* optional
169_AKB; 2; 4, en-GB
wdomann,
Version: 2.10.6 2008-07-16T08:52:06+02:00 - Seite 83 ZDateiname: 6515_0315_02_buchblock.pdf; preflight