Page 251 of 280
 4. Driving through deep water—the electrical system may be wet.
These temporary malfunctions can be corrected by filling the fuel tank
with good quality fuel, properly tightening the fuel cap or let")
4. Driving through deep water—the electrical system may be wet.
These temporary malfunctions can be corrected by filling the fuel tank
with good quality fuel, properly tightening the fuel cap or letting the
electrical system dry out. After three driving cycles without these or any
other temporary malfunctions present, the
indicator should stay off
the next time the engine is started. A driving cycle consists of a cold
engine startup followed by mixed city/highway driving. No additional
vehicle service is required.
If the
indicator remains on, have your vehicle serviced at the first
available opportunity. Although some malfunctions detected by the
OBD-II may not have symptoms that are apparent, continued driving
with the
indicator on can result in increased emissions, lower fuel
economy, reduced engine and transmission smoothness, and lead to more
costly repairs.
Readiness for Inspection/Maintenance (I/M) testing
Some state/provincial and local governments may have
Inspection/Maintenance (I/M) programs to inspect the emission control
equipment on your vehicle. Failure to pass this inspection could prevent
you from getting a vehicle registration. Your vehicle may not pass the I/M
test if the
indicator is on or not working properly (bulb is burned
out), or if the OBD-II system has determined that some of the emission
control systems have not been properly checked. In this case, the vehicle
is considered not ready for I/M testing.
If the
indicator is on or the bulb does not work, the vehicle may
need to be serviced. Refer to the On board diagnostics (OBD-II)
description in this chapter.
If the vehicle’s engine or transmission has just been serviced, or the
battery has recently run down or been replaced, the OBD-II system may
indicate that the vehicle is not ready for I/M testing. To determine if the
vehicle is ready for I/M testing, turn the ignition key to the ON position
for 15 seconds without cranking the engine. If the
indicator blinks
eight times, it means that the vehicle is not ready for I/M testing; if
the
indicator stays on solid, it means that the vehicle is ready for
I/M testing.
The OBD-II system is designed to check the emission control system
during normal driving. A complete check may take several days. If the
vehicle is not ready for I/M testing, the following driving cycle consisting
of mixed city and highway driving may be performed:
2008 B-Series (mbs)
Owners Guide (post-2002-fmt)
USA (fus)
Maintenance and Specifications
251
Page 252 of 280
15 minutes of steady driving on an expressway/highway followed by 20
minutes of stop-and-go driving with at least four 30-second idle periods.
Allow the vehicle to sit for at least eight hours without starting the
engine. Then, start the engine and complete the above driving cycle. The
engine must warm up to its normal operating temperature. Once started,
do not turn off the engine until the above driving cycle is complete. If
the vehicle is still not ready for I/M testing, the above driving cycle will
have to be repeated.
POWER STEERING FLUID
•2.3L I4 engine
• 3.0L V6 engine
2008 B-Series (mbs)
Owners Guide (post-2002-fmt)
USA (fus)
Maintenance and Specifications
252
Page 253 of 280
•4.0L V6 engine
Check the power steering fluid. Refer to the service maintenance section
for the service interval schedules. 1. Start the engine and let it run until it reaches normal operating temperature (the engine coolant temperature gauge indicator will be
near the center of the normal area between H and C).
2. While the engine idles, turn the steering wheel left and right several times.
3. Turn the engine off.
4. Check the fluid level in the reservoir. It should be between the MIN and MAX lines. Do not add fluid if the level is within this range.
5. If the fluid is low, add fluid in small amounts, until it reaches between the MIN and MAX lines. Refer to Maintenance product
specifications and capacities in this chapter for the proper fluid
type.
DONOTOVERFILLPOWERSTEERINGFLUID
2008 B-Series (mbs)
Owners Guide (post-2002-fmt)
USA (fus)
Maintenance and Specifications
253
Page 255 of 280
 TRANSMISSION FLUID
Checking automatic transmission fluid
•Refer to scheduled maintenance information for scheduled check
and change intervals.
• Transmission does not consume fluid.
• Check flui")
TRANSMISSION FLUID
Checking automatic transmission fluid
•Refer to scheduled maintenance information for scheduled check
and change intervals.
• Transmission does not consume fluid.
• Check fluid when transmission is not operating properly or if you see
a leak.
• Fluid level must be checked at normal operating temperature, 20 miles
(30 km) of driving.
To check and add fluid: 1. Drive the vehicle 20 miles (30 km) to reach normal operating temperatures.
2. If driven in hot weather, city traffic, pulling a trailer, allow transmission to cool for 30 minutes before checking.
3. Engage parking brake, start engine.
4. Put your foot on the brake pedal and move the gearshift lever slowly through all of the gear ranges.
5. Shift to P (Park) and leave the engine running.
6. Remove the dipstick, wipe clean with a dry lint free rag.
7. Install and fully seat the dipstick into the filler tube.
8. Remove the dipstick and inspect the fluid level. Level should be
in the cross-hatched area.
9. If necessary, add fluid in 1/2 pint (250ml) increments through the filler tube until the level is correct at normal operating temperatures.
Refer to the Maintenance product specifications and capacities
section in this chapter for the correct fluid type. The use of any
other non-approved fluid may cause internal transmission damage.
10. Fluid can be checked at ambient temperatures between 50–95°F
(10–30°C). DO NOT ADD fluid
until the transmission is at
normal operating temperatures or the transmission will be overfilled.
2008 B-Series (mbs)
Owners Guide (post-2002-fmt)
USA (fus)
Maintenance and Specifications
255
Page 258 of 280
 DRIVELINE UNIVERSAL JOINT AND SLIP YOKE
Your vehicle may be equipped with universal joints that require
lubrication. If the original universal joints are replaced with universal
joints equipped with g")
DRIVELINE UNIVERSAL JOINT AND SLIP YOKE
Your vehicle may be equipped with universal joints that require
lubrication. If the original universal joints are replaced with universal
joints equipped with grease fittings, lubrication will also be necessary.
CHECKING AND ADDING REAR DIFFERENTIAL FLUID1. Park the vehicle on a level surface.
2. Engage the parking brake fully – put in first gear.
3. Ensure the vehicle cannot move.
4. Clean the filler plug.
5. Remove the filler plug and inspect the fluid level.
6. Fluid level should be at the bottom of the opening.
7. Add enough fluid through the filler opening so that the fluid
level is at the bottom of the
opening.
8. Install and tighten the fill plug securely.
Use only fluid that meets Mazda specifications. Refer to the
Maintenance product specifications and capacities section in this
chapter.
AIR FILTER
Refer to scheduled maintenance for the appropriate intervals for
changing the air filter element.
When changing the air filter element, only use a genuine Mazda air filter
element.
WARNING: To reduce the risk of vehicle damage and/or
personal burn injuries do not start your engine with the air
cleaner removed and do not remove it while the engine is
running.
2008 B-Series (mbs)
Owners Guide (post-2002-fmt)
USA (fus)
Maintenance and Specifications
258
Page 259 of 280
 1. Loosen the clamp that secures the air inlet tube to the engine airfilter cover and disconnect the tube from the cover (for V6 only).
2. Release the clamps that secure the air filter housing cover.")
1. Loosen the clamp that secures the air inlet tube to the engine airfilter cover and disconnect the tube from the cover (for V6 only).
2. Release the clamps that secure the air filter housing cover.
3. Carefully separate the two halves of the air filter housing.
4. Remove the air filter element from the air filter housing.
5. Wipe the air filter housing and cover clean to remove any dirt or debris and to ensure good sealing.
6. Install a new air filter element. Be careful not to crimp the
filter element edges between
the air filter housing and cover.
This could cause filter damage
and allow unfiltered air to enter
the engine if not properly
seated.
7. Replace the air filter housing cover and secure the clamps.
8. Replace the air inlet tube and secure the clamp.
Note: Failure to use the correct air filter element may result in severe
engine damage. The customer warranty may be void for any damage to
the engine if the correct air filter element is not used.
2008 B-Series (mbs)
Owners Guide (post-2002-fmt)
USA (fus)
Maintenance and Specifications
259
Page 261 of 280
ItemApplicationMazda part name or
equivalent Capacity
Engine coolant 2.3 L I4 engine
with manual
transmission
Premium EngineCoolant
2
10.5 quarts (10.0L)
2.3L I4 engine
with automatic transmission 10.2 quarts (9.7L)
3.0L V6 engine with manual
transmission 15.1 quarts (14.3L)
3.0L V6 engine with automatic transmission 14.8 quarts (14.0L)
4.0L V6 engine with manual
transmission 13.7 quarts (13.0L)
4.0L V6 engine with automatic transmission 13.2 quarts (12.5L)
Engine oil 2.3L I4 engine
SAE 5W-20 Motor Oil 4.0 quarts (3.8L)
3.0L V6 engine 4.5 quarts (4.3L)
4.0L V6 engine SAE 5W-30 Motor Oil 5.0 quarts (4.7L)
Power steering fluid AllMERCON�VATF Fill between MAX / MIN
line on reservoir
2008 B-Series (mbs)
Owners Guide (post-2002-fmt)
USA (fus)
Maintenance and Specifications
261
Page 262 of 280
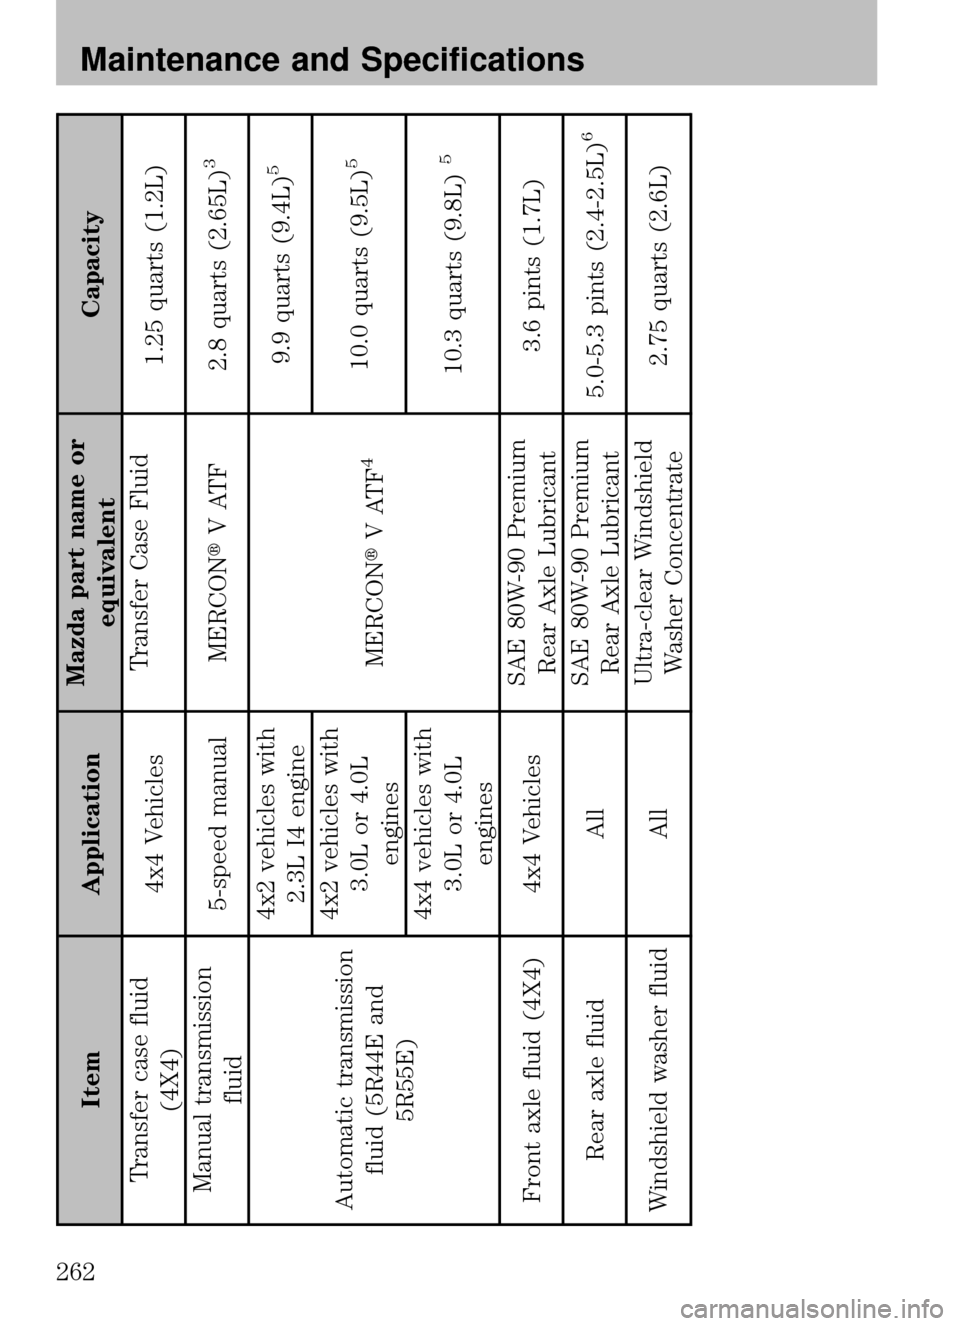
ItemApplicationMazda part name or
equivalent Capacity
Transfer case fluid (4X4) 4x4 Vehicles Transfer Case Fluid
1.25 quarts (1.2L)
Manual transmission fluid 5-speed manual MERCON�
V ATF 2.8 quarts (2.65L)
3
Automatic transmission
fluid (5R44E and 5R55E) 4x2 vehicles with
2.3L I4 engine
MERCON�VATF
4
9.9 quarts (9.4L)
5
4x2 vehicles with
3.0L or 4.0Lengines 10.0 quarts (9.5L)
5
4x4 vehicles with
3.0L or 4.0Lengines 10.3 quarts (9.8L)
5
Front axle fluid (4X4) 4x4 Vehicles
SAE 80W-90 Premium
Rear Axle Lubricant 3.6 pints (1.7L)
Rear axle fluid AllSAE 80W-90 Premium
Rear Axle Lubricant 5.0-5.3 pints (2.4-2.5L)
6
Windshield washer fluid All Ultra-clear Windshield
Washer Concentrate 2.75 quarts (2.6L)
2008 B-Series
(mbs)
Owners Guide (post-2002-fmt)
USA (fus)
Maintenance and Specifications
262
 15 minutes of steady driving on an expressway/highway followed by 20
minutes of stop-and-go driving with at least four 30-second idle periods.
Allow the vehicle to sit for at least eight hours without")
 •4.0L V6 engine
Check the power steering fluid. Refer to the service maintenance section
for the service interval schedules. 1. Start the engine and let it run until it reaches normal operating temp")
 ItemApplicationMazda part name or
equivalent Capacity
Engine coolant 2.3 L I4 engine
with manual
transmission
Premium EngineCoolant
2
10.5 quarts (10.0L)
2.3L I4 engine
with automatic transmission 10.")