2008 KIA Sportage ECU
[x] Cancel search: ECUPage 117 of 350
Knowing your vehicle
108 3
1
2
3
4
5
6
7
8
9
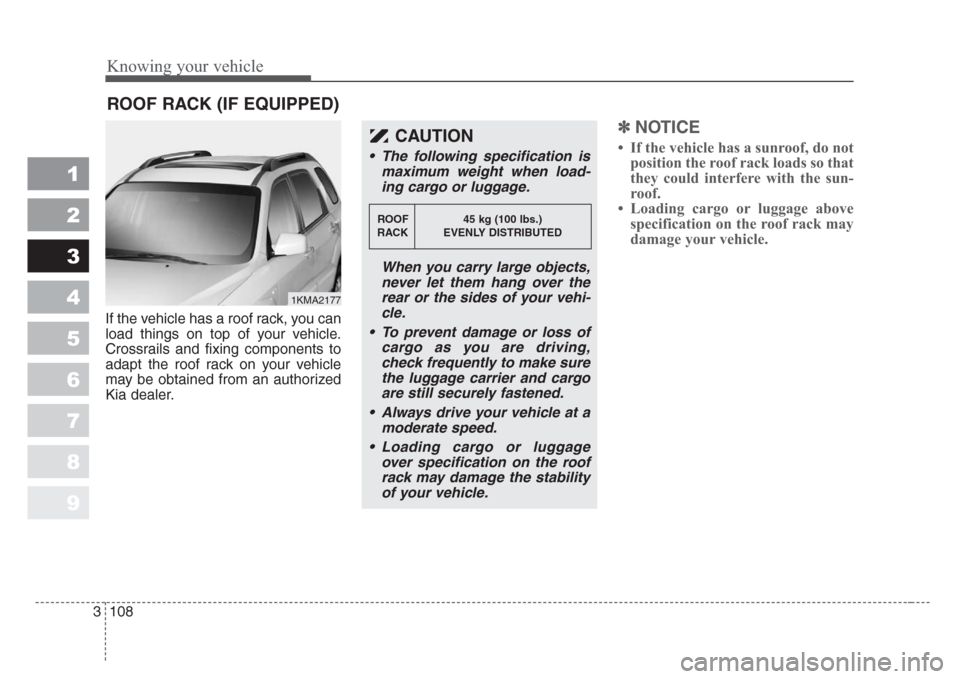
If the vehicle has a roof rack, you can
load things on top of your vehicle.
Crossrails and fixing components to
adapt the roof rack on your vehicle
may be obtained from an authorized
Kia dealer.
✽
NOTICE
• If the vehicle has a sunroof, do not
position the roof rack loads so that
they could interfere with the sun-
roof.
• Loading cargo or luggage above
specification on the roof rack may
damage your vehicle.
ROOF RACK (IF EQUIPPED)
1KMA2177
CAUTION
• The following specification is
maximum weight when load-
ing cargo or luggage.
When you carry large objects,
never let them hang over the
rear or the sides of your vehi-
cle.
• To prevent damage or loss of
cargo as you are driving,
check frequently to make sure
the luggage carrier and cargo
are still securely fastened.
•Always drive your vehicle at a
moderate speed.
• Loading cargo or luggage
over specification on the roof
rack may damage the stability
of your vehicle.
ROOF 45 kg (100 lbs.)
RACK EVENLY DISTRIBUTED
Page 128 of 350
Driving your vehicle
10 4
1
2
3
4
5
6
7
8
9
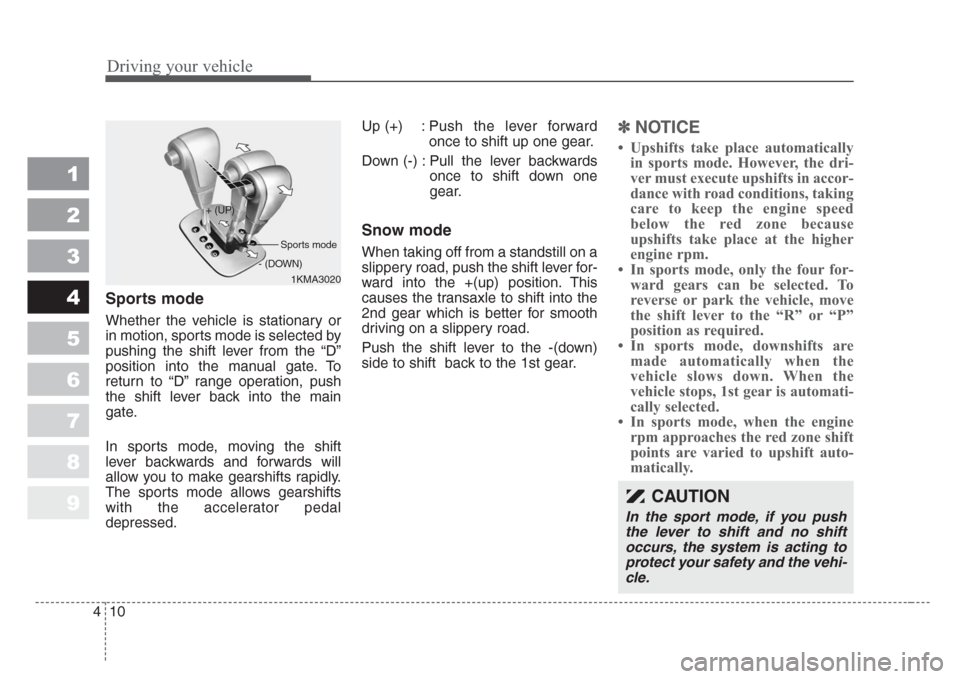
Sports mode
Whether the vehicle is stationary or
in motion, sports mode is selected by
pushing the shift lever from the “D”
position into the manual gate. To
return to “D” range operation, push
the shift lever back into the main
gate.
In sports mode, moving the shift
lever backwards and forwards will
allow you to make gearshifts rapidly.
The sports mode allows gearshifts
with the accelerator pedal
depressed.Up (+) : Push the lever forward
once to shift up one gear.
Down (-) : Pull the lever backwards
once to shift down one
gear.
Snow mode
When taking off from a standstill on a
slippery road, push the shift lever for-
ward into the +(up) position. This
causes the transaxle to shift into the
2nd gear which is better for smooth
driving on a slippery road.
Push the shift lever to the -(down)
side to shift back to the 1st gear.
✽
NOTICE
• Upshifts take place automatically
in sports mode. However, the dri-
ver must execute upshifts in accor-
dance with road conditions, taking
care to keep the engine speed
below the red zone because
upshifts take place at the higher
engine rpm.
• In sports mode, only the four for-
ward gears can be selected. To
reverse or park the vehicle, move
the shift lever to the “R” or “P”
position as required.
• In sports mode, downshifts are
made automatically when the
vehicle slows down. When the
vehicle stops, 1st gear is automati-
cally selected.
• In sports mode, when the engine
rpm approaches the red zone shift
points are varied to upshift auto-
matically.
1KMA3020 + (UP)
- (DOWN)
Sports mode
CAUTION
In the sport mode,if you push
the lever to shift and no shift
occurs, the system is acting to
protect your safety and the vehi-
cle.
Page 138 of 350
Driving your vehicle
20 4
1
2
3
4
5
6
7
8
9
Parking brake
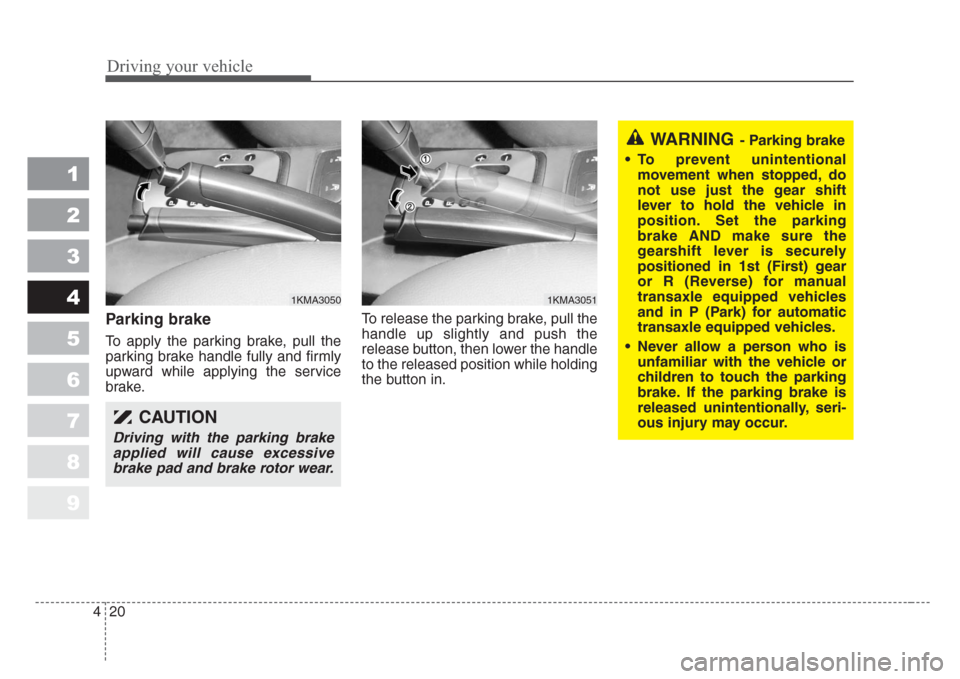
To apply the parking brake, pull the
parking brake handle fully and firmly
upward while applying the service
brake.To release the parking brake, pull the
handle up slightly and push the
release button, then lower the handle
to the released position while holding
the button in.
CAUTION
Driving with the parking brake
applied will cause excessive
brake pad and brake rotor wear.
1KMA30501KMA3051
WARNING- Parking brake
• To prevent unintentional
movement when stopped, do
not use just the gear shift
lever to hold the vehicle in
position.Set the parking
brake AND make sure the
gearshift lever is securely
positioned in 1st (First) gear
or R (Reverse) for manual
transaxle equipped vehicles
and in P (Park) for automatic
transaxle equipped vehicles.
• Never allow a person who is
unfamiliar with the vehicle or
children to touch the park
ing
brake.If the parking brake is
released unintentionally,seri-
ous injury may occur.
Page 167 of 350
449
Driving your vehicle
1
2
3
4
5
6
7
8
9
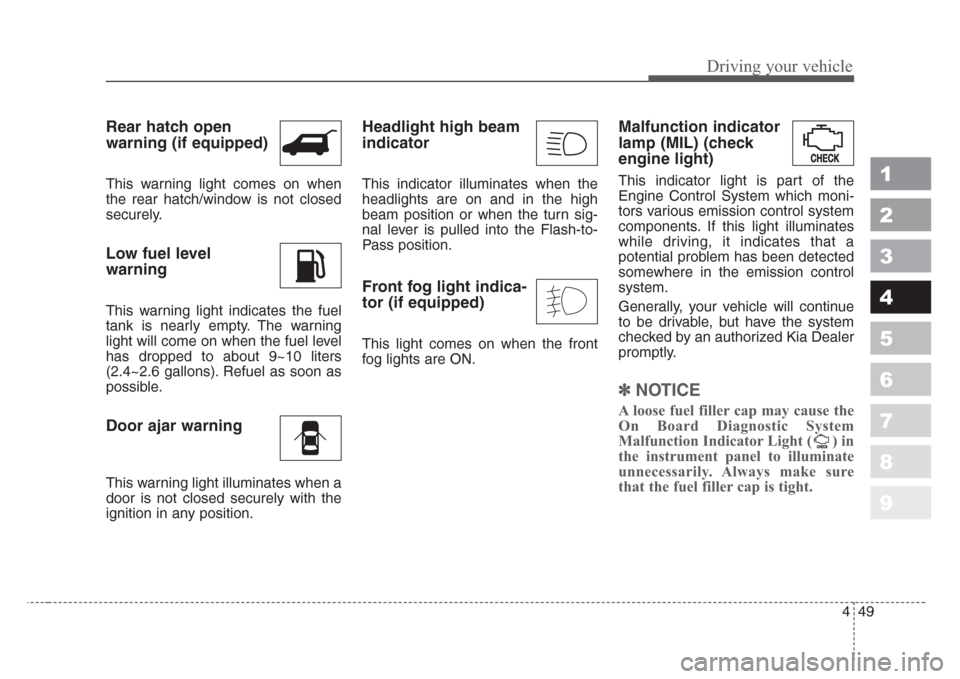
Rear hatch open
warning (if equipped)
This warning light comes on when
the rear hatch/window is not closed
securely.
Low fuel level
warning
This warning light indicates the fuel
tank is nearly empty. The warning
light will come on when the fuel level
has dropped to about 9~10 liters
(2.4~2.6 gallons). Refuel as soon as
possible.
Door ajar warning
This warning light illuminates when a
door is not closed securely with the
ignition in any position.
Headlight high beam
indicator
This indicator illuminates when the
headlights are on and in the high
beam position or when the turn sig-
nal lever is pulled into the Flash-to-
Pass position.
Front fog light indica-
tor (if equipped)
This light comes on when the front
fog lights are ON.
Malfunction indicator
lamp (MIL) (check
engine light)
This indicator light is part of the
Engine Control System which moni-
tors various emission control system
components. If this light illuminates
while driving, it indicates that a
potential problem has been detected
somewhere in the emission control
system.
Generally, your vehicle will continue
to be drivable, but have the system
checked by an authorized Kia Dealer
promptly.
✽
NOTICE
A loose fuel filler cap may cause the
On Board Diagnostic System
Malfunction Indicator Light ( ) in
the instrument panel to illuminate
unnecessarily. Always make sure
that the fuel filler cap is tight.
Page 226 of 350
Driving tips
16 5
1
2
3
4
5
6
7
8
9
Off-road driving with your
four-wheel drive vehicle
Off-road driving can be great fun. But
it has definite hazards. The greatest
of these is the terrain itself.
“Off-roading” means you’ve left the
paved road system behind. Traffic
lanes are not marked. Curves are not
banked.
There are no carefully engineered
road signs to warn you of dangerous
conditions or to advise you of a safe
speed. You have to assess the envi-
ronment yourself. Surfaces can be
slippery, rough, uphill or downhill.
Off-road driving involves learning
new skills. That’s why it’s important
that you read and understand this
section. You’ll find useful driving
information and suggestions. These
will help make your off-road driving
safer and more enjoyable.
Before you go off-roading
There are some things to do before
you leave the paved roads. Be sure
to have all necessary maintenance
and service work done beforehand.
Be sure to read all the information
about your four-wheel drive vehicle
in this manual. Is there enough fuel?
Is the spare tire fully inflated? Are the
fluid levels at the proper levels? What
are the local laws that apply to off-
roading where you’ll be driving? If
you don’t know, you should check
with law enforcement people in the
area. Will you be on someone’s pri-
vate land? If so, be sure to get the
necessary permission.
Loading your vehicle for off-road
driving
There are some important items to
remember about how to properly
load your vehicle.
• The heaviest things should be in
the cargo area and forward of your
rear axle. Place heavier items as
far forward as you can.
• Be sure the load is properly
secured, so driving over off-road
terrain doesn’t shift your load or
throw items toward the driver or
passengers.
Page 227 of 350
517
Driving tips
1
2
3
4
5
6
7
8
9
Traveling to remote areas
It makes sense to plan your trip,
especially when going to a remote
area. Know the terrain and plan your
route. You are much less likely to
encounter unwanted surprises. Get
accurate maps of trails.
It’s also a good idea to travel with at
least one other vehicle. If something
happens to one of them, the other
can quickly help.WARNING - Cargo
• Cargo piled close to the height
of (or higher than) the seat
backs can be thrown forward
during a sudden stop or on
downhill slopes.You or your
passengers could be severely
injured.Keep cargo below the
top of the seat backs and,if
possible, do not pile separate
items.
•Unsecured cargo in the cargo
area can be tossed about
when driving on the highways
or over rough terrain.You or
your passengers can be
struck by flying objects and
severely injured.
Secure the
cargo properly.
(Continued)
(Continued)
• Cargo should not be carried
on the roof without a proper
roof rack installed.The roof
rack will hold a maximum of
45 kg (100 lbs.).Heavy loads
in a roof rack raise the vehi-
cle’s center of gravity, making
it more likely to roll over.Yo u
can be seriously or fatally
injured if the vehicle rolls
over.Do not load cargo on the
roof while driving off-road,if
at all possible.Put heavy
loads inside the cargo area,
not on the roof or in a roof
rack.Keep cargo in the cargo
area as far forward and low as
po
ssible.
Page 246 of 350
Driving tips
36 5
1
2
3
4
5
6
7
8
9
Safety chains
You should always attach chains
between your vehicle and your trail-
er. Cross the safety chains under the
tongue of the trailer so that the
tongue will not drop to the road if it
becomes separated from the hitch.
Instructions about safety chains may
be provided by the hitch manufactur-
er or by the trailer manufacturer.
Follow the manufacturer’s recom-
mendation for attaching safety
chains. Always leave just enough
slack so you can turn with your trail-
er. And, never allow safety chains to
drag on the ground.
Tr ailer brakes
If your trailer weighs more than the
maximum trailer weight without trail-
er brakes loaded, then it needs its
own brakes and they must be ade-
quate. Be sure to read and follow the
instructions for the trailer brakes so
you’ll be able to install, adjust and
maintain them properly.
• Don’t tap into your vehicle's brake
system.
Driving with a trailer
Towing a trailer requires a certain
amount of experience. Before setting
out for the open road, you must get
to know your trailer. Acquaint your-
self with the feel of handling and
braking with the added weight of the
trailer. And always keep in mind that
the vehicle you are driving is now a
good deal longer and not nearly so
responsive as your vehicle is by
itself.
Before you start, check the trailer
hitch and platform, safety chains,
electrical connector(s), lights, tires
and mirror adjustment. If the trailer
has electric brakes, start your vehicle
and trailer moving and then apply the
trailer brake controller by hand to be
sure the brakes are working. This lets
you check your electrical connection
at the same time.
During your trip, check occasionally
to be sure that the load is secure,
and that the lights and any trailer
brakes are still working.
WARNING - Tr ailer brakes
Do not use a trailer with its own
brakes unless you are absolute-
ly certain that you have properly
set up the brake system.This is
not a task for amateurs.Use an
experienced, competent trailer
shop for this work.
Page 254 of 350
Driving tips
44 5
1
2
3
4
5
6
7
8
9
✽
NOTICE
• Overloading your vehicle may
cause damage. Repairs would not
be covered by your warranty. Do
not overload your vehicle.
• Using heavier suspension compo-
nents to get added durability
might not change your weight rat-
ings. Ask your dealer to help you
load your vehicle the right way.
The label will help you decide how
much cargo and installed equipment
your vehicle can carry.
If you carry items inside your vehicle
- like suitcases, tools, packages, or
anything else - they are moving as
fast as the vehicle. If you have to stop
or turn quickly, or if there is a crash,
the items will keep going and can
cause an injury if they strike the driv-
er or a passenger.
WARNING - Loose cargo
Items you carry inside your
vehicle can strike and injure
people in a sudden stop or turn,
or in a crash.
• Put things in the cargo area of
your vehicle.Try to spread the
weight evenly.
• Never stack items,like suit-
cases,inside the vehicle
above the tops of the seats.
• Do not leave an unsecured
child restraint in your vehicle.
• When you carry somethi
ng
inside the vehicle,secure it.
• Do not drive with a seat folded
down unless necessary.