Page 255 of 350
545
Driving tips
1
2
3
4
5
6
7
8
9
HOMELINK® WIRELESS CONTROL SYSTEM (IF EQUIPPED)
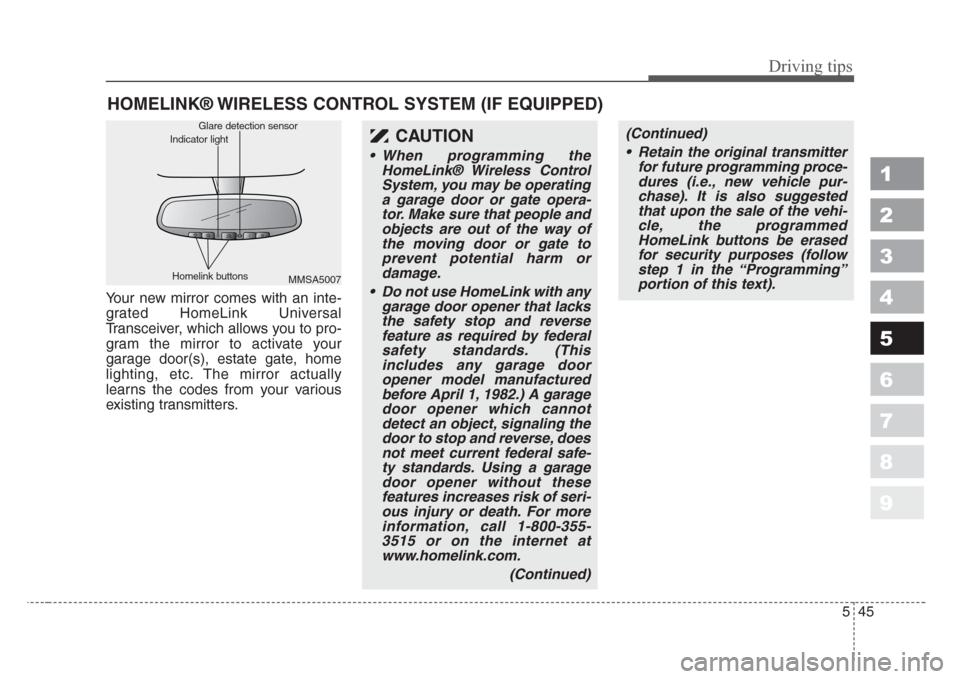
Your new mirror comes with an inte-
grated HomeLink Universal
Transceiver, which allows you to pro-
gram the mirror to activate your
garage door(s), estate gate, home
lighting, etc. The mirror actually
learns the codes from your various
existing transmitters.
CAUTION
• When programming the
HomeLink® Wireless Control
System, you may be operating
a garage door or gate opera-
tor.Make sure that people and
objects are out of the way of
the moving door or gate to
prevent potential harm or
damage.
• Do not use HomeLink with any
garage door opener that lacks
the safety stop and reverse
feature as required by federal
safety standards.(This
includes any garage door
opener model manufactured
before April 1, 1982.) A garage
door opener which cannot
detect an object,signaling the
door to stop and reverse, does
not meet current federal safe-
ty standards.Using a garage
door opener without the
se
features increases risk of seri-
ous injury or death.For more
information, call 1-800-355-
3515 or on the internet at
www.homelink.com.
(Continued)
(Continued)
• Retain the original transmitter
for future programming proce-
dures (i.e., new vehicle pur-
chase).It is also suggested
that upon the sale of the vehi-
cle, the programmed
HomeLink buttons be erased
for security purposes (follow
step 1 in the “Programming”
portion of this text).
MMSA5007 Homelink buttonsGlare detection sensor
Indicator light
Page 258 of 350
Driving tips
48 5
1
2
3
4
5
6
7
8
9
6. Return to the vehicle and firmly
press and release the pro-
grammed HomeLink button up to
three times. The rolling code
equipped device should now rec-
ognize the HomeLink signal and
activate when the HomeLink but-
ton is pressed. The remaining two
buttons may now be programmed
if this has not previously been
done. Refer to the “Programming”
portion of this text.Operating HomeLink
To operate, simply press the pro-
grammed HomeLink button.
Activation will now occur for the
trained product (garage door, securi-
ty system, entry door lock, estate
gate, or home or office lighting). For
convenience, the hand-held trans-
mitter of the device may also be used
at any time. The HomeLink Wireless
Controls System (once programmed)
or the original hand-held transmitter
may be used to activate the device
(e.g. garage door, entry door lock,
etc.). In the event that there are still
programming difficulties, contact
HomeLink at 1-800-355-3515 or on
the internet at www.homelink.com.
Erasing programmed
HomeLink buttons
To erase the three programmed but-
tons (individual buttons cannot be
erased):
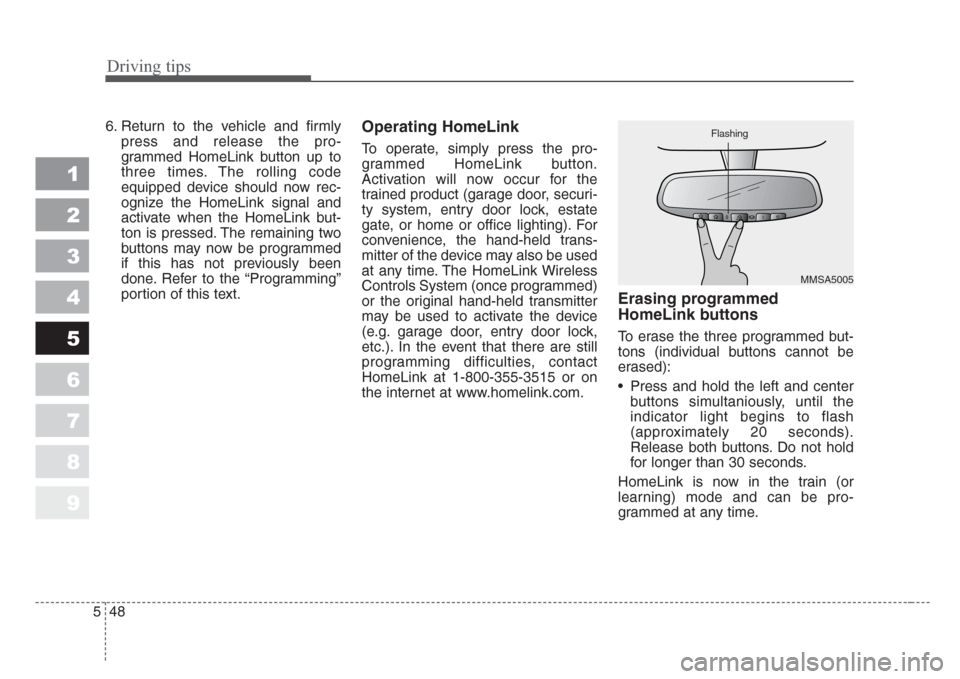
• Press and hold the left and center
buttons simultaniously, until the
indicator light begins to flash
(approximately 20 seconds).
Release both buttons. Do not hold
for longer than 30 seconds.
HomeLink is now in the train (or
learning) mode and can be pro-
grammed at any time.
MMSA5005 Flashing
Page 271 of 350
69
In case of an emergency
Engine compartment
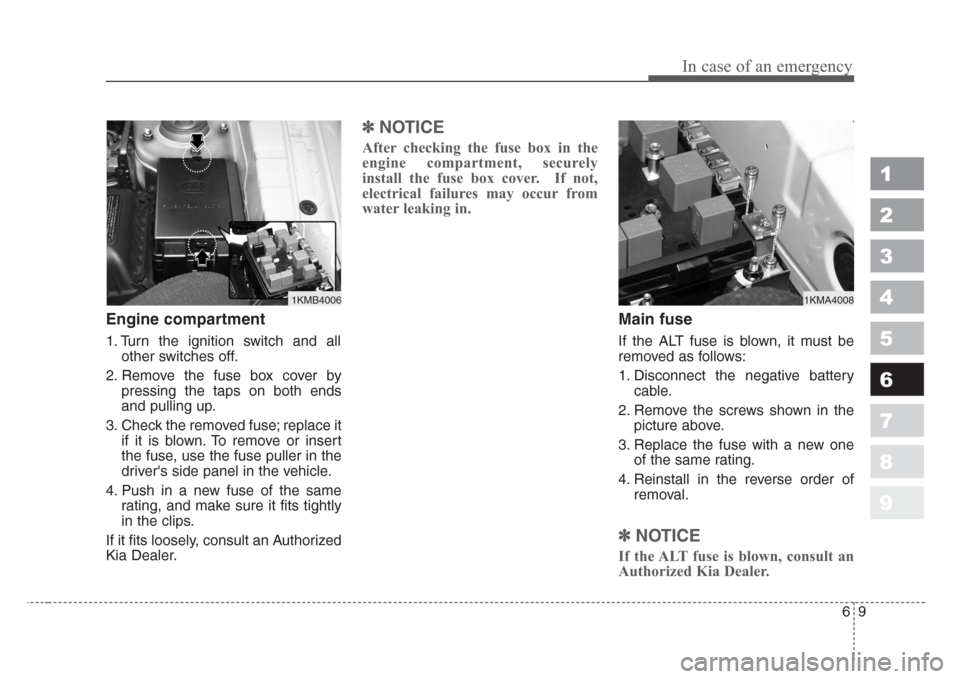
1. Turn the ignition switch and all
other switches off.
2. Remove the fuse box cover by
pressing the taps on both ends
and pulling up.
3. Check the removed fuse; replace it
if it is blown. To remove or insert
the fuse, use the fuse puller in the
driver's side panel in the vehicle.
4. Push in a new fuse of the same
rating, and make sure it fits tightly
in the clips.
If it fits loosely, consult an Authorized
Kia Dealer.
✽
NOTICE
After checking the fuse box in the
engine compartment, securely
install the fuse box cover. If not,
electrical failures may occur from
water leaking in.
Main fuse
If the ALT fuse is blown, it must be
removed as follows:
1. Disconnect the negative battery
cable.
2. Remove the screws shown in the
picture above.
3. Replace the fuse with a new one
of the same rating.
4. Reinstall in the reverse order of
removal.
✽
NOTICE
If the ALT fuse is blown, consult an
Authorized Kia Dealer.
1
2
3
4
5
6
7
8
9
1KMB40061KMA4008
Page 273 of 350
611
In case of an emergency
1
2
3
4
5
6
7
8
9
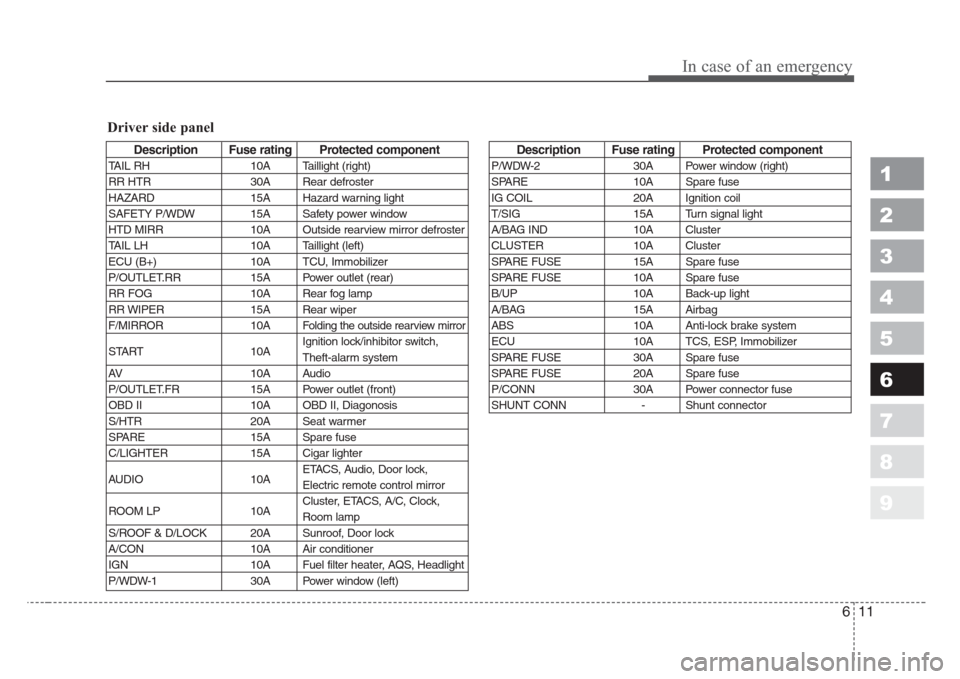
Description Fuse rating Protected component
TAIL RH 10A Taillight (right)
RR HTR 30A Rear defroster
HAZARD 15A Hazard warning light
SAFETY P/WDW 15A Safety power window
HTD MIRR 10A Outside rearview mirror defroster
TAIL LH 10A Taillight (left)
ECU (B+) 10A TCU, Immobilizer
P/OUTLET.RR 15A Power outlet (rear)
RR FOG 10A Rear fog lamp
RR WIPER 15A Rear wiper
F/MIRROR 10A
Folding the outside rearview mirror
START 10AIgnition lock/inhibitor switch,
Theft-alarm system
AV 10A Audio
P/OUTLET.FR 15A Power outlet (front)
OBD II 10A OBD II, Diagonosis
S/HTR 20A Seat warmer
SPARE 15A Spare fuse
C/LIGHTER 15A Cigar lighter
AUDIO 10AETACS, Audio, Door lock,
Electric remote control mirror
ROOM LP 10ACluster, ETACS, A/C, Clock,
Room lamp
S/ROOF & D/LOCK 20A Sunroof, Door lock
A/CON 10A Air conditioner
IGN 10A Fuel filter heater, AQS, Headlight
P/WDW-1 30A Power window (left)
Description Fuse rating Protected component
P/WDW-2 30A Power window (right)
SPARE 10A Spare fuse
IG COIL 20A Ignition coil
T/SIG 15A Turn signal light
A/BAG IND 10A Cluster
CLUSTER 10A Cluster
SPARE FUSE 15A Spare fuse
SPARE FUSE 10A Spare fuse
B/UP 10A Back-up light
A/BAG 15A Airbag
ABS 10A Anti-lock brake system
ECU 10A TCS, ESP, Immobilizer
SPARE FUSE 30A Spare fuse
SPARE FUSE 20A Spare fuse
P/CONN 30A Power connector fuse
SHUNT CONN - Shunt connector
Driver side panel
Page 274 of 350
In case of an emergency
12 6
1
2
3
4
5
6
7
8
9
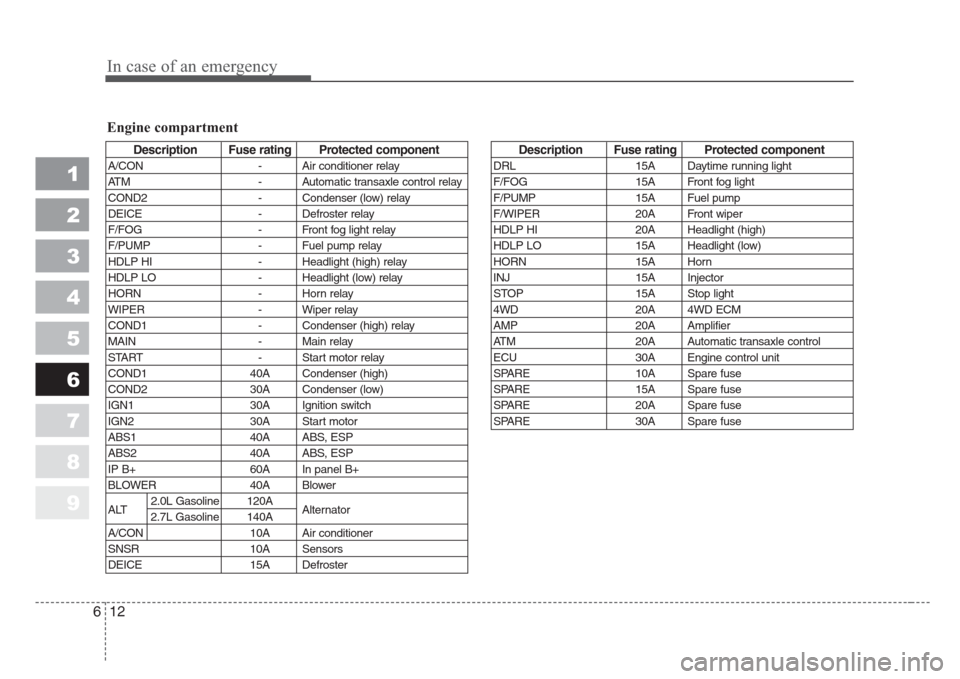
Engine compartment
Description Fuse rating Protected component
A/CON - Air conditioner relay
ATM - Automatic transaxle control relay
COND2 - Condenser (low) relay
DEICE - Defroster relay
F/FOG - Front fog light relay
F/PUMP - Fuel pump relay
HDLP HI - Headlight (high) relay
HDLP LO - Headlight (low) relay
HORN - Horn relay
WIPER - Wiper relay
COND1 - Condenser (high) relay
MAIN - Main relay
START - Start motor relay
COND1 40A Condenser (high)
COND2 30A Condenser (low)
IGN1 30A Ignition switch
IGN2 30A Start motor
ABS1 40A ABS, ESP
ABS2 40A ABS, ESP
IP B+ 60A In panel B+
BLOWER 40A Blower
ALT2.0L Gasoline 120A
Alternator
2.7L Gasoline 140A
A/CON 10A Air conditioner
SNSR 10A Sensors
DEICE 15A Defroster
Description Fuse rating Protected component
DRL 15A Daytime running light
F/FOG 15A Front fog light
F/PUMP 15A Fuel pump
F/WIPER 20A Front wiper
HDLP HI 20A Headlight (high)
HDLP LO 15A Headlight (low)
HORN 15A Horn
INJ 15A Injector
STOP 15A Stop light
4WD 20A 4WD ECM
AMP 20A Amplifier
ATM 20A Automatic transaxle control
ECU 30A Engine control unit
SPARE 10A Spare fuse
SPARE 15A Spare fuse
SPARE 20A Spare fuse
SPARE 30A Spare fuse
Page 278 of 350
In case of an emergency
16 6
1
2
3
4
5
6
7
8
9
To wing with a vehicle other
than a tow truck
If towing is necessary, we recom-
mend you to have it done by an
Authorized Kia dealer or a commer-
cial tow truck service.
If towing service is not available in an
emergency, your vehicle may be
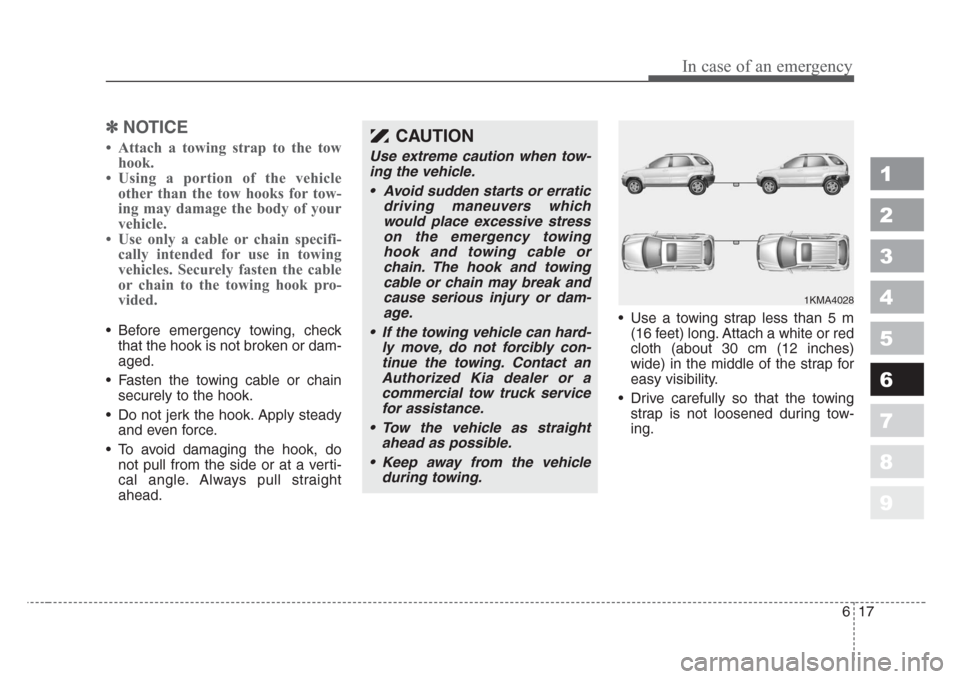
temporarily towed using a cable or
chain secured to the emergency tow-
ing hook under the front or rear of the
vehicle. Use extreme caution when
towing the vehicle. A driver must be
in the vehicle to steer it and operate
the brakes.Towing in this manner may be done
only on hard-surfaced roads for a
short distance and at low speeds.
Also, the wheels, axles, power train,
steering and brakes must all be in
good condition.
• Do not use the tow hooks to pull a
vehicle out of mud, sand or other
conditions from which the vehicle
cannot be driven out under its own
power.
• Avoid towing a vehicle heavier than
the vehicle doing the towing.
6KMA4026 • Front
1KMA4027 • Rear
Page 279 of 350
617
In case of an emergency
1
2
3
4
5
6
7
8
9
✽
NOTICE
• Attach a towing strap to the tow
hook.
• Using a portion of the vehicle
other than the tow hooks for tow-
ing may damage the body of your
vehicle.
• Use only a cable or chain specifi-
cally intended for use in towing
vehicles. Securely fasten the cable
or chain to the towing hook pro-
vided.
• Before emergency towing, check
that the hook is not broken or dam-
aged.
• Fasten the towing cable or chain
securely to the hook.
• Do not jerk the hook. Apply steady
and even force.
• To avoid damaging the hook, do
not pull from the side or at a verti-
cal angle. Always pull straight
ahead.• Use a towing strap less than 5 m
(16 feet) long. Attach a white or red
cloth (about 30 cm (12 inches)
wide) in the middle of the strap for
easy visibility.
• Drive carefully so that the towing
strap is not loosened during tow-
ing.
CAUTION
Use extreme caution when tow-
ing the vehicle.
• Avoid sudden starts or erratic
driving maneuvers which
would place excessive stress
on the emergency towing
hook and towing cable or
chain.The hook and towing
cable or chain may break and
cause serious injury or dam-
age.
• If the towing vehicle can hard-
ly move, do not forcibly con-
tinue the towing.Contact an
Authorized Kia dealer or a
commercial tow truck service
for assistance.
• Tow the vehicle a
s straight
ahead as possible.
• Keep away from the vehicle
during towing.
1KMA4028
Page 283 of 350
621
In case of an emergency
1
2
3
4
5
6
7
8
9
Changing tires
Jacking instructions
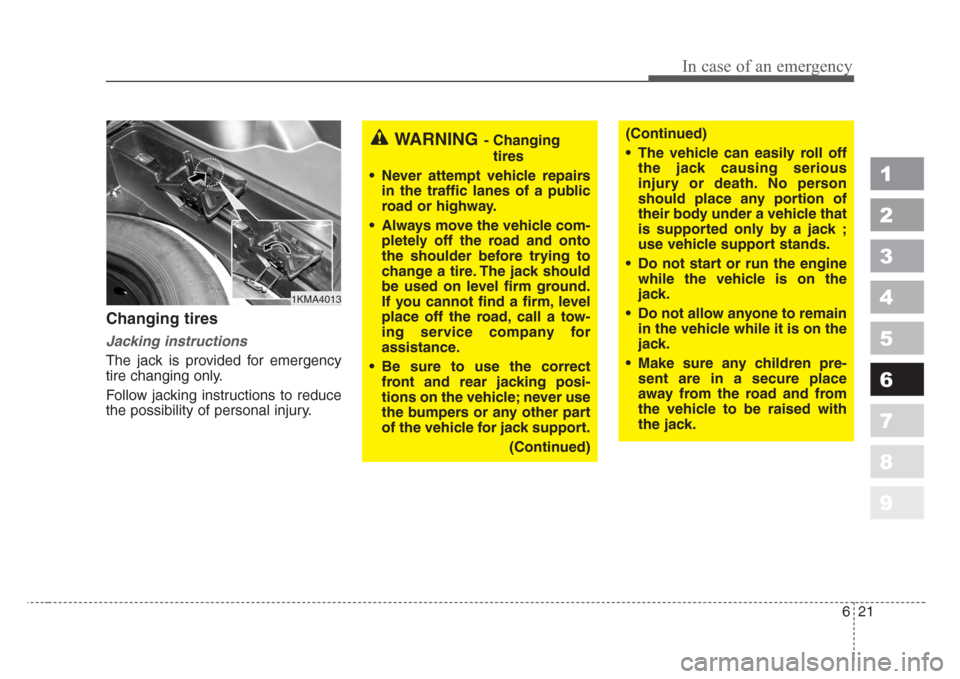
The jack is provided for emergency
tire changing only.
Follow jacking instructions to reduce
the possibility of personal injury.
WARNING- Changing
tires
• Never attempt vehicle repairs
in the traffic lanes of a public
road or highway.
•Always move the vehicle com-
pletely off the road and onto
the shoulder before trying to
change a tire.The jack should
be used on level firm ground.
If you cannot find a firm, level
place off the road, call a tow-
ing service company for
assistance.
• Be sure to use the correct
front and rear jacking posi-
tions on the vehicle; never use
the bumpers or any other part
of the vehicle for jack support.
(Continued)(Continued)
• The vehicle can easily roll off
the jack causing serious
injury or death.No person
should place any portion of
their body under a vehicle that
is supported only by a jack ;
use vehicle support stands.
• Do not start or run the engine
while the vehicle is on the
jack.
• Do not allow anyone to remain
in the vehicle while it is on the
jack.
• Make sure any children pre-
sent are in a secure place
away from the road and from
the vehicle to be raised with
the
jack.
1KMA4013