2008 KIA Sedona ESP
[x] Cancel search: ESPPage 259 of 339
427
Driving your vehicle
Driving at night
Because night driving presents more
hazards than driving in the daylight, here
are some important tips to remember:
• Slow down and keep more distance
between you and other vehicles, as it
may be more difficult to see at night,
especially in areas where there may
not be any street lights.
• Adjust your mirrors to reduce the glare
from other driver's headlights.
• Keep your headlights clean and prop-
erly aimed on vehicles not equipped
with the automatic headlight aiming
feature. Dirty or improperly aimed
headlights will make it much more diffi-
cult to see at night.
• Avoid staring directly at the headlights
of oncoming vehicles. You could be
temporarily blinded, and it will take
several seconds for your eyes to read-
just to the darkness.
Driving in the rain
Rain and wet roads can make driving
dangerous, especially if you’re not pre-
pared for the slick pavement. Here are a
few things to consider when driving in the
rain:
• A heavy rainfall will make it harder to
see and will increase the distance
needed to stop your vehicle, so slow
down.
• Keep your windshield wiping equip-
ment in good shape. Replace your
windshield wiper blades when they
show signs of streaking or missing
areas on the windshield.
• If your tires are not in good condition,
making a quick stop on wet pavement
can cause a skid and possibly lead to
an accident. Be sure your tires are in
good shape.
• Turn on your headlights to make it eas-
ier for others to see you.
• Driving too fast through large puddles
can affect your brakes. If you must go
through puddles, try to drive through
them slowly.
• If you believe you may have gotten
your brakes wet, apply them lightly
while driving until normal braking oper-
ation returns.
Driving in flooded areas
Avoid driving through flooded areas
unless you are sure the water is no high-
er than the bottom of the wheel hub.
Drive through any water slowly. Allow
adequate stopping distance because
brake performance may be affected.
After driving through water, dry the
brakes by gently applying them several
times while the vehicle is moving slowly.
Page 262 of 339
Driving your vehicle
30 4
Safety chains
You should always attach chains
between your vehicle and your trailer.
Cross the safety chains under the tongue
of the trailer so that the tongue will not
drop to the road if it becomes separated
from the hitch.
Instructions about safety chains may be
provided by the hitch manufacturer or by
the trailer manufacturer. Follow the man-
ufacturer’s recommendation for attaching
safety chains. Always leave just enough
slack so you can turn with your trailer.
And, never allow safety chains to drag on
the ground.
Trailer brakes
If your trailer weighs more than the max-
imum trailer weight without trailer brakes
loaded, then it needs its own brakes and
they must be adequate. Be sure to read
and follow the instructions for the trailer
brakes so you’ll be able to install, adjust
and maintain them properly.
• Don’t tap into your vehicle's brake sys-
tem.
Driving with a trailer
Towing a trailer requires a certain
amount of experience. Before setting out
for the open road, you must get to know
your trailer. Acquaint yourself with the
feel of handling and braking with the
added weight of the trailer. And always
keep in mind that the vehicle you are
driving is now a good deal longer and not
nearly so responsive as your vehicle is
by itself.
Before you start, check the trailer hitch
and platform, safety chains, electrical
connector(s), lights, tires and mirror
adjustment. If the trailer has electric
brakes, start your vehicle and trailer mov-
ing and then apply the trailer brake con-
troller by hand to be sure the brakes are
working. This lets you check your electri-
cal connection at the same time.
During your trip, check occasionally to be
sure that the load is secure, and that the
lights and any trailer brakes are still work-
ing.
WARNING- Trailer brakes
Do not use a trailer with its own
brakes unless you are absolutely
certain that you have properly set
up the brake system. This is not a
task for amateurs. Use an experi-
enced, competent trailer shop for
this work.
Page 276 of 339
59
What to do in an emergency
• Do not take this vehicle through an
automatic car wash while the com-
pact spare tire is installed.
• Do not use tire chains on the com-
pact spare tire. Because of the
smaller size, a tire chain will not fit
properly. This could damage the
vehicle and result in loss of the
chain.
• The compact spare tire should not
be installed on the front axle if the
vehicle must be driven in snow or
on ice.
• Do not use the compact spare tire
on any other vehicle because this
tire has been designed especially
for your vehicle.
• The compact spare tire’s tread life
is shorter than a regular tire.
Inspect your compact spare tire
regularly and replace worn com-
pact spare tires with the same size
and design, mounted on the same
wheel.
Changing tires
Jacking instructions
The jack is provided for emergency
tire changing only.
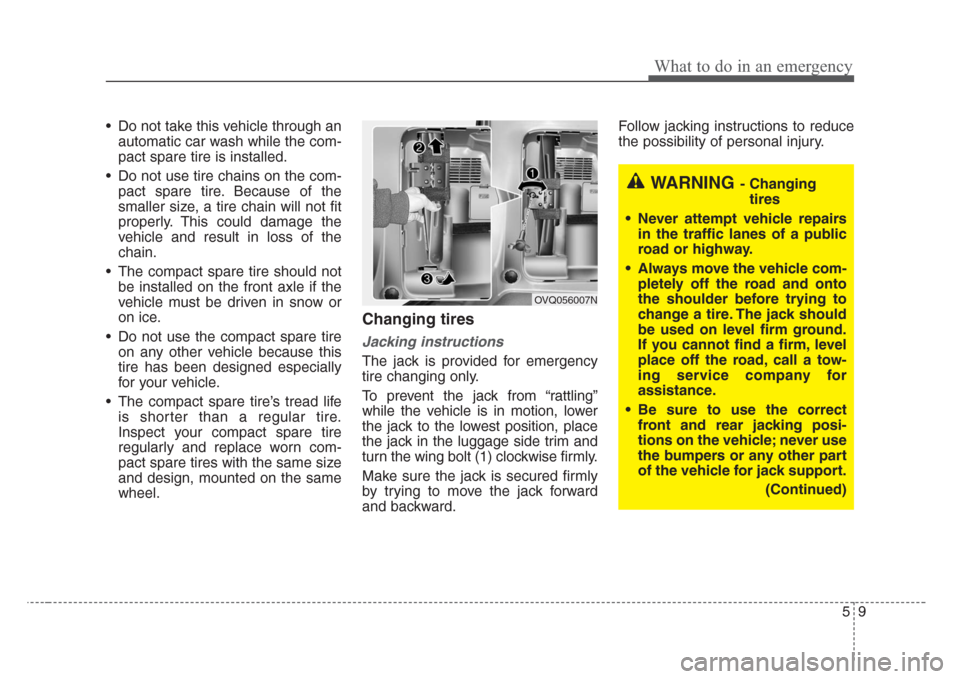
To prevent the jack from “rattling”
while the vehicle is in motion, lower
the jack to the lowest position, place
the jack in the luggage side trim and
turn the wing bolt (1) clockwise firmly.
Make sure the jack is secured firmly
by trying to move the jack forward
and backward.Follow jacking instructions to reduce
the possibility of personal injury.
WARNING- Changing
tires
• Never attempt vehicle repairs
in the traffic lanes of a public
road or highway.
• Always move the vehicle com-
pletely off the road and onto
the shoulder before trying to
change a tire. The jack should
be used on level firm ground.
If you cannot find a firm, level
place off the road, call a tow-
ing service company for
assistance.
• Be sure to use the correct
front and rear jacking posi-
tions on the vehicle; never use
the bumpers or any other part
of the vehicle for jack support.
(Continued)
OVQ056007N
Page 287 of 339
Maintenance
2 6
MAINTENANCE SERVICES
You should exercise the utmost care to
prevent damage to your vehicle and
injury to yourself whenever performing
any maintenance or inspection proce-
dures.
Should you have any doubts concerning
the inspection or servicing of your vehi-
cle, we strongly recommend that you
have an Authorized Kia Dealer perform
this work.
An Authorized Kia Dealer has factory-
trained technicians and genuine Kia
parts to service your vehicle properly. For
expert advice and quality service, see an
Authorized Kia Dealer.
Inadequate, incomplete or insufficient
servicing may result in operational prob-
lems with your vehicle that could lead to
vehicle damage, an accident, or person-
al injury.Owner’s responsibility
Maintenance Service and Record
Retention are the owner's responsibil-
ity.
You should retain documents that show
proper maintenance has been performed
on your vehicle in accordance with the
scheduled maintenance service charts
shown on the following pages. You need
this information to establish your compli-
ance with the servicing and maintenance
requirements of your Kia warranties.
Detailed warranty information is provided
in your Warranty & Consumer Information
manual.Repairs and adjustments required as a
result of improper maintenance or a lack
of required maintenance are not covered.
We strongly recommend that all vehicle
maintenance be performed by an author-
ized Kia dealer using genuine Kia parts.
Page 322 of 339
637
Maintenance
86 - Load Index, a numerical code
associated with the maximum
load the tire can carry.
H - Speed Rating Symbol. See the
speed rating chart in this section
for additional information.
Wheel size designation
Wheels are also marked with impor-
tant information that you need if you
ever have to replace one. The follow-
ing explains what the letters and
numbers in the wheel size designa-
tion mean.
Example wheel size designation:
5.5JX14
5.5 - Rim width in inches.
J - Rim contour designation.
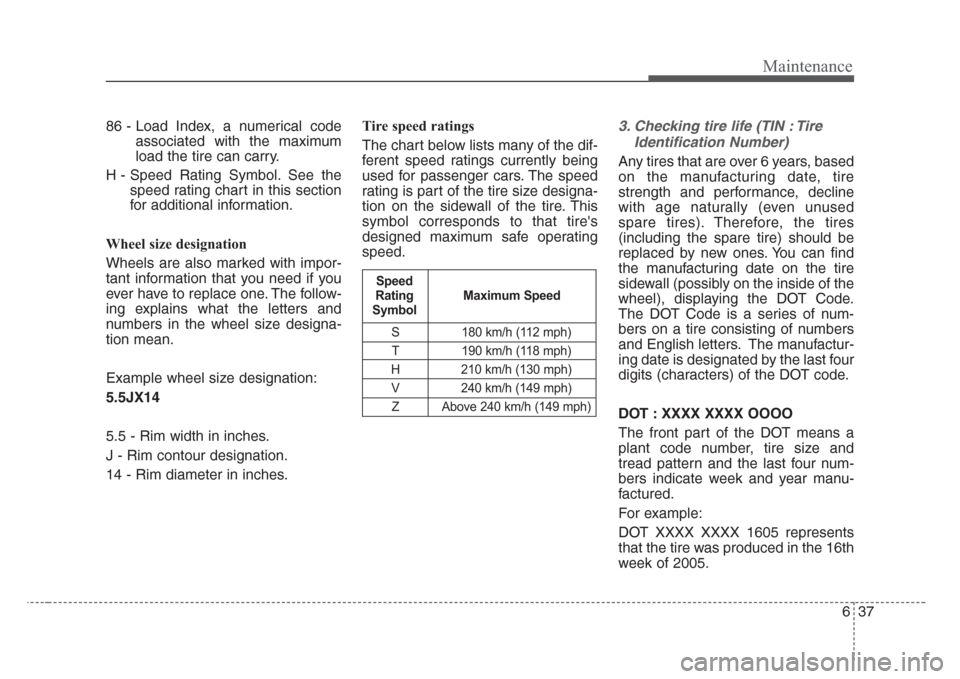
14 - Rim diameter in inches.Tire speed ratings
The chart below lists many of the dif-
ferent speed ratings currently being
used for passenger cars. The speed
rating is part of the tire size designa-
tion on the sidewall of the tire. This
symbol corresponds to that tire's
designed maximum safe operating
speed.3. Checking tire life (TIN : Tire
Identification Number)
Any tires that are over 6 years, based
on the manufacturing date, tire
strength and performance, decline
with age naturally (even unused
spare tires). Therefore, the tires
(including the spare tire) should be
replaced by new ones. You can find
the manufacturing date on the tire
sidewall (possibly on the inside of the
wheel), displaying the DOT Code.
The DOT Code is a series of num-
bers on a tire consisting of numbers
and English letters. The manufactur-
ing date is designated by the last four
digits (characters) of the DOT code.
DOT : XXXX XXXX OOOO
The front part of the DOT means a
plant code number, tire size and
tread pattern and the last four num-
bers indicate week and year manu-
factured.
For example:
DOT XXXX XXXX 1605 represents
that the tire was produced in the 16th
week of 2005.
S 180 km/h (112 mph)
T 190 km/h (118 mph)
H 210 km/h (130 mph)
V 240 km/h (149 mph)
Z Above 240 km/h (149 mph)
Maximum Speed Speed
Rating
Symbol
Page 323 of 339
Maintenance
38 6
4. Tire ply composition and mate-
rial
The number of layers or plies of rub-
ber-coated fabric in the tire. Tire
manufacturers also must indicate the
materials in the tire, which include
steel, nylon, polyester, and others.
The letter "R" means radial ply con-
struction; the letter "D" means diago-
nal or bias ply construction; and the
letter "B" means belted-bias ply con-
struction.
5. Maximum permissible inflation
pressure
This number is the greatest amount
of air pressure that should be put in
the tire. Do not exceed the maximum
permissible inflation pressure. Refer
to the Tire and Loading Information
label for recommended inflation
pressure.
6. Maximum load rating
This number indicates the maximum
load in kilograms and pounds that
can be carried by the tire. When
replacing the tires on the vehicle,
always use a tire that has the same
load rating as the factory installed
tire.
7. Uniform tire quality grading
The following information relates to
the tire grading system developed by
the Canadian Motor Vehicle Safety
Standard (CMVSS) for grading tires
by tread wear, traction and tempera-
ture performance.Tread wear
The tread wear grade is a compara-
tive rating based on the wear rate of
the tire when tested under controlled
conditions on a specified govern-
ment test course. For example, a tire
graded 150 would wear one-and-a-
half times as well on the government
course as a tire graded 100.
The relative performance of tires
depends upon the actual conditions
of their use. However, performance
may differ from the norm because of
variations in driving habits, service
practices and differences in road
characteristics and climate.
These grades are molded on the
side-walls of passenger vehicle tires.
The tires available as standard or
optional equipment on Kia vehicles
may vary with respect to grade.
WARNING - Tire age
Tires degrade over time, even
when they are not being used.
Regardless of the remaining
tread, it is recommended that
tires generally be replaced after
six (6) years of normal service.
Heat caused by hot climates or
frequent high loading conditions
can accelerate the aging
process. Failure to follow this
warning can result in sudden tire
failure, which could lead to a
loss of control and an accident
involving serious injury or death.
Page 327 of 339
Maintenance
42 6
LUBRICANT
Recommended lubricants
To help achieve proper engine and powertrain performance and
durability, use only lubricants of the proper quality. The correct
lubricants also help promote engine efficiency that results in
improved fuel economy.
Engine oils labeled Energy Conserving Oil are now available.
Along with other additional benefits, they contribute to fuel
economy by reducing the amount of fuel necessary to over-
come engine friction. Often, these improvements are difficult to
measure in everyday driving, but in a year’s time, they can offer
significant cost and energy savings.
These lubricants and fluids are recommended for use in your
vehicle.
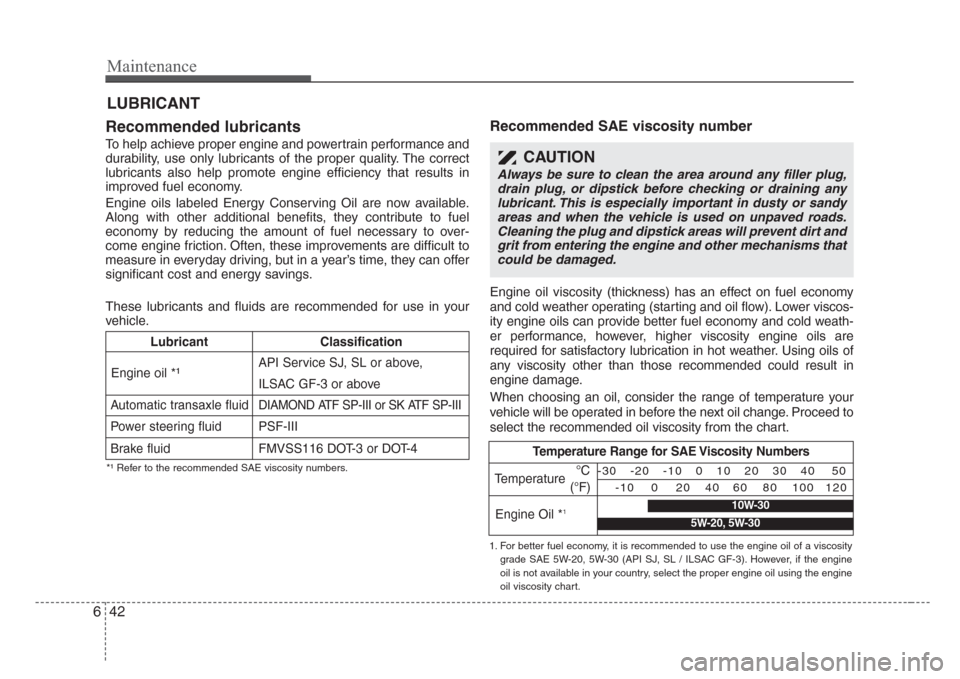
Recommended SAE viscosity number
Engine oil viscosity (thickness) has an effect on fuel economy
and cold weather operating (starting and oil flow). Lower viscos-
ity engine oils can provide better fuel economy and cold weath-
er performance, however, higher viscosity engine oils are
required for satisfactory lubrication in hot weather. Using oils of
any viscosity other than those recommended could result in
engine damage.
When choosing an oil, consider the range of temperature your
vehicle will be operated in before the next oil change. Proceed to
select the recommended oil viscosity from the chart.
CAUTION
Always be sure to clean the area around any filler plug,
drain plug, or dipstick before checking or draining any
lubricant. This is especially important in dusty or sandy
areas and when the vehicle is used on unpaved roads.
Cleaning the plug and dipstick areas will prevent dirt and
grit from entering the engine and other mechanisms that
could be damaged.
*¹ Refer to the recommended SAE viscosity numbers.
Lubricant Classification
API Service SJ, SL or above,
ILSAC GF-3 or above
Automatic transaxle fluid
DIAMOND ATF SP-III or SK ATF SP-III
Power steering fluid PSF-III
Brake fluid FMVSS116 DOT-3 or DOT-4
Engine oil *¹
Temperature Range for SAE Viscosity Numbers
Temperature
Engine Oil *
1
°C
(°F)-30 -20 -10 0 10 20 30 40 50
-10 0 20 40 60 80 100 120
1. For better fuel economy, it is recommended to use the engine oil of a viscosity
grade SAE 5W-20, 5W-30 (API SJ, SL / ILSAC GF-3). However, if the engine
oil is not available in your country, select the proper engine oil using the engine
oil viscosity chart.
10W-30
5W-20, 5W-30