2008 INFINITI QX56 cooling
[x] Cancel search: coolingPage 2232 of 4083
ELECTRICAL LEAK DETECTORHA-27
< ON-VEHICLE MAINTENANCE >
C
DE
F
G H
J
K L
M A
B
HA
N
O P
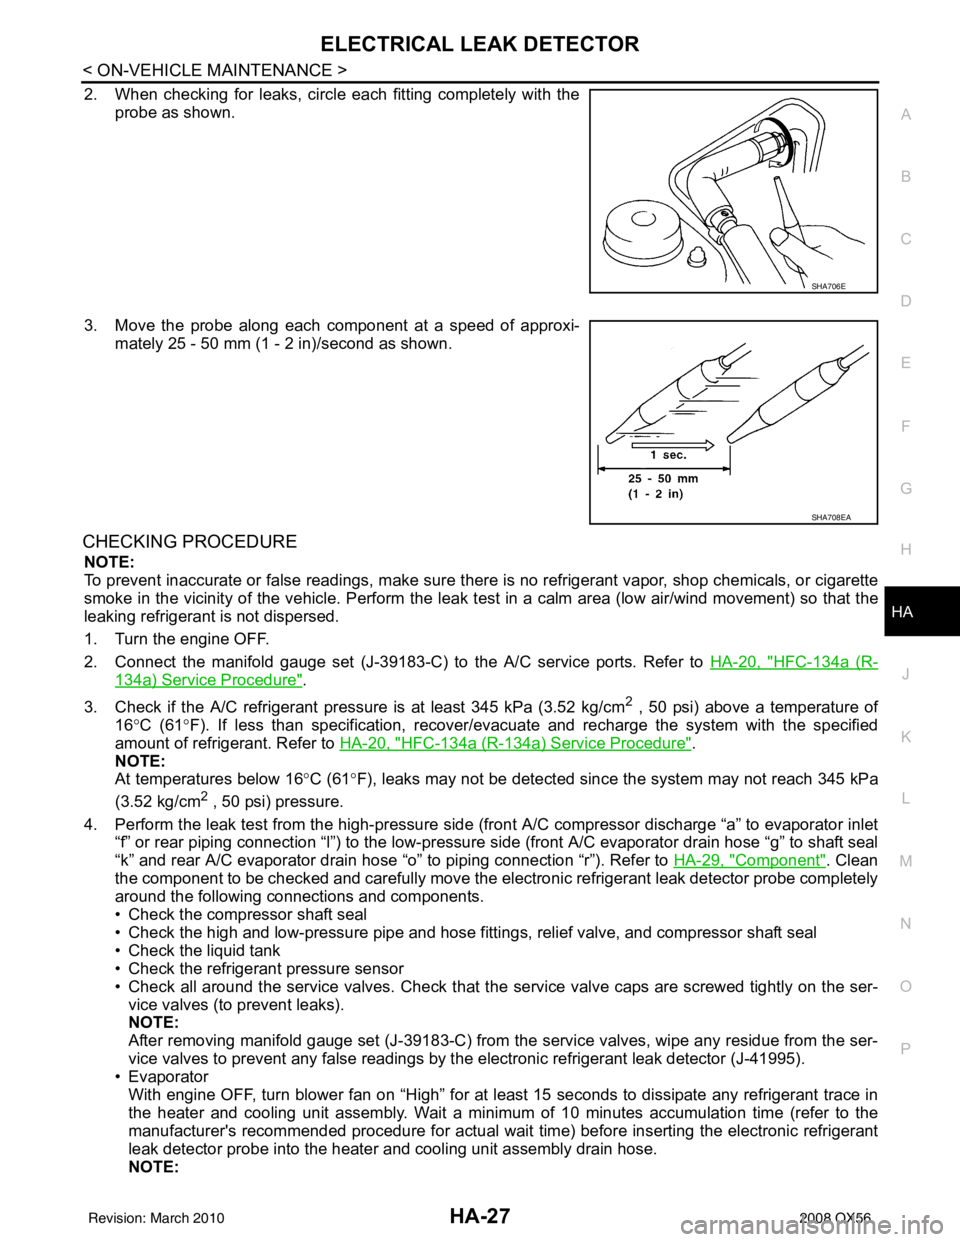
2. When checking for leaks, circle each fitting completely with the probe as shown.
3. Move the probe along each component at a speed of approxi- mately 25 - 50 mm (1 - 2 in)/second as shown.
CHECKING PROCEDURE
NOTE:
To prevent inaccurate or false readings, make sure t here is no refrigerant vapor, shop chemicals, or cigarette
smoke in the vicinity of the vehicle. Perform the leak test in a calm area (low air/wind movement) so that the
leaking refrigerant is not dispersed.
1. Turn the engine OFF.
2. Connect the manifold gauge set (J-39183-C) to the A/C service ports. Refer to HA-20, "
HFC-134a (R-
134a) Service Procedure".
3. Check if the A/C refrigerant pressu re is at least 345 kPa (3.52 kg/cm
2 , 50 psi) above a temperature of
16° C (61° F). If less than specification, recover/ev acuate and recharge the system with the specified
amount of refrigerant. Refer to HA-20, "
HFC-134a (R-134a) Service Procedure".
NOTE:
At temperatures below 16 °C (61° F), leaks may not be detected sinc e the system may not reach 345 kPa
(3.52 kg/cm
2 , 50 psi) pressure.
4. Perform the leak test from the high-pressure side (front A/C compressor discharge “a” to evaporator inlet “f” or rear piping connection “l”) to the low-pressure side (front A/C evaporator drain hose “g” to shaft seal
“k” and rear A/C evaporator drain hose “o” to piping connection “r”). Refer to HA-29, "
Component". Clean
the component to be checked and carefully move the electronic refrigerant leak detector probe completely
around the following connections and components.
• Check the compressor shaft seal
• Check the high and low-pressure pipe and hose fitt ings, relief valve, and compressor shaft seal
• Check the liquid tank
• Check the refrigerant pressure sensor
• Check all around the service valves. Check that the service valve caps are screwed tightly on the ser-
vice valves (to prevent leaks).
NOTE:
After removing manifold gauge set (J-39183-C) from the service valves, wipe any residue from the ser-
vice valves to prevent any false readings by the electronic refrigerant leak detector (J-41995).
• Evaporator
With engine OFF, turn blower fan on “High” for at least 15 seconds to dissipate any refrigerant trace in
the heater and cooling unit assembly. Wait a minimum of 10 minutes accumulation time (refer to the
manufacturer's recommended procedure for actual wait time) before inserting the electronic refrigerant
leak detector probe into the heater and cooling unit assembly drain hose.
NOTE:
SHA706E
SHA708EA
Revision: March 2010 2008 QX56
Page 2235 of 4083
HA-30
< ON-VEHICLE REPAIR >
REFRIGERATION SYSTEM
Rear A/C System
NOTE:
Refer to HA-5, "
Precaution for Refrigerant Connection".
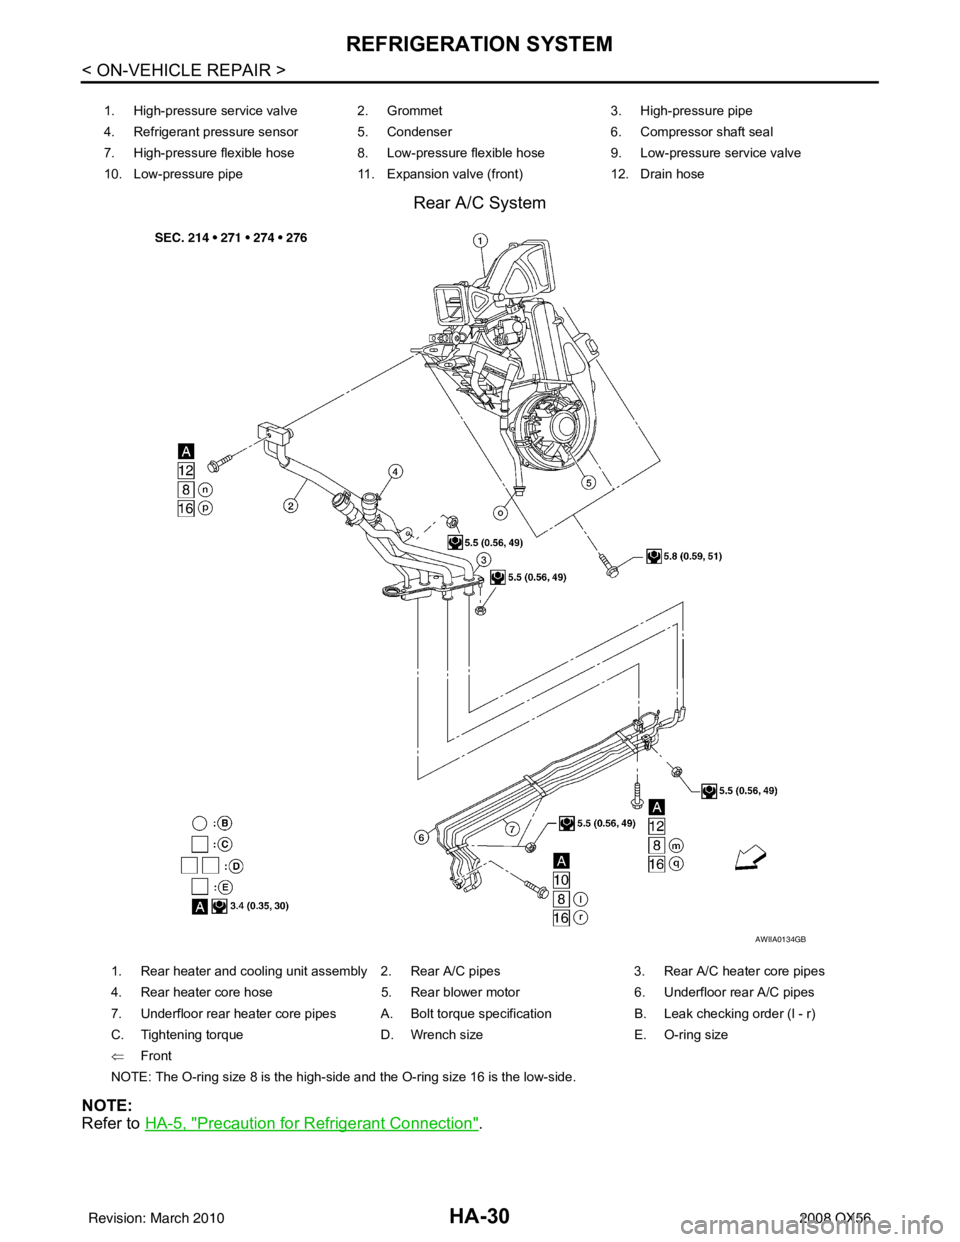
1. High-pressure service valve 2. Grommet 3. High-pressure pipe
4. Refrigerant pressure sensor 5. Condenser 6. Compressor shaft seal
7. High-pressure flexible hose 8. Low-pressure flexible hose 9. Low-pressure service valve
10. Low-pressure pipe 11. Expansion valve (front)12. Drain hose
AWIIA0134GB
1. Rear heater and cooling unit assembly 2. Rear A/C pipes 3. Rear A/C heater core pipes
4. Rear heater core hose 5. Rear blower motor6. Underfloor rear A/C pipes
7. Underfloor rear heater core pipes A. Bolt torque specification B. Leak checking order (l - r)
C. Tightening torque D. Wrench sizeE. O-ring size
⇐ Front
NOTE: The O-ring size 8 is the high-side and the O-ring size 16 is the low-side.
Revision: March 2010 2008 QX56
Page 2242 of 4083
LOW-PRESSURE PIPEHA-37
< ON-VEHICLE REPAIR >
C
DE
F
G H
J
K L
M A
B
HA
N
O P
LOW-PRESSURE PIPE
Removal and Installation for Low-Pressure PipeINFOID:0000000001516655
REMOVAL
1. Discharge the refrigerant. Refer to HA-20, "HFC-134a (R-134a) Service Procedure".
2. Remove the cowl top and the cowl top extension. Refer to EXT-18, "
Removal and Installation".
3. Remove the low-pressure pipe. CAUTION:
Cap or wrap the joint of the pipes with suitable material such as viny l tape to avoid the entry of air.
INSTALLATION
Installation is in the reverse order of removal.
Refer to HA-29, "
Component".
CAUTION:
• Replace the O-ring of the high/low-pressure pipe with a new one, then apply compressor oil to it
when installing it.
• After charging refrigerant, check for leaks.
Removal and Installation for Rear High- and Low-Pressure A/C and Heater Core Pipes
INFOID:0000000002975446
REMOVAL
1. Discharge the refrigerant from the A/C system. Refer to HA-20, "HFC-134a (R-134a) Service Procedure".
2. Drain the coolant from the engine cooling system. Refer to CO-11, "
Changing Engine Coolant".
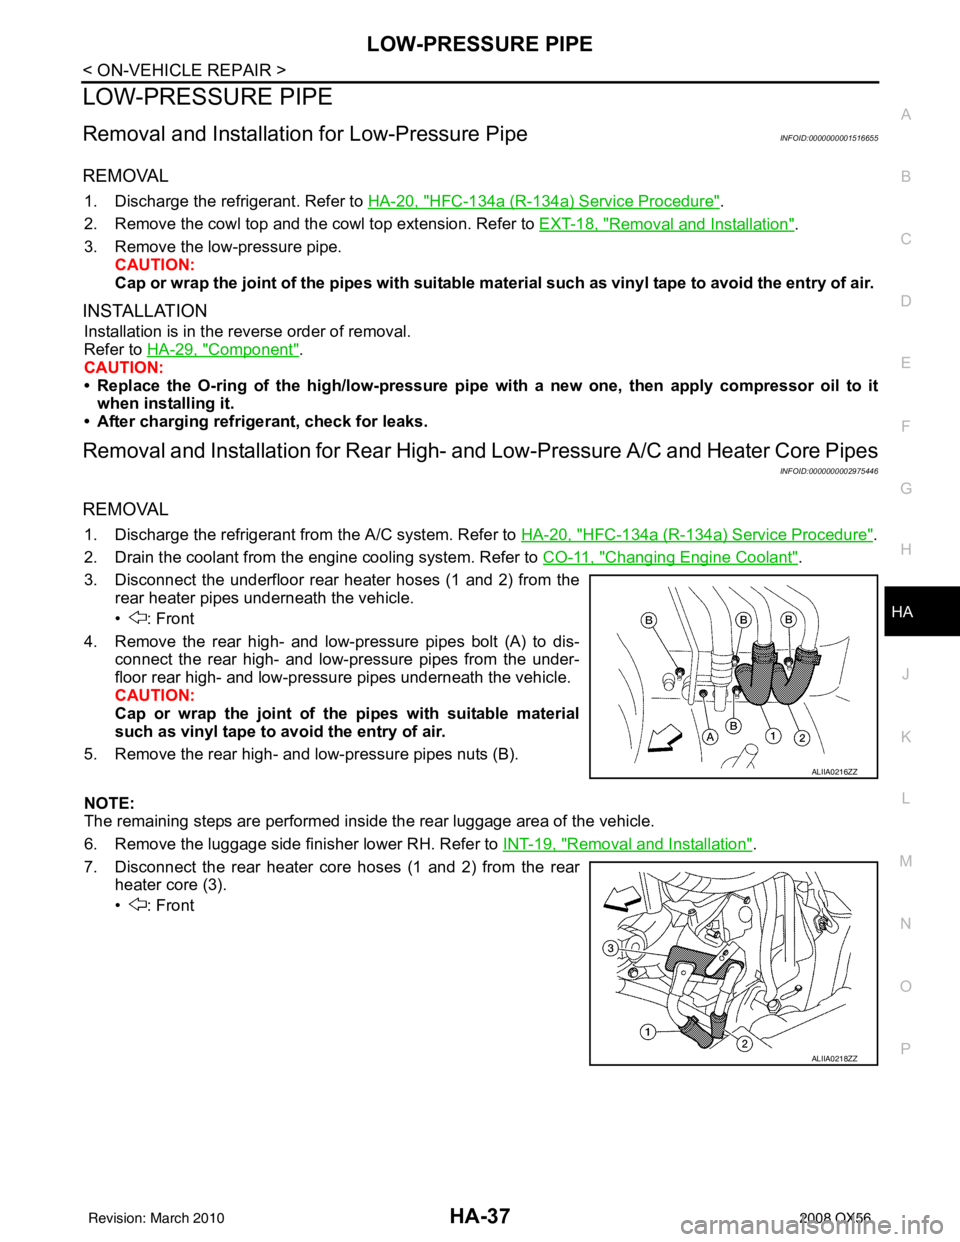
3. Disconnect the underfloor rear heater hoses (1 and 2) from the rear heater pipes underneath the vehicle.
• : Front
4. Remove the rear high- and low-pressure pipes bolt (A) to dis- connect the rear high- and low-pressure pipes from the under-
floor rear high- and low-pressure pipes underneath the vehicle.
CAUTION:
Cap or wrap the joint of the pipes with suitable material
such as vinyl tape to avo id the entry of air.
5. Remove the rear high- and low-pressure pipes nuts (B).
NOTE:
The remaining steps are performed inside the rear luggage area of the vehicle.
6. Remove the luggage side finisher lower RH. Refer to INT-19, "
Removal and Installation".
7. Disconnect the rear heater core hoses (1 and 2) from the rear heater core (3).
• : Front
ALIIA0216ZZ
ALIIA0218ZZ
Revision: March 2010 2008 QX56
Page 2243 of 4083
HA-38
< ON-VEHICLE REPAIR >
LOW-PRESSURE PIPE
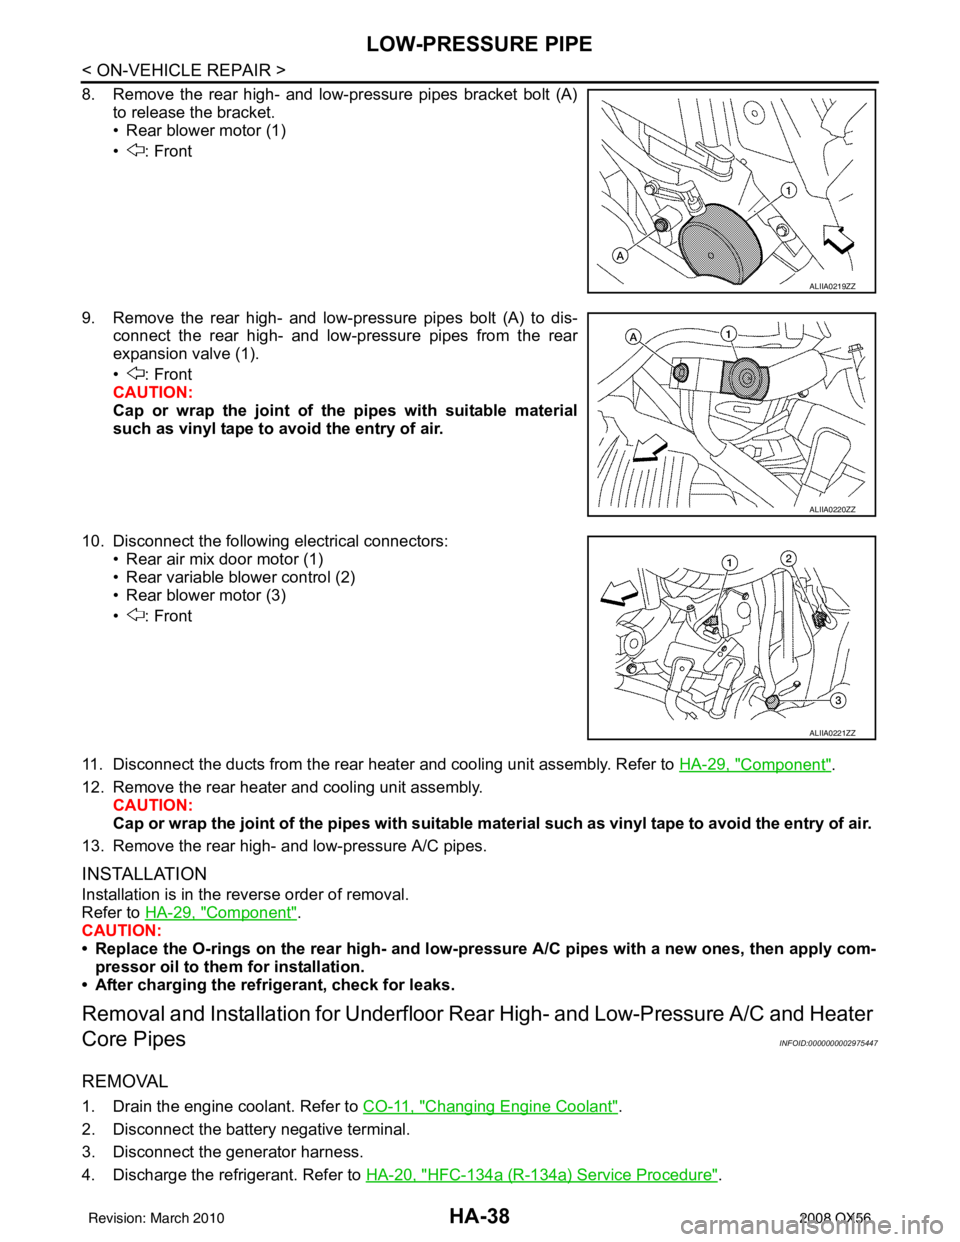
8. Remove the rear high- and low-pressure pipes bracket bolt (A)to release the bracket.
• Rear blower motor (1)
• : Front
9. Remove the rear high- and low-pressure pipes bolt (A) to dis- connect the rear high- and low-pressure pipes from the rear
expansion valve (1).
• : Front
CAUTION:
Cap or wrap the joint of the pipes with suitable material
such as vinyl tape to avoid the entry of air.
10. Disconnect the following electrical connectors: • Rear air mix door motor (1)
• Rear variable blower control (2)
• Rear blower motor (3)
• : Front
11. Disconnect the ducts from the rear heater and cooling unit assembly. Refer to HA-29, "
Component".
12. Remove the rear heater and cooling unit assembly. CAUTION:
Cap or wrap the joint of the pipes with suitable material such as viny l tape to avoid the entry of air.
13. Remove the rear high- and low-pressure A/C pipes.
INSTALLATION
Installation is in the reverse order of removal.
Refer to HA-29, "
Component".
CAUTION:
• Replace the O-rings on the rear high- and low-pr essure A/C pipes with a new ones, then apply com-
pressor oil to them for installation.
• After charging the refrigerant, check for leaks.
Removal and Installati on for Underfloor Rear High- and Low-Pressure A/C and Heater
Core Pipes
INFOID:0000000002975447
REMOVAL
1. Drain the engine coolant. Refer to CO-11, "Changing Engine Coolant".
2. Disconnect the battery negative terminal.
3. Disconnect the generator harness.
4. Discharge the refrigerant. Refer to HA-20, "
HFC-134a (R-134a) Service Procedure".
ALIIA0219ZZ
ALIIA0220ZZ
ALIIA0221ZZ
Revision: March 2010 2008 QX56
Page 2246 of 4083
HIGH-PRESSURE PIPEHA-41
< ON-VEHICLE REPAIR >
C
DE
F
G H
J
K L
M A
B
HA
N
O P
HIGH-PRESSURE PIPE
Removal and Installation for High-Pressure PipeINFOID:0000000001516657
REMOVAL
1. Remove the cowl top extension. Refer to EXT-18, "Removal and Installation".
2. Disconnect the battery negative terminal and positive battery terminal.
3. Reposition the IPDM E/R aside.
4. Remove the front right wheel and tire assembly. Refer to WT-48, "
Rotation".
5. Remove front right fender protector. Refer to EXT-23, "
Removal and Installation"
6. Position aside the front floor insulator.
7. Discharge the refrigerant. Refer to HA-20, "
HFC-134a (R-134a) Service Procedure".
8. Remove the low pressure pipe. Refer to HA-37, "
Removal and Installation for Low-Pressure Pipe".
9. Remove the high-pressure pipe. CAUTION:
Cap or wrap the joint of the pipe with suitable mate rial such as vinyl tape to avoid the entry of air.
INSTALLATION
Installation is in the reverse order of removal.
Refer to HA-29, "
Component".
CAUTION:
• Replace the O-ring of the high-pressure pipe with a new one, then apply compressor oil to it when
installing it.
• After charging refrigerant, check for leaks.
Removal and Installation for Rear High- and Low-Pressure A/C and Heater Core Pipes
INFOID:0000000002975448
REMOVAL
1. Discharge the refrigerant from the A/C system. Refer to HA-20, "HFC-134a (R-134a) Service Procedure".
2. Drain the coolant from the engine cooling system. Refer to CO-11, "
Changing Engine Coolant".
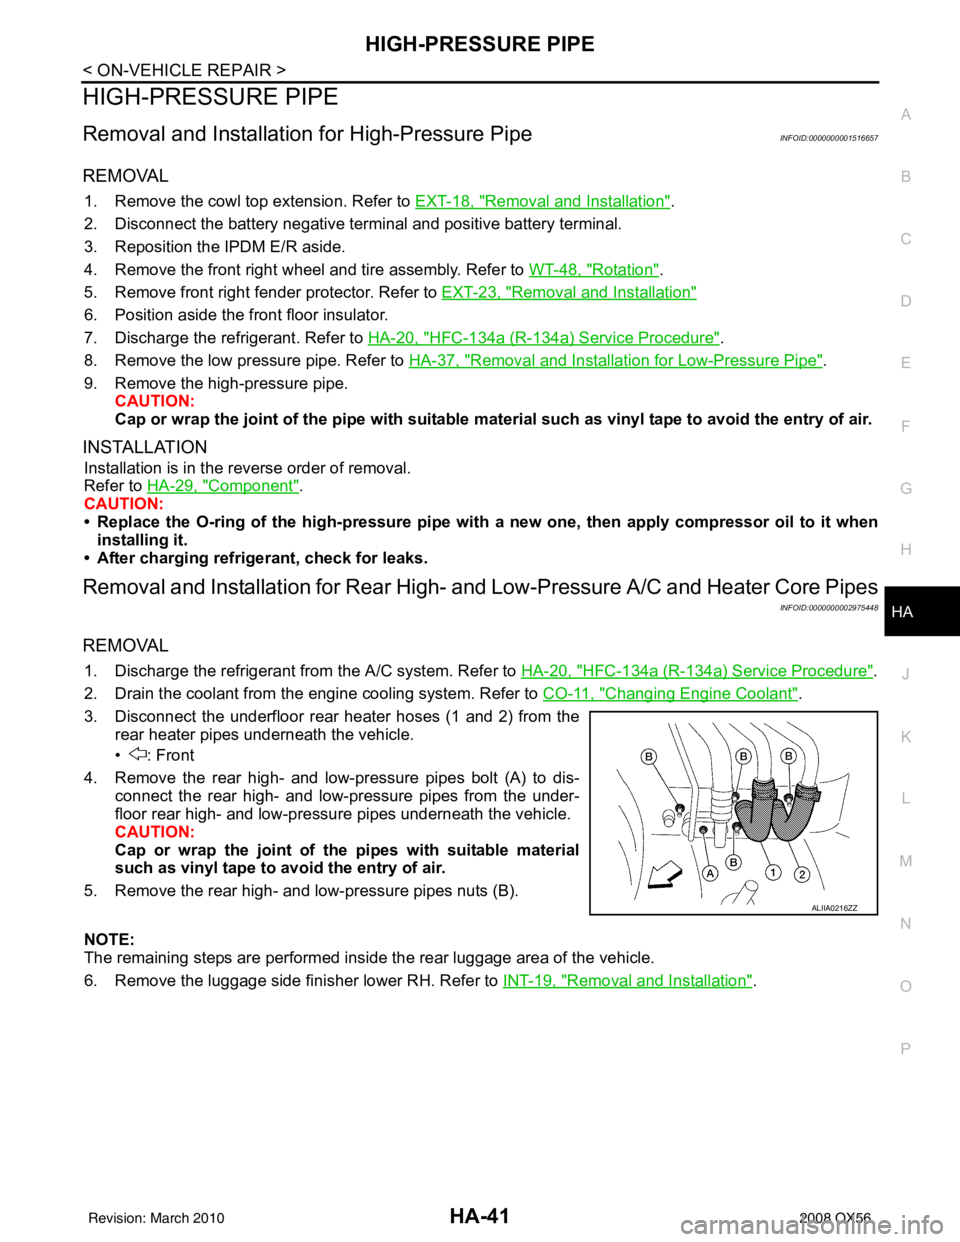
3. Disconnect the underfloor rear heater hoses (1 and 2) from the rear heater pipes underneath the vehicle.
• : Front
4. Remove the rear high- and low-pressure pipes bolt (A) to dis- connect the rear high- and low-pressure pipes from the under-
floor rear high- and low-pressure pipes underneath the vehicle.
CAUTION:
Cap or wrap the joint of the pipes with suitable material
such as vinyl tape to avo id the entry of air.
5. Remove the rear high- and low-pressure pipes nuts (B).
NOTE:
The remaining steps are performed inside the rear luggage area of the vehicle.
6. Remove the luggage side finisher lower RH. Refer to INT-19, "
Removal and Installation".
ALIIA0216ZZ
Revision: March 2010 2008 QX56
Page 2247 of 4083
HA-42
< ON-VEHICLE REPAIR >
HIGH-PRESSURE PIPE
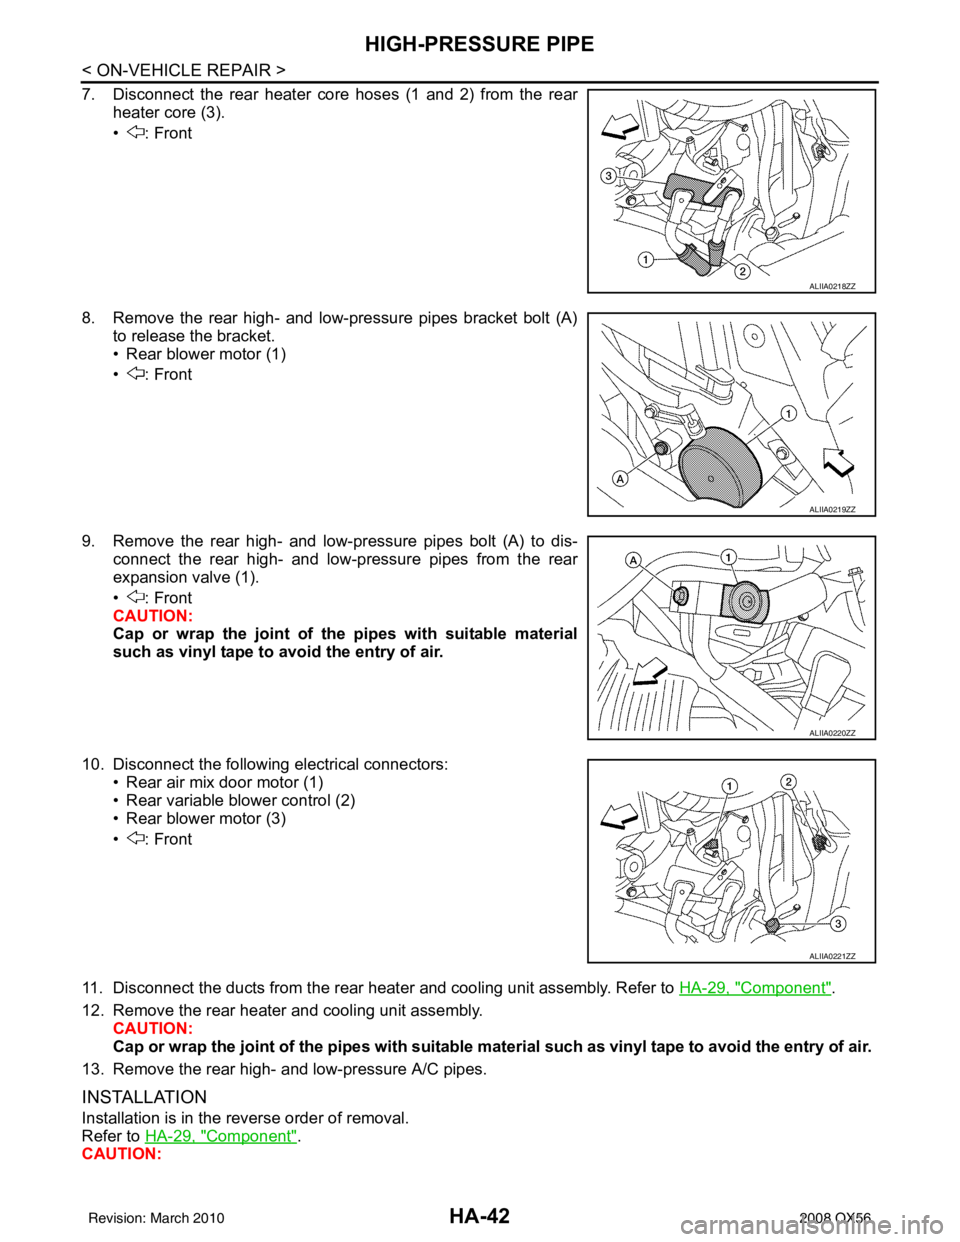
7. Disconnect the rear heater core hoses (1 and 2) from the rearheater core (3).
• : Front
8. Remove the rear high- and low-pressure pipes bracket bolt (A) to release the bracket.
• Rear blower motor (1)
• : Front
9. Remove the rear high- and low-pressure pipes bolt (A) to dis- connect the rear high- and low-pressure pipes from the rear
expansion valve (1).
• : Front
CAUTION:
Cap or wrap the joint of the pipes with suitable material
such as vinyl tape to avoid the entry of air.
10. Disconnect the following electrical connectors: • Rear air mix door motor (1)
• Rear variable blower control (2)
• Rear blower motor (3)
• : Front
11. Disconnect the ducts from the rear heater and cooling unit assembly. Refer to HA-29, "
Component".
12. Remove the rear heater and cooling unit assembly. CAUTION:
Cap or wrap the joint of the pipes with suitable material such as viny l tape to avoid the entry of air.
13. Remove the rear high- and low-pressure A/C pipes.
INSTALLATION
Installation is in the reverse order of removal.
Refer to HA-29, "
Component".
CAUTION:
ALIIA0218ZZ
ALIIA0219ZZ
ALIIA0220ZZ
ALIIA0221ZZ
Revision: March 2010 2008 QX56
Page 2255 of 4083

HAC-2
MAGNET CLUTCH ............................................71
System Description .............................................. ...71
Magnet Clutch Component Function Check ........ ...71
Magnet Clutch Diagnosis Procedure ................... ...72
WATER VALVE CIRCUIT ..................................76
Description ........................................................... ...76
Water Valve Diagnosis Procedure ..........................76
AMBIENT SENSOR ...........................................78
Component Description ....................................... ...78
Ambient Sensor Diagnosis Procedure ....................78
Ambient Sensor Component Inspection .................79
IN-VEHICLE SENSOR .......................................81
Component Description ....................................... ...81
In-Vehicle Sensor Diagnosis Procedure .................81
In-Vehicle Sensor Component Inspection ..............83
OPTICAL SENSOR ...........................................84
Component Description ..........................................84
Optical Sensor Diagnosis Procedure ......................84
INTAKE SENSOR ..............................................86
System Description .............................................. ...86
Intake Sensor Diagnosis Procedure .......................86
Intake Sensor Component Inspection ................. ...87
POWER SUPPLY AND GROUND CIRCUIT
FOR CONTROLLER ..........................................
88
Component Description ....................................... ...88
A/C Auto Amp. Component Function Check ..........88
A/C Auto Amp Power and Ground Diagnosis Pro-
cedure .....................................................................
89
ECU DIAGNOSIS .......................................90
AIR CONDITIONER CONTROL ..................... ...90
A/C Auto Amp. Terminals Reference Values ..........90
Wiring Diagram .................................................... ...92
SYMPTOM DIAGNOSIS ...........................108
AIR CONDITIONER CONTROL ..................... ..108
Symptom Matrix Chart ........................................ .108
INSUFFICIENT COOLING ................................109
Component Function Check ................................ .109
Diagnostic Work Flow ...........................................110
Performance Chart ................................................113
Trouble Diagnoses for Abnormal Pressure ...........114
INSUFFICIENT HEATING ................................117
Component Function Check .................................117
NOISE ...............................................................119
Component Function Check ................................ .119
MEMORY FUNCTION DOES NOT OPERATE ..121
Memory Function Check ...................................... .121
PRECAUTION ...........................................122
PRECAUTIONS .............................................. ..122
Precaution for Supplemental Restraint System
(SRS) "AIR BAG" and "SEAT BELT PRE-TEN-
SIONER" .............................................................. .
122
Working with HFC-134a (R-134a) ........................ .122
Precaution for Service Equipment ........................123
Revision: March 2010 2008 QX56
Page 2263 of 4083
![INFINITI QX56 2008 Factory Service Manual HAC-10
< FUNCTION DIAGNOSIS >[AUTOMATIC AIR CONDITIONER]
FUNCTION INFORMATION
Defroster door motor is malfunctioning. Go to Trouble Diagnosis Procedure for Defroster Door Motor.
HAC-45
Front blower mo INFINITI QX56 2008 Factory Service Manual HAC-10
< FUNCTION DIAGNOSIS >[AUTOMATIC AIR CONDITIONER]
FUNCTION INFORMATION
Defroster door motor is malfunctioning. Go to Trouble Diagnosis Procedure for Defroster Door Motor.
HAC-45
Front blower mo](/manual-img/42/57030/w960_57030-2262.png)
HAC-10
< FUNCTION DIAGNOSIS >[AUTOMATIC AIR CONDITIONER]
FUNCTION INFORMATION
Defroster door motor is malfunctioning. Go to Trouble Diagnosis Procedure for Defroster Door Motor.
HAC-45
Front blower motor operation is malfunction-
ing.Go to Trouble Diagnosis Procedure for Front Blower Motor.
HAC-50
Rear blower motor operation is malfunction-
ing.Go to Trouble Diagnosis Procedure for Rear Blower Motor.
HAC-56
Rear air discharge outlet does not change. Go to Trouble Diagnosis Procedure for Mode Door Motor (rear). HAC-61
Rear air temperature does not change. Go to Trouble Diagnosis Procedure for Air Mix Door Motor (rear).HAC-61
Magnet clutch does not engage.Go to Trouble Diagnosis Procedure for Magnet Clutch. HAC-71
Insufficient coolingGo to Trouble Diagnosis Procedure for Insufficient Cooling. HAC-109
Insufficient heatingGo to Trouble Diagnosis Procedure for Insufficient Heating. HAC-117
NoiseGo to Trouble Diagnosis Procedure for Noise. HAC-119
Self-diagnosis cannot be performed. Go to Trouble Diagnosis Procedure for Self-diagnosis. HAC-88
Memory function does not operate.Go to Trouble Diagnosis Procedure for Memory Function. HAC-121
SymptomReference Page
Revision: March 2010 2008 QX56