Page 3381 of 4083

DRIVER AIR BAG MODULESR-5
< ON-VEHICLE REPAIR >
C
DE
F
G
I
J
K L
M A
B
SR
N
O P
ON-VEHICLE REPAIR
DRIVER AIR BAG MODULE
Removal and InstallationINFOID:0000000001602201
REMOVAL
CAUTION:
• Do not attempt to repair or replace damaged direct-connect SRS component connectors. If a driver air bag direct-connect harness connector is damaged, the spiral cable must be replaced.
• Before servicing the SRS, turn ignition switch OFF, disconnect both battery cables and wait at least
3 minutes.
• When servicing the SRS, do not work from directly in front of air bag module.
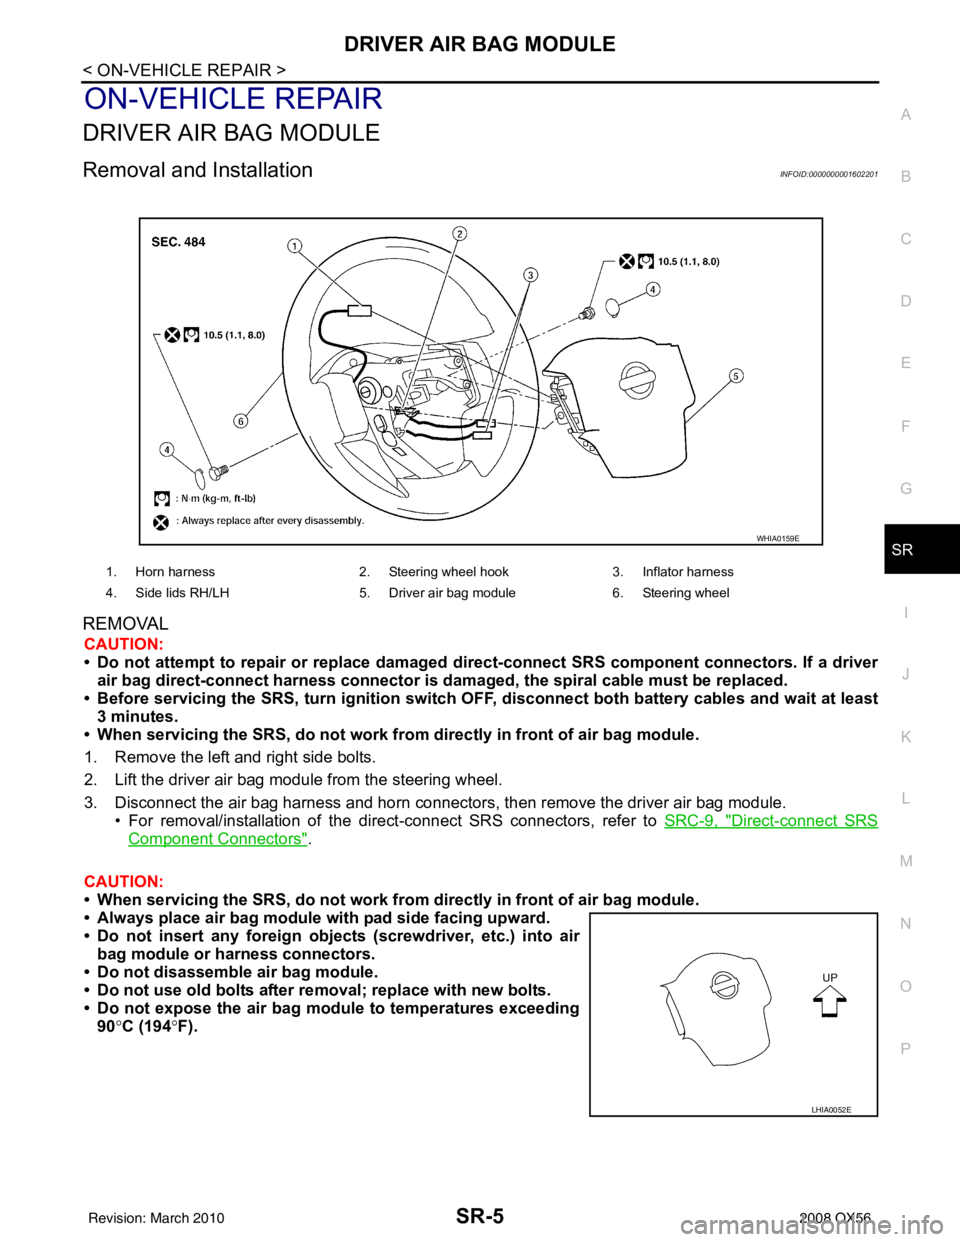
1. Remove the left and right side bolts.
2. Lift the driver air bag module from the steering wheel.
3. Disconnect the air bag harness and horn connectors, then remove the driver air bag module. • For removal/installation of the direct-connect SRS connectors, refer to SRC-9, "
Direct-connect SRS
Component Connectors".
CAUTION:
• When servicing the SRS, do not work from directly in front of air bag module.
• Always place air bag module wi th pad side facing upward.
• Do not insert any foreign object s (screwdriver, etc.) into air
bag module or harness connectors.
• Do not disassemble air bag module.
• Do not use old bolts after removal; replace with new bolts.
• Do not expose the air bag mo dule to temperatures exceeding
90° C (194 °F).
1. Horn harness 2. Steering wheel hook3. Inflator harness
4. Side lids RH/LH 5. Driver air bag module6. Steering wheel
WHIA0159E
LHIA0052E
Revision: March 2010 2008 QX56
Page 3497 of 4083
ST-6
< PREPARATION >
PREPARATION
Commercial Service Tool
INFOID:0000000004920095
KV40107300
(—) Crimping boot bands
—
(J-44372)
Spring gauge Measuring steering wheel turning force
Tool number
(Kent-Moore No.)
Tool name
Description
ZZA1229D
LST024
Tool name
Description
Power tool Removing nuts and bolts
PBIC0190E
Revision: March 2010 2008 QX56
Page 3513 of 4083

ST-22
< REMOVAL AND INSTALLATION >
STEERING COLUMN
• Check for proper lubrication, apply grease as necessary.
INSTALLATION
Installation is in the reverse order of removal.
CAUTION:
• When installing the steering column, finger-tighten all of the lower bracket and joint retaining bolts;
then tighten them to specifi cation. Do not apply undue st ress to the steering column.
• The lower nut on the upper joint may not be reused.
NOTE:
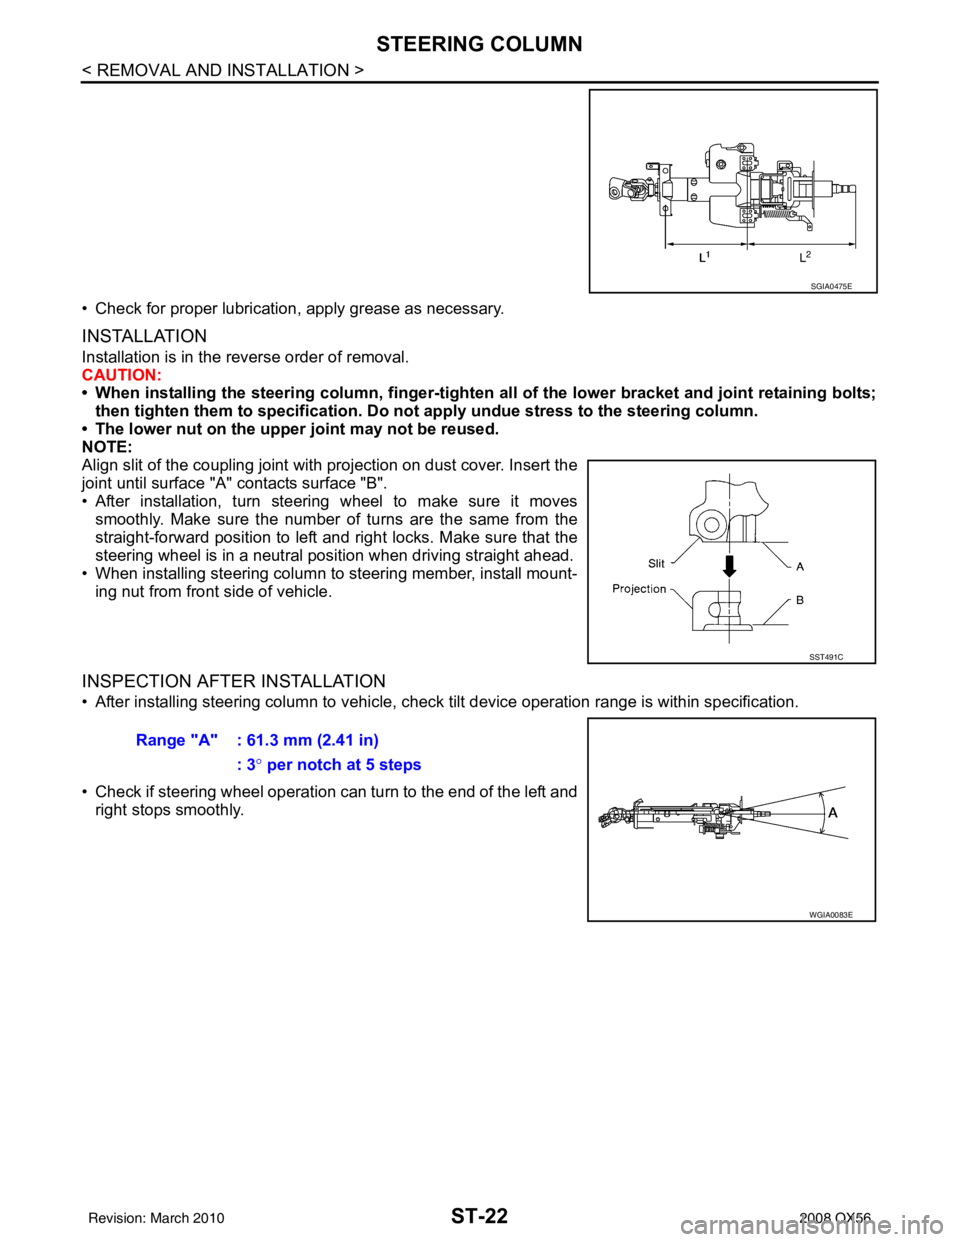
Align slit of the coupling joint with projection on dust cover. Insert the
joint until surface "A" contacts surface "B".
• After installation, turn steering wheel to make sure it moves smoothly. Make sure the number of turns are the same from the
straight-forward position to left and right locks. Make sure that the
steering wheel is in a neutral position when driving straight ahead.
• When installing steering column to steering member, install mount- ing nut from front side of vehicle.
INSPECTION AFTER INSTALLATION
• After installing steering column to vehicle, chec k tilt device operation range is within specification.
• Check if steering wheel operation can turn to the end of the left and right stops smoothly.
SGIA0475E
SST491C
Range "A" : 61.3 mm (2.41 in)
: 3° per notch at 5 steps
WGIA0083E
Revision: March 2010 2008 QX56
Page 3515 of 4083

ST-24
< REMOVAL AND INSTALLATION >
POWER STEERING GEAR AND LINKAGE
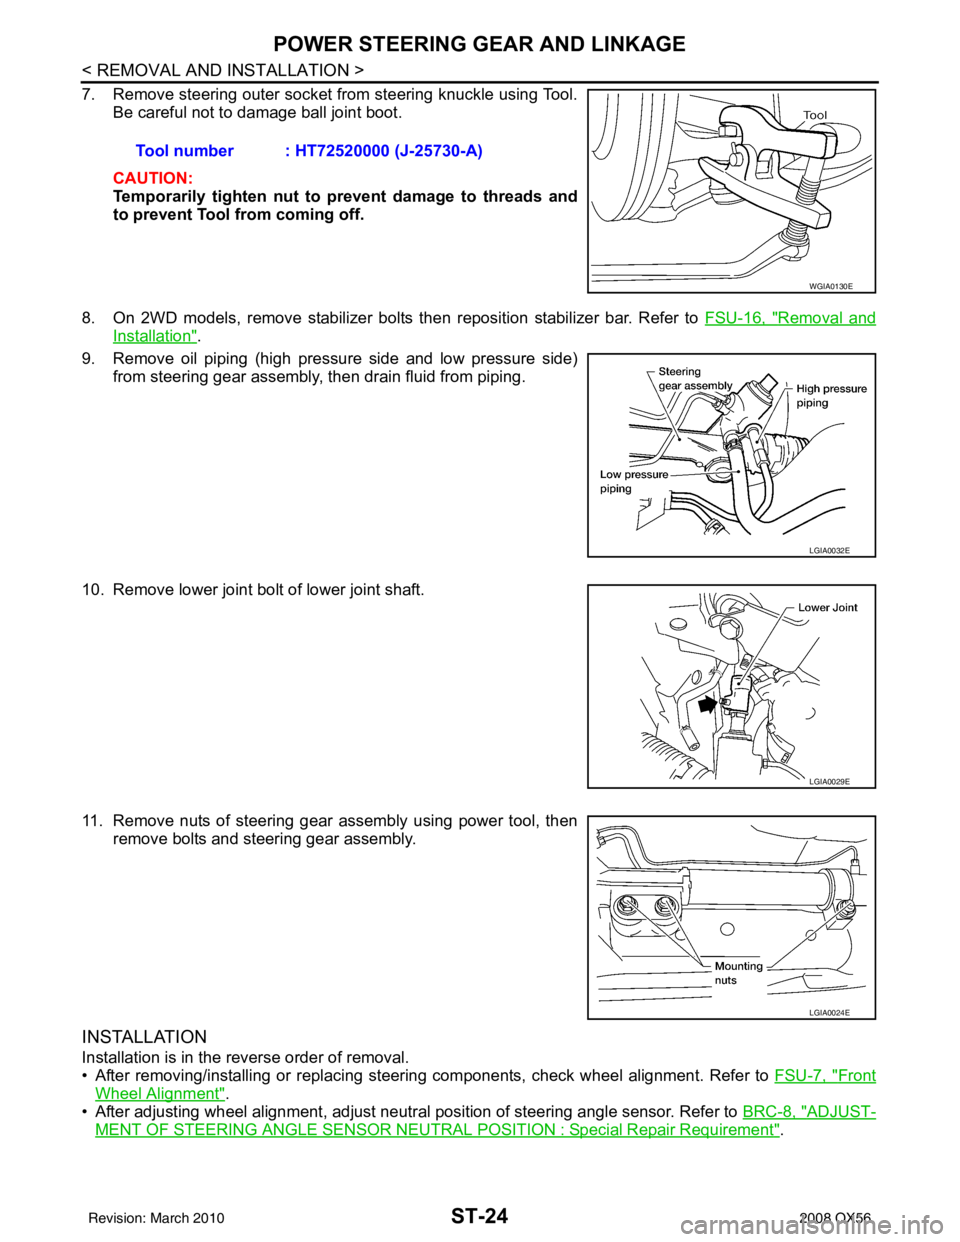
7. Remove steering outer socket from steering knuckle using Tool.Be careful not to damage ball joint boot.
CAUTION:
Temporarily tighten nut to prevent damage to threads and
to prevent Tool from coming off.
8. On 2WD models, remove stabilizer bolts then reposition stabilizer bar. Refer to FSU-16, "
Removal and
Installation".
9. Remove oil piping (high pressure side and low pressure side) from steering gear assembly, then drain fluid from piping.
10. Remove lower joint bolt of lower joint shaft.
11. Remove nuts of steering gear assembly using power tool, then remove bolts and steering gear assembly.
INSTALLATION
Installation is in the reverse order of removal.
• After removing/installing or replacing steering components, check wheel alignment. Refer to FSU-7, "
Front
Wheel Alignment".
• After adjusting wheel alignment, adjust neutral position of steering angle sensor. Refer to BRC-8, "
ADJUST-
MENT OF STEERING ANGLE SENSOR NEUTRAL POSITION : Special Repair Requirement".
Tool number : HT72520000 (J-25730-A)
WGIA0130E
LGIA0032E
LGIA0029E
LGIA0024E
Revision: March 2010
2008 QX56