2008 INFINITI QX56 stop start
[x] Cancel search: stop startPage 1731 of 4083
![INFINITI QX56 2008 Factory Service Manual EC-432
< ECU DIAGNOSIS >[VK56DE]
ECM
21
22
23
44O/L
BR
GR/W
O Fuel injector No. 5
Fuel injector No. 3
Fuel injector No. 1
Fuel injector No. 7 [Engine is running]
•
Warm-up condition
• Idle speed
N INFINITI QX56 2008 Factory Service Manual EC-432
< ECU DIAGNOSIS >[VK56DE]
ECM
21
22
23
44O/L
BR
GR/W
O Fuel injector No. 5
Fuel injector No. 3
Fuel injector No. 1
Fuel injector No. 7 [Engine is running]
•
Warm-up condition
• Idle speed
N](/manual-img/42/57030/w960_57030-1730.png)
EC-432
< ECU DIAGNOSIS >[VK56DE]
ECM
21
22
23
44O/L
BR
GR/W
O Fuel injector No. 5
Fuel injector No. 3
Fuel injector No. 1
Fuel injector No. 7 [Engine is running]
•
Warm-up condition
• Idle speed
NOTE:
The pulse cycle changes depending on rpm at
idle BATTERY VOLTAGE
(11 - 14V)
[Engine is running]
• Warm-up condition
• Engine speed: 2,000 rpm BATTERY VOLTAGE
(11 - 14V)
24
43 GR/G
GR/G
A/F sensor 1 heater (bank 2) [Engine is running]
•
Warm-up condition
• Idle speed
(More than 140 seconds after starting en-
gine) Approximately 2.9 - 8.8V
25 O/G Heated oxygen sensor 2 heat-
er (bank 2) [Engine is running]
• Engine speed: Below 3,600 rpm after the
following conditions are met.
- Engine: After warming up
- Keeping the engine speed between 3,500
and 4,000 rpm for 1 minute and at idle for 1
minute under no load 0 - 1.0V
[Ignition switch: ON]
• Engine: Stopped
[Engine is running]
• Engine speed: Above 3,600 rpm BATTERY VOLTAGE
(11 - 14V)
32 L EVAP control system pres-
sure sensor
[Ignition switch: ON]
Approximately 1.8 - 4.8V
34 R/B Intake air temperature sensor [Engine is running]Approximately 0 - 4.8V
Output voltage varies with intake
air temperature.
35 BR/R A/F sensor 1 (bank 1) [Engine is running]
•
Warm-up condition
• Engine speed: 2,000 rpm Approximately 1.8V
Output voltage varies with air fuel
ratio.
36 W Knock sensor (bank 2) [Engine is running]
• Idle speedApproximately 2.5V
TER-
MI-
NAL NO. WIRE
COLOR ITEM
CONDITION DATA (DC Voltage)SEC984C
SEC985C
PBIA8148J
Revision: March 2010 2008 QX56
Page 1732 of 4083
![INFINITI QX56 2008 Factory Service Manual ECM
EC-433
< ECU DIAGNOSIS > [VK56DE]
C
D
E
F
G H
I
J
K L
M A
EC
NP
O
40
41
42
63
Y/G
P
L
G Fuel injector No. 6
Fuel injector No. 4
Fuel injector No. 2
Fuel injector No. 8 [Engine is running]
•
War INFINITI QX56 2008 Factory Service Manual ECM
EC-433
< ECU DIAGNOSIS > [VK56DE]
C
D
E
F
G H
I
J
K L
M A
EC
NP
O
40
41
42
63
Y/G
P
L
G Fuel injector No. 6
Fuel injector No. 4
Fuel injector No. 2
Fuel injector No. 8 [Engine is running]
•
War](/manual-img/42/57030/w960_57030-1731.png)
ECM
EC-433
< ECU DIAGNOSIS > [VK56DE]
C
D
E
F
G H
I
J
K L
M A
EC
NP
O
40
41
42
63
Y/G
P
L
G Fuel injector No. 6
Fuel injector No. 4
Fuel injector No. 2
Fuel injector No. 8 [Engine is running]
•
Warm-up condition
• Idle speed
NOTE:
The pulse cycle changes depending on rpm at
idle BATTERY VOLTAGE
(11 - 14V)
[Engine is running]
• Warm-up condition
• Engine speed: 2,000 rpm BATTERY VOLTAGE
(11 - 14V)
45 L/Y EVAP canister purge volume
control solenoid valve [Engine is running]
• Idle speed
• Accelerator pedal: Not depressed even
slightly, after engine starting BATTERY VOLTAGE
(11 - 14V)
[Engine is running]
• Engine speed: About 2,000 rpm (More than 100 seconds after starting engine) BATTERY VOLTAGE
(11 - 14V)
47 Y Sensor power supply
(Throttle position sensor) [Ignition switch: ON]
Approximately 5V
48 SB Sensor power supply
(EVAP control system pres-
sure sensor) [Ignition switch: ON]
Approximately 5V
49 R/Y Sensor power supply
(Refrigerant pressure sensor) [Ignition switch: ON]
Approximately 5V
50 B Throttle position sensor 1 [Ignition switch: ON]
• Engine: Stopped
• Selector lever: D
• Accelerator pedal: Fully released
More than 0.36V
[Ignition switch: ON]
• Engine: Stopped
• Selector lever: D
• Accelerator pedal: Fully depressed Less than 4.75V
TER-
MI-
NAL NO. WIRE
COLOR ITEM
CONDITION DATA (DC Voltage)SEC984C
SEC985C
SEC990C
SEC991C
Revision: March 2010 2008 QX56
Page 1759 of 4083
![INFINITI QX56 2008 Factory Service Manual EC-460
< ECU DIAGNOSIS >[VK56DE]
ECM
• When there is an open circuit on MIL circuit, the ECM cannot warn the driver by lighting up MIL when there
is malfunction on engine control system.
Therefore, INFINITI QX56 2008 Factory Service Manual EC-460
< ECU DIAGNOSIS >[VK56DE]
ECM
• When there is an open circuit on MIL circuit, the ECM cannot warn the driver by lighting up MIL when there
is malfunction on engine control system.
Therefore,](/manual-img/42/57030/w960_57030-1758.png)
EC-460
< ECU DIAGNOSIS >[VK56DE]
ECM
• When there is an open circuit on MIL circuit, the ECM cannot warn the driver by lighting up MIL when there
is malfunction on engine control system.
Therefore, when electrical controlled throttle and pa rt of ECM related diagnoses are continuously detected
as NG for 5 trips, ECM warns the driver that engi ne control system malfunctions and MIL circuit is open by
means of operating fail-safe function.
The fail-safe function also operates when above diagnos es except MIL circuit are detected and demands the
driver to repair the malfunction.
DTC No. Detected items Engine operating condition in fail-safe mode
P0102
P0103 Mass air flow sensor circuit Engine speed will not rise more than 2,400 rpm due to the fuel cut.
P0117
P0118 Engine coolant tempera-
ture sensor circuit Engine coolant temperature will be determined by ECM based on the following condition.
CONSULT-IIl displays the engine coolant temperature decided by ECM.
Condition Engine coolant temperature decided
(CONSULT-IIl display)
Just as ignition switch is turned ON
or START 40
°C (104 °F)
Approx 4 minutes or more after en-
gine starting. 80
°C (176 °F)
Except as shown above 40 - 80
°C (104 - 176 °F)
(Depends on the time)
When the fail-safe system for engine coolant temperature sensor is activated, the cooling
fan operates while engine is running.
P0122
P0123
P0222
P0223
P2135 Throttle position sensor The ECM controls the electric throttle control actuator in regulating the throttle opening in
order for the idle position to be within +10 degrees.
The ECM regulates the opening speed of the throttle valve to be slower than the normal
condition.
So, the acceleration will be poor.
P0643 Sensor power supply ECM stops the electric throttle control actuator control, throttle valve is maintained at a fixed opening (approx. 5 degrees) by the return spring.
P2100
P2103 Throttle control motor relay ECM stops the electric throttle control actuator control, throttle valve is maintained at a
fixed opening (approx. 5 degrees) by the return spring.
P2101 Electric throttle control function ECM stops the electric throttle control actuator control, throttle valve is maintained at a
fixed opening (approx. 5 degrees) by the return spring.
P2118 Throttle control motor ECM stops the electric throttle control actuator control, throttle valve is maintained at a fixed opening (approx. 5 degrees) by the return spring.
P2119 Electric throttle control ac- tuator (When electric throttle control actuator does not function properly due to the return spring
malfunction:)
ECM controls the electric throttle actuator by regulating the throttle opening around the
idle position. The engine speed will not rise more than 2,000 rpm.
(When throttle valve opening angle in fail-safe mode is not in specified range:)
ECM controls the electric throttle control actuator by regulating the throttle opening to 20
degrees or less.
(When ECM detects the throttle valve is stuck open:)
While the vehicle is driving, it slows down gradually by fuel cut. After the vehicle stops, the
engine stalls.
The engine can restart in N or P position, and engine speed will not exceed 1,000 rpm or
more.
P2122
P2123
P2127
P2128
P2138 Accelerator pedal position
sensor
The ECM controls the electric throttle control actuator in regulating the throttle opening in
order for the idle position to be within +10 degrees.
The ECM regulates the opening speed of the throttle valve to be slower than the normal
condition.
So, the acceleration will be poor.
Engine operating condition in fail-safe mode
Engine speed will not rise more than 2,500 rpm due to the fuel cut
Revision: March 2010 2008 QX56
Page 1807 of 4083

EM-4
< PRECAUTION >
PRECAUTIONS
5. When the repair work is completed, return the ignition switch to the ″LOCK ″ position before connecting
the battery cables. (At this time, the steering lock mechanism will engage.)
6. Perform a self-diagnosis check of a ll control units using CONSULT-III.
Precaution for Drain Engine CoolantINFOID:0000000001538794
Drain engine coolant when engine is cooled.
Precaution for Disconnecting Fuel PipingINFOID:0000000001538795
• Before starting work, make sure no fire or spark producing items are in the work area.
• Release fuel pressure before disconnecting and disassembly.
• After disconnecting pipes, plug openings to stop fuel leakage.
Precaution for Removal and DisassemblyINFOID:0000000001538796
• When instructed to use special service tools, use the s pecified tools. Always be careful to work safely, avoid
forceful or uninstructed operations.
• Exercise maximum care to avoid damage to mating or sliding surfaces.
• Cover openings of engine system with tape or the equivalent, if necessary, to seal out foreign materials.
• Mark and arrange disassembly parts in an organi zed way for easy troubleshooting and assembly.
• When loosening nuts and bolts, as a basic rule, start with the one furthest outside, then the one diagonally opposite, and so on. If the order of loosening is specified, do exactly as specified. Power tools may be used
where noted in the step.
Precaution for Inspection, Repair and ReplacementINFOID:0000000001538797
Before repairing or replacing, thoroughly inspect parts. Inspect new replacement parts in the same way, and
replace if necessary.
Precaution for Assembly and InstallationINFOID:0000000001538798
• Use torque wrench to tighten bolts or nuts to specification.
• When tightening nuts and bolts, as a basic rule, equally tighten in several different steps starting with theones in center, then ones on inside and outside diagonally in this order. If the order of tightening is specified,
do exactly as specified.
• Replace with new gasket, packing, oil seal or O-ring.
• Thoroughly wash, clean, and air-blow each part. Carefully check engine oil or engine coolant passages for any restriction and blockage.
• Avoid damaging sliding or mating surfaces. Completely remove foreign materials such as cloth lint or dust. Before assembly, oil sliding surfaces well.
• Release air within route when refilling after draining engine coolant.
• Before starting engine, apply fuel pressure to fuel lines with turning ignition switch ON (with engine stopped). Then make sure that there are no leaks at fuel line connections.
• After repairing, start engine and increase engine s peed to check engine coolant, fuel, oil, and exhaust sys-
tems for leakage.
Parts Requiring Angular TighteningINFOID:0000000001538799
• For final tightening of the following engine parts use Tool:
- Cylinder head bolts
- Main bearing cap bolts
- Connecting rod cap bolts
- Crankshaft pulley bolt (No angle wrench is required as the bolt flange is provided with notches for angle tightening)
• Do not use a torque value for final tightening.
• The torque value for these parts are for a preliminary step.
• Ensure thread and seat surfaces are clean and lightly coated with engine oil. Tool number : KV10112100 (BT-8653-A)
Revision: March 2010
2008 QX56
Page 1821 of 4083

EM-18
< ON-VEHICLE MAINTENANCE >
CAMSHAFT VALVE CLEARANCE
CAMSHAFT VALVE CLEARANCE
Valve ClearanceINFOID:0000000001538810
INSPECTION
NOTE:
Perform the following inspection after removal, installation or replacement of camshaft or valve-related parts,
or if there are unusual engine conditions due to changes in valve clearance over time (starting, idling, and/or
noise).
1. Warm up the engine. Then stop the engine.
2. Remove the engine room cover. Refer to EM-24, "
Removal and Installation".
3. Remove the air cleaner and air duct assembly. Refer to EM-25, "
Removal and Installation".
4. Remove the RH bank and LH bank rocker covers using power tool. Refer to EM-38, "
Removal and Instal-
lation".
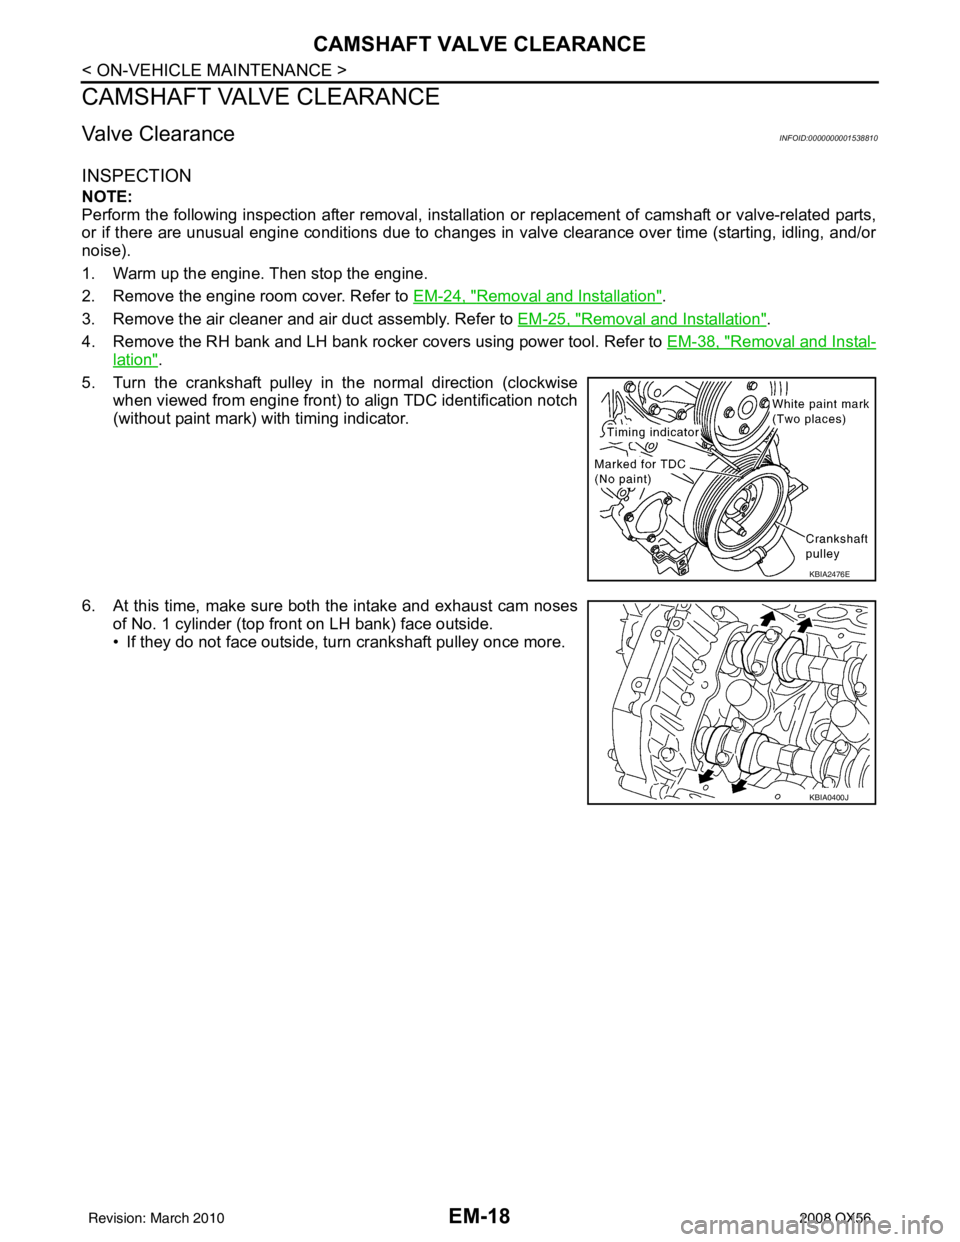
5. Turn the crankshaft pulley in the normal direction (clockwise when viewed from engine front) to align TDC identification notch
(without paint mark) with timing indicator.
6. At this time, make sure both the intake and exhaust cam noses of No. 1 cylinder (top front on LH bank) face outside.
• If they do not face outside, turn crankshaft pulley once more.
KBIA2476E
KBIA0400J
Revision: March 2010 2008 QX56
Page 1826 of 4083

COMPRESSION PRESSUREEM-23
< ON-VEHICLE MAINTENANCE >
C
DE
F
G H
I
J
K L
M A
EM
NP
O
COMPRESSION PRESSURE
Checking Compression PressureINFOID:0000000001538811
1. Warm up the engine thoroughly. Then stop the engine.
2. Release the fuel pressure. Refer to EC-494, "
Fuel Pressure Check".
CAUTION:
If CONSULT-III is not used to release fuel pressure leave the fuel pump fuse disconnected until
step 7.
3. Remove the spark plug from each cylinder. Refer to EM-16, "
Removal and Installation".
4. Connect the engine tachometer (not required in use of CONSULT-III).
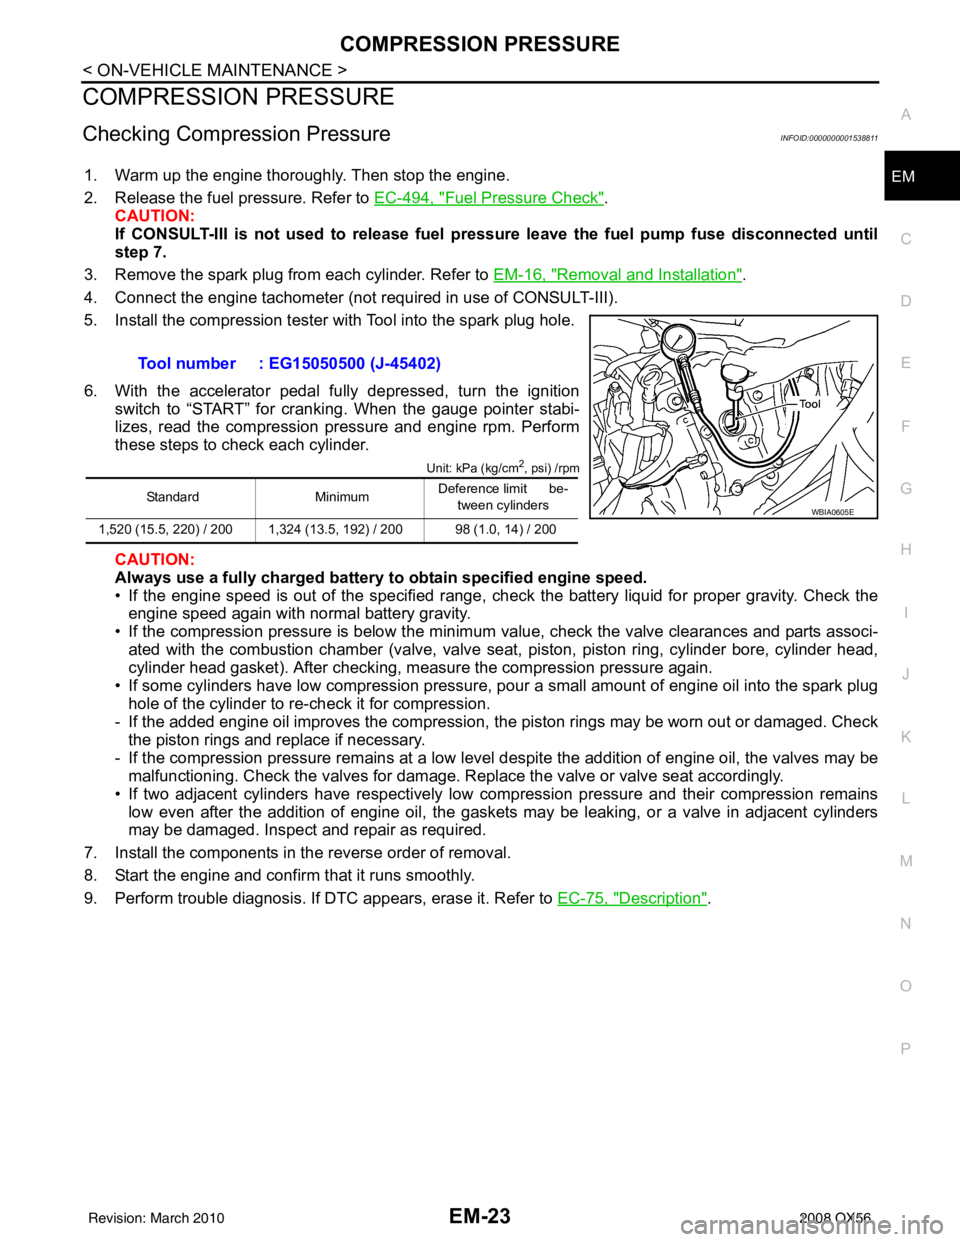
5. Install the compression tester with Tool into the spark plug hole.
6. With the accelerator pedal fully depressed, turn the ignition switch to “START” for cranking. When the gauge pointer stabi-
lizes, read the compression pressure and engine rpm. Perform
these steps to check each cylinder.
Unit: kPa (kg/cm2, psi) /rpm
CAUTION:
Always use a fully charged battery to obtain specified engine speed.
• If the engine speed is out of the specified range, check the battery liquid for proper gravity. Check the engine speed again with normal battery gravity.
• If the compression pressure is below the minimum value, check the valve clearances and parts associ-
ated with the combustion chamber (valve, valve seat , piston, piston ring, cylinder bore, cylinder head,
cylinder head gasket). After checking, measure the compression pressure again.
• If some cylinders have low compression pressure, pour a small amount of engine oil into the spark plug hole of the cylinder to re-check it for compression.
- If the added engine oil improves the compression, t he piston rings may be worn out or damaged. Check
the piston rings and replace if necessary.
- If the compression pressure remains at a low level despite the addition of engine oil, the valves may be malfunctioning. Check the valves for damage. Replace the valve or valve seat accordingly.
• If two adjacent cylinders have respectively low compression pressure and their compression remains low even after the addition of engine oil, the gaskets may be leaking, or a valve in adjacent cylinders
may be damaged. Inspect and repair as required.
7. Install the components in the reverse order of removal.
8. Start the engine and confirm that it runs smoothly.
9. Perform trouble diagnosis. If DTC appears, erase it. Refer to EC-75, "
Description".
Tool number : EG15050500 (J-45402)
Standard
MinimumDeference limit be-
tween cylinders
1,520 (15.5, 220) / 200 1,324 (13.5, 192) / 200 98 (1.0, 14) / 200WBIA0605E
Revision: March 2010 2008 QX56
Page 1832 of 4083

INTAKE MANIFOLDEM-29
< ON-VEHICLE REPAIR >
C
DE
F
G H
I
J
K L
M A
EM
NP
O
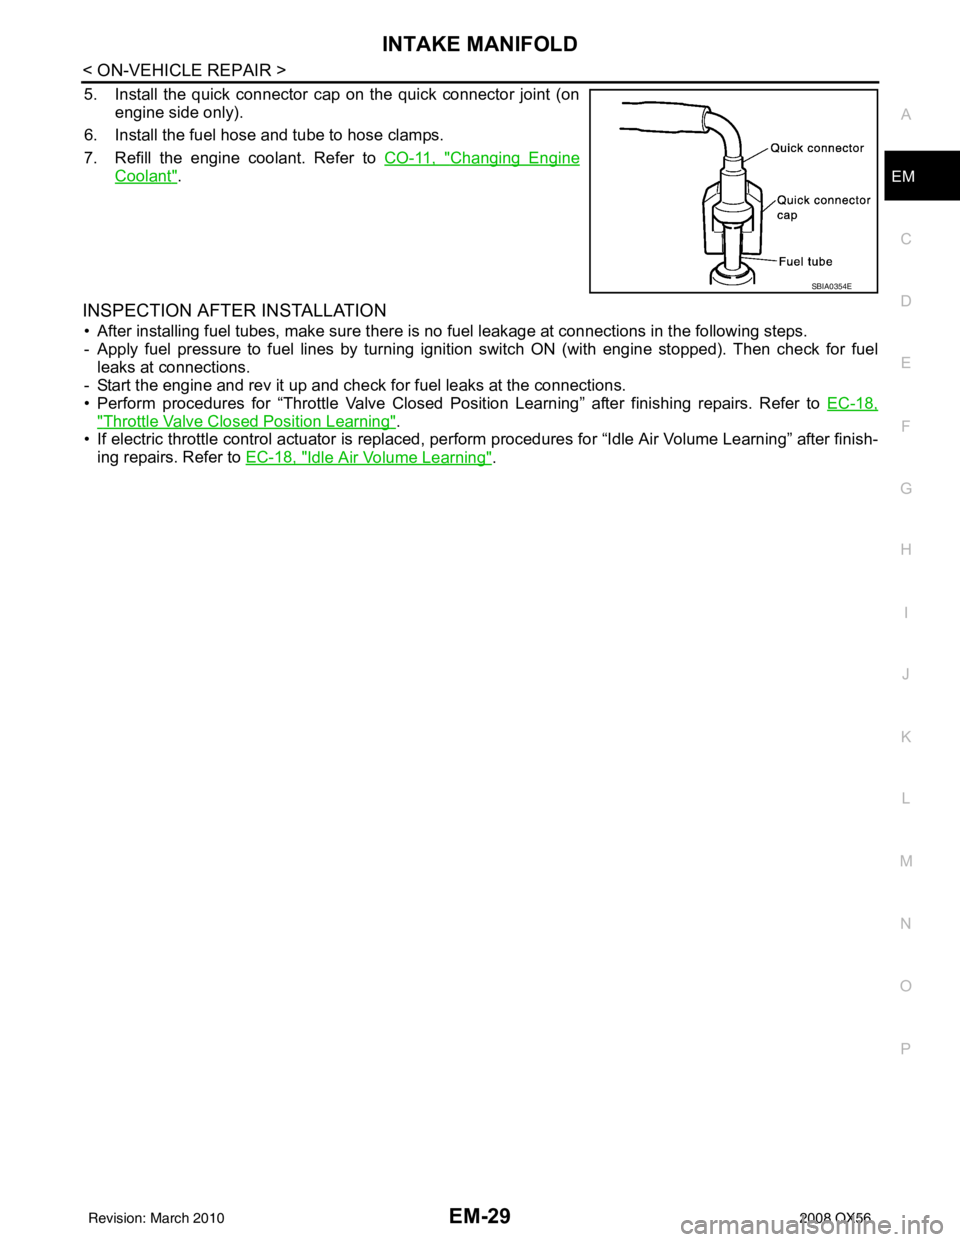
5. Install the quick connector cap on the quick connector joint (on
engine side only).
6. Install the fuel hose and tube to hose clamps.
7. Refill the engine coolant. Refer to CO-11, "
Changing Engine
Coolant".
INSPECTION AFTER INSTALLATION
• After installing fuel tubes, make sure there is no fuel leakage at connections in the following steps.
- Apply fuel pressure to fuel lines by turning ignition switch ON (with engine stopped). Then check for fuel leaks at connections.
- Start the engine and rev it up and check for fuel leaks at the connections.
• Perform procedures for “Throttle Valve Closed Position Learning” after finishing repairs. Refer to EC-18,
"Throttle Valve Closed Position Learning".
• If electric throttle control actuator is replaced, per form procedures for “Idle Air Volume Learning” after finish-
ing repairs. Refer to EC-18, "
Idle Air Volume Learning".
SBIA0354E
Revision: March 2010 2008 QX56
Page 1839 of 4083

EM-36
< ON-VEHICLE REPAIR >
OIL PAN AND OIL STRAINER
4. Install the oil pan drain plug.
5. Install engine assembly. Refer to EM-78, "
Removal and Installation".
• Do not fill the engine oil for at least 30 minutes after oil pan is installed.
INSPECTION AFTER INSTALLATION
1. Check engine oil level and add engine oil if necessary. Refer to LU-8, "Inspection".
2. Start the engine, and check for leaks of engine oil.
3. Stop engine and wait for 10 minutes.
4. Check engine oil level again.
Revision: March 2010 2008 QX56