2008 INFINITI QX56 Front wheel bearing hub
[x] Cancel search: Front wheel bearing hubPage 427 of 4083

FRONT DISC BRAKEBR-7
< BASIC INSPECTION >
C
DE
G H
I
J
K L
M A
B
BR
N
O P
BASIC INSPECTION
FRONT DISC BRAKE
BRAKE PAD
BRAKE PAD : InspectionINFOID:0000000004894482
PA D W E A R
Check pad thickness from the inspection holes on cylinder body.
Check using a scale if necessary.
DISC ROTOR
DISC ROTOR : InspectionINFOID:0000000004894483
VISUAL
Check surface of disc rotor for uneven wear, cracks, and serious damage. Replace as necessary.
RUNOUT
1. Attach disc rotor to wheel hub using wheel nuts (at two or more positions).
2. Inspect runout using a dial gauge placed at 10 mm (0.39 in) inside the disc edge.
NOTE:
Before measuring, make sure that wheel bearing axial end play
is within the specification. Refer to FA X - 6 , "
On-Vehicle Inspec-
tion and Service".
3. When runout exceeds limit value, displace mounting positions of disc rotor by one hole. And then find a position of the minimum value for runout.
4. If runout is outside the specified value after performing the above operation, turn disc rotor using Tool.
THICKNESS
Standard thickness : Refer to BR-46, "Front Disc
Brake".
Repair limit thickness : Refer to BR-46, "
Front Disc
Brake".
WFIA0522E
Runout limit : Refer to BR-46, "Front Disc
Brake".
(with it attached to the vehicle)
Tool number : 38-PFM90.5 ( — )
BRA0580D
Revision: March 2010 2008 QX56
Page 581 of 4083
![INFINITI QX56 2008 Factory Service Manual BRC-114
< REMOVAL AND INSTALLATION >[VDC/TCS/ABS]
WHEEL SENSORS
REMOVAL AND INSTALLATION
WHEEL SENSORS
Removal and InstallationINFOID:0000000001604548
REMOVAL
1. Remove wheel sensor bolt.
• When rem INFINITI QX56 2008 Factory Service Manual BRC-114
< REMOVAL AND INSTALLATION >[VDC/TCS/ABS]
WHEEL SENSORS
REMOVAL AND INSTALLATION
WHEEL SENSORS
Removal and InstallationINFOID:0000000001604548
REMOVAL
1. Remove wheel sensor bolt.
• When rem](/manual-img/42/57030/w960_57030-580.png)
BRC-114
< REMOVAL AND INSTALLATION >[VDC/TCS/ABS]
WHEEL SENSORS
REMOVAL AND INSTALLATION
WHEEL SENSORS
Removal and InstallationINFOID:0000000001604548
REMOVAL
1. Remove wheel sensor bolt.
• When removing the front wheel sensor, first remove t he disc rotor to gain access to the front wheel sen-
sor bolt. Refer to BR-31, "
Removal and Installation of Brake Caliper and Rotor" .
• When removing the rear wheel sensor, first remove the rear hub and bearing assembly to gain access to
the rear wheel sensor bolt. Refer to RAX-8, "
Removal and Installation".
2. Pull out the sensor, being careful to turn it as little as possible. CAUTION:
• Do not pull on the sensor harness.
3. Disconnect wheel sensor harness electrical connec tor, then remove harness from attaching points.
INSTALLATION
Installation is in the reverse order of removal. Tighten wheel sensor bolt to specification.
CAUTION:
• Inspect wheel sensor O-ring, replace sensor assembly if damaged.
• Before installing wheel sensor, make sure no foreign materials (such as iron fragments) are adhered
to the pick-up part of the sensor, to the inside of the sensor hole or on the rotor mating surface.
• Apply a coat of suitable grease to the wheel sensor O-ring and hole. Refer to MA-12, "
Fluids and
Lubricants" .
WFIA0376E
Revision: March 2010 2008 QX56
Page 582 of 4083
![INFINITI QX56 2008 Factory Service Manual SENSOR ROTORBRC-115
< REMOVAL AND INSTALLATION > [VDC/TCS/ABS]
C
D
E
G H
I
J
K L
M A
B
BRC
N
O P
SENSOR ROTOR
Removal and InstallationINFOID:0000000001604549
NOTE:
The wheel sensor rotors are built in INFINITI QX56 2008 Factory Service Manual SENSOR ROTORBRC-115
< REMOVAL AND INSTALLATION > [VDC/TCS/ABS]
C
D
E
G H
I
J
K L
M A
B
BRC
N
O P
SENSOR ROTOR
Removal and InstallationINFOID:0000000001604549
NOTE:
The wheel sensor rotors are built in](/manual-img/42/57030/w960_57030-581.png)
SENSOR ROTORBRC-115
< REMOVAL AND INSTALLATION > [VDC/TCS/ABS]
C
D
E
G H
I
J
K L
M A
B
BRC
N
O P
SENSOR ROTOR
Removal and InstallationINFOID:0000000001604549
NOTE:
The wheel sensor rotors are built into the wheel hubs and are not removable. If damaged, replace wheel hub
and bearing assembly. Refer to FAX-7, "
Removal and Installation" (front), RAX-8, "Removal and Installation"
(rear).
Revision: March 2010 2008 QX56
Page 2085 of 4083
FAX-1
TRANSMISSION & DRIVELINE
CEF
G H
I
J
K L
M
SECTION FA X
A
B
FA X
N
O P
CONTENTS
FRONT AXLE
PRECAUTION ....... ........................................2
PRECAUTIONS .............................................. .....2
Precaution for Supplemental Restraint System
(SRS) "AIR BAG" and "SEAT BELT PRE-TEN-
SIONER" ............................................................. ......
2
Precaution Necessary for Steering Wheel Rota-
tion After Battery Disconnect ............................... ......
2
Precaution .................................................................3
PREPARATION ............................................4
PREPARATION .............................................. .....4
Special Service Tool ........................................... ......4
Commercial Service Tool ..........................................4
SYMPTOM DIAGNOSIS ...............................5
NOISE, VIBRATION AND HARSHNESS
(NVH) TROUBLESHOOTING ........................ .....
5
NVH Troubleshooting Chart ................................ ......5
ON-VEHICLE MAINTENANCE .....................6
WHEEL HUB ......................................................6
On-Vehicle Inspection and Service ..................... .....6
REMOVAL AND INSTALLATION ................7
WHEEL HUB ......................................................7
Removal and Installation ..................................... .....7
DRIVE SHAFT ....................................................9
Removal and Installation ..........................................9
DISASSEMBLY AND ASSEMBLY ..............11
DRIVE SHAFT ...................................................11
Disassembly and Assembly ................................. ....11
SERVICE DATA AND SPECIFICATIONS
(SDS) ............... .......................................... ...
16
SERVICE DATA AND SPECIFICATIONS
(SDS) .................................................................
16
Wheel Bearing ..................................................... ....16
Drive Shaft ...............................................................16
Boot Bands ..............................................................16
Revision: March 2010 2008 QX56
Page 2089 of 4083
NOISE, VIBRATION AND HARSHNESS (NVH) TROUBLESHOOTINGFAX-5
< SYMPTOM DIAGNOSIS >
CEF
G H
I
J
K L
M A
B
FA X
N
O P
SYMPTOM DIAGNOSIS
NOISE, VIBRATION AND HARSHN ESS (NVH) TROUBLESHOOTING
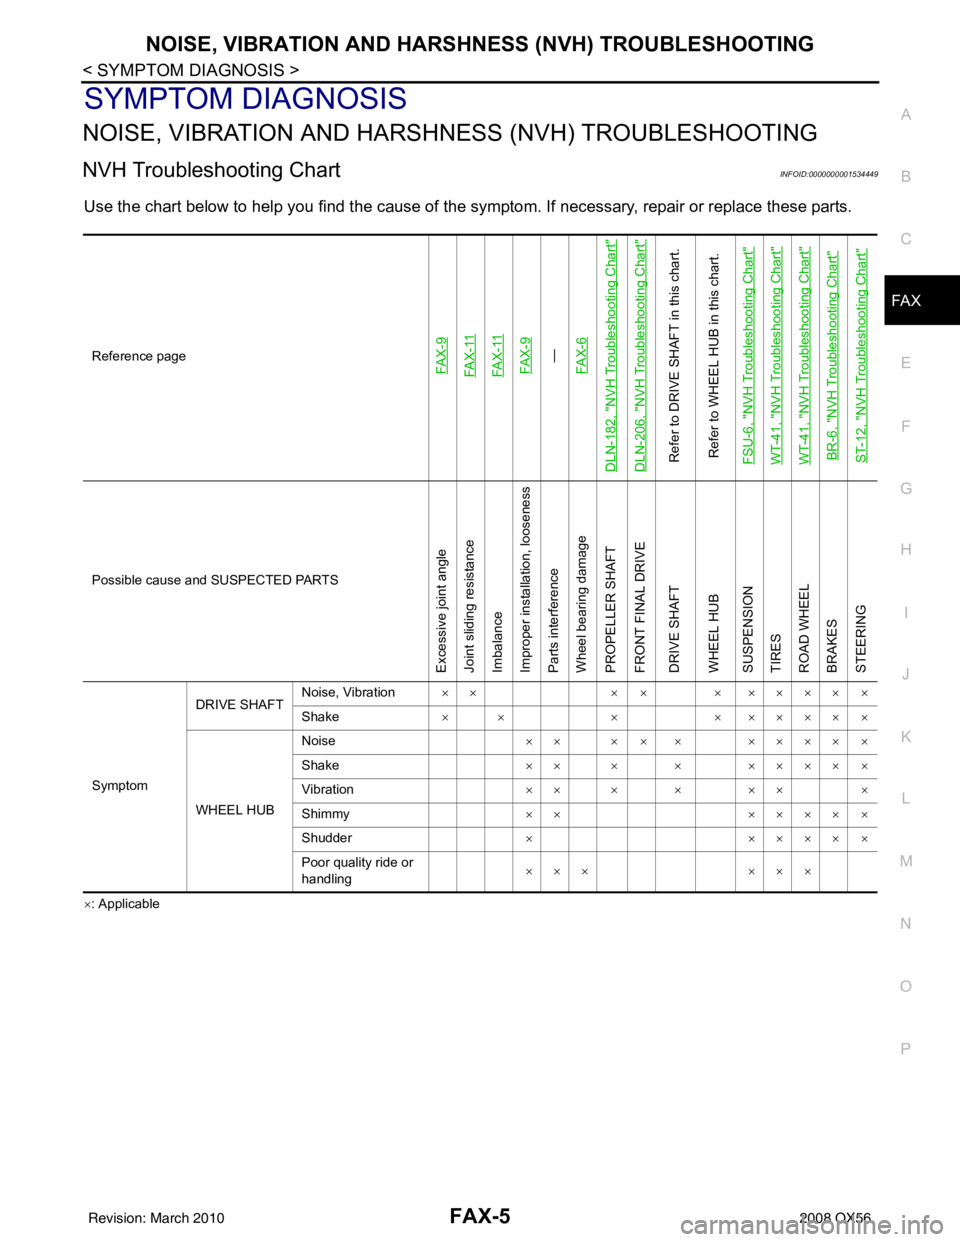
NVH Troubleshooting ChartINFOID:0000000001534449
Use the chart below to help you find t he cause of the symptom. If necessary, repair or replace these parts.
×: ApplicableReference page
FA X - 9FA X - 11FA X - 11FA X - 9—
FA X - 6
DLN-182, "
NVH Troubleshooting Chart
"
DLN-206, "
NVH Troubleshooting Chart
"
Refer to DRIVE SHAFT in this chart.
Refer to WHEEL HUB in this chart.
FSU-6, "
NVH Troubleshooting Chart
"
WT-41, "
NVH Troubleshooting Chart
"
WT-41, "
NVH Troubleshooting Chart
"
BR-6, "
NVH Troubleshooting Chart
"
ST-12, "
NVH Troubleshooting Chart
"
Possible cause and SUSPECTED PARTS
Excessive joint angle
Joint sliding resistance
Imbalance
Improper installation, looseness
Parts interference
Wheel bearing damage
PROPELLER SHAFT
FRONT FINAL DRIVE
DRIVE SHAFT
WHEEL HUB
SUSPENSION
TIRES
ROAD WHEEL
BRAKES
STEERING
Symptom DRIVE SHAFT
Noise, Vibration
×× × × × ×××× ×
Shake × × ×× ×××× ×
WHEEL HUB Noise
×× × × × ×××× ×
Shake ×× × × ×××× ×
Vibration ×× × × ×× ×
Shimmy ×××××× ×
Shudder ×× ××× ×
Poor quality ride or
handling ×××
×××
Revision: March 2010 2008 QX56
Page 2091 of 4083
WHEEL HUBFAX-7
< REMOVAL AND INSTALLATION >
CEF
G H
I
J
K L
M A
B
FA X
N
O P
REMOVAL AND INSTALLATION
WHEEL HUB
Removal and InstallationINFOID:0000000001534453
REMOVAL
1. Remove wheel and tire using power tool.
2. Remove engine under cover using power tool.
3. Without disassembling the hydraulic lines, remove caliper torque member bolts using power tool. Then
reposition brake caliper aside with wire. Refer to BR-31, "
Removal and Installation of Brake Caliper and
Rotor" .
NOTE:
Do not press brake pedal while brake caliper is removed.
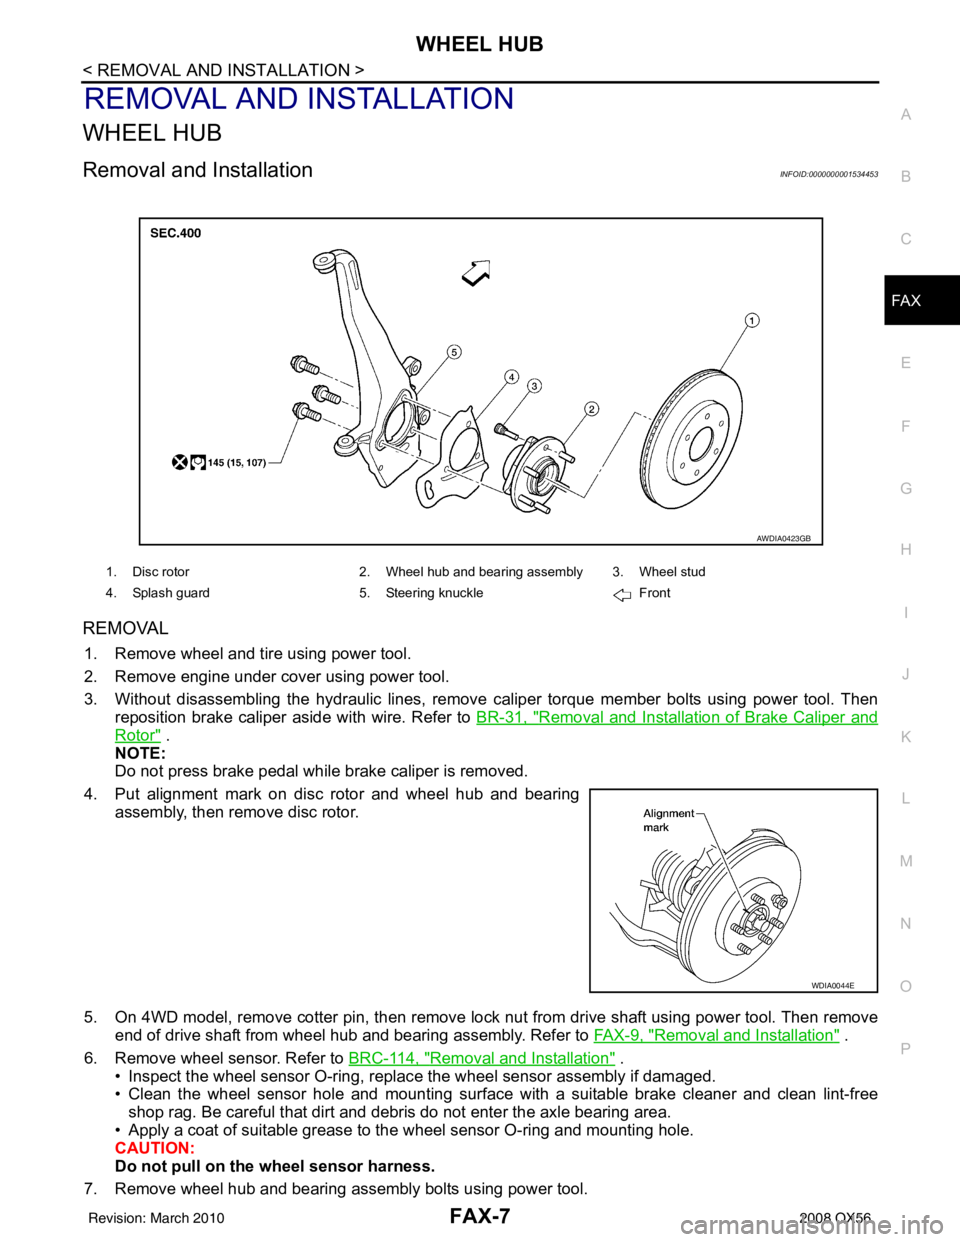
4. Put alignment mark on disc rotor and wheel hub and bearing assembly, then remove disc rotor.
5. On 4WD model, remove cotter pin, then remove lock nut from drive shaft using power tool. Then remove end of drive shaft from wheel hub and bearing assembly. Refer to FAX-9, "
Removal and Installation" .
6. Remove wheel sensor. Refer to BRC-114, "
Removal and Installation" .
• Inspect the wheel sensor O-ring, replac e the wheel sensor assembly if damaged.
• Clean the wheel sensor hole and mounting surface with a suitable brake cleaner and clean lint-free shop rag. Be careful that dirt and debris do not enter the axle bearing area.
• Apply a coat of suitable grease to the wheel sensor O-ring and mounting hole.
CAUTION:
Do not pull on the wheel sensor harness.
7. Remove wheel hub and bearing assembly bolts using power tool.
1. Disc rotor 2. Wheel hub and bearing assembly 3. Wheel stud
4. Splash guard 5. Steering knuckle Front
AWDIA0423GB
WDIA0044E
Revision: March 2010 2008 QX56
Page 2093 of 4083
DRIVE SHAFTFAX-9
< REMOVAL AND INSTALLATION >
CEF
G H
I
J
K L
M A
B
FA X
N
O P
DRIVE SHAFT
Removal and InstallationINFOID:0000000001534458
REMOVAL
1. Remove wheel and tire using power tool.
2. Remove engine under cover using power tool.
3. Remove wheel sensor harness from mount on knuckle. CAUTION:
Do not pull on wheel sensor harness.
4. Without disassembling the hydraulic lines, remove brake caliper using power tool. Reposition it aside with wire. Refer to BR-31, "
Removal and Installation of Brake Caliper and Rotor" .
NOTE:
Avoid depressing brake pedal while brake caliper is removed.
5. Remove coil spring and shock absorber assembly using power tool. Refer to FSU-15, "
Removal and
Installation" .
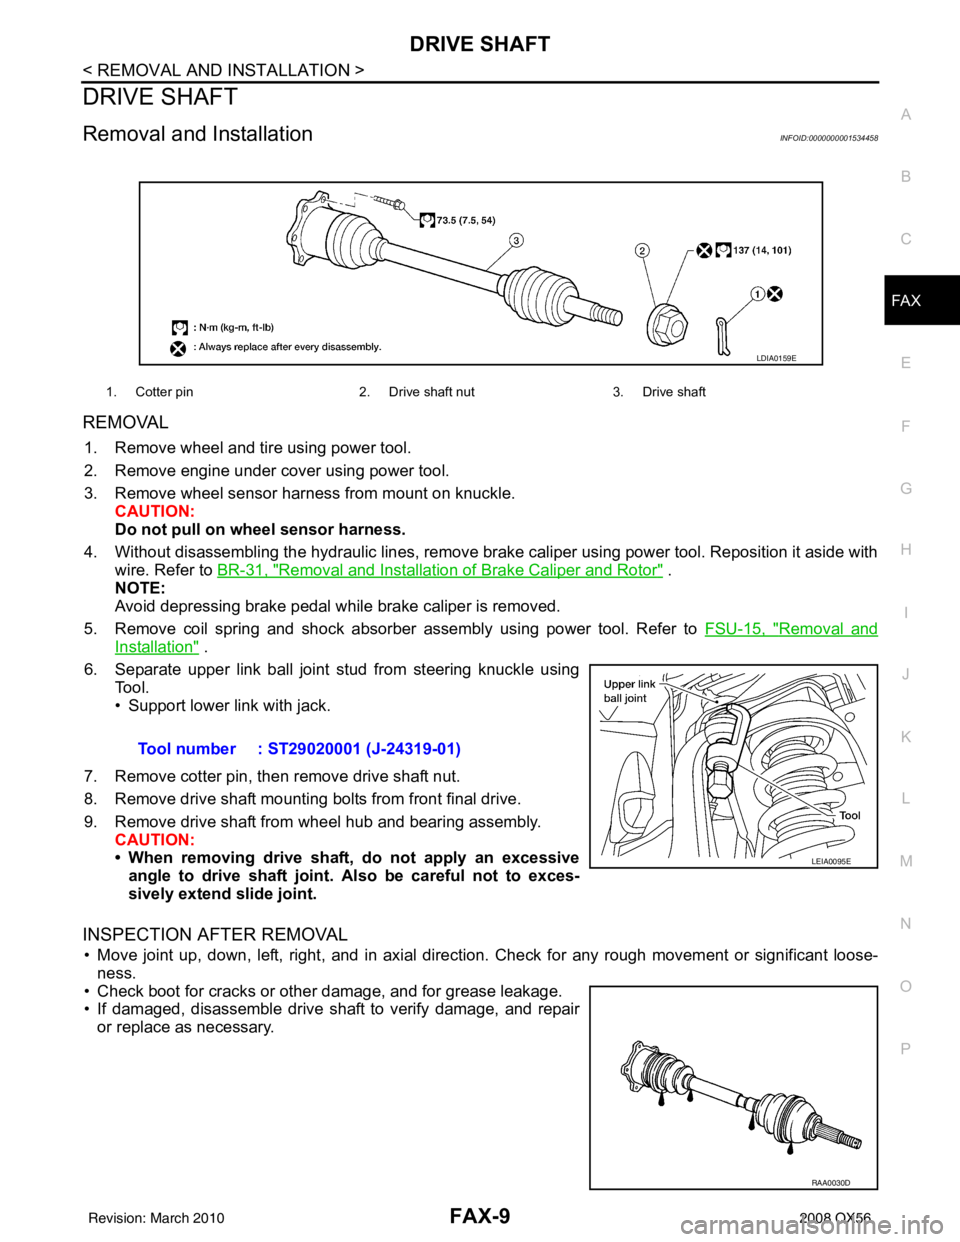
6. Separate upper link ball joint stud from steering knuckle using Tool.
• Support lower link with jack.
7. Remove cotter pin, then remove drive shaft nut.
8. Remove drive shaft mounting bolts from front final drive.
9. Remove drive shaft from wheel hub and bearing assembly. CAUTION:
• When removing drive shaf t, do not apply an excessive
angle to drive shaft joint. Also be careful not to exces-
sively extend slide joint.
INSPECTION AFTER REMOVAL
• Move joint up, down, left, right, and in axial directi on. Check for any rough movement or significant loose-
ness.
• Check boot for cracks or other damage, and for grease leakage.
• If damaged, disassemble drive shaft to verify damage, and repair or replace as necessary.
1. Cotter pin 2. Drive shaft nut3. Drive shaft
LDIA0159E
Tool number : ST29020001 (J-24319-01)
LEIA0095E
RAA0030D
Revision: March 2010 2008 QX56
Page 2137 of 4083
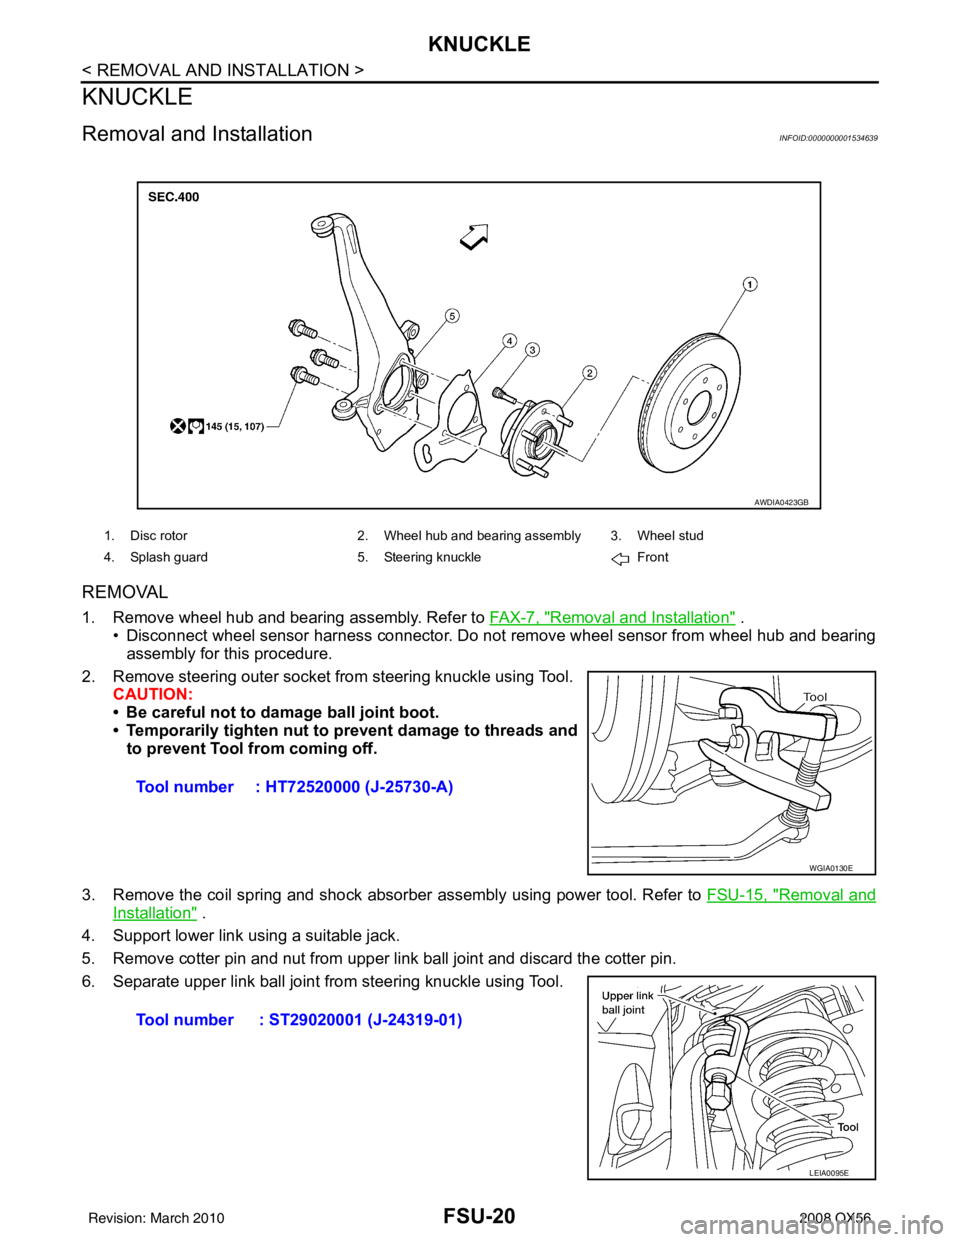
FSU-20
< REMOVAL AND INSTALLATION >
KNUCKLE
KNUCKLE
Removal and InstallationINFOID:0000000001534639
REMOVAL
1. Remove wheel hub and bearing assembly. Refer to FA X - 7 , "Removal and Installation" .
• Disconnect wheel sensor harness connector. Do not remove wheel sensor from wheel hub and bearing
assembly for this procedure.
2. Remove steering outer socket from steering knuckle using Tool. CAUTION:
• Be careful not to damage ball joint boot.
• Temporarily tighten nut to prevent damage to threads andto prevent Tool from coming off.
3. Remove the coil spring and shock absorber assembly using power tool. Refer to FSU-15, "
Removal and
Installation" .
4. Support lower link using a suitable jack.
5. Remove cotter pin and nut from upper link ball joint and discard the cotter pin.
6. Separate upper link ball joint from steering knuckle using Tool.
1. Disc rotor 2. Wheel hub and bearing assembly 3. Wheel stud
4. Splash guard 5. Steering knuckle Front
AWDIA0423GB
Tool number : HT72520000 (J-25730-A)
WGIA0130E
Tool number : ST29020001 (J-24319-01)
LEIA0095E
Revision: March 2010 2008 QX56