Page 3534 of 3924
SUNROOFRF-19
< SERVICE INFORMATION >
C
DE
F
G H
J
K L
M A
B
RF
N
O P
OK or NG
OK >> GO TO 4.
NG >> Repair or replace harness.
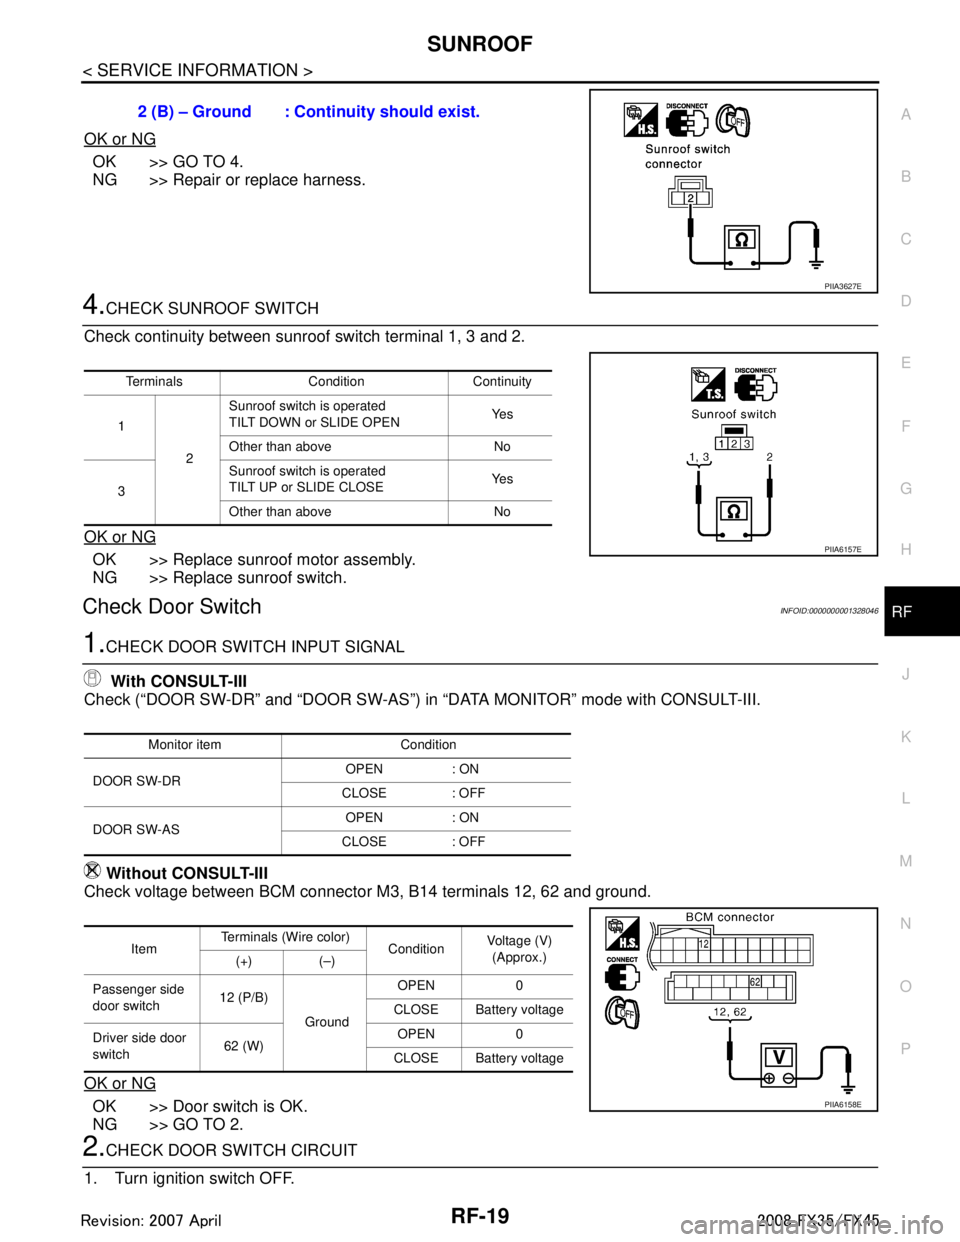
4.CHECK SUNROOF SWITCH
Check continuity between sunroof switch terminal 1, 3 and 2.
OK or NG
OK >> Replace sunroof motor assembly.
NG >> Replace sunroof switch.
Check Door SwitchINFOID:0000000001328046
1.CHECK DOOR SWITCH INPUT SIGNAL With CONSULT-III
Check (“DOOR SW-DR” and “DOOR SW-AS”) in “DATA MONITOR” mode with CONSULT-III.
Without CONSULT-III
Check voltage between BCM connector M3, B14 terminals 12, 62 and ground.
OK or NG
OK >> Door switch is OK.
NG >> GO TO 2.
2.CHECK DOOR SWITCH CIRCUIT
1. Turn ignition switch OFF. 2 (B) – Ground : Continuity should exist.
PIIA3627E
Terminals Condition Continuity
1 2Sunroof switch is operated
TILT DOWN or SLIDE OPEN
Ye s
Other than above No
3 Sunroof switch is operated
TILT UP or SLIDE CLOSE
Ye s
Other than above No
PIIA6157E
Monitor item Condition
DOOR SW-DR OPEN : ON
CLOSE : OFF
DOOR SW-AS OPEN : ON
CLOSE : OFF
Item Terminals (Wire color)
ConditionVoltage (V)
(Approx.)
(+) (–)
Passenger side
door switch 12 (P/B)
Ground OPEN 0
CLOSE Battery voltage
Driver side door
switch 62 (W) OPEN 0
CLOSE Battery voltage
PIIA6158E
3AA93ABC3ACD3AC03ACA3AC03AC63AC53A913A773A893A873A873A8E3A773A983AC73AC93AC03AC3
3A893A873A873A8F3A773A9D3AAF3A8A3A8C3A863A9D3AAF3A8B3A8C
Page 3535 of 3924
RF-20
< SERVICE INFORMATION >
SUNROOF
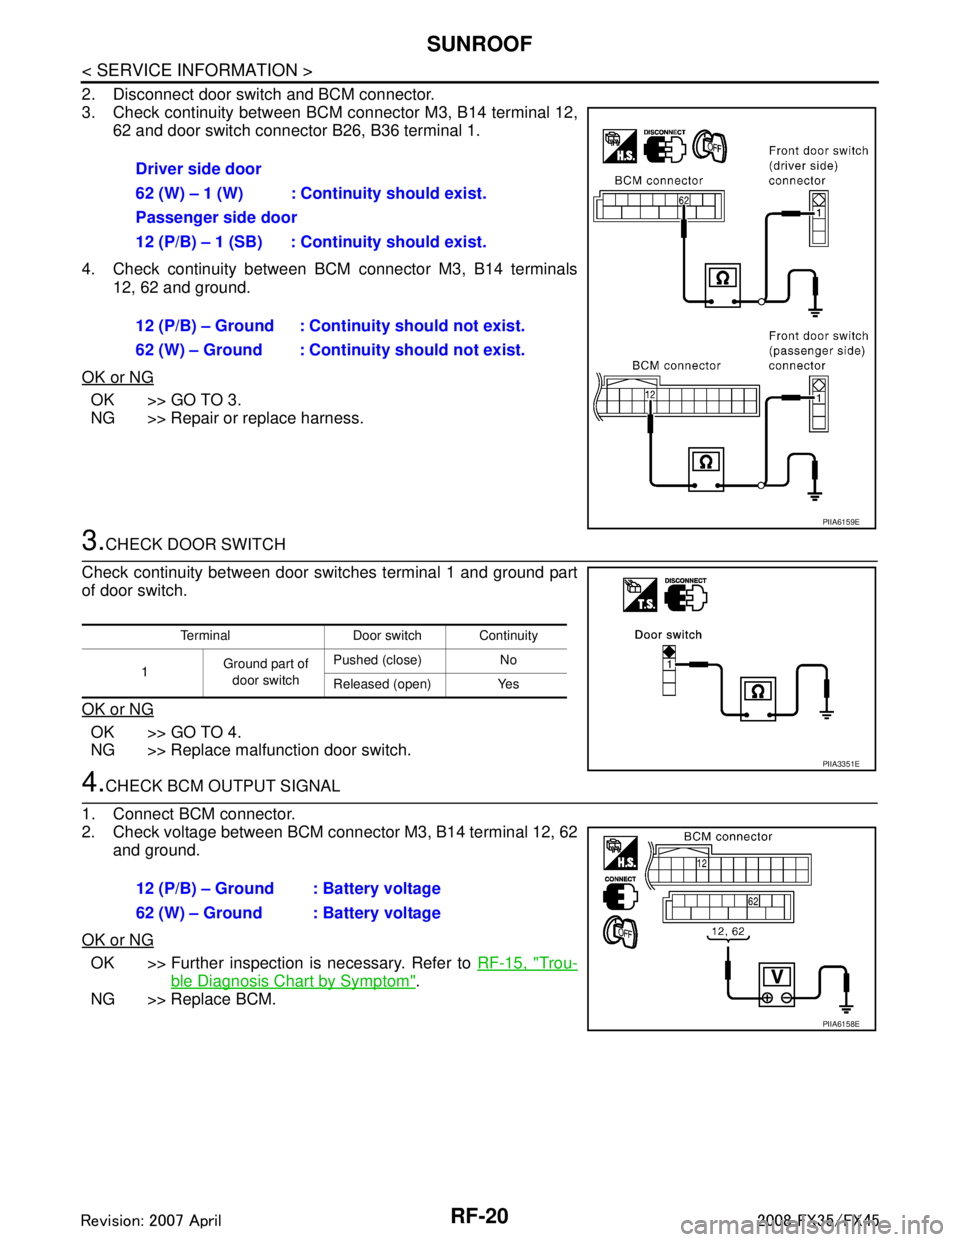
2. Disconnect door switch and BCM connector.
3. Check continuity between BCM connector M3, B14 terminal 12,62 and door switch connector B26, B36 terminal 1.
4. Check continuity between BCM connector M3, B14 terminals 12, 62 and ground.
OK or NG
OK >> GO TO 3.
NG >> Repair or replace harness.
3.CHECK DOOR SWITCH
Check continuity between door switches terminal 1 and ground part
of door switch.
OK or NG
OK >> GO TO 4.
NG >> Replace malfunction door switch.
4.CHECK BCM OUTPUT SIGNAL
1. Connect BCM connector.
2. Check voltage between BCM connector M3, B14 terminal 12, 62 and ground.
OK or NG
OK >> Further inspection is necessary. Refer to RF-15, "Trou-
ble Diagnosis Chart by Symptom".
NG >> Replace BCM. Driver side door
62 (W) – 1 (W) : Cont
inuity should exist.
Passenger side door
12 (P/B) – 1 (SB) : Cont inuity should exist.
12 (P/B) – Ground : Continuity should not exist.
62 (W) – Ground : Continuity should not exist.
PIIA6159E
Terminal Door switch Continuity
1 Ground part of
door switch Pushed (close) No
Released (open) Yes
PIIA3351E
12 (P/B) – Ground : Battery voltage
62 (W) – Ground : Battery voltage
PIIA6158E
3AA93ABC3ACD3AC03ACA3AC03AC63AC53A913A773A893A873A873A8E3A773A983AC73AC93AC03AC3
3A893A873A873A8F3A773A9D3AAF3A8A3A8C3A863A9D3AAF3A8B3A8C
Page 3536 of 3924
SUNROOFRF-21
< SERVICE INFORMATION >
C
DE
F
G H
J
K L
M A
B
RF
N
O P
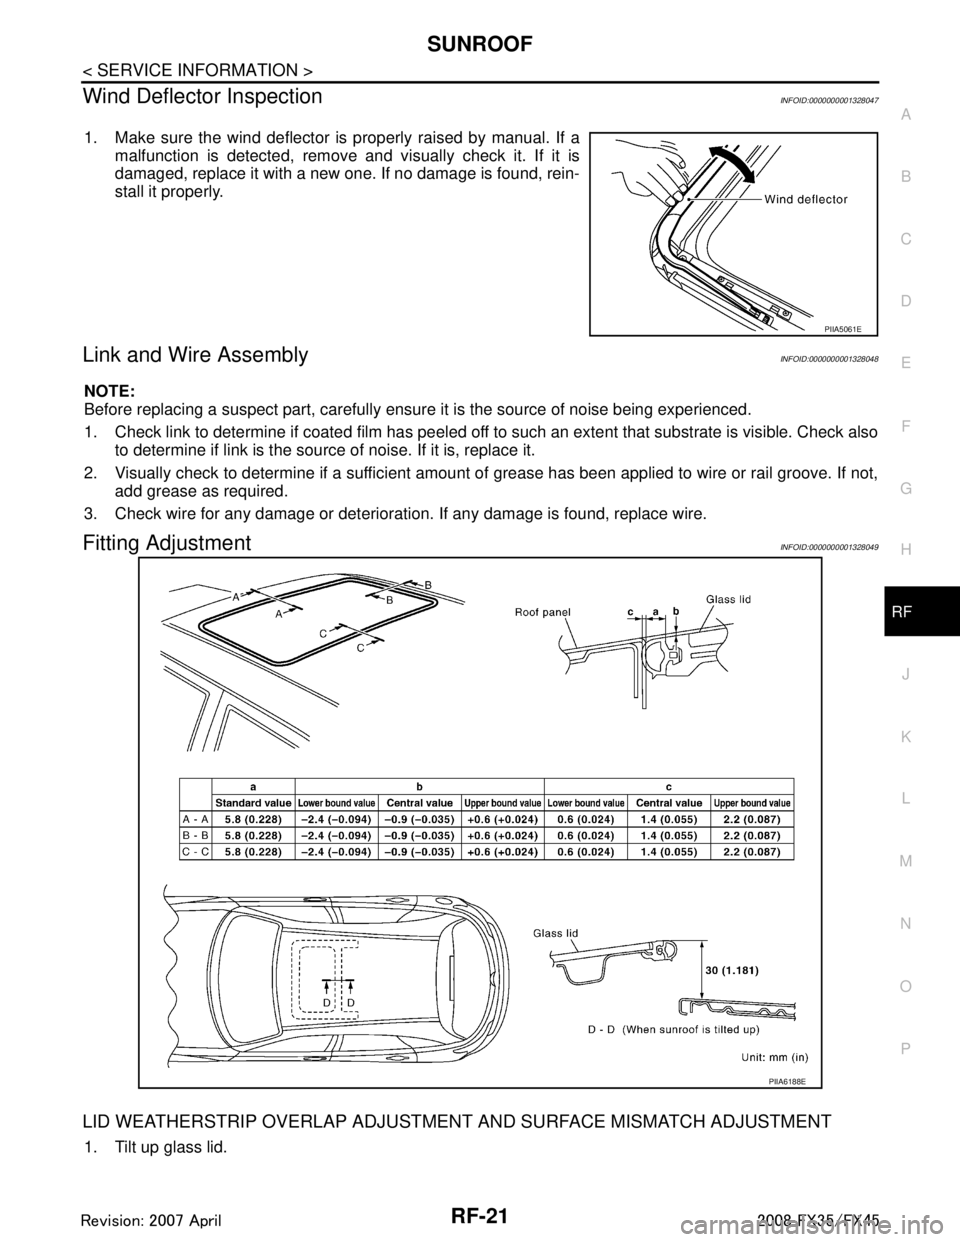
Wind Deflector InspectionINFOID:0000000001328047
1. Make sure the wind deflector is properly raised by manual. If a malfunction is detected, remove and visually check it. If it is
damaged, replace it with a new one. If no damage is found, rein-
stall it properly.
Link and Wire AssemblyINFOID:0000000001328048
NOTE:
Before replacing a suspect part, carefully ensur e it is the source of noise being experienced.
1. Check link to determine if coated film has peeled off to such an extent that substrate is visible. Check also
to determine if link is the source of noise. If it is, replace it.
2. Visually check to determine if a sufficient amount of grease has been applied to wire or rail groove. If not,
add grease as required.
3. Check wire for any damage or deteriorati on. If any damage is found, replace wire.
Fitting AdjustmentINFOID:0000000001328049
LID WEATHERSTRIP OVERLAP ADJUSTMENT AND SURFACE MISMATCH ADJUSTMENT
1. Tilt up glass lid.
PIIA5061E
PIIA6188E
3AA93ABC3ACD3AC03ACA3AC03AC63AC53A913A773A893A873A873A8E3A773A983AC73AC93AC03AC3
3A893A873A873A8F3A773A9D3AAF3A8A3A8C3A863A9D3AAF3A8B3A8C
Page 3537 of 3924
RF-22
< SERVICE INFORMATION >
SUNROOF
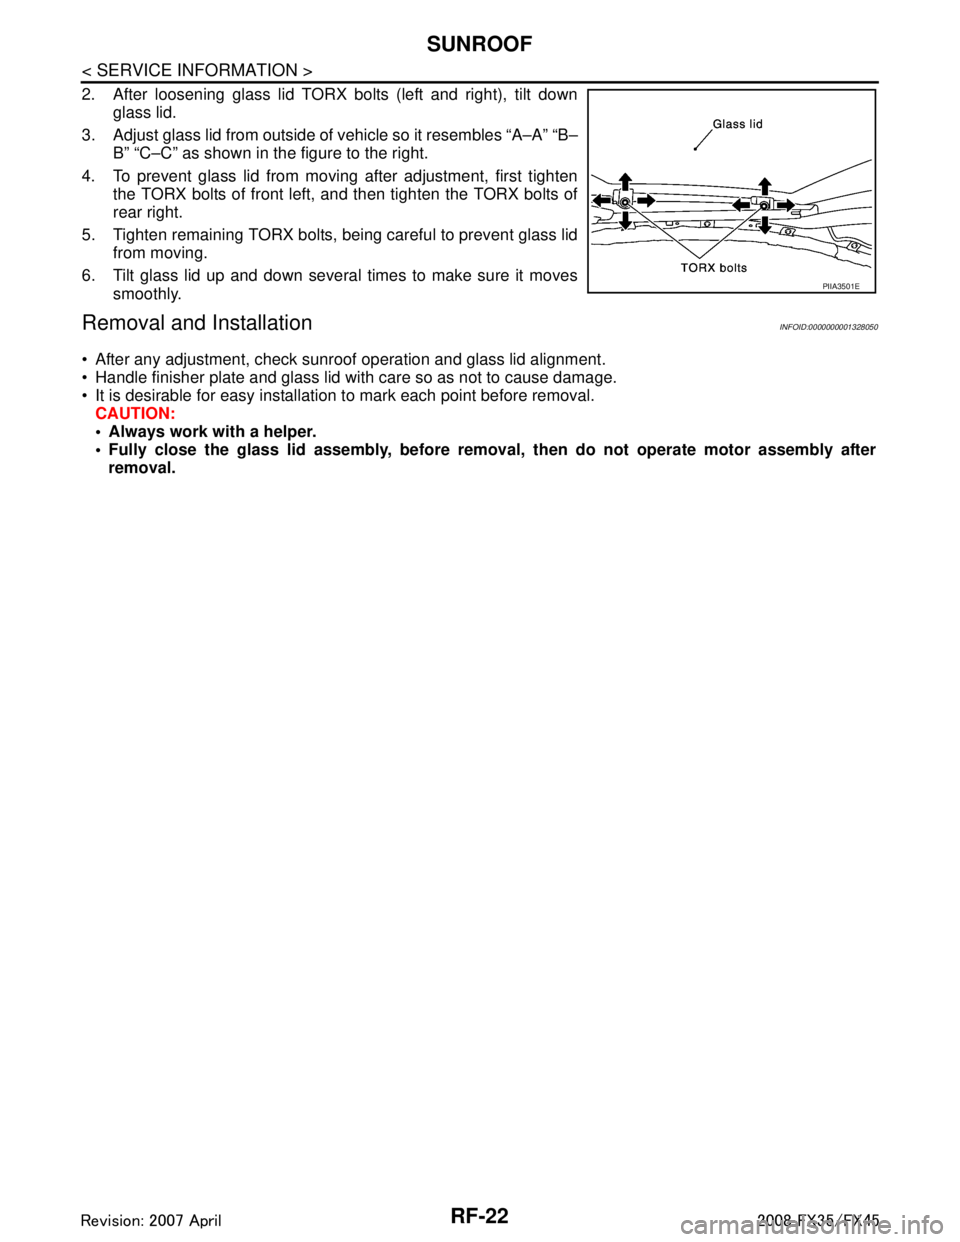
2. After loosening glass lid TORX bolts (left and right), tilt downglass lid.
3. Adjust glass lid from outside of vehicle so it resembles “A–A” “B– B” “C–C” as shown in the figure to the right.
4. To prevent glass lid from moving after adjustment, first tighten the TORX bolts of front left, and then tighten the TORX bolts of
rear right.
5. Tighten remaining TORX bolts, being careful to prevent glass lid from moving.
6. Tilt glass lid up and down several times to make sure it moves smoothly.
Removal and InstallationINFOID:0000000001328050
After any adjustment, check sunroof operation and glass lid alignment.
Handle finisher plate and glass lid with care so as not to cause damage.
It is desirable for easy installation to mark each point before removal. CAUTION:
Always work with a helper.
Fully close the glass lid assembly, before remo val, then do not operate motor assembly after
removal.
PIIA3501E
3AA93ABC3ACD3AC03ACA3AC03AC63AC53A913A773A893A873A873A8E3A773A983AC73AC93AC03AC3
3A893A873A873A8F3A773A9D3AAF3A8A3A8C3A863A9D3AAF3A8B3A8C
Page 3538 of 3924
SUNROOFRF-23
< SERVICE INFORMATION >
C
DE
F
G H
J
K L
M A
B
RF
N
O P
PIIA6190E
1. Glass lid 2. TORX bolt 3. Washer
4. Rear sunroof bracket 5. Front sunroof bracket 6. Wind deflector
7. Sunroof unit assembly 8. Noise cover 9. Sunroof motor assembly
10. Screw 11. Sunshade 12. Nut
13. Bolt 14. Drain plate 15. Sunshade stopper
16. Drain hose
3AA93ABC3ACD3AC03ACA3AC03AC63AC53A913A773A893A873A873A8E3A773A983AC73AC93AC03AC3
3A893A873A873A8F3A773A9D3AAF3A8A3A8C3A863A9D3AAF3A8B3A8C
Page 3539 of 3924
RF-24
< SERVICE INFORMATION >
SUNROOF
SUNROOF UNIT ASSEMBLY
Removal
CAUTION:
Always work with a helper.
When taking sunroof unit out, use clothes to protect the seats and trim from damage.
After installing the sunroof un it and glass lid, be sure to perform the leakage test and make sure
there is no malfunction.
1. Tilt up glass lid.
2. Remove the headlining. Refer to EI-43, "
Component Parts Location".
3. Disconnect drain hoses.
4. Remove glass lid. Refer to RF-22, "
Removal and Installation".
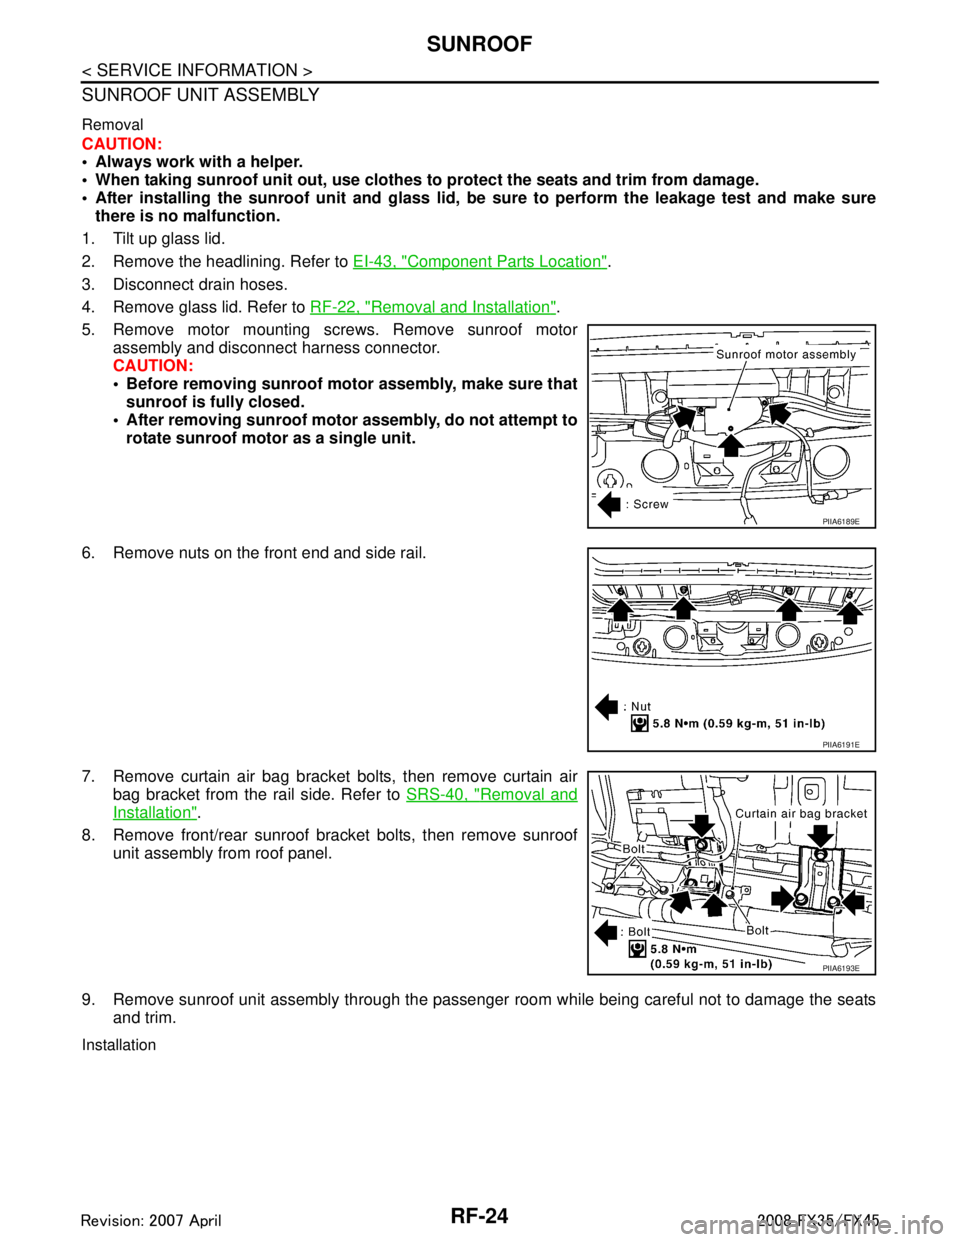
5. Remove motor mounting screws. Remove sunroof motor assembly and disconnect harness connector.
CAUTION:
Before removing sunroof motor assembly, make sure thatsunroof is fully closed.
After removing sunroof motor assembly, do not attempt to
rotate sunroof motor as a single unit.
6. Remove nuts on the front end and side rail.
7. Remove curtain air bag bracket bolts, then remove curtain air bag bracket from the rail side. Refer to SRS-40, "
Removal and
Installation".
8. Remove front/rear sunroof bracket bolts, then remove sunroof unit assembly from roof panel.
9. Remove sunroof unit assembly through the passenger room while being careful not to damage the seats
and trim.
Installation
PIIA6189E
PIIA6191E
PIIA6193E
3AA93ABC3ACD3AC03ACA3AC03AC63AC53A913A773A893A873A873A8E3A773A983AC73AC93AC03AC3
3A893A873A873A8F3A773A9D3AAF3A8A3A8C3A863A9D3AAF3A8B3A8C
Page 3540 of 3924
SUNROOFRF-25
< SERVICE INFORMATION >
C
DE
F
G H
J
K L
M A
B
RF
N
O P
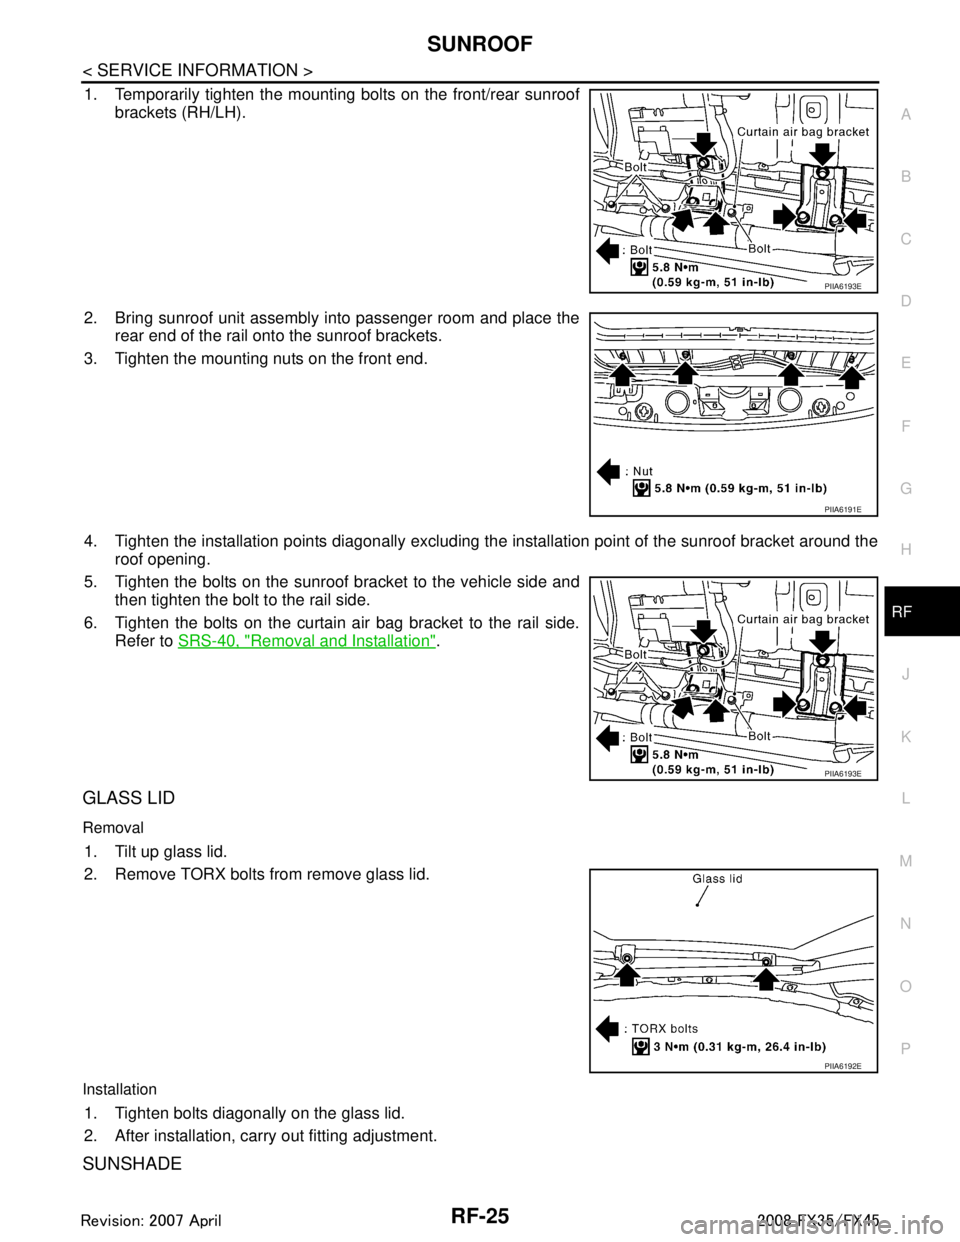
1. Temporarily tighten the mounting bolts on the front/rear sunroof brackets (RH/LH).
2. Bring sunroof unit assembly into passenger room and place the rear end of the rail onto the sunroof brackets.
3. Tighten the mounting nuts on the front end.
4. Tighten the installation points diagonally excluding the installation point of the sunroof bracket around the roof opening.
5. Tighten the bolts on the sunroof bracket to the vehicle side and then tighten the bolt to the rail side.
6. Tighten the bolts on the curtain air bag bracket to the rail side. Refer to SRS-40, "
Removal and Installation".
GLASS LID
Removal
1. Tilt up glass lid.
2. Remove TORX bolts from remove glass lid.
Installation
1. Tighten bolts diagonally on the glass lid.
2. After installation, carry out fitting adjustment.
SUNSHADE
PIIA6193E
PIIA6191E
PIIA6193E
PIIA6192E
3AA93ABC3ACD3AC03ACA3AC03AC63AC53A913A773A893A873A873A8E3A773A983AC73AC93AC03AC3
3A893A873A873A8F3A773A9D3AAF3A8A3A8C3A863A9D3AAF3A8B3A8C
Page 3541 of 3924
RF-26
< SERVICE INFORMATION >
SUNROOF
Removal
NOTE:
Detaching is possible even with the sunshade attached on the vehicle.
1. Remove the headlining. Refer to EI-43, "
Component Parts Location".
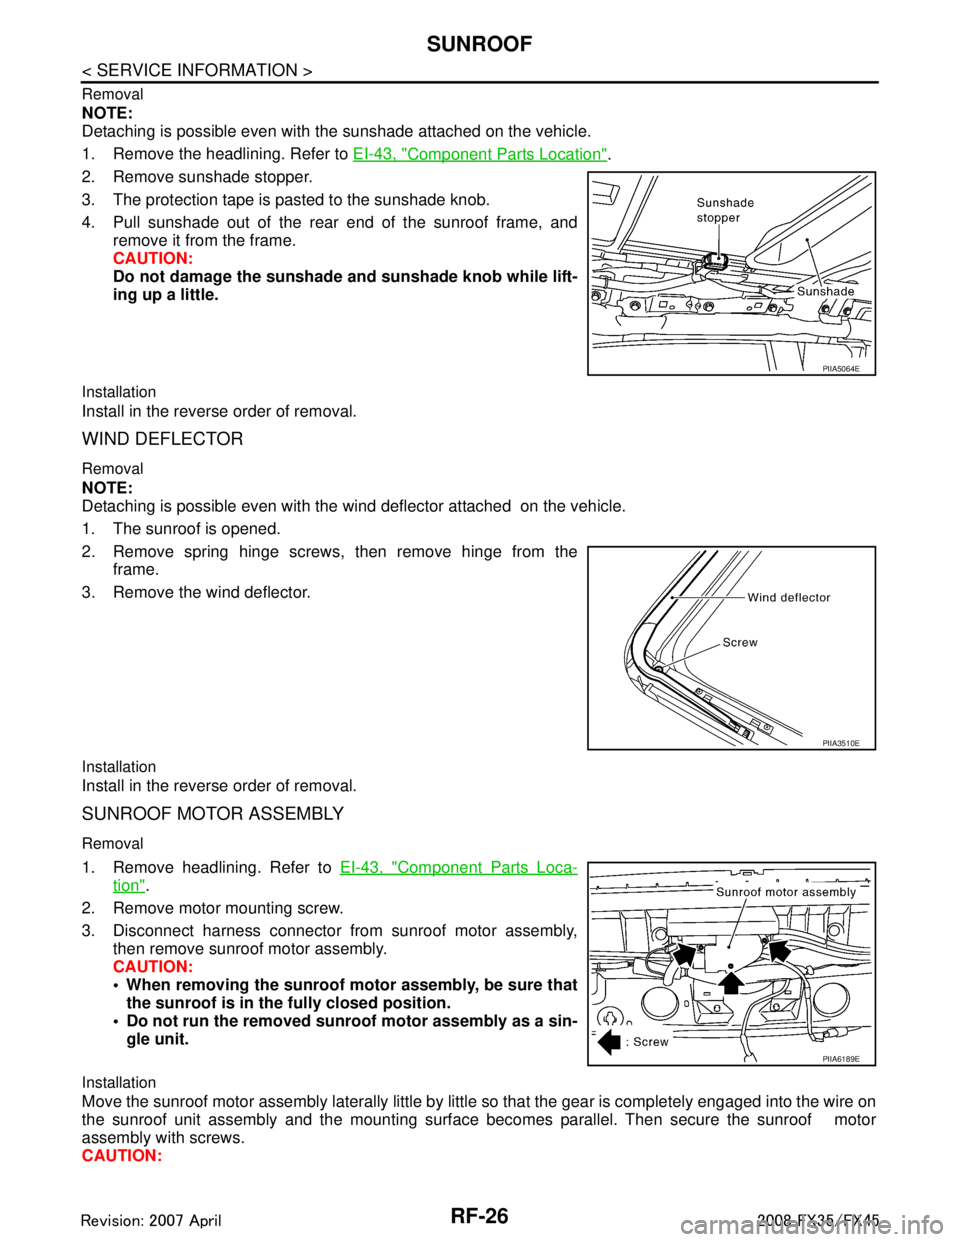
2. Remove sunshade stopper.
3. The protection tape is pasted to the sunshade knob.
4. Pull sunshade out of the rear end of the sunroof frame, and remove it from the frame.
CAUTION:
Do not damage the sunshade and sunshade knob while lift-
ing up a little.
Installation
Install in the reverse order of removal.
WIND DEFLECTOR
Removal
NOTE:
Detaching is possible even with the wind deflector attached on the vehicle.
1. The sunroof is opened.
2. Remove spring hinge screws, then remove hinge from theframe.
3. Remove the wind deflector.
Installation
Install in the reverse order of removal.
SUNROOF MOTOR ASSEMBLY
Removal
1. Remove headlining. Refer to EI-43, "Component Parts Loca-
tion".
2. Remove motor mounting screw.
3. Disconnect harness connector from sunroof motor assembly, then remove sunroof motor assembly.
CAUTION:
When removing the sunroof motor assembly, be sure that
the sunroof is in the fully closed position.
Do not run the removed sunroof motor assembly as a sin- gle unit.
Installation
Move the sunroof motor assembly laterally little by lit tle so that the gear is completely engaged into the wire on
the sunroof unit assembly and the mounting surface bec omes parallel. Then secure the sunroof motor
assembly with screws.
CAUTION:
PIIA5064E
PIIA3510E
PIIA6189E
3AA93ABC3ACD3AC03ACA3AC03AC63AC53A913A773A893A873A873A8E3A773A983AC73AC93AC03AC3
3A893A873A873A8F3A773A9D3AAF3A8A3A8C3A863A9D3AAF3A8B3A8C