2008 INFINITI FX35 warning
[x] Cancel search: warningPage 2900 of 3924
GI-38
< SERVICE INFORMATION >
LIFTING POINT
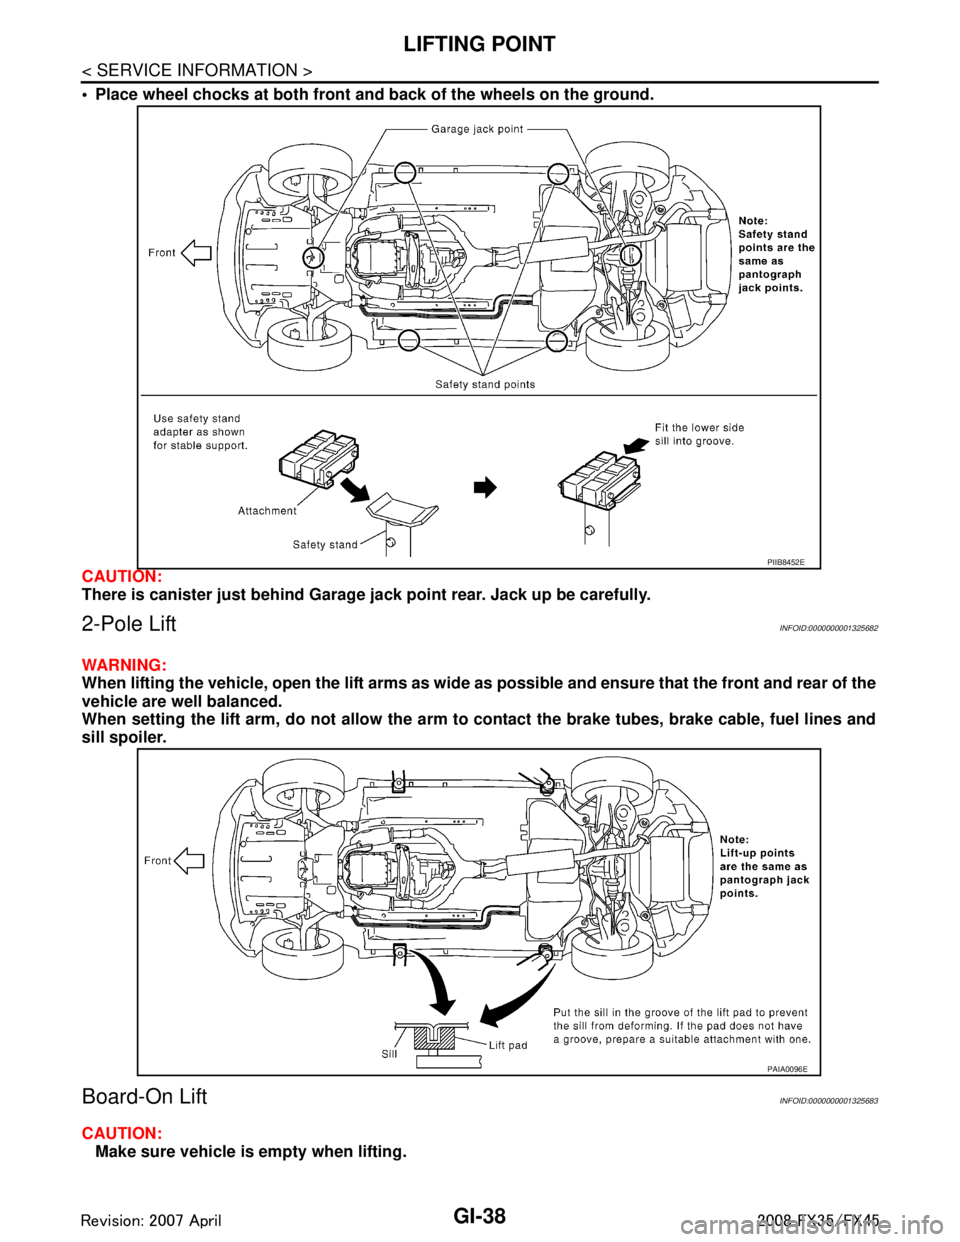
Place wheel chocks at both front and back of the wheels on the ground.
CAUTION:
There is canister just behind Garage jack point rear. Jack up be carefully.
2-Pole LiftINFOID:0000000001325682
WARNING:
When lifting the vehicle, open the lift arms as wide as possible and ensure that the front and rear of the
vehicle are well balanced.
When setting the lift arm, do no t allow the arm to contact the brake tubes, brake cable, fuel lines and
sill spoiler.
Board-On LiftINFOID:0000000001325683
CAUTION: Make sure vehicle is empty when lifting.
PIIB8452E
PAIA0096E
3AA93ABC3ACD3AC03ACA3AC03AC63AC53A913A773A893A873A873A8E3A773A983AC73AC93AC03AC3
3A893A873A873A8F3A773A9D3AAF3A8A3A8C3A863A9D3AAF3A8B3A8C
Page 2903 of 3924
TOW TRUCK TOWINGGI-41
< SERVICE INFORMATION >
C
DE
F
G H
I
J
K L
M B
GI
N
O P
AWD MODELS
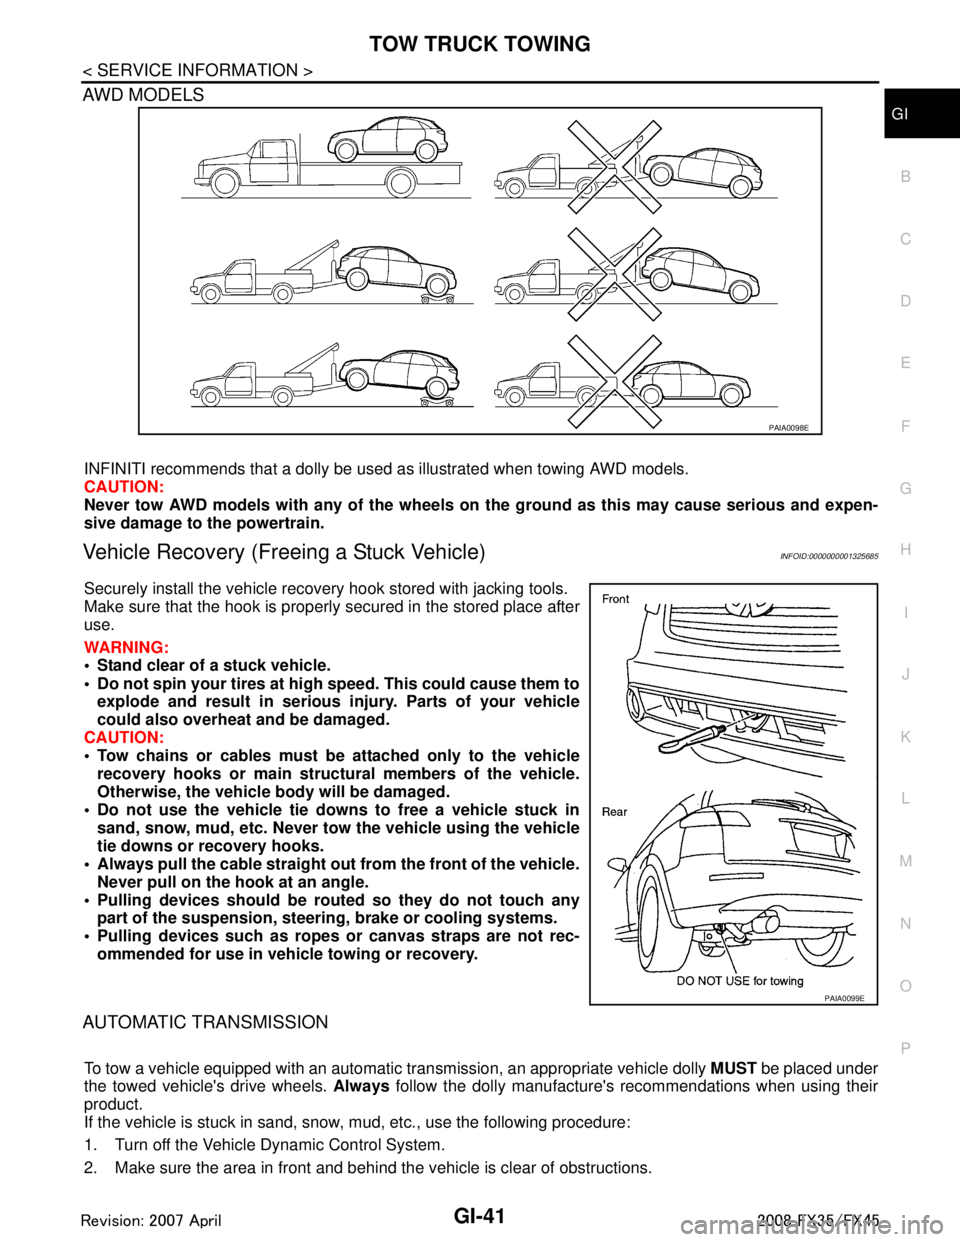
INFINITI recommends that a dolly be used as illustrated when towing AWD models.
CAUTION:
Never tow AWD models with any of the wheels on the ground as this may cause serious and expen-
sive damage to the powertrain.
Vehicle Recovery (Freeing a Stuck Vehicle)INFOID:0000000001325685
Securely install the vehicle recovery hook stored with jacking tools.
Make sure that the hook is properly secured in the stored place after
use.
WARNING:
Stand clear of a stuck vehicle.
Do not spin your tires at high speed. This could cause them to
explode and result in serious injury. Parts of your vehicle
could also overheat and be damaged.
CAUTION:
Tow chains or cables must be attached only to the vehicle recovery hooks or main struct ural members of the vehicle.
Otherwise, the vehicle body will be damaged.
Do not use the vehicle tie downs to free a vehicle stuck in
sand, snow, mud, etc. Never to w the vehicle using the vehicle
tie downs or recovery hooks.
Always pull the cable straight out from the front of the vehicle.
Never pull on the hook at an angle.
Pulling devices should be rout ed so they do not touch any
part of the suspension, steer ing, brake or cooling systems.
Pulling devices such as ropes or canvas straps are not rec- ommended for use in vehicle towing or recovery.
AUTOMATIC TRANSMISSION
To tow a vehicle equipped with an automatic tr ansmission, an appropriate vehicle dolly MUST be placed under
the towed vehicle's drive wheels. Always follow the dolly manufacture's recommendations when using their
product.
If the vehicle is stuck in sand, snow , mud, etc., use the following procedure:
1. Turn off the Vehicle Dynamic Control System.
2. Make sure the area in front and behind the vehicle is clear of obstructions.
PAIA0098E
PAIA0099E
3AA93ABC3ACD3AC03ACA3AC03AC63AC53A913A773A893A873A873A8E3A773A983AC73AC93AC03AC3
3A893A873A873A8F3A773A9D3AAF3A8A3A8C3A863A9D3AAF3A8B3A8C
Page 2916 of 3924
PRECAUTIONSGW-3
< SERVICE INFORMATION >
C
DE
F
G H
J
K L
M A
B
GW
N
O P
SERVICE INFORMATION
PRECAUTIONS
Precaution for Supplemental Restraint System (SRS) "AIR BAG" and "SEAT BELT
PRE-TENSIONER"
INFOID:0000000001612893
The Supplemental Restraint System such as “A IR BAG” and “SEAT BELT PRE-TENSIONER”, used along
with a front seat belt, helps to reduce the risk or severi ty of injury to the driver and front passenger for certain
types of collision. This system includes seat belt switch inputs and dual stage front air bag modules. The SRS
system uses the seat belt switches to determine the front air bag deployment, and may only deploy one front
air bag, depending on the severity of a collision and whether the front occupants are belted or unbelted.
Information necessary to service the system safely is included in the “SUPPLEMENTAL RESTRAINT SYS-
TEM” and “SEAT BELTS” of this Service Manual.
WARNING:
• To avoid rendering the SRS inoper ative, which could increase the risk of personal injury or death in
the event of a collision which would result in air bag inflation, all maintenance must be performed by
an authorized NISSAN/INFINITI dealer.
Improper maintenance, including in correct removal and installation of the SRS, can lead to personal
injury caused by unintentional act ivation of the system. For removal of Spiral Cable and Air Bag
Module, see the “SUPPLEMEN TAL RESTRAINT SYSTEM”.
Do not use electrical test equipm ent on any circuit related to the SRS unless instructed to in this
Service Manual. SRS wiring harnesses can be identi fied by yellow and/or orange harnesses or har-
ness connectors.
Precaution for Procedur e without Cowl Top CoverINFOID:0000000001612894
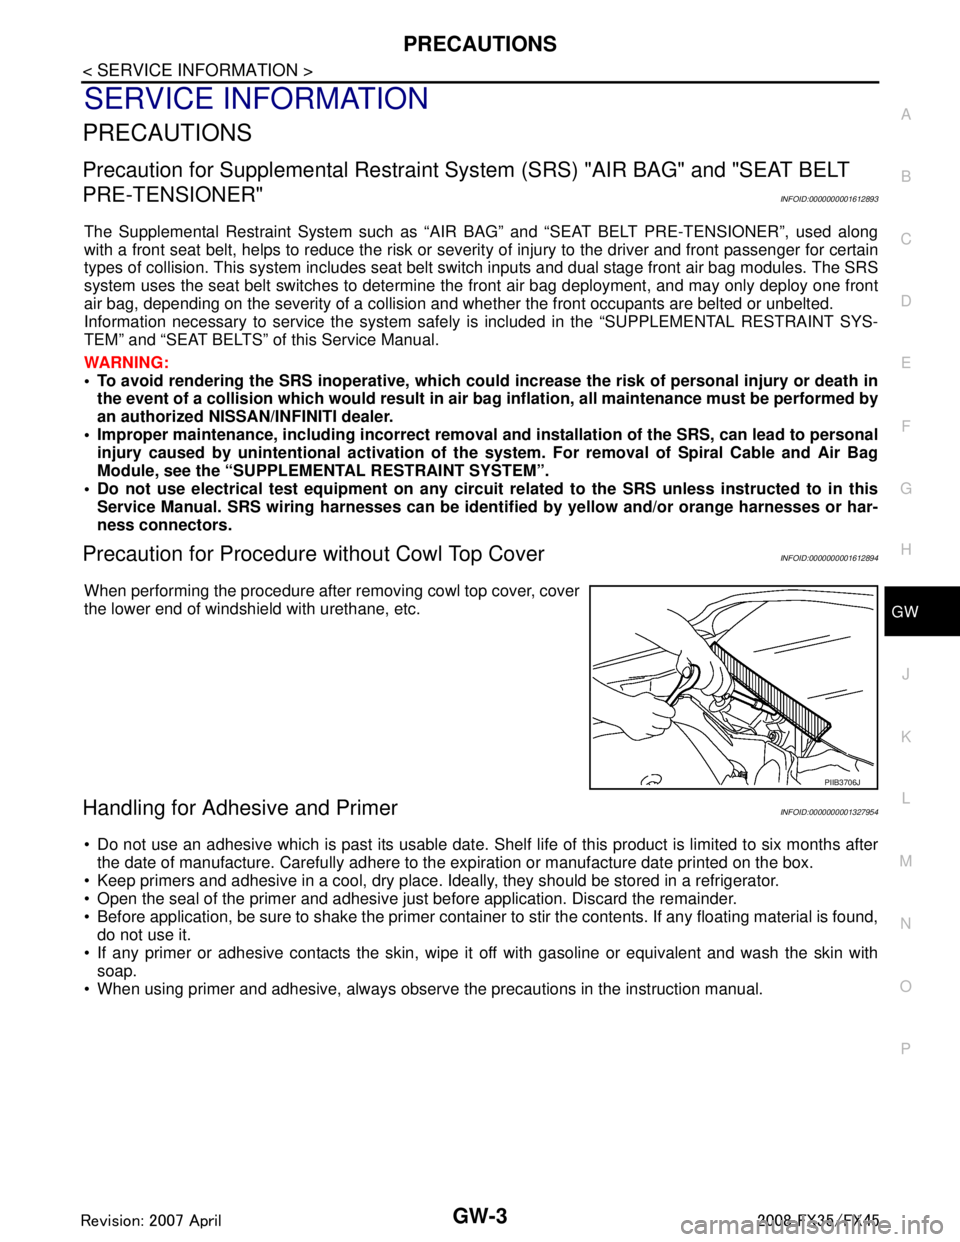
When performing the procedure after removing cowl top cover, cover
the lower end of windshield with urethane, etc.
Handling for Adhesive and PrimerINFOID:0000000001327954
Do not use an adhesive which is past its usable date. Shel f life of this product is limited to six months after
the date of manufacture. Carefully adhere to the ex piration or manufacture date printed on the box.
Keep primers and adhesive in a cool, dry place. I deally, they should be stored in a refrigerator.
Open the seal of the primer and adhesive just before application. Discard the remainder.
Before application, be sure to shake the primer container to stir the contents. If any floating material is found,
do not use it.
If any primer or adhesive contacts the skin, wipe it off with gasoline or equivalent and wash the skin with
soap.
When using primer and adhesive, always observe the precautions in the instruction manual.
PIIB3706J
3AA93ABC3ACD3AC03ACA3AC03AC63AC53A913A773A893A873A873A8E3A773A983AC73AC93AC03AC3
3A893A873A873A8F3A773A9D3AAF3A8A3A8C3A863A9D3AAF3A8B3A8C
Page 2924 of 3924
WINDSHIELD GLASSGW-11
< SERVICE INFORMATION >
C
DE
F
G H
J
K L
M A
B
GW
N
O P
WINDSHIELD GLASS
Removal and InstallationINFOID:0000000001327960
REMOVAL
1. Remove the front pillar garnish. Refer to EI-38.
2. Partially remove the headlining (front edge). Refer to EI-43
.
3. Remove the front wiper arms. Refer to WW-28, "
Removal and Installation of Front Wiper and Washer
Switch".
4. Remove the cowl top cover. Refer to EI-23
.
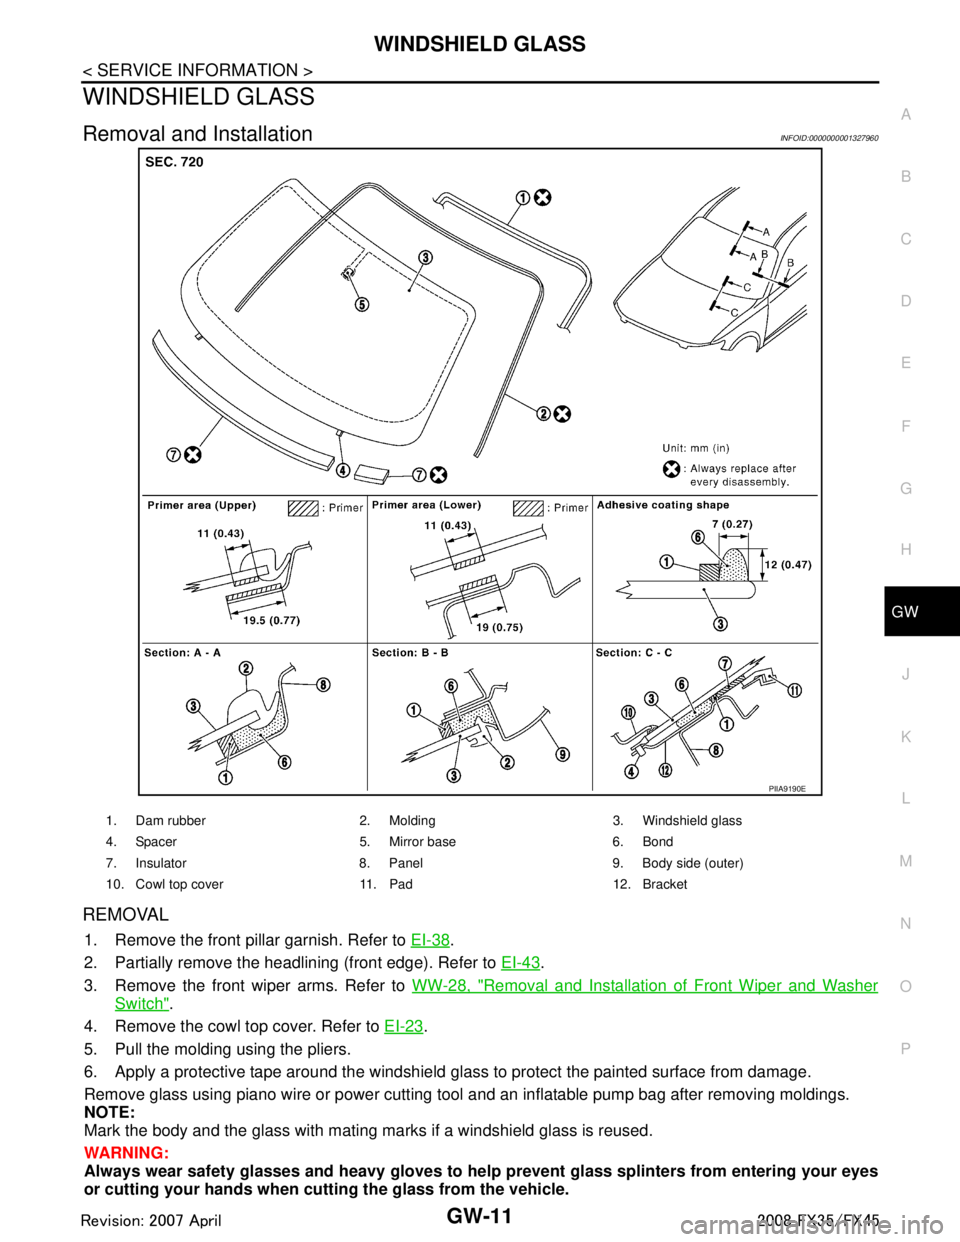
5. Pull the molding using the pliers.
6. Apply a protective tape around the windshield gl ass to protect the painted surface from damage.
Remove glass using piano wire or power cutting tool and an inflatable pump bag after removing moldings.
NOTE:
Mark the body and the glass with mating marks if a windshield glass is reused.
WARNING:
Always wear safety glasses and heavy gloves to help prevent glass splinters from entering your eyes
or cutting your hands when cu tting the glass from the vehicle.
PIIA9190E
1. Dam rubber 2. Molding 3. Windshield glass
4. Spacer 5. Mirror base 6. Bond
7. Insulator 8. Panel 9. Body side (outer)
10. Cowl top cover 11. Pad 12. Bracket
3AA93ABC3ACD3AC03ACA3AC03AC63AC53A913A773A893A873A873A8E3A773A983AC73AC93AC03AC3
3A893A873A873A8F3A773A9D3AAF3A8A3A8C3A863A9D3AAF3A8B3A8C
Page 2925 of 3924
GW-12
< SERVICE INFORMATION >
WINDSHIELD GLASS
CAUTION:
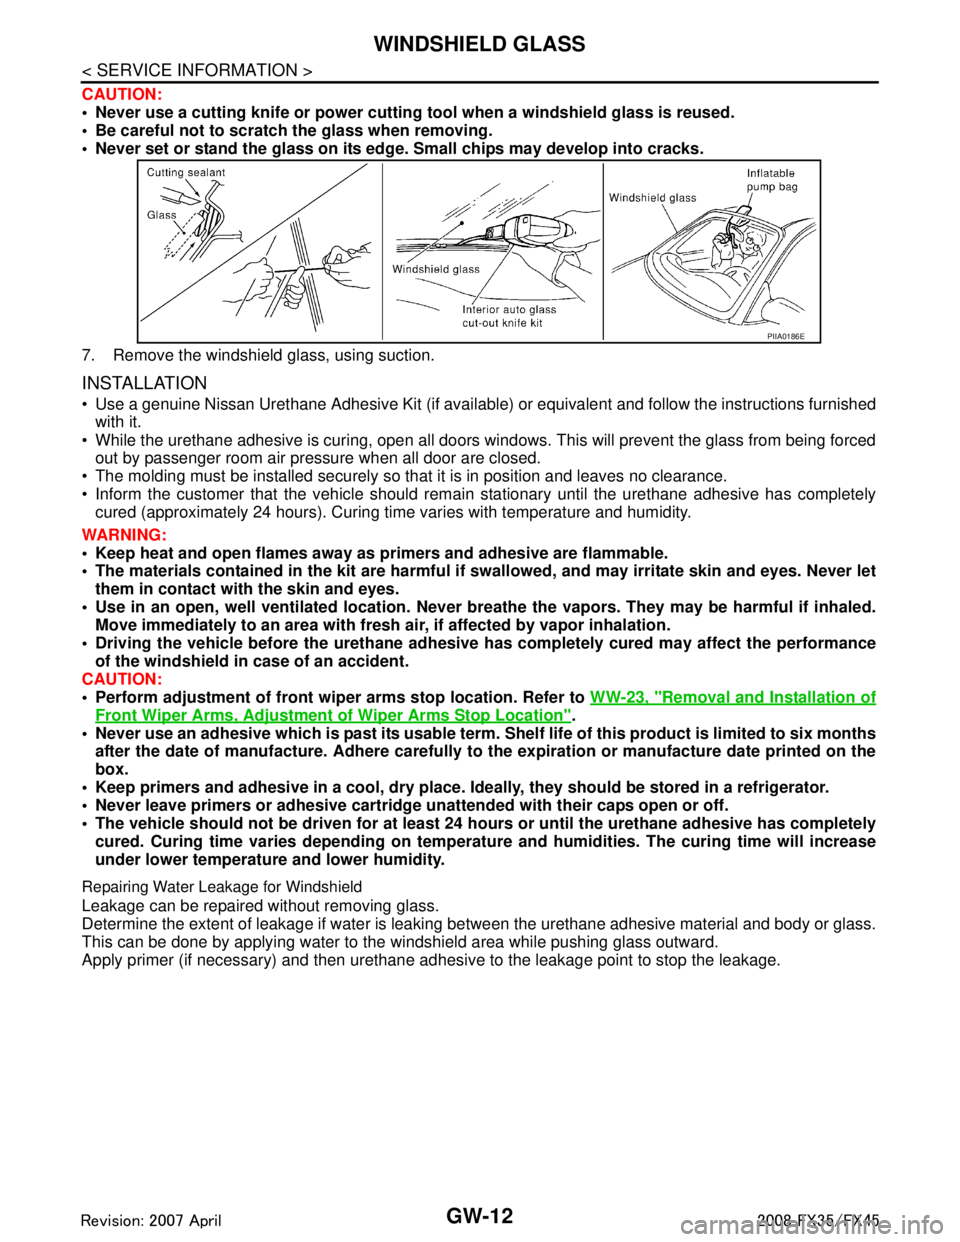
Never use a cutting knife or power cutting tool when a windshield glass is reused.
Be careful not to scratch the glass when removing.
Never set or stand the glass on its edge. Small chips may develop into cracks.
7. Remove the windshield glass, using suction.
INSTALLATION
Use a genuine Nissan Urethane Adhesive Kit (if available) or equivalent and follow the instructions furnished
with it.
While the urethane adhesive is curing, open all doors windows. This will prevent the glass from being forced out by passenger room air pressure when all door are closed.
The molding must be installed securely so that it is in position and leaves no clearance.
Inform the customer that the vehicle should rema in stationary until the urethane adhesive has completely
cured (approximately 24 hours). Curing time varies with temperature and humidity.
WARNING:
Keep heat and open flames away as primers and adhesive are flammable.
The materials contained in the ki t are harmful if swallowed, and may irritate skin and eyes. Never let
them in contact with the skin and eyes.
Use in an open, well ventilated location. Never br eathe the vapors. They may be harmful if inhaled.
Move immediately to an area with fresh ai r, if affected by vapor inhalation.
Driving the vehicle before the urethane adhesive has completely cured may affect the performance
of the windshield in case of an accident.
CAUTION:
Perform adjustment of front wipe r arms stop location. Refer to WW-23, "
Removal and Installation of
Front Wiper Arms, Adjustment of Wiper Arms Stop Location".
Never use an adhesive which is past its usable term. Shelf life of this product is limited to six months
after the date of manufacture. Adhere carefully to the expiration or manufacture date printed on the
box.
Keep primers and adhesive in a c ool, dry place. Ideally, they should be stored in a refrigerator.
Never leave primers or adhesive cartridge un attended with their caps open or off.
The vehicle should not be driven for at least 24 hours or until the urethane adhesive has completely
cured. Curing time varies depending on temperat ure and humidities. The curing time will increase
under lower temperature and lower humidity.
Repairing Water Leakage for Windshield
Leakage can be repaired without removing glass.
Determine the extent of leakage if water is leaki ng between the urethane adhesive material and body or glass.
This can be done by applying water to the windshield area while pushing glass outward.
Apply primer (if necessary) and then urethane adhesiv e to the leakage point to stop the leakage.
PIIA0186E
3AA93ABC3ACD3AC03ACA3AC03AC63AC53A913A773A893A873A873A8E3A773A983AC73AC93AC03AC3
3A893A873A873A8F3A773A9D3AAF3A8A3A8C3A863A9D3AAF3A8B3A8C
Page 2926 of 3924
BACK DOOR WINDOW GLASSGW-13
< SERVICE INFORMATION >
C
DE
F
G H
J
K L
M A
B
GW
N
O P
BACK DOOR WINDOW GLASS
Removal and InstallationINFOID:0000000001327961
REMOVAL
1. Remove the back door finisher. Refer to EI-47.
2. Remove the rear wiper arm. Refer to WW-44, "
Removal and Installation of Rear Wiper and Washer
Switch".
3. Remove the connectors and grounds for the rear window defogger.
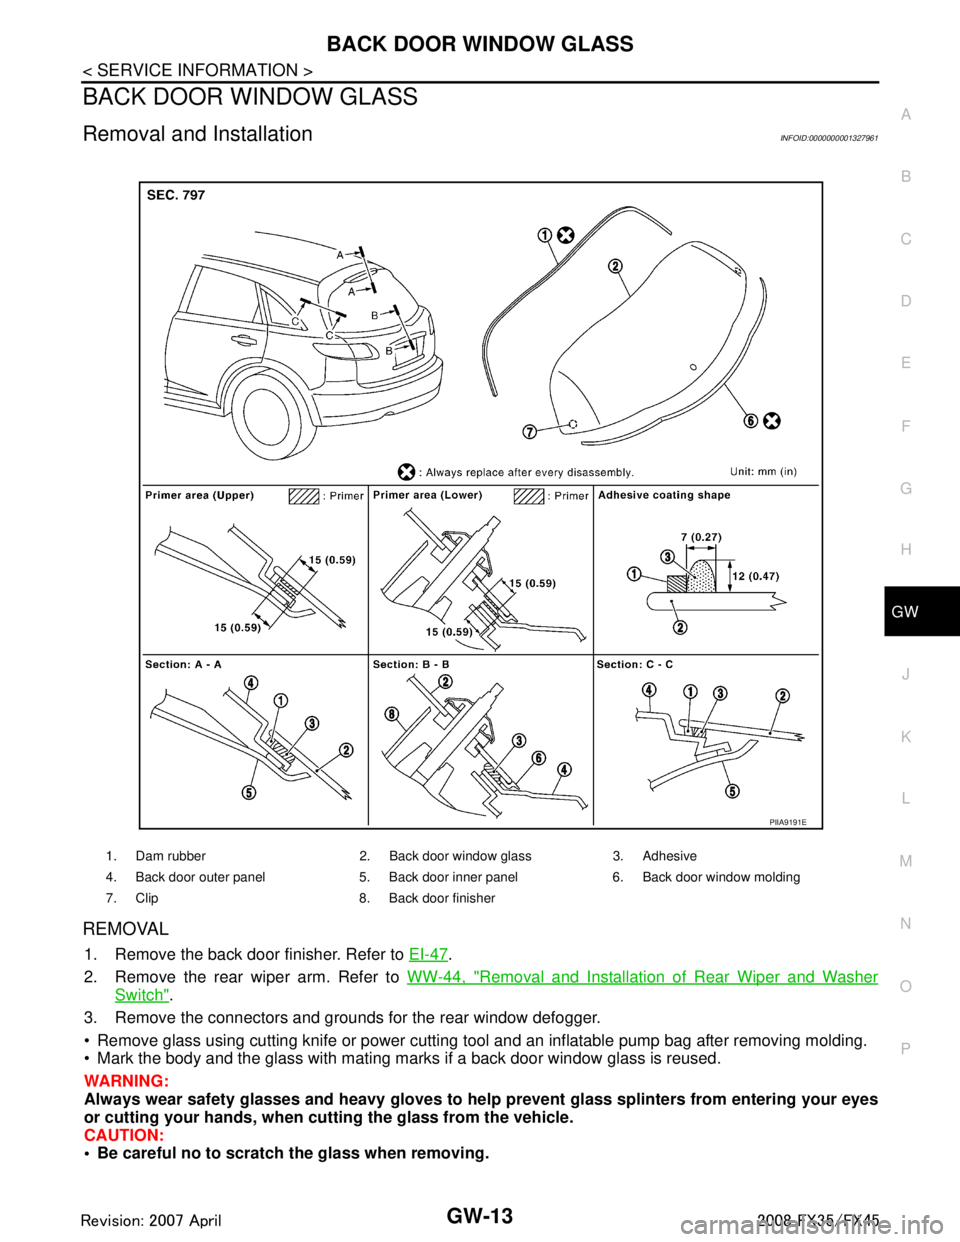
Remove glass using cutting knife or power cutting tool and an inflatable pump bag after removing molding.
Mark the body and the glass with mating marks if a back door window glass is reused.
WARNING:
Always wear safety glasses and heavy gloves to help prevent glass splinters from entering your eyes
or cutting your hands, when cu tting the glass from the vehicle.
CAUTION:
Be careful no to scratch the glass when removing.
1. Dam rubber 2. Back door window glass 3. Adhesive
4. Back door outer panel 5. Back door inner panel 6. Back door window molding
7. Clip 8. Back door finisher
PIIA9191E
3AA93ABC3ACD3AC03ACA3AC03AC63AC53A913A773A893A873A873A8E3A773A983AC73AC93AC03AC3
3A893A873A873A8F3A773A9D3AAF3A8A3A8C3A863A9D3AAF3A8B3A8C
Page 2927 of 3924
GW-14
< SERVICE INFORMATION >
BACK DOOR WINDOW GLASS
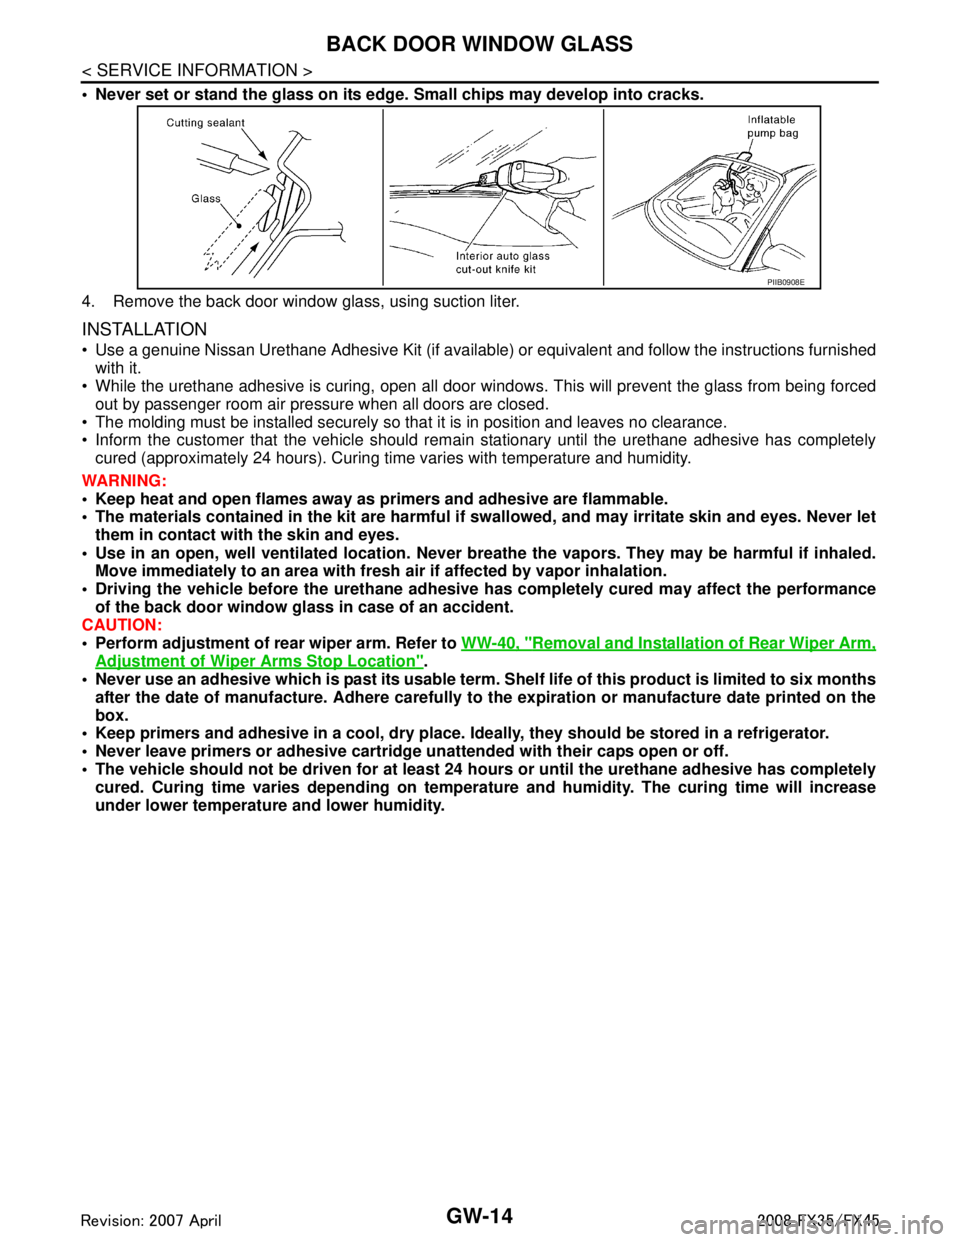
Never set or stand the glass on its edge. Small chips may develop into cracks.
4. Remove the back door window glass, using suction liter.
INSTALLATION
Use a genuine Nissan Urethane Adhesive Kit (if available) or equivalent and follow the instructions furnished
with it.
While the urethane adhesive is curing, open all door window s. This will prevent the glass from being forced
out by passenger room air pressure when all doors are closed.
The molding must be installed securely so that it is in position and leaves no clearance.
Inform the customer that the vehicle should rema in stationary until the urethane adhesive has completely
cured (approximately 24 hours). Curing time varies with temperature and humidity.
WARNING:
Keep heat and open flames away as primers and adhesive are flammable.
The materials contained in the ki t are harmful if swallowed, and may irritate skin and eyes. Never let
them in contact with the skin and eyes.
Use in an open, well ventilated location. Never br eathe the vapors. They may be harmful if inhaled.
Move immediately to an area with fresh air if affected by vapor inhalation.
Driving the vehicle before the urethane adhesive has completely cured may affect the performance
of the back door window gl ass in case of an accident.
CAUTION:
Perform adjustment of rear wiper arm. Refer to WW-40, "
Removal and Installation of Rear Wiper Arm,
Adjustment of Wiper Arms Stop Location".
Never use an adhesive which is past its usable term. Shelf life of this product is limited to six months
after the date of manufacture. Adhere carefully to the expiration or manufacture date printed on the
box.
Keep primers and adhesive in a c ool, dry place. Ideally, they should be stored in a refrigerator.
Never leave primers or adhesive cartridge un attended with their caps open or off.
The vehicle should not be driven for at least 24 hours or until the urethane adhesive has completely
cured. Curing time varies depe nding on temperature and humidity . The curing time will increase
under lower temperature and lower humidity.
PIIB0908E
3AA93ABC3ACD3AC03ACA3AC03AC63AC53A913A773A893A873A873A8E3A773A983AC73AC93AC03AC3
3A893A873A873A8F3A773A9D3AAF3A8A3A8C3A863A9D3AAF3A8B3A8C
Page 2961 of 3924
GW-48
< SERVICE INFORMATION >
SIDE WINDOW GLASS
SIDE WINDOW GLASS
Removal and InstallationINFOID:0000000001327989
REMOVAL
1. Remove the roof rear garnish. Refer to EI-45, "Component Parts Location".
2. Remove the luggage side finisher. Refer to EI-45, "
Component Parts Location".
3. Remove the rear pillar upper garnish. Refer to EI-45, "
Component Parts Location".
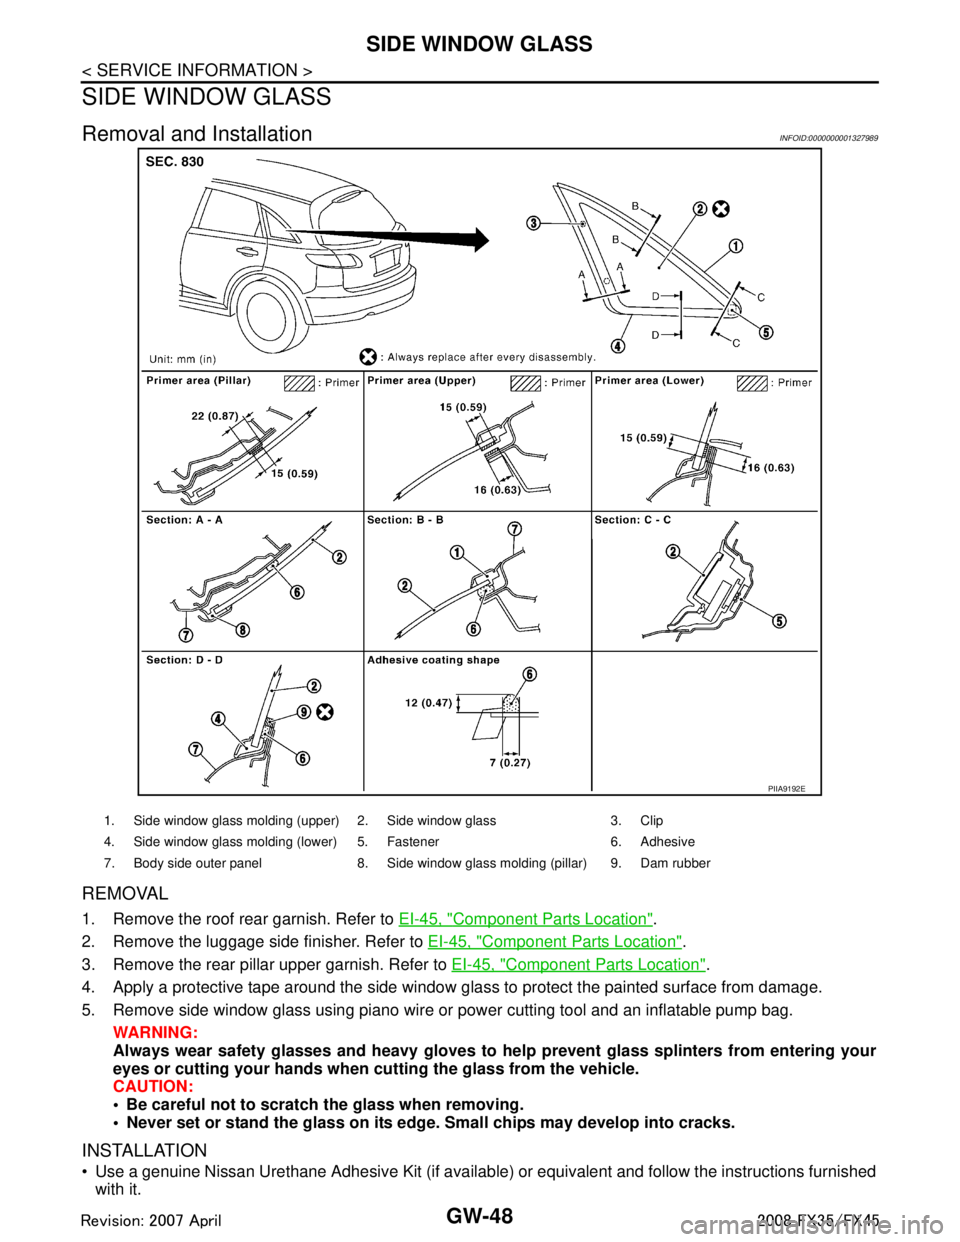
4. Apply a protective tape around the side window gl ass to protect the painted surface from damage.
5. Remove side window glass using piano wire or power cutting tool and an inflatable pump bag. WARNING:
Always wear safety glasses and heavy gloves to help prevent glass splinters from entering your
eyes or cutting your hands when cu tting the glass from the vehicle.
CAUTION:
Be careful not to scratch the glass when removing.
Never set or stand the glass on its edge. Small chips may develop into cracks.
INSTALLATION
Use a genuine Nissan Urethane Adhesive Kit (if available) or equivalent and follow the instructions furnished
with it.
PIIA9192E
1. Side window glass molding (upper) 2. Side window glass 3. Clip
4. Side window glass molding (lower) 5. Fastener 6. Adhesive
7. Body side outer panel 8. Side window glass molding (pillar) 9. Dam rubber
3AA93ABC3ACD3AC03ACA3AC03AC63AC53A913A773A893A873A873A8E3A773A983AC73AC93AC03AC3
3A893A873A873A8F3A773A9D3AAF3A8A3A8C3A863A9D3AAF3A8B3A8C