2008 INFINITI FX35 relay
[x] Cancel search: relayPage 3169 of 3924

FRONT FOG LAMPLT-67
< SERVICE INFORMATION >
C
DE
F
G H
I
J
L
M A
B
LT
N
O P
to BCM terminals 49 and 52
through grounds M35, M45 and M85,
to IPDM E/R terminals 38 and 60
through grounds E21, E50 and E51.
FRONT FOG LAMP OPERATION
The front fog lamp switch is built into combination s witch. The lighting switch must be in the 2ND position or
AUTO position (headlamp is ON) and the front fog lamp switch must be ON for front fog lamp operation.
With the front fog lamp switch in the ON position, t he CPU located in the IPDM E/R grounds the coil side of the
front fog lamp relay. The front fog lamp relay then directs power
through IPDM E/R terminal 36
to front fog lamp RH terminal 1,
through IPDM E/R terminal 37
to front fog lamp LH terminal 1.
Ground is supplied
to front fog lamp RH and LH terminals 2
through grounds E21, E50 and E51.
With power and grounds supplied, front fog lamps illuminate.
COMBINATION SWITCH READING FUNCTION
Refer to BCS-4, "System Description".
EXTERIOR LAMP BATTERY SAVER CONTROL
When the combination switch (lighting switch) is in the 2ND position (ON), the front fog lamp switch is ON, and
the ignition switch is turned from ON or ACC to OF F, the battery saver control feature is activated.
Under this condition, the front fog lamps (and headlamps ) remain illuminated for 5 minutes, then the front fog
lamps (and headlamps) are turned off.
Exterior lamp battery saver control mode can be changed by the function setting of CONSULT-III.
CAN Communication System DescriptionINFOID:0000000001328329
CAN (Controller Area Network) is a serial communication li ne for real time application. It is an on-vehicle mul-
tiplex communication line with high data communication speed and excellent error detection ability. Many elec-
tronic control units are equipped onto a vehicle, and each control unit shares information and links with other
control units during operation (not independent). In CAN communication, control units are connected with 2
communication lines (CAN H line, CAN L line) allowing a high rate of information transmission with less wiring.
Each control unit transmits/receives data but selectively reads required data only.
CAN Communication UnitINFOID:0000000001328330
Refer to LAN-43, "CAN System Specification Chart".
3AA93ABC3ACD3AC03ACA3AC03AC63AC53A913A773A893A873A873A8E3A773A983AC73AC93AC03AC3
3A893A873A873A8F3A773A9D3AAF3A8A3A8C3A863A9D3AAF3A8B3A8C
Page 3220 of 3924

LT-118
< SERVICE INFORMATION >
PARKING, LICENSE PLATE AND TAIL LAMPS
PARKING, LICENSE PLATE AND TAIL LAMPS
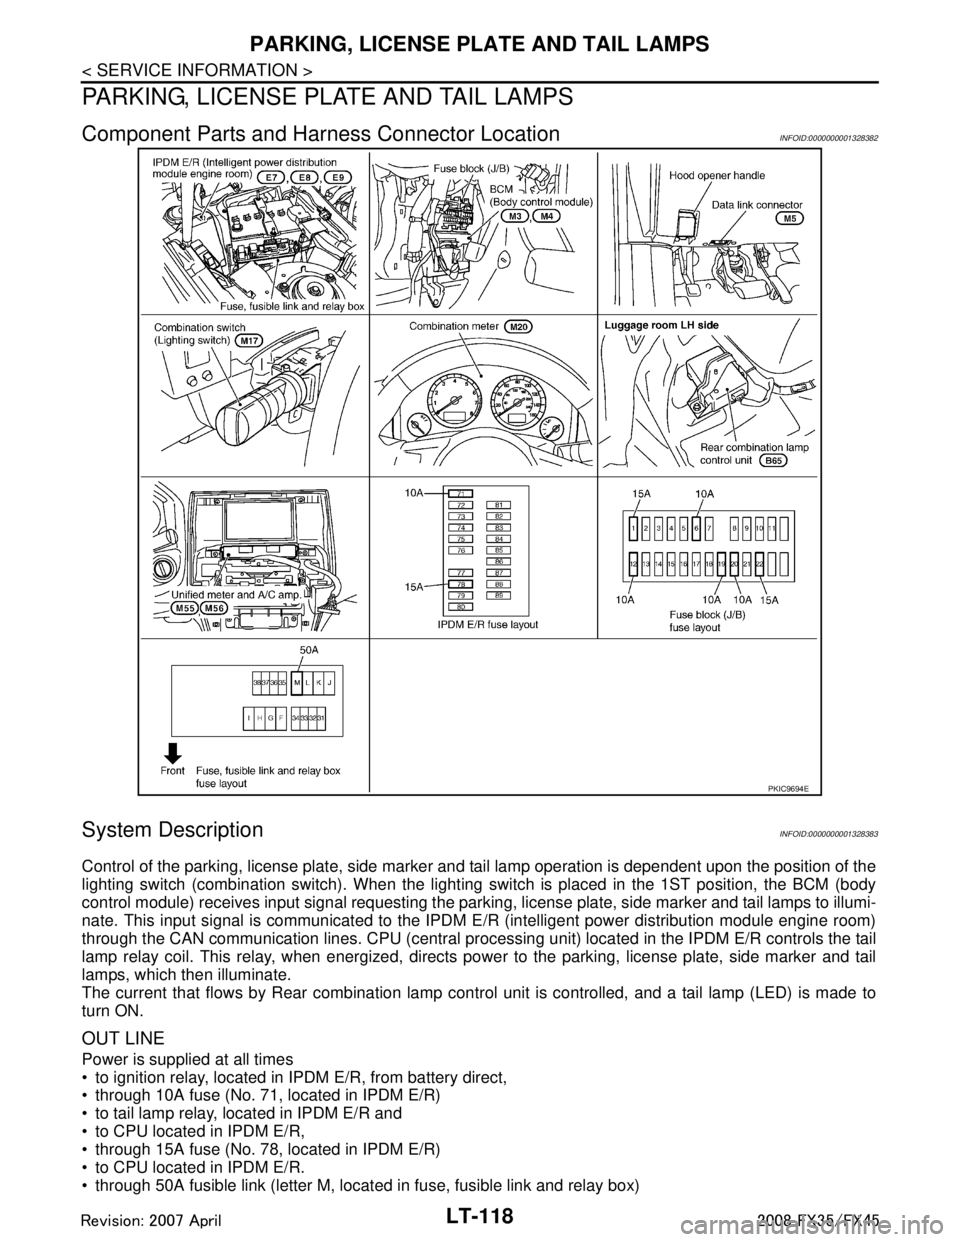
Component Parts and Harness Connector LocationINFOID:0000000001328382
System DescriptionINFOID:0000000001328383
Control of the parking, license plate, side marker and tail lamp operation is dependent upon the position of the
lighting switch (combination switch). When the lighting switch is placed in the 1ST position, the BCM (body
control module) receives input signal requesting the parki ng, license plate, side marker and tail lamps to illumi-
nate. This input signal is communicated to the IPDM E/R (intelligent power distribution module engine room)
through the CAN communication lines. CPU (central processi ng unit) located in the IPDM E/R controls the tail
lamp relay coil. This relay, when energized, directs pow er to the parking, license plate, side marker and tail
lamps, which then illuminate.
The current that flows by Rear combination lamp cont rol unit is controlled, and a tail lamp (LED) is made to
turn ON.
OUT LINE
Power is supplied at all times
to ignition relay, located in IP DM E/R, from battery direct,
through 10A fuse (No. 71, located in IPDM E/R)
to tail lamp relay, located in IPDM E/R and
to CPU located in IPDM E/R,
through 15A fuse (No. 78, located in IPDM E/R)
to CPU located in IPDM E/R.
through 50A fusible link (letter M, located in fuse, fusible link and relay box)
PKIC9694E
3AA93ABC3ACD3AC03ACA3AC03AC63AC53A913A773A893A873A873A8E3A773A983AC73AC93AC03AC3
3A893A873A873A8F3A773A9D3AAF3A8A3A8C3A863A9D3AAF3A8B3A8C
Page 3221 of 3924
![INFINITI FX35 2008 Service Manual
PARKING, LICENSE PLATE AND TAIL LAMPS
LT-119
< SERVICE INFORMATION >
C
D E
F
G H
I
J
L
M A
B
LT
N
O P
to BCM terminal 55,
through 15A fuse [No. 22, located in fuse block (J/B)]
to BCM terminal INFINITI FX35 2008 Service Manual
PARKING, LICENSE PLATE AND TAIL LAMPS
LT-119
< SERVICE INFORMATION >
C
D E
F
G H
I
J
L
M A
B
LT
N
O P
to BCM terminal 55,
through 15A fuse [No. 22, located in fuse block (J/B)]
to BCM terminal](/manual-img/42/57017/w960_57017-3220.png)
PARKING, LICENSE PLATE AND TAIL LAMPS
LT-119
< SERVICE INFORMATION >
C
D E
F
G H
I
J
L
M A
B
LT
N
O P
to BCM terminal 55,
through 15A fuse [No. 22, located in fuse block (J/B)]
to BCM terminal 42,
through 10A fuse [No. 20, located in fuse block (J/B)]
to rear combination lamp control unit terminal 1,
through 10A fuse [No. 19, located in fuse block (J/B)]
to combination meter terminal 8 and
to unified meter and A/C amp. terminal 21.
With the ignition switch in ON or START position, power is supplied
through ignition relay, located in IPDM E/R, from battery direct,
through 15A fuse [No. 1, located in fuse block (J/B)]
to BCM terminal 38,
through 10A fuse [No. 14, located in fuse block (J/B)]
to combination meter terminal 7 and
through 10A fuse [No. 12, located in fuse block (J/B)]
to unified meter and A/C amp. terminal 22.
With ignition switch in ACC or ON position, power is supplied
through 10A fuse [No. 6, located in fuse block (J/B)]
to BCM terminal 11.
Ground is supplied
to rear combination lamp control unit terminal 7 and
to IPDM E/R terminals 38 and 60
through grounds E21, E50 and E51,
to BCM terminals 49 and 52
to combination meter terminals 5, 6 and 15, and
to unified meter and A/C amp. terminals 29 and 30
through grounds M35, M45 and M85.
OPERATION BY LIGHTING SWITCH
With the lighting switch in the 1ST or 2ND position (or if the auto light system is activated), the BCM receives
input signal requesting the parking, license plate, side ma rker and tail lamps to illuminate. This input signal is
communicated to the IPDM E/R through the CAN communi cation. The CPU located in the IPDM E/R controls
the tail lamp relay coil, which when energized, directs power.
through IPDM E/R terminal 22
to front side marker lamp LH terminal 1
to parking lamp LH terminal 2
to license plate lamp LH terminal 1
to rear combination lamp LH terminal 1
to rear combination lamp control unit terminal 2
to front side marker lamp RH terminal 1
to parking lamp RH terminal 2
to license plate lamp RH terminal 1 and
to rear combination lamp RH terminal 1.
Ground is supplied at all times
to front side marker lamp LH terminal 2
through grounds E21, E50 and E51,
to parking lamp LH terminal 3
through grounds E21, E50 and E51,
to license plate lamp LH terminal 2
through grounds B15 and B45,
to rear combination lamp LH terminal 2
through grounds B15 and B45,
to front side marker lamp RH terminal 2
through grounds E21, E50 and E51,
to parking lamp RH terminal 3
through grounds E21, E50 and E51,
to license plate lamp RH terminal 2
through grounds B15 and B45,
to rear combination lamp RH terminal 2
through grounds B203 and B210,
to rear combination lamp control unit terminal 7
through grounds E21, E50 and E51.
3AA93ABC3ACD3AC03ACA3AC03AC63AC53A913A773A893A873A873A8E3A773A983AC73AC93AC03AC3
3A893A873A873A8F3A773A9D3AAF3A8A3A8C3A863A9D3AAF3A8B3A8C
Page 3237 of 3924

PARKING, LICENSE PLATE AND TAIL LAMPS
LT-135
< SERVICE INFORMATION >
C
D E
F
G H
I
J
L
M A
B
LT
N
O P
Minutes)INFOID:0000000001328397
1.CHECK IPDM E/R
1. Turn ignition switch ON. Turn combination switch (li ghting switch) to the OFF position. Turn ignition switch
OFF.
2. Verify that parking, license plate, and tail lamps turn on and off after approximately 10 minutes.
OK or NG
OK >> Ignition relay malfunction. Refer to PG-18, "Function of Detecting Ignition Relay Malfunction".
NG >> INSPECTION END
License Plate LampINFOID:0000000001328398
BULB REPLACEMENT, REMOVAL AND INSTALLATION
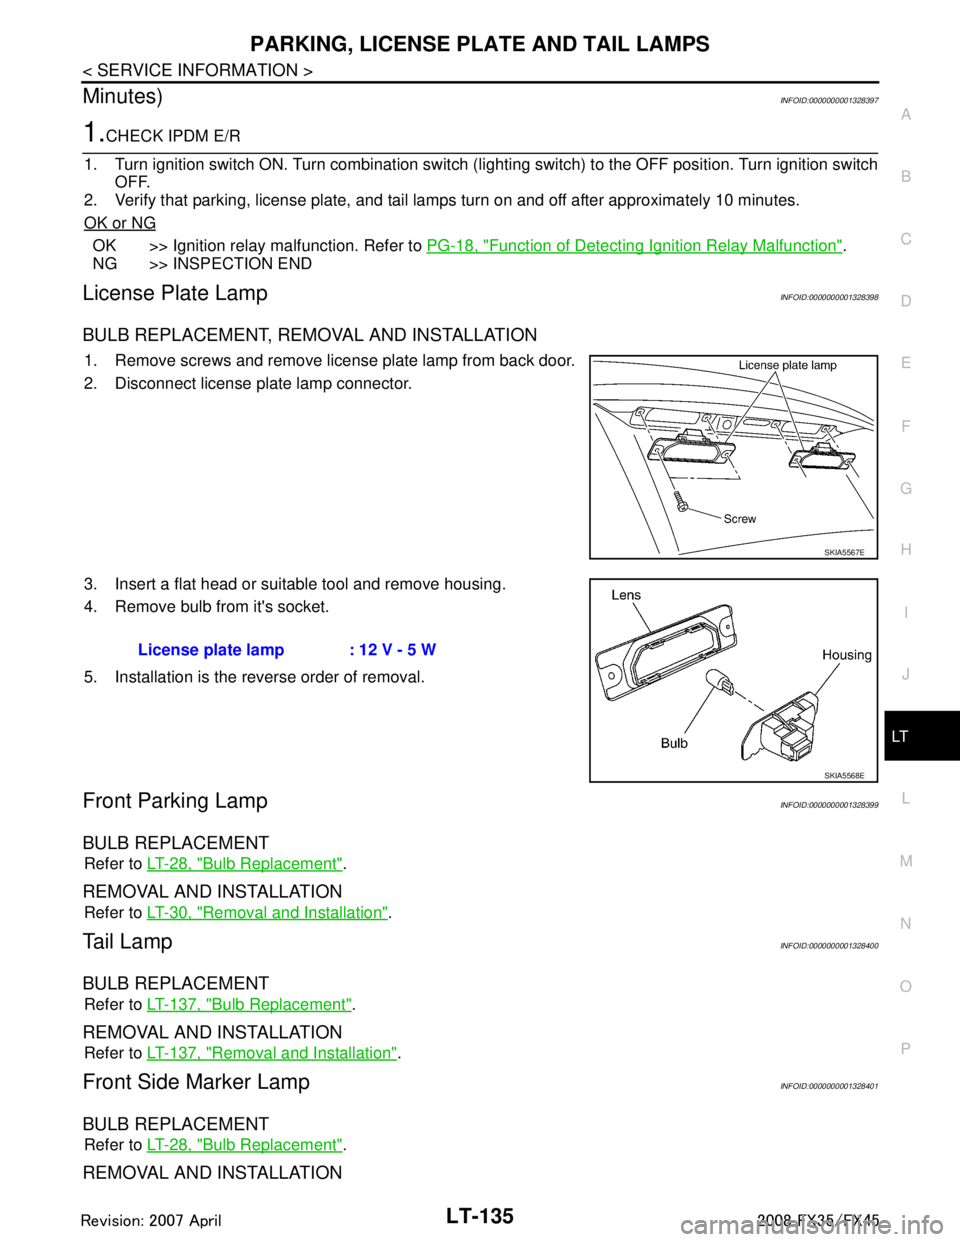
1. Remove screws and remove license plate lamp from back door.
2. Disconnect license plate lamp connector.
3. Insert a flat head or suitable tool and remove housing.
4. Remove bulb from it's socket.
5. Installation is the reverse order of removal.
Front Parking LampINFOID:0000000001328399
BULB REPLACEMENT
Refer to LT-28, "Bulb Replacement".
REMOVAL AND INSTALLATION
Refer to LT-30, "Removal and Installation".
Ta i l L a m pINFOID:0000000001328400
BULB REPLACEMENT
Refer to LT-137, "Bulb Replacement".
REMOVAL AND INSTALLATION
Refer to LT-137, "Removal and Installation".
Front Side Marker LampINFOID:0000000001328401
BULB REPLACEMENT
Refer to LT-28, "Bulb Replacement".
REMOVAL AND INSTALLATION
SKIA5567E
License plate lamp : 12 V - 5 W
SKIA5568E
3AA93ABC3ACD3AC03ACA3AC03AC63AC53A913A773A893A873A873A8E3A773A983AC73AC93AC03AC3
3A893A873A873A8F3A773A9D3AAF3A8A3A8C3A863A9D3AAF3A8B3A8C
Page 3241 of 3924

INTERIOR ROOM LAMPLT-139
< SERVICE INFORMATION >
C
DE
F
G H
I
J
L
M A
B
LT
N
O P
Ignition keyhole illumination turns ON at time when dr iver door is opened (door switch ON) or removed keyfob
from key cylinder. Illumination turns OFF when driver door is closed (door switch OFF).
Step lamp turns ON at time when driver door or pa ssenger door is opened (door switch ON). Lamp turns OFF
when the driver, passenger doors are closed (all door switches OFF).
POWER SUPPLY AND GROUND
Power is supplied at all times (without Intelligent Key system)
through 15A fuse [No. 22, located in fuse block (J/B)]
to key switch terminal 2 and
to BCM terminal 42,
through 50A fusible link (letter M, located in fuse, fusible link and relay box)
to BCM terminal 55,
through 10A fuse [No. 19, located in fuse block (J/B)]
to combination meter terminal 8.
Power is supplied at all times (with Intelligent Key system)
through 10A fuse (No.38, located in fuse, fusible link and relay box)
to key switch and ignition knob switch terminal 1,
through 15A fuse [No.22, located in fuse block (J/B)]
to BCM terminal 42 and
to key switch and ignition knob switch terminal 3,
through 50A fusible link (letter M, located in fuse, fusible link and relay box)
to BCM terminal 55,
through 10A fuse [No. 19, located in fuse block (J/B)]
to combination meter terminal 8.
When key plate inserted to key switch, power is supplied (without Intelligent Key system)
through key switch terminal 1
to BCM terminal 37.
When inserted key plate to key switch, power is supplied (with Intelligent Key system)
through key switch and ignition knob switch terminal 4
to BCM terminal 37.
When moved ignition knob switch, power is supplied (with Intelligent Key system)
through ignition knob switch terminal 2
to intelligent key unit terminal 27.
With ignition switch in the ON or START position, power is supplied
through 15A fuse [No. 1, located in fuse block (J/B)]
to BCM terminal 38,
through 10A fuse [No. 14, located in fuse block (J/B)]
to combination meter terminal 7.
Ground is supplied
to BCM terminals 49 and 52, and
to combination meter terminal 5, 6 and 15
through grounds terminals M35, M45 and M85.
When driver side door is opened, ground is supplied
to BCM terminal 62
through front door switch (driver side) terminal 1
through case ground of front door switch (driver side).
When passenger side door is opened, ground is supplied
to BCM terminal 12
through front door switch (passenger side) terminal 1
through case ground of front door switch (passenger side).
When rear door RH is opened, ground is supplied
to BCM terminal 13, and
to personal lamp RH terminal 1
through rear door switch RH terminal 1
through case ground of rear door switch RH.
When rear door LH is opened, ground is supplied
to BCM terminal 63, and
to personal lamp LH terminal 1
through rear door switch LH terminal 1
through case ground of rear door switch LH.
When driver side door is unlocked by door lock and unlock switch, BCM receives a ground signal
through grounds terminals M35, M45 and M85
3AA93ABC3ACD3AC03ACA3AC03AC63AC53A913A773A893A873A873A8E3A773A983AC73AC93AC03AC3
3A893A873A873A8F3A773A9D3AAF3A8A3A8C3A863A9D3AAF3A8B3A8C
Page 3271 of 3924

ILLUMINATIONLT-169
< SERVICE INFORMATION >
C
DE
F
G H
I
J
L
M A
B
LT
N
O P
ILLUMINATION
System DescriptionINFOID:0000000001328422
Control of illumination lamps operation is dependent upon position of lighting switch (combination switch).
When lighting switch is placed in the 1ST or 2ND positi on (or if auto light system is activated), BCM (body con-
trol module) receives input signal requesting illuminati on lamps to illuminate. This input signal is communi-
cated to IPDM E/R (intelligent power distribution module engine room) through the CAN communication. The
CPU (central processing unit) located in the IPDM E/R co ntrols tail lamp relay coil. This relay, when energized,
directs power to illumination lamps, which then illuminate.
Power is supplied at all times
through 10A fuse (No. 71, located in IPDM E/R)
to tail lamp relay, located in IPDM E/R, and
to CPU located in IPDM E/R.
Power is also supplied at all times
through 50A fusible link (letter M, located in fuse, fusible link and relay box)
to BCM terminal 55,
through 15A fuse [No. 22 located in fuse block (J/B)]
to BCM terminal 42,
through 15A fuse (No. 78, located in IPDM E/R)
to CPU located in IPDM E/R,
through 10A fuse [No. 19 located in fuse block (J/B)]
to unified meter and A/C amp. terminal 21 and
to combination meter terminal 8.
With ignition switch in ON or START position, power is supplied
to ignition relay, located in IPDM E/R, from battery direct,
through 15A fuse [No. 1 located in fuse block (J/B)]
to BCM terminal 38,
through 10A fuse [No. 12, located in fuse block (J/B)]
to unified meter and A/C amp. terminal 22 and
to combination meter terminal 7.
With ignition switch in ACC or ON position, power is supplied
through 10A fuse [No. 6, located in fuse block (J/B)]
to combination meter terminal 4 and
to BCM terminal 11.
Ground is supplied
to BCM terminals 49 and 52
to unified meter and A/C amp. terminals 29 and 30, and
to combination meter terminals 5, 6, and 15
through grounds M35, M45, and M85,
to IPDM E/R terminals 38 and 60
through grounds E21, E50, and E51.
ILLUMINATION OPERATION BY LIGHTING SWITCH
With lighting switch in the 1ST or 2ND position (or if auto light system is activated), BCM receives input signal
requesting illumination lamps to illuminate. This input signal is communicated to IPDM E/R through the CAN
communication. The CPU located in the IPDM E/R controls tail lamp relay coil, which, when energized, directs
power
through IPDM E/R terminal 22
to glove box lamp terminal 1
to A/T device (illumination) terminal 11
to snow mode switch (illumination) terminal 5
to VDC off switch (illumination) terminal 3
to clock (illumination) terminal 3
to hazard switch (illumination) terminal 3
to heated seat switch (driver side) (illumination) terminal 5
to heated seat switch (passenger side) (illumination) terminal 5
to door mirror remote control switch (illumination) terminal 16
to LDW switch (illumination) terminal 5
to combination switch (spiral cable) terminal 26
to microphone terminal 2 (with telephone system)
3AA93ABC3ACD3AC03ACA3AC03AC63AC53A913A773A893A873A873A8E3A773A983AC73AC93AC03AC3
3A893A873A873A8F3A773A9D3AAF3A8A3A8C3A863A9D3AAF3A8B3A8C
Page 3365 of 3924

PG-1
ELECTRICAL
C
DE
F
G H
I
J
L
M
SECTION PG
A
B
PG
N
O P
CONTENTS
POWER SUPPLY, GROUND & CIRCUIT ELEMENTS
SERVICE INFORMATION .. ..........................2
DTC INDEX ..................................................... .....2
U1000 .................................................................. ......2
POWER SUPPLY ROUTING CIRCUIT ...............3
Schematic ........................................................... ......3
Wiring Diagram - POWER - ......................................4
Fuse ........................................................................16
Fusible Link .............................................................16
Circuit Breaker ........................................................16
IPDM E/R (INTELLIGENT POWER DISTRI-
BUTION MODULE ENGINE ROOM) .................
17
System Description ............................................. ....17
CAN Communication System Description ...............18
CAN Communication Unit .......................................18
Function of Detecting Ignition Relay Malfunction ....18
CONSULT-III Function (IPDM E/R) ..................... ....18
Auto Active Test ......................................................20
Schematic ...............................................................22
IPDM E/R Terminal Arrangement ...........................23
IPDM E/R Power/Ground Circuit Inspection ...........23
U1000 CAN COMM CIRCUIT .................................24
Removal and Installation of IPDM E/R ....................24
GROUND ...........................................................26
Ground Distribution .............................................. ....26
HARNESS .........................................................40
Harness Layout ................................................... ....40
Wiring Diagram Codes (Cell Codes) .......................60
ELECTRICAL UNITS LOCATION ....................64
Electrical Units Location ..........................................64
HARNESS CONNECTOR .................................68
Description ...............................................................68
ELECTRICAL UNITS ........................................71
Terminal Arrangement .............................................71
SMJ (SUPER MULTIPLE JUNCTION) .............73
Terminal Arrangement .............................................73
STANDARDIZED RELAY .................................75
Description ...............................................................75
FUSE BLOCK - JUNCTION BOX (J/B) ............77
Terminal Arrangement .............................................77
FUSE, FUSIBLE LINK AND RELAY BOX ........78
Terminal Arrangement .............................................78
3AA93ABC3ACD3AC03ACA3AC03AC63AC53A913A773A893A873A873A8E3A773A983AC73AC93AC03AC3
3A893A873A873A8F3A773A9D3AAF3A8A3A8C3A863A9D3AAF3A8B3A8C
Page 3381 of 3924

IPDM E/R (INTELLIGENT POWER DISTRIBUTION MODULE ENGINE ROOM)
PG-17
< SERVICE INFORMATION >
C
D E
F
G H
I
J
L
M A
B
PG
N
O P
IPDM E/R (INTELLIGENT POWER DISTRIBUTION MODULE ENGINE
ROOM)
System DescriptionINFOID:0000000001328870
IPDM E/R (Intelligent Power Distribution Module Engi ne Room) integrates the relay box and fuse block
which were originally placed in engine compartment. It c ontrols integrated relay via IPDM E/R control circuit.
IPDM E/R-integrated control circuit performs ON-OFF operation of relay, CAN communication control, oil
pressure switch signal, and hood switch signal reception, etc.
It controls operation of each electrical pa rt via ECM, BCM and CAN communication lines.
CAUTION:
None of the IPDM E/R-integr ated relays can be removed.
SYSTEMS CONTROLLED BY IPDM E/R
IPDM E/R receives a request signal fr om each control unit with CAN communication. It controls each system.
CAN COMMUNICATION LINE CONTROL
With CAN communication, by connecting each control uni t using two communication lines (CAN-L line, CAN-H
line), it is possible to transmit maximum amount of in formation with minimum wiring. Each control unit can
transmit and receive data, and reads necessary information only.
Fail- Safe Control
When CAN communication with other control units is impos sible, IPDM E/R performs fail-safe control. After
CAN communication recovers normally, it also returns to normal control.
Operation of control parts by IPDM E/R during fail-safe mode is as follows:
IPDM E/R STATUS CONTROL
In order to save power, IPDM E/R switches status by itself based on each operating condition.
1. CAN communication status CAN communication is normally performed with other control units.
Individual unit control by IPDM E/R is normally performed.
When sleep request signal is received from BCM, mode is switched to sleep waiting status.
2. Sleep waiting status Process to stop CAN communication is activated.
Control system Transmit control unit Control part
Lamp control BCM Headlamps (HI, LO)
Front fog lamps
Parking, license plate, side marker and tail lamps
Wiper control BCM Front wipers
Rear window defogger control BCM Rear window defogger
A/C compressor control ECM A/C compressor (magnet clutch)
Cooling fan control ECM Cooling fan
Horn control BCM Horn
Controlled system Fail-safe mode
Headlamp With the ignition switch ON, the headlamp (low) is ON.
With the ignition switch OFF, the headlamp (low) is OFF.
Parking, license plate side marker, and
tail lamps With the ignition switch ON, the parking, license plate, side marker and tail lamps is ON.
With the ignition switch OFF, the parking, license plate, side marker and tail lamps is OFF.
Cooling fan With the ignition switch ON, the cooling fan HI operates.
With the ignition switch OFF, the cooling fan stops.
Front wiper Until the ignition switch is turned OFF, the front wiper LO and HI remains in the same status
it was in just before fail-safe control was initiated.
Rear window defogger Rear window defogger relay OFF
A/C compressor A/C compressor OFF
Front fog lamps Front fog lamp relay OFF
3AA93ABC3ACD3AC03ACA3AC03AC63AC53A913A773A893A873A873A8E3A773A983AC73AC93AC03AC3
3A893A873A873A8F3A773A9D3AAF3A8A3A8C3A863A9D3AAF3A8B3A8C