Page 181 of 268

3
WHAT TO DO IN AN EMERGENCY
15
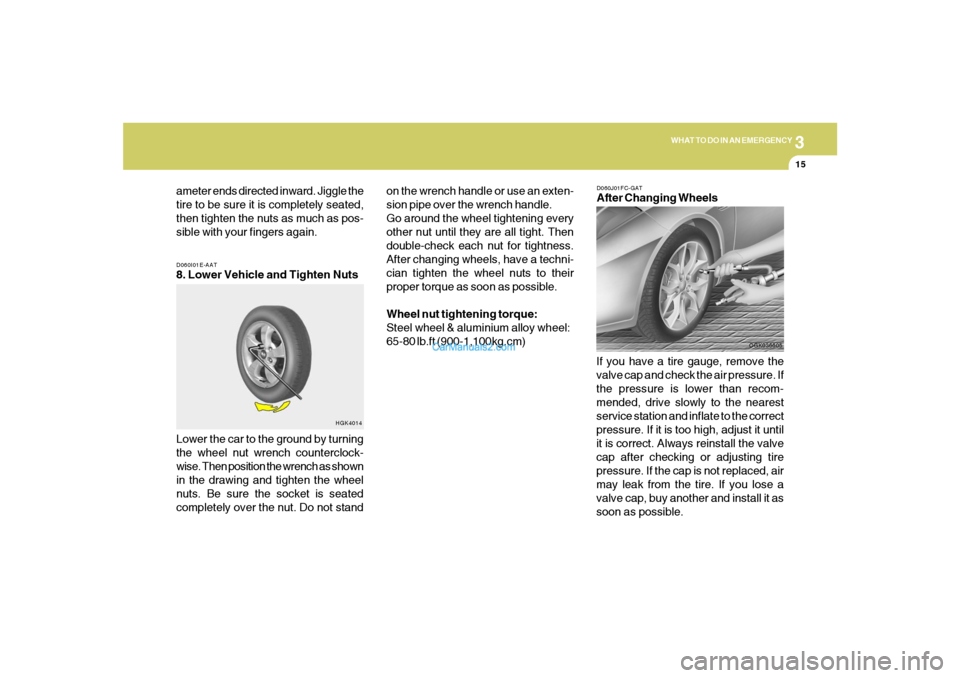
D060I01E-AAT8. Lower Vehicle and Tighten Nuts
Lower the car to the ground by turning
the wheel nut wrench counterclock-
wise. Then position the wrench as shown
in the drawing and tighten the wheel
nuts. Be sure the socket is seated
completely over the nut. Do not stand
HGK4014
ameter ends directed inward. Jiggle the
tire to be sure it is completely seated,
then tighten the nuts as much as pos-
sible with your fingers again.
D060J01FC-GATAfter Changing Wheels
If you have a tire gauge, remove the
valve cap and check the air pressure. If
the pressure is lower than recom-
mended, drive slowly to the nearest
service station and inflate to the correct
pressure. If it is too high, adjust it until
it is correct. Always reinstall the valve
cap after checking or adjusting tire
pressure. If the cap is not replaced, air
may leak from the tire. If you lose a
valve cap, buy another and install it as
soon as possible.
OGK036605
on the wrench handle or use an exten-
sion pipe over the wrench handle.
Go around the wheel tightening every
other nut until they are all tight. Then
double-check each nut for tightness.
After changing wheels, have a techni-
cian tighten the wheel nuts to their
proper torque as soon as possible.
Wheel nut tightening torque:
Steel wheel & aluminium alloy wheel:
65-80 lb.ft (900-1,100kg.cm)
Page 206 of 268

6
DO-IT-YOURSELF MAINTENANCE
6
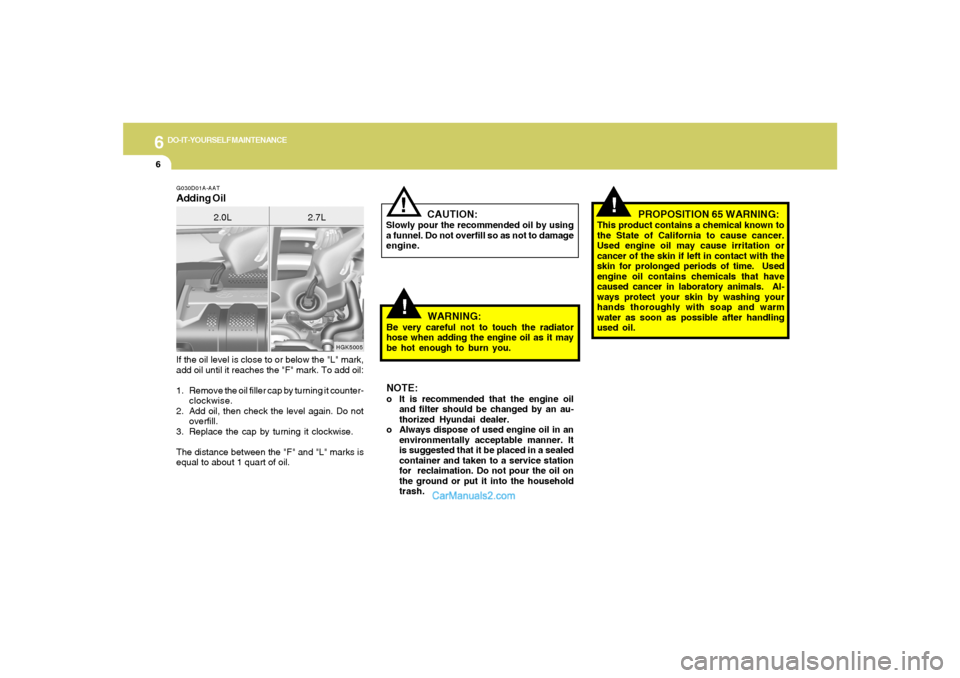
If the oil level is close to or below the "L" mark,
add oil until it reaches the "F" mark. To add oil:
1. Remove the oil filler cap by turning it counter-
clockwise.
2. Add oil, then check the level again. Do not
overfill.
3. Replace the cap by turning it clockwise.
The distance between the "F" and "L" marks is
equal to about 1 quart of oil.G030D01A-AATAdding Oil
HGK5005
2.0L 2.7L
!
CAUTION:
Slowly pour the recommended oil by using
a funnel. Do not overfill so as not to damage
engine.
!
WARNING:
Be very careful not to touch the radiator
hose when adding the engine oil as it may
be hot enough to burn you.NOTE:o It is recommended that the engine oil
and filter should be changed by an au-
thorized Hyundai dealer.
o Always dispose of used engine oil in an
environmentally acceptable manner. It
is suggested that it be placed in a sealed
container and taken to a service station
for reclaimation. Do not pour the oil on
the ground or put it into the household
trash.
!
PROPOSITION 65 WARNING:
This product contains a chemical known to
the State of California to cause cancer.
Used engine oil may cause irritation or
cancer of the skin if left in contact with the
skin for prolonged periods of time. Used
engine oil contains chemicals that have
caused cancer in laboratory animals. Al-
ways protect your skin by washing your
hands thoroughly with soap and warm
water as soon as possible after handling
used oil.
Page 208 of 268

6
DO-IT-YOURSELF MAINTENANCE
8
G050D03A-AATTo Change the Engine CoolantThe engine coolant should be changed at those
intervals specified in the vehicle maintenance
schedule in Section 5.
CAUTION:
Engine coolant can damage the finish of
your car. If you spill engine coolant on the
car, wash it off thoroughly with clean water.
1. Park the car on level ground, set the park-
ing brake and remove the radiator cap when
cool.
2. Be sure your drain receptacle is in place.
Open the drain cock on the radiator. Allow all
the engine coolant to drain from the cooling
system, then securely close the drain cock.
3. Check Section 9 for the capacity of the
cooling system in your car. Then, following
the manufacturer’s directions on the engine
coolant container, add the appropriate quan-
tity of coolant to the radiator.
!
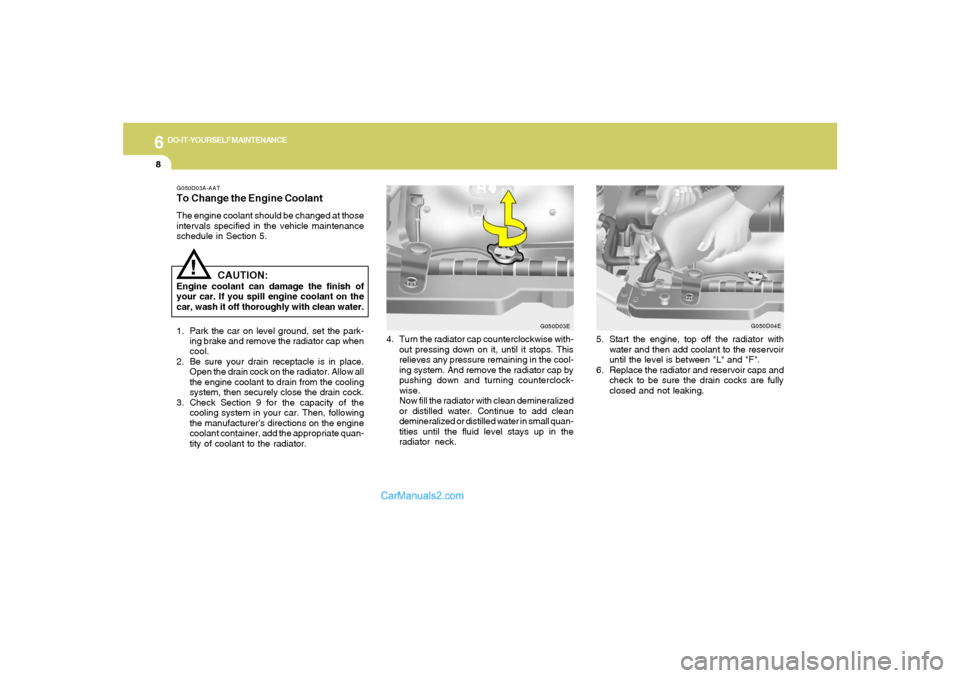
4. Turn the radiator cap counterclockwise with-
out pressing down on it, until it stops. This
relieves any pressure remaining in the cool-
ing system. And remove the radiator cap by
pushing down and turning counterclock-
wise.
Now fill the radiator with clean demineralized
or distilled water. Continue to add clean
demineralized or distilled water in small quan-
tities until the fluid level stays up in the
radiator neck.
G050D03E
5. Start the engine, top off the radiator with
water and then add coolant to the reservoir
until the level is between "L" and "F".
6. Replace the radiator and reservoir caps and
check to be sure the drain cocks are fully
closed and not leaking.
G050D04E
Page 224 of 268

6
DO-IT-YOURSELF MAINTENANCE
24
OGK076047
5. Turn the plastic cover counterclockwise
and remove it.
G270A01GK-AATHeadlight and Front Turn Signal Light1. Allow the bulb to cool. Wear eye protection.
2. Open the engine hood.
3. Always grasp the bulb by its plastic base,
avoid touching the glass.4. Disconnect the power cord from the bulb
base in the back of the headlight.
OGK076066N
REPLACEMENT OF LIGHT BULBS!
G260A01MC-AATBefore attempting to replace a light bulb, be sure
the switch is turned to the "OFF" position.
The next paragraph shows how to reach the
light bulbs so they may be changed. Be sure to
replace the burned-out bulb with one of the
same number and wattage rating.
See page 6-27 for the wattage descriptions.
CAUTION:
o Keep the lamps out of contact with
petroleum products, such as oil, gaso-
line, etc.
o If you don't have necessary tools, the
correct bulbs and the expertise, consult
your authorized Hyundai dealer.
OGK076048
6. Disconnect the connector from the bulb
base in the back of the headlight.
Page 227 of 268
6
DO-IT-YOURSELF MAINTENANCE
27
OGK076041
3. Remove the nut (8mm) with a socket wrench.
4. To detach the rear combination light tap it
strongly with your hand.
5. To replace the rear combination light (stop/
tail light, back-up light, turn signal light, side
mark light), take it out from the bulb holder by
turning it counterclockwise.
6. Install the new bulb.
(1) Stop/Tail light
(2) Back-up light
(3) Turn signal light
(4) Side mark light
OGK076042
2. To remove the cover of the rear luggage trim,
turn the knobs by hand to the counterclock-
wise.
OGK076040
Page 229 of 268
6
DO-IT-YOURSELF MAINTENANCE
29
8. To replace the rear combination light (stop/
tail light, back-up light, turn signal light, side
mark light), take it out from the bulb holder by
turning it counterclockwise.
9. Install the new bulb.
(1) Stop/Tail light
(2) Back-up light
(3) Turn signal light
(4) Side mark light
OGK076040
5. To remove the cover of the rear luggae trim,
turn the knob by hand to the counterclock-
wise.
OGK076041
6. Remove the nut (8mm) with a socket wrench.
OGK076042
7. To detach the rear combination light tap it
strongly with your hand.
Page 237 of 268

6
DO-IT-YOURSELF MAINTENANCE
37
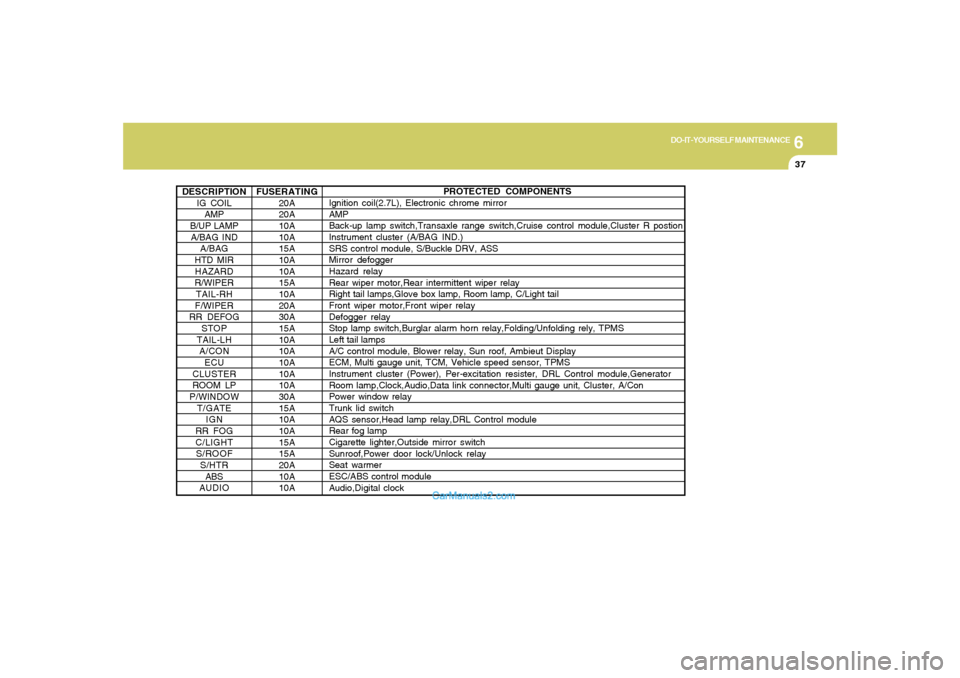
DESCRIPTION
IG COIL
AMP
B/UP LAMP
A/BAG IND
A/BAG
HTD MIR
HAZARD
R/WIPER
TAIL-RH
F/WIPER
RR DEFOG
STOP
TAIL-LH
A/CON
ECU
CLUSTER
ROOM LP
P/WINDOW
T/GATE
IGN
RR FOG
C/LIGHT
S/ROOF
S/HTR
ABS
AUDIO
PROTECTED COMPONENTS
Ignition coil(2.7L), Electronic chrome mirror
AMP
Back-up lamp switch,Transaxle range switch,Cruise control module,Cluster R postion
Instrument cluster (A/BAG IND.)
SRS control module, S/Buckle DRV, ASS
Mirror defogger
Hazard relay
Rear wiper motor,Rear intermittent wiper relay
Right tail lamps,Glove box lamp, Room lamp, C/Light tail
Front wiper motor,Front wiper relay
Defogger relay
Stop lamp switch,Burglar alarm horn relay,Folding/Unfolding rely, TPMS
Left tail lamps
A/C control module, Blower relay, Sun roof, Ambieut Display
ECM, Multi gauge unit, TCM, Vehicle speed sensor, TPMS
Instrument cluster (Power), Per-excitation resister, DRL Control module,Generator
Room lamp,Clock,Audio,Data link connector,Multi gauge unit, Cluster, A/Con
Power window relay
Trunk lid switch
AQS sensor,Head lamp relay,DRL Control module
Rear fog lamp
Cigarette lighter,Outside mirror switch
Sunroof,Power door lock/Unlock relay
Seat warmer
ESC/ABS control module
Audio,Digital clock FUSERATING
20A
20A
10A
10A
15A
10A
10A
15A
10A
20A
30A
15A
10A
10A
10A
10A
10A
30A
15A
10A
10A
15A
15A
20A
10A
10A
Page:
< prev 1-8 9-16 17-24