2008 Hyundai Santa Fe lower
[x] Cancel search: lowerPage 236 of 355

2
DRIVING YOUR HYUNDAI
25
C160D01A-AATCheck Battery and CablesWinter puts additional burdens on the
battery system. Visually inspect the battery
and cables as described in Section 6. The
level of charge in your battery can be
checked by your Hyundai dealer or a ser-
vice station.
C160F01A-AATCheck Spark Plugs and Ignition
SystemInspect your spark plugs as described in
Section 6 and replace them if necessary.
Also check all ignition wiring and compo-
nents to be sure they are not cracked, worn
or damaged in any way.C160E01A-AATChange to "Winter Weight" Oil if
NecessaryIn some climates it is recommended that a
lower viscosity "winter weight" oil be used
during cold weather. See Section 9 for
recommendations. If you aren't sure what
weight oil you should use, consult your
Hyundai dealer.
C160G01A-GATTo Keep Locks from FreezingTo keep the locks from freezing, squirt an
approved de-icer fluid or glycerine into the
key opening. If a lock is covered with ice,
squirt it with an approved de-icing fluid to
remove the ice. If the lock is frozen inter-
nally, you may be able to thaw it out by
using a heated key. Handle the heated key
with care to avoid injury.NOTE:The proper temperature for using the
immobilizer key is from -40°F (-40°C) to
176°F (80°C). If you heat the immobilizer
key over 80°C to open the frozen lock, it
may cause damage to the transponder
in its head.
C160C01A-AATUse High Quality Ethylene Glycol
CoolantYour Hyundai is delivered with high qual-
ity ethylene glycol coolant in the cooling
system. It is the only type of coolant that
should be used because it helps prevent
corrosion in the cooling system, lubricates
the water pump and prevents freezing. Be
sure to replace or replenish your coolant in
accordance with the maintenance sched-
ule in Section 5. Before winter, have your
coolant tested to assure that its freezing
point is sufficient for the temperatures an-
ticipated during the winter.
Page 242 of 355
2
DRIVING YOUR HYUNDAI
31
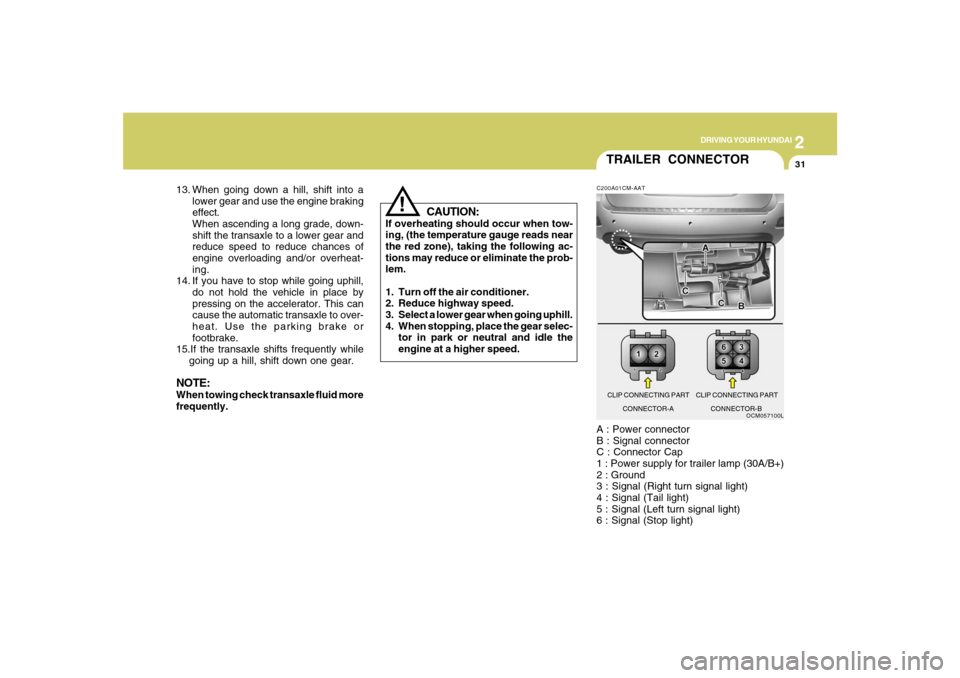
TRAILER CONNECTOR
CAUTION:
If overheating should occur when tow-
ing, (the temperature gauge reads near
the red zone), taking the following ac-
tions may reduce or eliminate the prob-
lem.
1. Turn off the air conditioner.
2. Reduce highway speed.
3. Select a lower gear when going uphill.
4. When stopping, place the gear selec-
tor in park or neutral and idle the
engine at a higher speed.
!
13. When going down a hill, shift into a
lower gear and use the engine braking
effect.
When ascending a long grade, down-
shift the transaxle to a lower gear and
reduce speed to reduce chances of
engine overloading and/or overheat-
ing.
14. If you have to stop while going uphill,
do not hold the vehicle in place by
pressing on the accelerator. This can
cause the automatic transaxle to over-
heat. Use the parking brake or
footbrake.
15.If the transaxle shifts frequently while
going up a hill, shift down one gear.NOTE:When towing check transaxle fluid more
frequently.
OCM057100L C200A01CM-AAT
A : Power connector
B : Signal connector
C : Connector Cap
1 : Power supply for trailer lamp (30A/B+)
2 : Ground
3 : Signal (Right turn signal light)
4 : Signal (Tail light)
5 : Signal (Left turn signal light)
6 : Signal (Stop light)CLIP CONNECTING PART CLIP CONNECTING PART
CONNECTOR-A CONNECTOR-B
Page 255 of 355
3
WHAT TO DO IN AN EMERGENCY
7
!
WARNING:
Significantly low tire pressure makes
the vehicle unstable and can contrib-
ute to loss of vehicle control and
increased braking distances.
Continued driving on low pressure
tires will cause the tires to overheat
and fail. CAUTION:
In winter or cold weather, the low tire
pressure telltale may be illuminated
if the tire pressure was adjusted to
the recommended tire inflation pres-
sure in warm weather. It does not
mean your TPMS is malfunctioning
because the decreased temperature
leads to a proportional lowering of
tire pressure.
When you drive your vehicle from a
warm area to a cold area or from a
cold area to a warm area, or the
outside temperature significantly
increases or decreases, you should
check the tire inflation pressure and
adjust the tires to the recommended
tire inflation pressure.
!
TPMS (Tire pressure moni-
toring system) malfunction
The TPMS malfunction indicator comes
on and stays on when there is a problem
with the Tire Pressure Monitoring Sys-
tem. If the Front Left sensor fails, the
TPMS malfunction indicator illuminates,
but if the Front Right, Rear Left, or Rear
Right tire is under-inflated, the low tire
pressure and position telltales may illu-
minate together with the TPMS mal-
function indicator.
Have the system checked by an autho-
rized Hyundai dealer as soon as pos-
sible to determine the cause of the
problem.
Page 264 of 355
316
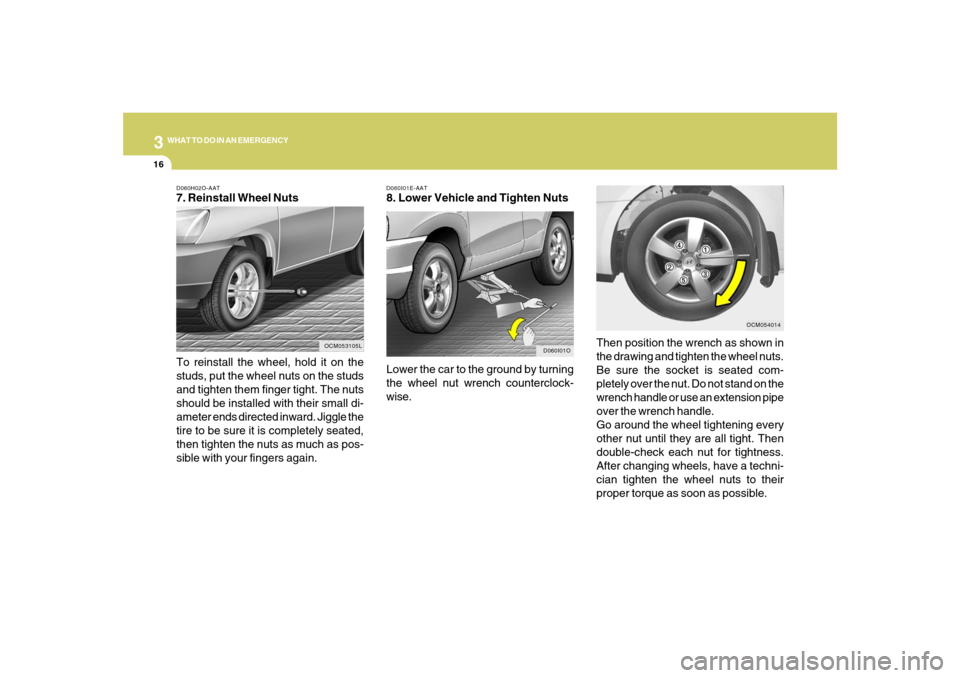
WHAT TO DO IN AN EMERGENCYD060H02O-AAT7. Reinstall Wheel Nuts
To reinstall the wheel, hold it on the
studs, put the wheel nuts on the studs
and tighten them finger tight. The nuts
should be installed with their small di-
ameter ends directed inward. Jiggle the
tire to be sure it is completely seated,
then tighten the nuts as much as pos-
sible with your fingers again.
OCM053105LD060I01E-AAT
8. Lower Vehicle and Tighten Nuts
Lower the car to the ground by turning
the wheel nut wrench counterclock-
wise.
D060I01O
Then position the wrench as shown in
the drawing and tighten the wheel nuts.
Be sure the socket is seated com-
pletely over the nut. Do not stand on the
wrench handle or use an extension pipe
over the wrench handle.
Go around the wheel tightening every
other nut until they are all tight. Then
double-check each nut for tightness.
After changing wheels, have a techni-
cian tighten the wheel nuts to their
proper torque as soon as possible.
OCM054014
Page 265 of 355
3
WHAT TO DO IN AN EMERGENCY
17
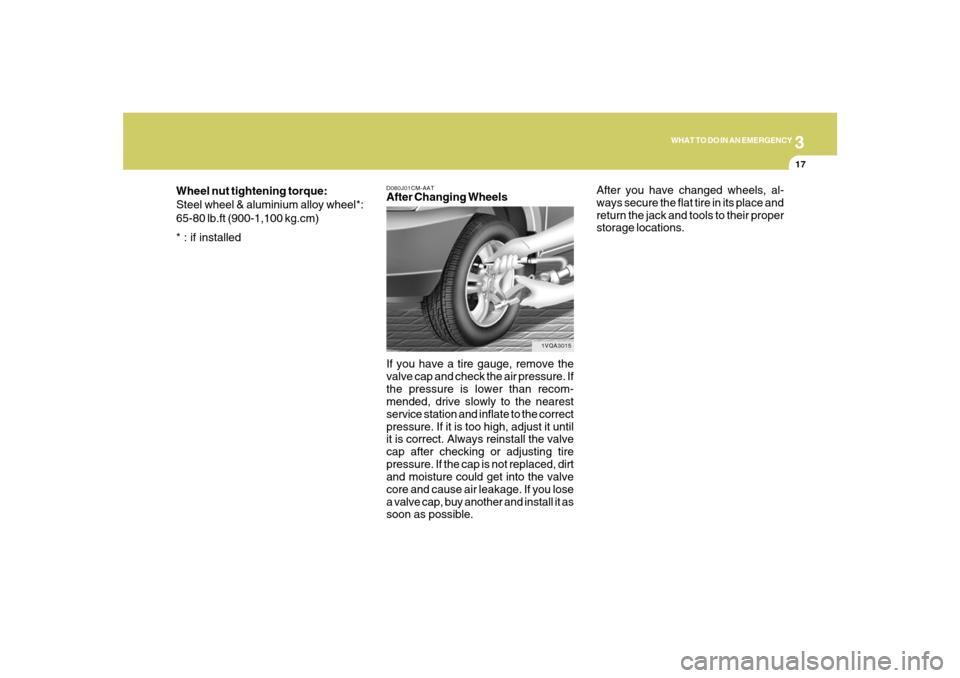
D060J01CM-AATAfter Changing Wheels
If you have a tire gauge, remove the
valve cap and check the air pressure. If
the pressure is lower than recom-
mended, drive slowly to the nearest
service station and inflate to the correct
pressure. If it is too high, adjust it until
it is correct. Always reinstall the valve
cap after checking or adjusting tire
pressure. If the cap is not replaced, dirt
and moisture could get into the valve
core and cause air leakage. If you lose
a valve cap, buy another and install it as
soon as possible.
1VQA3015
After you have changed wheels, al-
ways secure the flat tire in its place and
return the jack and tools to their proper
storage locations. Wheel nut tightening torque:
Steel wheel & aluminium alloy wheel*:
65-80 lb.ft (900-1,100 kg.cm)
* : if installed
Page 272 of 355
4
CORROSION PREVENTION AND APPEARANCE CARE
3
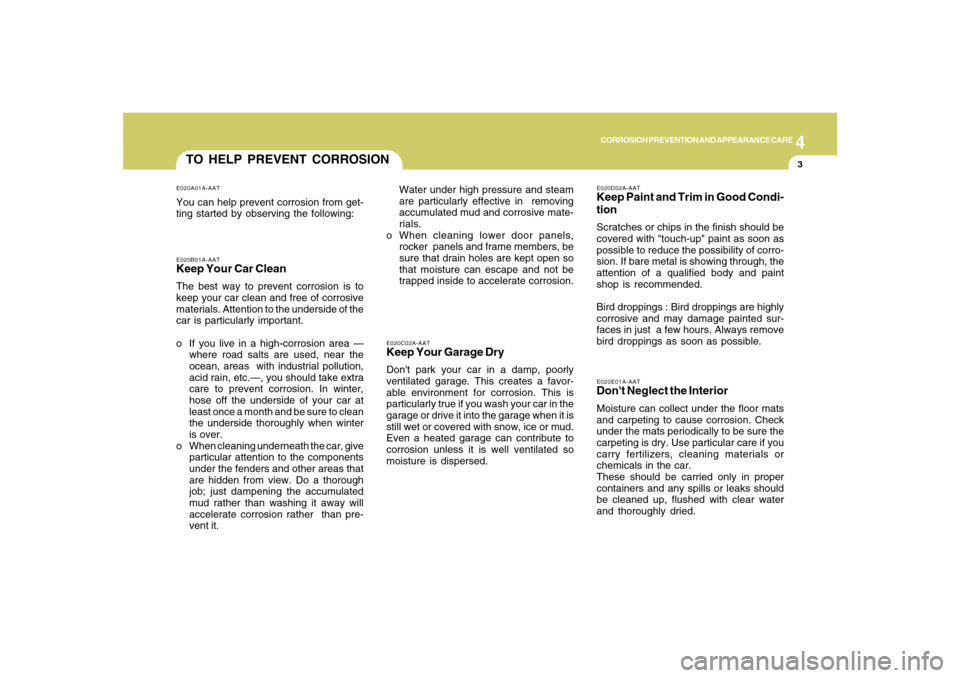
E020B01A-AATKeep Your Car CleanThe best way to prevent corrosion is to
keep your car clean and free of corrosive
materials. Attention to the underside of the
car is particularly important.
o If you live in a high-corrosion area —
where road salts are used, near the
ocean, areas with industrial pollution,
acid rain, etc.—, you should take extra
care to prevent corrosion. In winter,
hose off the underside of your car at
least once a month and be sure to clean
the underside thoroughly when winter
is over.
o When cleaning underneath the car, give
particular attention to the components
under the fenders and other areas that
are hidden from view. Do a thorough
job; just dampening the accumulated
mud rather than washing it away will
accelerate corrosion rather than pre-
vent it.E020A01A-AATYou can help prevent corrosion from get-
ting started by observing the following:TO HELP PREVENT CORROSION
E020C02A-AATKeep Your Garage DryDon't park your car in a damp, poorly
ventilated garage. This creates a favor-
able environment for corrosion. This is
particularly true if you wash your car in the
garage or drive it into the garage when it is
still wet or covered with snow, ice or mud.
Even a heated garage can contribute to
corrosion unless it is well ventilated so
moisture is dispersed.Water under high pressure and steam
are particularly effective in removing
accumulated mud and corrosive mate-
rials.
o When cleaning lower door panels,
rocker panels and frame members, be
sure that drain holes are kept open so
that moisture can escape and not be
trapped inside to accelerate corrosion.
E020E01A-AATDon't Neglect the InteriorMoisture can collect under the floor mats
and carpeting to cause corrosion. Check
under the mats periodically to be sure the
carpeting is dry. Use particular care if you
carry fertilizers, cleaning materials or
chemicals in the car.
These should be carried only in proper
containers and any spills or leaks should
be cleaned up, flushed with clear water
and thoroughly dried.E020D02A-AATKeep Paint and Trim in Good Condi-
tionScratches or chips in the finish should be
covered with "touch-up" paint as soon as
possible to reduce the possibility of corro-
sion. If bare metal is showing through, the
attention of a qualified body and paint
shop is recommended.
Bird droppings : Bird droppings are highly
corrosive and may damage painted sur-
faces in just a few hours. Always remove
bird droppings as soon as possible.
Page 281 of 355
5
VEHICLE MAINTENANCE REQUIREMENTS
5
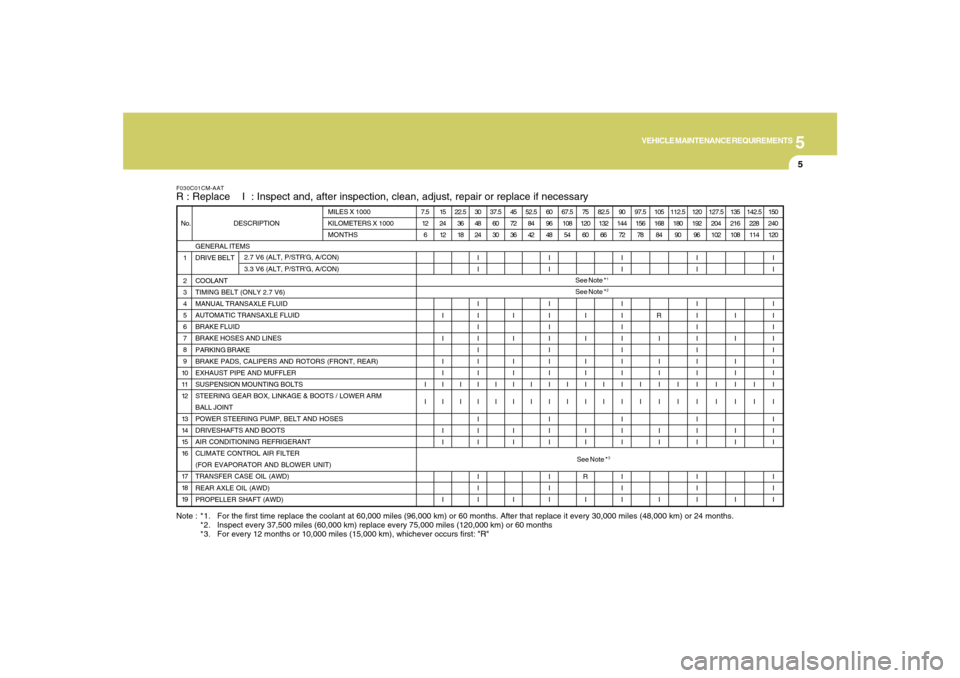
Note : *1. For the first time replace the coolant at 60,000 miles (96,000 km) or 60 months. After that replace it every 30,000 miles (48,000 km) or 24 months.
*2. Inspect every 37,500 miles (60,000 km) replace every 75,000 miles (120,000 km) or 60 months
*3. For every 12 months or 10,000 miles (15,000 km), whichever occurs first: "R"F030C01CM-AATR : Replace I : Inspect and, after inspection, clean, adjust, repair or replace if necessary
GENERAL ITEMS
DRIVE BELT
COOLANT
TIMING BELT (ONLY 2.7 V6)
MANUAL TRANSAXLE FLUID
AUTOMATIC TRANSAXLE FLUID
BRAKE FLUID
BRAKE HOSES AND LINES
PARKING BRAKE
BRAKE PADS, CALIPERS AND ROTORS (FRONT, REAR)
EXHAUST PIPE AND MUFFLER
SUSPENSION MOUNTING BOLTS
STEERING GEAR BOX, LINKAGE & BOOTS / LOWER ARM
BALL JOINT
POWER STEERING PUMP, BELT AND HOSES
DRIVESHAFTS AND BOOTS
AIR CONDITIONING REFRIGERANT
CLIMATE CONTROL AIR FILTER
(FOR EVAPORATOR AND BLOWER UNIT)
TRANSFER CASE OIL (AWD)
REAR AXLE OIL (AWD)
PROPELLER SHAFT (AWD) 1
2
3
4
5
6
7
8
9
10
11
12
13
14
15
16
17
18
19 No. DESCRIPTIONMILES X 1000
KILOMETERS X 1000
MONTHS
2.7 V6 (ALT, P/STR'G, A/CON)
3.3 V6 (ALT, P/STR'G, A/CON)7.5
12
6
I
I15
24
12
I
I
I
I
I
I
I
I
I22.5
36
18
I
I30
48
24
I
I
I
I
I
I
I
I
I
I
I
I
I
I
I
I
I37.5
60
30
I
I45
72
36
I
I
I
I
I
I
I
I
I52.5
84
42
I
I60
96
48
I
I
I
I
I
I
I
I
I
I
I
I
I
I
I
I
I67.5
108
54
I
I75
120
60
I
I
I
I
I
I
I
I
R
I82.5
132
66
I
I90
144
72
I
I
I
I
I
I
I
I
I
I
I
I
I
I
I
I
I97.5
156
78
I
I105
168
84
R
I
I
I
I
I
I
I
I112.5
180
90
I
I120
192
96
I
I
I
I
I
I
I
I
I
I
I
I
I
I
I
I
I127.5
204
102
I
I135
216
108
I
I
I
I
I
I
I
I
I142.5
228
114
I
I150
240
120
I
I
I
I
I
I
I
I
I
I
I
I
I
I
I
I
ISee Note *
1
See Note *
2
See Note *
3
Page 282 of 355

5
VEHICLE MAINTENANCE REQUIREMENTS6
MAINTENANCE UNDER SEVERE USAGE
CONDITIONSF040A02CM-AATThe following items must be serviced more frequently on cars normally used under severe driving conditions. Refer to the chart below
for the appropriate maintenance intervals.
R : Replace I : Inspect and, after inspection, clean, adjust, repair or replace if necessary
*1. Transfer case Oil and Rear Axle Oil should be changed anytime they have been submerged in water.ENGINE OIL AND FILTER
AIR CLEANER FILTER
SPARK PLUGS
TIMING BELT (2.7 V6)
BRAKE PADS, CALIPERS AND ROTORS (Front, Rear)
PARKING BRAKE
STEERING GEAR BOX, LINKAGE & BOOTS/
LOWER ARM BALL JOINT
DRIVESHAFTS AND BOOTS
MANUAL TRANSAXLE FLUID
AUTOMATIC TRANSAXLE FLUID
CLIMATE CONTROL AIR FILTER
(FOR EVAPORATOR AND BLOWER UNIT)
TRANSFER CASE OIL (AWD) *
1
REAR AXLE OIL (AWD) *
1
PROPELLER SHAFT (AWD)
MAINTENANCE ITEM
R
R
R
I
R
I
I
I
I
R
R
R
R
R
I
EVERY 3,000 MILES (4,800 KM) OR 3 MONTHS
MORE FREQUENTLY
MORE FREQUENTLY
EVERY 25,000 MILES (40,000 KM)
EVERY 50,000 MILES (80,000 KM) OR 48 MONTHS
MORE FREQUENTLY
MORE FREQUENTLY
MORE FREQUENTLY
EVERY 7,500 MILES (12,000 KM) OR 6 MONTHS
EVERY 60,000 MILES (96,000 KM)
EVERY 30,000 MILES (48,000 KM)
MORE FREQUENTLY
EVERY 30,000 MILES (48,000 KM)
EVERY 60,000 MILES (96,000 KM)
EVERY 7,500 MILES (12,000 KM) OR 6 MONTHS
DRIVING
CONDITION MAINTENANCE
INTERVALS MAINTENANCE
OPERATION
A, B, C, D, E, F, G, H, I, K
C, E
B, H
D, E, F, G
C, D, G, H
C, D, G, H
C, D, E, F, G
C, E, F
C, D, E, G, H, I, J
A, C, E, F, G, H, I
C, E
C, E, G, H, I, J
C, E, G, H, I, J
C, E