Page 90 of 148

90Navigation System
System Set-up
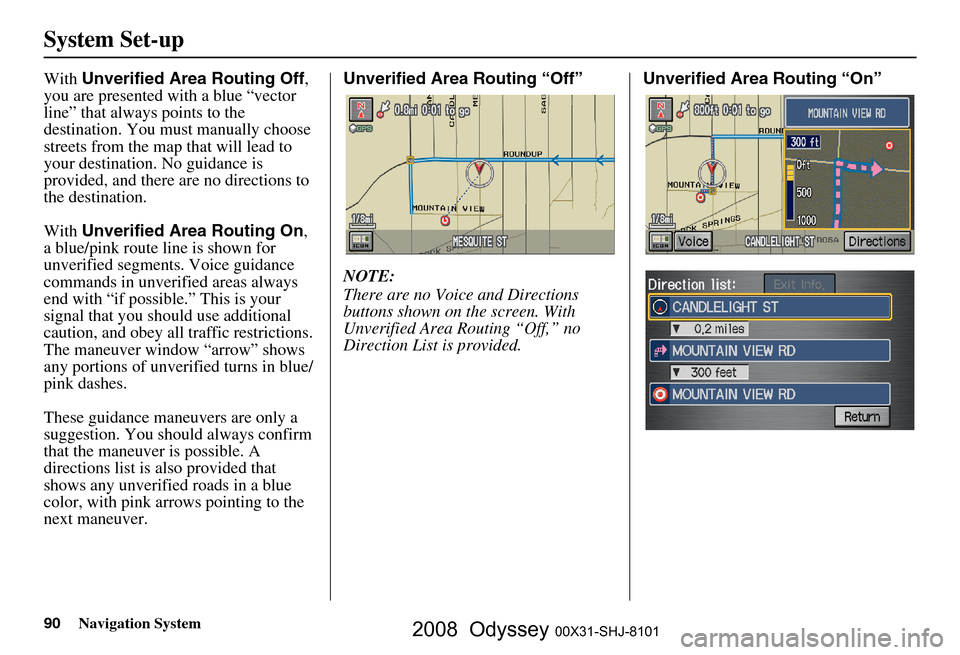
With Unverified Area Routing Off ,
you are presented with a blue “vector
line” that always points to the
destination. You must manually choose
streets from the map that will lead to
your destination. No guidance is
provided, and there ar e no directions to
the destination.
With Unverified Area Routing On ,
a blue/pink route line is shown for
unverified segmen ts. Voice guidance
commands in unverified areas always
end with “if possible.” This is your
signal that you should use additional
caution, and obey all traffic restrictions.
The maneuver window “arrow” shows
any portions of unverified turns in blue/
pink dashes.
These guidance maneuvers are only a
suggestion. You should always confirm
that the maneuver is possible. A
directions list is also provided that
shows any unverified roads in a blue
color, with pink arrows pointing to the
next maneuver. Unverified Area Routing “Off”
NOTE:
There are no Voice and Directions
buttons shown on the screen. With
Unverified Area Routing “Off,” no
Direction List is provided.
Unverified Area Routing “On”
2008 Odyssey 00X31-SHJ-8101
Page 91 of 148

Navigation System91
System Set-up
Edit Avoid Area
This function allows you to select areas
you wish to avoid when calculating a
route to your destination. You can select
up to five areas to avoid. You may wish
to set up an “avoid area” to route around
long term road construction, closures, or
any area you wish to avoid. If you enter
a route that takes you through or into an
“avoid area,” a pop-up box will warn
you that your route takes you into one of
these areas. However, you can still
choose destinations in an avoided area.
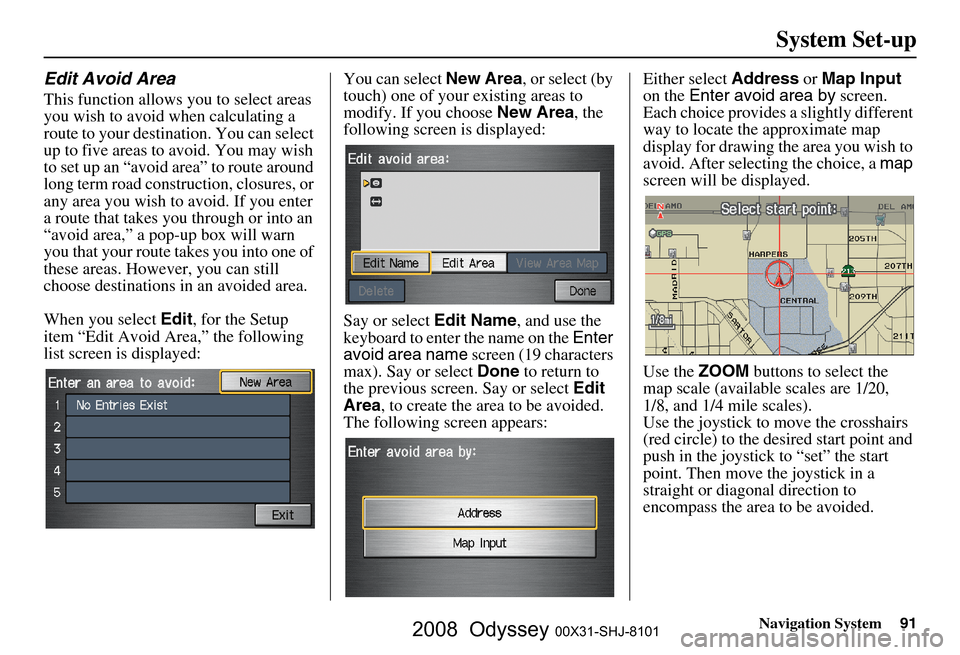
When you select Edit, for the Setup
item “Edit Avoid Area,” the following
list screen is displayed: You can select
New Area, or select (by
touch) one of your existing areas to
modify. If you choose New Area, the
following screen is displayed:
Say or select Edit Name, and use the
keyboard to enter the name on the Enter
avoid area name screen (19 characters
max). Say or select Done to return to
the previous screen. Say or select Edit
Area , to create the area to be avoided.
The following screen appears: Either select
Address or Map Input
on the Enter avoid area by screen.
Each choice provides a slightly different
way to locate the approximate map
display for drawing the area you wish to
avoid. After selecting the choice, a map
screen will be displayed.
Use the ZOOM buttons to select the
map scale (available scales are 1/20,
1/8, and 1/4 mile scales).
Use the joystick to move the crosshairs
(red circle) to the desired start point and
push in the joystick to “set” the start
point. Then move the joystick in a
straight or diagonal direction to
encompass the area to be avoided.
2008 Odyssey 00X31-SHJ-8101
Page 94 of 148

94Navigation System
System Set-up
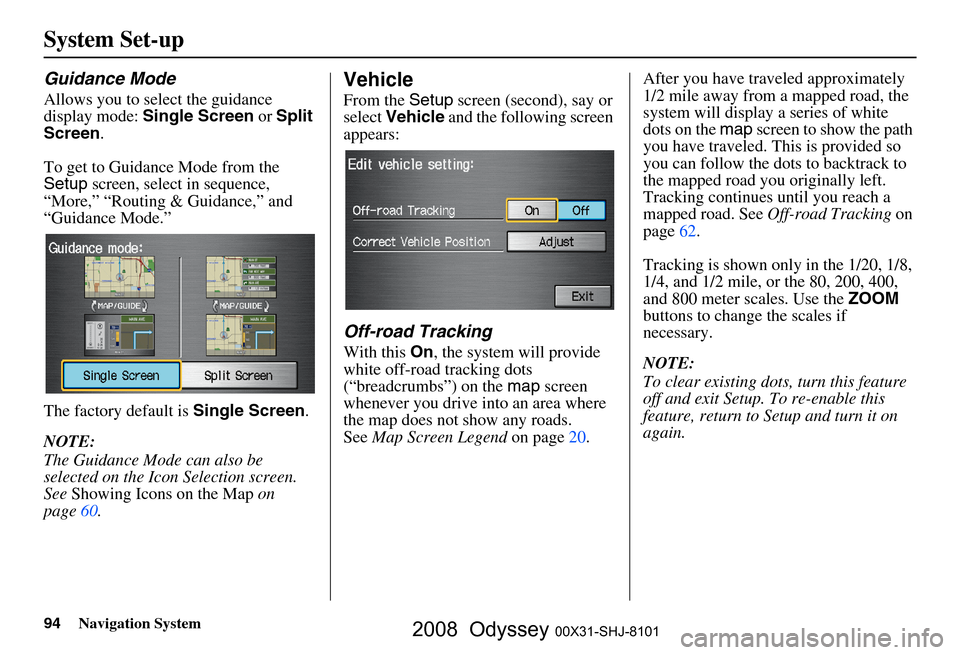
Guidance Mode
Allows you to select the guidance
display mode: Single Screen or Split
Screen .
To get to Guidance Mode from the
Setup screen, select in sequence,
“More,” “Routing & Guidance,” and
“Guidance Mode.”
The factory default is Single Screen.
NOTE:
The Guidance Mode can also be
selected on the Icon Selection screen.
See Showing Icons on the Map on
page
60.
Vehicle
From the Setup screen (second), say or
select Vehicle and the following screen
appears:
Off-road Tracking
With this On, the system will provide
white off-road tracking dots
(“breadcrumbs”) on the map screen
whenever you drive into an area where
the map does not show any roads.
See Map Screen Legend on page
20. After you have traveled approximately
1/2 mile away from a mapped road, the
system will display a series of white
dots on the
map screen to show the path
you have traveled. This is provided so
you can follow the dots to backtrack to
the mapped road you originally left.
Tracking continues until you reach a
mapped road. See Off-road Tracking on
page 62 .
Tracking is shown only in the 1/20, 1/8,
1/4, and 1/2 mile, or the 80, 200, 400,
and 800 meter scales. Use the ZOOM
buttons to change the scales if
necessary.
NOTE:
To clear existing dots , turn this feature
off and exit Setup. To re-enable this
feature, return to Setup and turn it on
again.
2008 Odyssey 00X31-SHJ-8101
Page 95 of 148

Navigation System95
System Set-up
Correct Vehicle Position
The system relies on satellites for
positioning information. Buildings,
tunnels, and other objects can block or
reflect these signals, requiring the
system to use “dead reckoning” to
determine your location and direction.
This can sometimes lead to small errors
in positioning, such as showing you on
an adjacent street.
NOTE:
Using this function to adjust vehicle
position is not recommended. When the
system acquires a GPS signal, it will
automatically place the vehicle in the
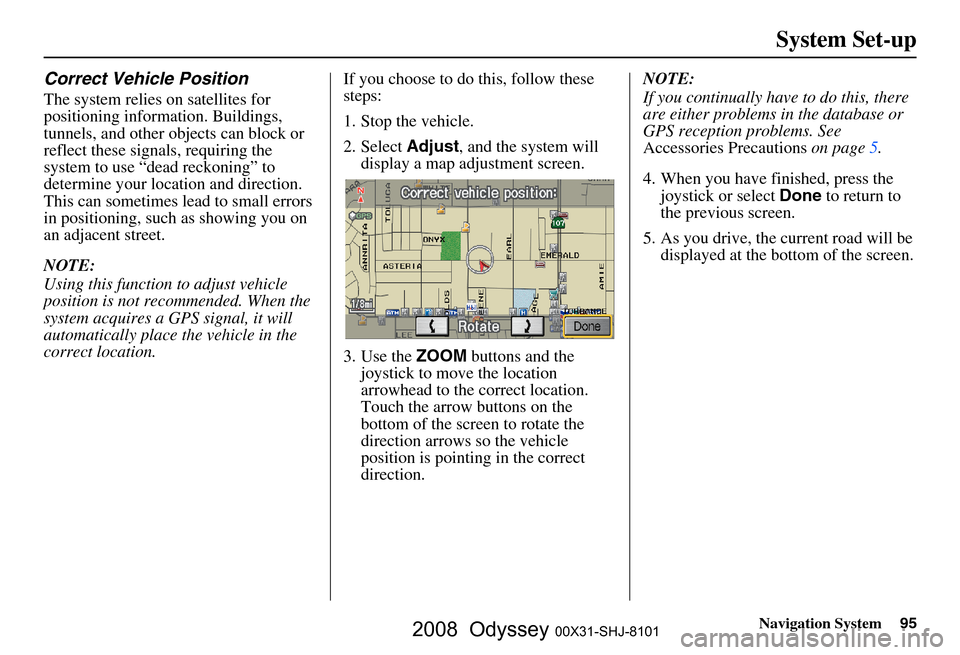
correct location. If you choose to do this, follow these
steps:
1. Stop the vehicle.
2. Select
Adjust, and the system will
display a map adjustment screen.
3. Use the ZOOM buttons and the
joystick to move the location
arrowhead to the correct location.
Touch the arrow buttons on the
bottom of the screen to rotate the
direction arrows so the vehicle
position is pointin g in the correct
direction. NOTE:
If you continually have to do this, there
are either problems in the database or
GPS reception problems. See
Accessories Precautions
on page
5 .
4. When you have finished, press the joystick or select Done to return to
the previous screen.
5. As you drive, the current road will be displayed at the bottom of the screen.
2008 Odyssey 00X31-SHJ-8101
Page 100 of 148

100Navigation System
System Set-up
Rear View Camera
Your vehicle is equipped with a rear
view camera as shown in the
illustration.
Whenever you shift to R (Reverse) with
the ignition switch in the ON (II)
position, the rear view is shown on the
navigation system screen. For the best
image, always keep the rear view
camera lens clean, and be sure it is not
covered.
Since the rear view camera display area
is limited, you should always back up
slowly and carefully, and look behind
you for obstacles.
Rear View Camera Brightness
Adjustment
When in reverse, the touch screen, and
Navi “hard” buttons are locked out,
except the ZOOM buttons. Touching
the “ ” or “ ” button allows you to
adjust the brightness of the rear view
camera image. This brightness
adjustment is independent of the screen
brightness adjustment in Setup.
NOTE:
The camera brightness cannot be adjusted by voice control.
Slight delays can occur when switching to the ca mera image, or
switching back to the map/menu
screen. This is normal.
Rear View Camera
2008 Odyssey 00X31-SHJ-8101
Page 131 of 148

Navigation System131
Glossary
Vehicle Speed Sensor - Provides speed
signal to the navigation system for
moving the VP icon on the map.
Verified Streets - These streets consist
of the detailed metropolitan coverage
areas, and all other inter-town
connection roads. These roads are
shown in black on the map.
Voice Control - See VR.
VP - Vehicle Position. When in map
mode, this circular icon shows the
vehicle position on the map. Touch
this icon to show the latitude,
longitude, and elevation of your
current position.
VR - Voice Recognition. This allows
voice control of many of the
navigation functions. The hardware
consists of the microphone, voice
control switch ( NAVI TALK/NAVI
BACK buttons), and the front
speakers.
Waypoint - A temporary destination
you may enter on route (e.g., a gas
station, ATM, etc.). See page
65. WMA -
A Windows media audio file
that can be played from a CD-R.
Yaw Rate Sensor - Senses when the
vehicle makes a turn, which makes
the VP change direction on the map
as you turn.
Zagat Ratings - Restaurant ratings
information prov ided by Zagat
Survey. See the Information screen
on page
75 for an explanation of the
ratings.
2008 Odyssey 00X31-SHJ-8101
Page 146 of 148
146Navigation System
Index
V
Vehicle
........................................... 94
Verified Streets.................................7
View Routes................................... 49
Voice Command Help.....................71
Voice Command Index.................. 132
Voice Control Basics....................... 12
Voice Recognition Feedback............96
Voice Recognition, Improving.........14
Volume.......................................... 77
W
Waypoints
................................ 65, 93
Z
Zagat 2007
......................... 33, 34, 38
ZOOM buttons................................ 11
2008 Odyssey 00X31-SHJ-8101
Page:
< prev 1-8 9-16 17-24