Page 65 of 145
 and returns you to the map
screen.
Back to Current Route
Returns you to the origi")
Navigation System65
Driving to Your Destination
Cancel Current Route
Cancels the current route (and any
waypoints) and returns you to the map
screen.
Back to Current Route
Returns you to the original map screen.
Changing Your Destination
There are four methods by which you
can change or add a waypoint to your
route. These are:
Find Nearest (Voice command)
From the map screen, say one of the
“Find Nearest...” voice commands to
locate the nearest gas station, ATM,
restaurant or other point of interest. See
the “Find Nearest” voice commands
listing on page133.
Go Home (Voice command)
From the map screen, say, “Go home.”
If you have entered a “Go home”
address, then the system will display a
confirmation screen.
Using Joystick to Change
Destination
While following a calculated route, you
can select a new destination with the
map screen and the joystick.
With the map screen displayed, use the
joystick to move the position icon. It
will change to cross hairs. Use the
joystick to position the cross hairs on
your desired new destination, street, or
icon, then push in on the joystick. The
address within the cross hairs will be
displayed. If this is your desired new
destination, push in on the joystick
again. If not, reposition the cross hairs
with the joystick, then push in on the
joystick again to see the new address.
2008 CR- V
Page 66 of 145

66Navigation System
With the desired address displayed,
push in on the joystick. The Calculate
route to screen is displayed. Say or
select OK. Say or select either Set as
New Destination or Set as
Waypoint on the pop-up screen. The
system will return to the map screen,
and recalculate the route to your new
destination or waypoint.
NOTE:
When you scroll the map screen while
on route to a destin ation, some voice
controls will not function. These
include:
Display “Heading up”
Display “North up”Entering a Destination from the
Menu Screen (while on route)
If you say “Menu” or press the MENU
button twice, the sy stem displays the
Enter destination by screen. Follow
the procedure described in Entering a
Destination , which begins on page21.
After selecting OK to the Calculate
route to screen, your new location can
be used either as a waypoint or as a
replacement destination.
Continue Trip Screen
If you restart the vehicle, without having
completed your prior trip, you will see
the following screen:
To continue to your destination or other waypoints, say or select OK.
To cancel your destination, press the CANCEL button or the NAVI
BACK button on the steering wheel,
or using the voice control system, say
“Cancel” or “Back.”
If you wish to change the route method, say or select CHANGE
METHOD .
For additional information on changing the routing method, see
Changing the Routing Method on
page45.
Driving to Your Destination
2008 CR- V
Page 67 of 145
Navigation System67
Information Features
Information Screen
When you say “Information” or press
the INFO button, the display changes to:
NOTE:
If some items appear to be grayed out,
and cannot be selected, it is because you
did not select OK on the initial
Disclaimer screen (see System Start-up
on page16).
Voice Command Help
When you say or select Voice
Command Help , you will see the
following screen:
NOTE:
You can select an item by saying either
the line number or the item name. There is a tutorial available for the voice
command help. Say or select
Getting
started , and the display changes to:
Select the line number of the desired
tutorial you want to view, and the
tutorial will automatically be read out.
Press Stop to stop the reading.
2008 CR- V
Page 68 of 145
68Navigation System
Information Features
When you make a selection, you will
see the help commands that can be used
with the voice control. You can say or
select Read List , and the system will
read the list to you.
For a listing of all voice commands, see
page131 in the Voice Command Index .Map Legend
You can use the Map legend screens to
learn the meaning of map features,
icons, colors, etc. us ed in this system.
When you say or select Map Legend,
the display changes to:
Say or select the desired item or item
number to view each section of the map
legend.
Calendar
The Calendar option allows you to
enter events and be reminded of them in
the future. When you say or select
Calendar , the system shows the
calendar with the current calendar day
highlighted.
Dates with an icon indicate there is a
schedule entry for that date.
2008 CR- V
Page 69 of 145

Navigation System69
You can scroll through the calendar day
by day by pushing the joystick or select
the day by voice. To change the month,
say “Next” or “Previous,” use the
ZOOM buttons, or touch the triangles at
the top of the screen.
If you say or select List, your entries are
listed. Press the CANCEL button to
return to the Calendar screen.Entering Your Schedule
Set your schedule by selecting the day
on the calendar, and the display changes
to:
Reminder
The default for Reminder is On. This
allows the system to remind you of the
calendar item the next time you start the
vehicle (see System Start-up on
page16).
Edit Date
This allows you to move your calendar
entry to a different date. If you say or
select Edit Date , the Calendar screen
is displayed with existing entries grayed
out. Select a new day and the display
returns to the Edit schedule screen
with a new date.
Edit Title
Say or select Edit Title , then enter the
name of your title using the on-screen
keyboard. Once you have entered the
title, say or select Done.
Edit Message
Say or select Edit Message , and the
system will show the Edit Message
screen. You can enter a message on two
lines. Use to change the line.
Once you have entered the message, say
or select Done.
Message Icon
Say or select Message Icon , and the
system displays a list of icons you can
select to help identify the type of
message you entered. The message icon
you choose will be displayed alongside
the specified date on the Calendar
screen.
Delete
From the Calendar screen, select the
date of the schedule you wish to
remove. To remove the schedule, say or
select Delete .
Information Features
2008 CR- V
Page 70 of 145

70Navigation System
Information Features
Done
Once you have finished entering the
schedule, say or select Done. The
Calendar screen is re-displayed and a
message icon appears.
NOTE:
You can only enter one message per day.
A maximum of 50 entries can be stored in the schedule.
To re-activate a previous message, turn the Reminder setting from Off to
On . If it is not turned on, the
reminder will not be displayed when
you start vehicle.
The system displays active calendar entries only after you answer OK on
the Disclaimer screen.
For more information, refer to System Start-up on page16.Calculator
When you say or select Calculator, the
display changes to:
Use the touch screen to use the
following features:
Calculator
The calculator function operates like a
standard hand held calculator.
Unit Conversion
Values entered on the calculator can be
converted from one unit to another (e.g.,
inches-to-millimeters).
Unit Conversion
To perform a conversion:
1. Enter a numeric value to be converted (for example, 100).
2. Select the type of unit you want to convert (for example, weight). The
screen for that conversion type
appears (see illustration in step 3).
3. Select the base un it (like pounds) that
you wish to convert to some other
unit. So, in the ex ample below, 100
lbs converts to 1600 ounces, 0.05 ton
(US), etc.
NOTE:
If you do not enter a value to be converted, only “Temperature” units
are selectable.
Conversions using negative value may produce meaningless or
physically impossible values.
2008 CR- V
Page 71 of 145

Navigation System71
System Set-up
Set-up Mode
The Setup function consists of two
different screens that allow you to
change and update information in the
system. To display the Setup screens,
use the voice control system and say
“Setup,” or press the SETUP button. To
change it to another Setup screen, say or
select More in the upper right corner of
the screen.
On any of the Setup screens, you can
use the voice control system to select
any item on the screen.
NOTE:
If some items appear to be grayed out, and cannot be selected, it is
because you did not select OK on the
initial Disclaimer screen. See
System Start-up on page16.
For information on the available voice commands, see Voice
Command Index on page131.
Setup Screen (first)
From any screen, say “Setup” or press
the SETUP button, and the following
screen appears:
Brightness
The screen brightness has 11 settings.
To change the brightness, use the voice
control system and say “Brightness up”
or “Brightness down.” You can also
select the Bright. bar and move the
cursor by pushing the joystick left or
right, or by touching the arrowhead in
the bar.
Tip:
If you are having trouble viewing the
screen in bright li ghting conditions, try
increasing the brightness. NOTE:
You can have a separate daytime and
nighttime setting for brightness. Adjust
each setting when the display is in either
daytime or nighttime mode.
Volume
The navi voice volume
is adjustable in
10 steps, and also can be turned off. To
adjust the volume, us e the voice control
system and say “Volume up” or
“Volume down.” You can also select the
Volume bar and move the cursor by
pushing the joystick left or right, or by
touching the arrowh eads in the bar.
After adjusting the volume, you will
hear beeps at the new volume level. You
can also select volume off.
NOTE:
If you turn the volume off, you will not
hear route guidance or voice command
confirmations.
2008 CR- V
Page 72 of 145

72Navigation System
System Set-up
Display
There are two screen display modes:
Day and Night . The recommended
setting is Auto, which automatically
switches the screen between Day and
Night modes as you turn the headlights
on or off.
You can select Day or Night mode to
override the Auto mode. This is a
useful feature for driver’s that like to
use headlights during the day, and want
to temporarily override Night mode.
However, the screen in Day mode will
be extremely bright at night.
Day ModeNight Mode
Display
Mode How setting affects
display mode: To override setting while
driving: But remember:
Auto
(factory
default) Automatically
switches between
Day
and Night
mode by sensing if
the headlights are
on. Override night display:
With headlights on,
repeatedly press the gauge
brightness (+) button until
full bright.
Override day display:
Turn on the headlights and
ensure the dash brightness
is not at full bright. Adjust the dash
brightness (with
headlights on) back to
normal to allow auto
switching by sensing
headlights.
Day Stays in Day mode. Push and hold the joystick
for 10 seconds (switches to
Night mode). There is no auto
Night/
Day mode change with
the headlights on/off.
You control the setting.
Night Stays in Night
mode. Push and hold the joystick
for 10 seconds (switches to
Day
mode). There is no auto
Night/
Day mode change with
the headlights on/off.
You control the setting.
Clock Turns the screen to
the clock screen. To return to the previous
screen, press the
NAVI
BACK button. Your route guidance
stops when the
clock
screen is displayed.
2008 CR- V
 1
1 2
2 3
3 4
4 5
5 6
6 7
7 8
8 9
9 10
10 11
11 12
12 13
13 14
14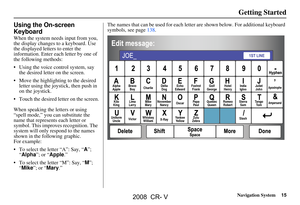 15
15 16
16 17
17 18
18 19
19 20
20 21
21 22
22 23
23 24
24 25
25 26
26 27
27 28
28 29
29 30
30 31
31 32
32 33
33 34
34 35
35 36
36 37
37 38
38 39
39 40
40 41
41 42
42 43
43 44
44 45
45 46
46 47
47 48
48 49
49 50
50 51
51 52
52 53
53 54
54 55
55 56
56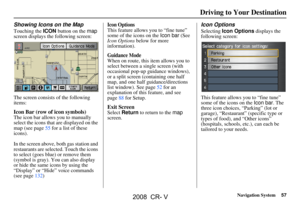 57
57 58
58 59
59 60
60 61
61 62
62 63
63 64
64 65
65 66
66 67
67 68
68 69
69 70
70 71
71 72
72 73
73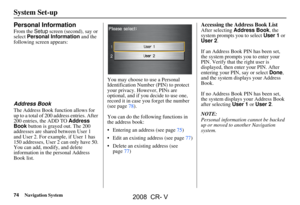 74
74 75
75 76
76 77
77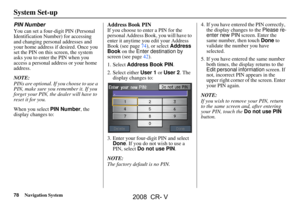 78
78 79
79 80
80 81
81 82
82 83
83 84
84 85
85 86
86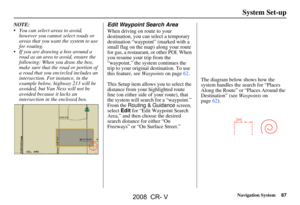 87
87 88
88 89
89 90
90 91
91 92
92 93
93 94
94 95
95 96
96 97
97 98
98 99
99 100
100 101
101 102
102 103
103 104
104 105
105 106
106 107
107 108
108 109
109 110
110 111
111 112
112 113
113 114
114 115
115 116
116 117
117 118
118 119
119 120
120 121
121 122
122 123
123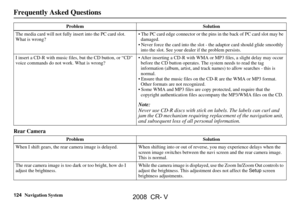 124
124 125
125 126
126 127
127 128
128 129
129 130
130 131
131 132
132 133
133 134
134 135
135 136
136 137
137 138
138 139
139 140
140 141
141 142
142 143
143 144
144
