Page 218 of 413
 or ON (II) position.
Turn the system on by pushing the
power/volume knob or the AM/FM
button. Adjust the volume by turning
the power")
�µ�Û�Ý
�Û
�Ý
The ignition switch must be in the
ACCESSORY (I) or ON (II) position.
Turn the system on by pushing the
power/volume knob or the AM/FM
button. Adjust the volume by turning
the power/volume knob.
Pushing the AUDIO button will also
turn on the system.
You can also operate the audio
system without using the control
icons on the audio screen. Use the
control buttons on the lef t side of the
screen. The status bar appears on
the bottom of the screen each time
you operate any of the control
buttons. On the navigation screen,
you can also see audio inf ormation
by touching the AUDIO INFO icon
on the lower of the screen. The band and f requency that the
radio was last tuned to are displayed.
To change bands, press the AM/FM
button, or touch the desired band
icon (FM1, FM2, AM, XM1, or XM2).
On the FM band, STEREO will be
displayed if the station is
broadcasting in stereo. Stereo
reproduction on AM is not available.
For inf ormation on XM radio, see
page .
You can use any of f ive methods to
f ind radio stations on the selected
band: tune, seek, scan, the preset
buttons, and auto select.
Use the TUNE bar to tune
the radio to a desired f requency.
Press the side of the bar to tune
to a higher f requency, and press the side to tune to a lower
f requency.
Press and hold the or side of
the TUNE bar until you hear two
beeps to change the f requency
rapidly. Release the bar when the
display reaches the desired
f requency.
136
CONT INUED
Audio System (Models with navigation system)
T o Play the A M/FM Radio
T o Select a Station
TUNE
Features
133
�����—�����—�����y���������������y���
�(�#���������y���
�����y
Page 220 of 413

�µIf you are
traveling far from home and can no
longer receive your preset stations,
you can use the auto select feature to
find stations in the local area.
Press the AUDIO button to view the
audio control icons, then press the
AUTO SEL icon. You will see AUTO
SEL f lashing in the display, and the
system goes into scan mode f or
several seconds. It stores the
f requencies of six AM, and twelve
FM stations in the preset buttons. You will see a ‘‘0’’ displayed af ter
pressing a preset button if auto
select cannot f ind a strong station f or
every preset button.
If you do not like the stations auto
select has stored, you can store
other f requencies on the preset
buttons as previously described.
press the
AUTO SEL icon. This restores the
presets you originally set.
For inf ormation on AM/FM radio
f requencies and reception, see page .
166
To turn of f auto select,
Audio System (Models with navigation system)
AUTO SELECT
Features
135
�����—�
���—�����y�
����
��������y���
�(�#���������y���
�����y
Page 221 of 413
Audio System (Models with navigation system)
Playing the XMSatellite Radio
136
TUNE BAR
SCAN BUTTON JOYSTICK
CATEGORY
INDICATOR
AUDIO BUTTON
XM RADIO
BUTTON
POWER/VOLUMEKNOB
PRESET BUTTONS
AM/FM BUTTON
PRESET CHANNEL
NUMBER XM RADIO ICON MODE ICON
�����—�����—�����y���
�������
���y���
�(�#���������y���
���
�y
Page 222 of 413

�µ
CONT INUED
Your audio system is capable of
receiving XM
Satellite Radio
anywhere in the United States,
except Hawaii and Alaska. XM
is a registered trademark of
XM Satellite Radio, Inc.
XM radio receives signals f rom two
satellites to produce clear, high-
quality digital reception. It of f ers
many channels in several categories.
Along with a large selection of
dif f erent types of music, XM radio
allows you to view channel and
category selections in the display.
Whenyoupressandholdthe
AUDIO button, the display also
shows all XM inf ormation. To listen to XM radio, turn the
ignition switch to the ACCESSORY
(I) or the ON (II) position. Push the
power/volume knob to turn on the
audio system, and press the CD/XM
button. Adjust the volume by turning
the knob. The last channel you
listened to will show in the display.
To switch between
channel mode and category mode,
touch the MODE icon. In channel
mode, you can select all of the
available channels. In category mode,
such as Jazz, Rock, Classical, etc.,
you can select all of the channels
within that category. Each time you
touch and release the MODE icon,
the display changes between the
channel mode and the category
mode.
You can also change to the XM radio
while you are listening to an FM
station, AM station, disc, pc card, etc.,
by touching the XM1 or XM2 icon on
the audio display.
You can also operate the radio using
the control buttons on the left side of
the screen. The status bar appears
on the bottom of the screen each
time you press any of the control
buttons. On the navigation screen,
you can also see the audio
inf ormation by touching the AUDIO
INFO icon on the lower of the screen.
Audio System (Models with navigation system)
Operating the XM Radio MODE
Features
137
�����—�����—�����y���
�����������y���
�(�#���������y���
�����y
Page 228 of 413
. The audio system
illuminates when the parking lights
are on, even if the radio")
You can use the instrument panel
brightness control buttons to adjust
the illumination of the audio system
(see page ). The audio system
illuminates when the parking lights
are on, even if the radio is of f .
You can select the background
screen to display the sound level.
There are three screen modes: level
(the sound level is shown with the
vertical bars), spectrum analysis (the
sound level appears as ripples of
water), and off. Each time you touch
the background icon, the display
changes.
The system will return to the audio
display about 5 seconds af ter you
stop adjusting a mode.
You can also select the icon with the
joystick. Move it up and down to
move the highlighting and scroll
through lists. Select the icon, then
move the joystick to lef t or right to
change the setting.
This f unction is set to MID as the
def ault setting when the vehicle
leaves the f actory. If you f eel the
sound is too loud, choose low. If you
f eel the sound is too quiet, choose Hi.
73
A udio System L ighting
Audio System (Models with navigation system)
Screen Mode
Features
143
�����—�����—�����y���
����
��
���y���
�(�#���������y���
�����y
Page 229 of 413
�µ�´
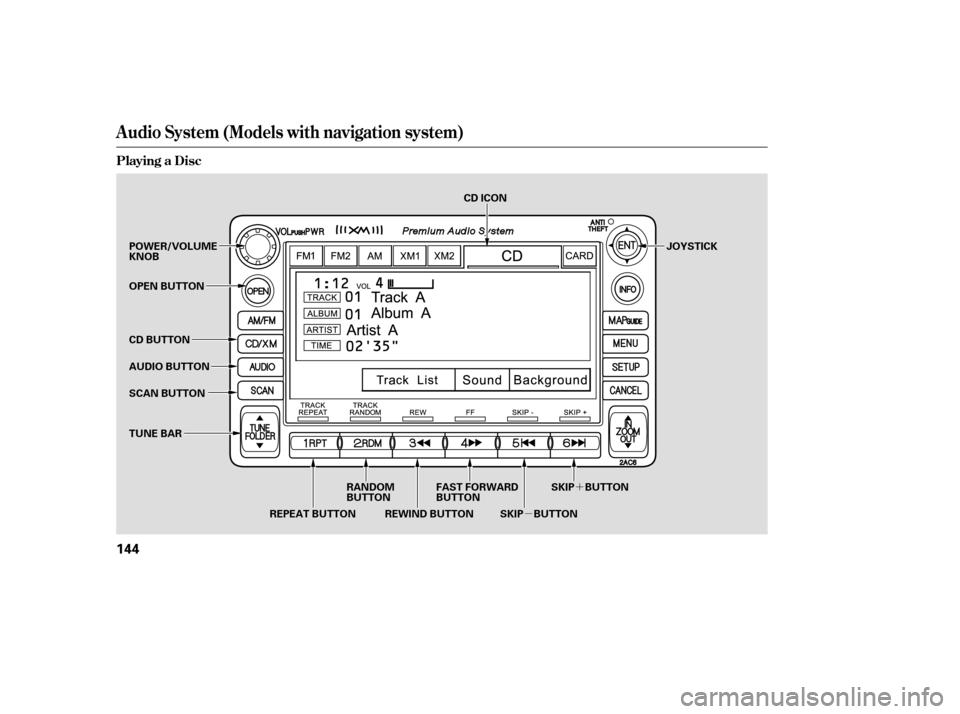
Audio System (Models with navigation system)
Playing a Disc
144
SCAN BUTTON JOYSTICK
AUDIO BUTTON
POWER/VOLUME KNOB
OPEN BUTTON
CD BUTTON
RANDOM
BUTTON
REPEAT BUTTON REWIND BUTTON FAST FORWARD
BUTTON
SKIP BUTTONSKIP BUTTON
TUNE BAR CD ICON
�����—�����—�����y���
����
������y���
�(�#���������y���
�����y
Page 232 of 413

�µ�µ
Push the AUDIO button beside the
screen to show the audio display and
operate the disc player.
You can also operate the audio
system without using the control
icons on the audio screen. Press the
CD button. The status bar appears
on the bottom of the screen. On the
navigation screen, you can see the
audio inf ormation whenever you
touch the AUDIO INFO icon on the
lower portion of the screen.
When playing a CD recorded with
text data, the track, album, and artist
name are shown on the audio display.
When playing a disc in MP3 or WMA,
the f older number and name, the f ile
number and name, the artist name,
and the elapsed time are shown. The
system will continuously play a disc
until you change modes. If the disc
was not recorded with text data, it
will not be displayed. You can also select an icon with the
joystick. Move it to left, right, up, or
down to change the highlighting and
scroll through lists. Then press the
ENT on the top of the joystick to
select the icon.
Each time you press and
release (preset 6), the player
skips forward to the beginning of the
next track (f ile in MP3 or WMA
mode). Press and release (preset 5), to skip backward to
the beginning of the current track.
Press it again to skip to the
beginning of the previous track.
You can use the preset buttons while
a disc is playing to select passages
and change tracks (files in MP3 or
WMA mode). Each preset button’s
f unction is shown on the bottom of
the screen. To move rapidly within
a track/f ile, press and hold (preset 4) or (preset 3).
CONT INUED
Audio System (Models with navigation system)
T o Change or Select T racks/Files
SK IP
FF/REWFeatures
147
PRESET BUTTONS
PRESET BUTTON’S FUNCTION
�����—�����—�����y���
����
������y���
�(�#���������y���
�����y
Page 240 of 413
: 8 layers
In WMA f ormat, DRM (digital rights
management) f iles cannot be played.
If the")
�µ �µ�µ�µ
CONT INUED
Compatible with variable bit rate
and multi-session
Maximum layers
(including ROOT): 8 layers
In WMA f ormat, DRM (digital rights
management) f iles cannot be played.
If the system finds a DRM file, it
skips that f ile and plays the next
available f older or f ile. The PC card slot is behind the
navigation screen. To use the PC
card player, press the OPEN button
beside the screen. The screen f olds
back, and the PC card slot appears.Insert a PC card straight into the slot.
The drive will read the PC card and
begin to play it.
Return the screen to the upright
position by pressing the CLOSE
button on the edge of the screen
panel.
Push the AUDIO button beside the
screen to show the audio display and
operate the PC card player.
You can also operate the audio
system without using the control
icons on the audio screen. Press any
of the appropriate control buttons.
The status bar appears on the
bottom of the screen. On the
navigation screen, you can see the
audio inf ormation whenever you
touch the AUDIO INFO icon on the
screen.
The specif ications f or compatible
WMA f iles are:
Sampling f requency:
32/44.1/48 kHz
Bit rate:
48/64/80/96/128/160/192 kbps
Audio System (Models with navigation system)
Loading a PC Card
Features
155
PC CARD SLOT
�����—�����—�����y���
�����������y���
�(�#���������y���
�����y

Playing the XMSatellite Radio
136
TUNE BAR
SCAN BUTTON JOYSTICK
CATEGORY
INDICATOR
AUDIO BUTTON
XM RADIO
BUTTON
POWER/VOLUMEKNOB
PRESET BUTTONS
AM/FM BUTT")