Page 8 of 303
�Î �Î�Î
�Î
�Î
�Î �Î
�Î
�Î �Î�Î
Only on vehicles equipped with navigation system. Ref er to the navigati
on system manual.
To use the horn, press the center pad of the steering wheel.
If equipped.
1:2:3:
Your Vehicle at a Glance
4
HEADLIGHTS/TURN SIGNALS
REAR WINDOW
DEFOGGER
WINDSHIELD WIPERS/WASHERS
INSTRUMENT PANEL
BRIGHTNESS
SEL/RESET BUTTON
HAZARD WARNING
BUTTON
ACCESSORY POWER
SOCKET
PASSENGER AIRBAG OFF
INDICATOR
(P.29)
DISPLAY CHANGE
BUTTON
HEATED MIRRORS
CRUISE
CONTROL
BUTTONS (P.178)
NAVIGATION SYSTEM VOICE CONTROL BUTTONS
(P.72)
(P.73)(P.66)
(P.65)
(P.104)
(P.217) (P.71)
(P.177)(P.75)
(P.182) (P.105)
(P.74)
AUXILIARY INPUT JACK
MIRROR CONTROLS
VEHICLE
STABILITY
ASSIST (VSA)
SYSTEM OFF
SWITCH
STEERING WHEEL
ADJUSTMENTS
REMOTE AUDIO
CONTROLS HORN
(P.108)(P.74) 3
3
1 3
3
3 32
�����—�����—�
�
�y�
�������������y���
�(�+���������y���������y
Page 44 of 303
Place the child seat on the vehicle
seat, then attach the seat to the
lower anchors according to the
child seat maker’s instructions.
Your vehicle is equipped with
LATCH (lower anchors and tethers
for children) at the outer rear seats.
Make sure there are no objects
near the anchors that could
prevent a secure connection
between the child seat and the
anchors.
Move the seat belt buckle or
tongue away f rom the lower
anchors.
To install a LATCH-compatible child
seat:
Some LATCH-compatible seats
have a rigid-type connector as
shown above.
The lower anchors are located
between the seat-back and seat
bottom, and are to be used only with
a child seat designed f or use with
LATCH.
The location of each lower anchor is
indicated by a small button above the
anchor point.
1. 2.3.
CONT INUED
Installing a Child Seat with
LATCH
Installing a Child Seat
Driver and Passenger Saf ety
41
LOWER ANCHORS
Rigid type
BUTTONS
�����—�����—�
�
�y�
����
��������y���
�(�+���������y���������y
Page 61 of 303
�Î�Î
�Î
�Î
�Î
�Î �Î
�Î
�Î
�Î �Î�Î
To use the horn, press the center pad of the steering wheel.
If equipped.
Only on vehicles equipped with navigation system. Ref er to the navigati
on system manual.
1:2:3:
Controls Near the Steering Wheel
70
WINDSHIELD WIPERS/WASHERS
INSTRUMENT PANEL
BRIGHTNESS HEADLIGHTS/ TURN SIGNALS
HORN HEATED MIRRORS
AUDIO SYSTEM
Vehicle without navigation system is shown. REMOTE
AUDIO
CONTROLSPASSENGER’S AIRBAG OFF
INDICATOR
MIRROR CONTROLS
NAVIGATION SYSTEM
VOICE CONTROL
BUTTONS REAR WINDOW
DEFOGGER
ACCESSORY POWER
SOCKET
HAZARD WARNING
BUTTON
AUXILIARY INPUT JACK
STEERING WHEEL
ADJUSTMENTS CRUISE CONTROL
BUTTONS
(P.72)
(P.71)
(P.73)
(P.104)
(P.217) (P.177)(P.75) (P.182)
(P.178)(P.74)
(P.105)
(P.74) (P.119)
(P.29)
VEHICLE STABILITY
ASSIST (VSA) SYSTEM
OFF SWITCH (P.108)
1
2
2
2
2
3 2
2
�����—�����—�
�
�y�
����
������
�y���
�(�+���������y���������y
Page 64 of 303

positio")
�´�µ
With the headlight switch of f or in
the position, the high beam
headlights and the high beam
indicator come on with reduced
brightness when you turn the
ignition switch to the ON (II)
position and release the parking
brake. They remain on until you turn
the ignition switch of f , even if you
set the parking brake.
The headlights revert to normal
operation when you turn them on
with the switch. The buttons under the lef t side vent
control the brightness of the
instrument panel. Push the or
button to adjust the brightness.
Separate adjustments can be made
when the headlights are on and of f .
There are six brightness levels.
When you push either button, the
inf ormation display indicates the
current level. You will hear a tonewhen you reach the maximum or
minimum brightness. The display
returns to the odometer 5 seconds
af ter you stop adjusting the
brightness.
To reduce glare at night, the
instrument panel illumination dims
when you turn the light switch to the
or position.
The center of each meter (upper and
lower) illuminates with reduced
brightness when you unlock and
open the driver’s door, and then goes
back to the selected brightness when
you turn the ignition switch to the
ON (II) position.
If you insert the key but do not turn
the ignition switch to the ON (II)
position, the illumination turns of f in
about 10 seconds.
Daytime Running L ights Instrument Panel Brightness
Headlights, Instrument Panel Brightness
Inst rument s and Cont rols
73
CONTROL BUTTONS
�����—�����—�
�
�y�
����
����
���y���
�(�+���������y���������y
Page 65 of 303

positio")
�´�µ
With the headlight switch of f or in
the position, the high beam
headlights and the high beam
indicator come on with reduced
brightness when you turn the
ignition switch to the ON (II)
position and release the parking
brake. They remain on until you turn
the ignition switch of f , even if you
set the parking brake.
The headlights revert to normal
operation when you turn them on
with the switch. The buttons under the lef t side vent
control the brightness of the
instrument panel. Push the or
button to adjust the brightness.
Separate adjustments can be made
when the headlights are on and of f .
There are six brightness levels.
When you push either button, the
inf ormation display indicates the
current level. You will hear a tonewhen you reach the maximum or
minimum brightness. The display
returns to the odometer 5 seconds
af ter you stop adjusting the
brightness.
To reduce glare at night, the
instrument panel illumination dims
when you turn the light switch to the
or position.
The center of each meter (upper and
lower) illuminates with reduced
brightness when you unlock and
open the driver’s door, and then goes
back to the selected brightness when
you turn the ignition switch to the
ON (II) position.
If you insert the key but do not turn
the ignition switch to the ON (II)
position, the illumination turns of f in
about 10 seconds.
Daytime Running L ights Instrument Panel Brightness
Headlights, Instrument Panel Brightness
Inst rument s and Cont rols
73
CONTROL BUTTONS
�����—�����—�
�
�y�
����
����
���y���
�(�+���������y���������y
Page 111 of 303
The spotlights have a two-position
switch. In the DOOR position, the
lights come on when you open either
door. In the OFF position, the lights
do not come on.
The spotlights (with the switch in
the DOOR position) also come on
when you unlock the door with the
key or the remote transmitter, and
when you remove the key f rom the
ignition switch.The courtesy light between the
spotlights comes on when you turn
the parking lights on. To adjust its
brightness, push the instrument
panel brightness control buttons
under the driver’s side vent with the
ignition switch in the ON (II)
position.
On models with moonroof
On models with moonroofCourtesy L ight
Interior Lights
112
DOOR ACTIVATEDOFF POSITION
SPOTLIGHT
COURTESY LIGHT
�����—�����—�
�
�y�
�������������y���
�(�+���������y���
�
���y
Page 112 of 303
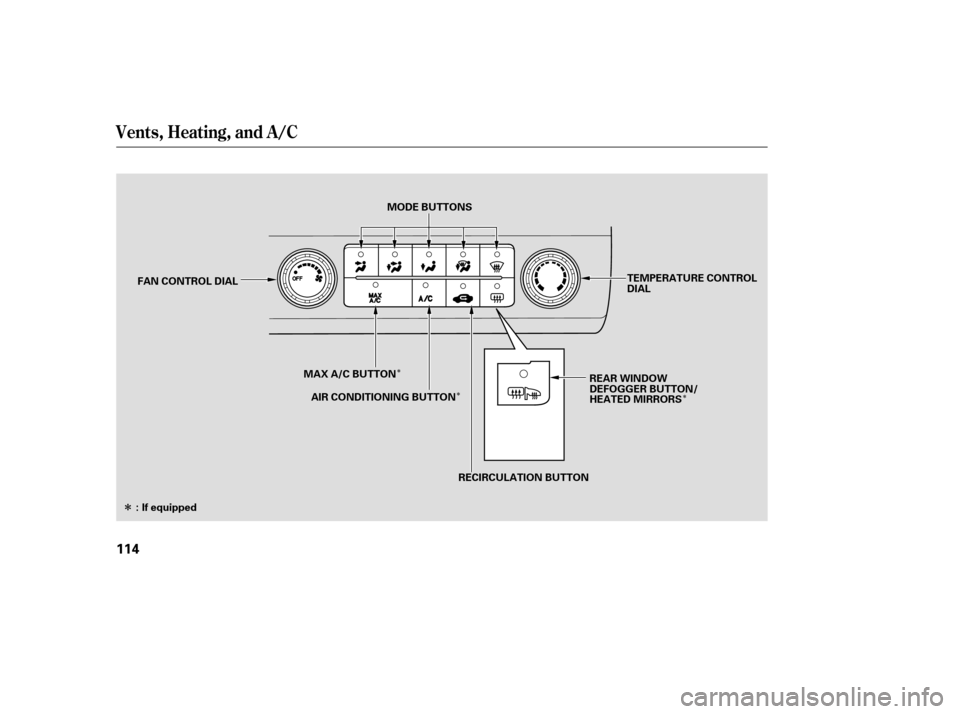
�Î
�Î
�Î
�Î
Vents, Heating, and A/C
114
MODE BUTTONS
RECIRCULATION BUTTON REAR WINDOW
DEFOGGER BUTTON/
HEATED MIRRORS
FAN CONTROL DIAL
TEMPERATURE CONTROL
DIAL
MAX A/C BUTTON AIR CONDITIONING BUTTON
: If equipped
�����—�����—�
�
�y�
�������������y���
�(�+���������y���
�
���y
Page 113 of 303

Turn this dial to increase or decrease
the fan speed and airflow.
Turning this dial clockwise increases
the temperature of the airflow.
This button turns the air
conditioning on and of f . The
indicatorinthebuttonisonwhen
the A/C is on.When the recirculation indicator is
on, air f rom the vehicle’s interior is
sent throughout the system again.
When the indicator is off, air is
brought in f rom the outside of the
vehicle (fresh air mode).
The outside air intakes f or the
heating and cooling system are at
the base of the windshield. Keep this
area clear of leaves and other debris.
Thesystemshouldbeleftinfresh
air mode under almost all conditions.
Keeping the system in recirculation
mode, particularly with the A/C of f ,
can cause the windows to fog up.
Switch to recirculation mode when
driving through dusty or smoky
conditions, then return to fresh air
mode.
Airf low is divided between
the vents in the dashboard and the
f loor vents. Air flows from the center
and corner vents in the dashboard.
Use the mode control buttons to
select the vents air flows from. Some
air will f low f rom the dashboard
corner vents in all modes.
On some models, this button also
operates the heated outside mirrors
(see page ).
This button turns the rear window
def ogger of f and on (see page ).
The system automatically
turns on the A/C and switches to
recirculation mode. Air f lows f rom
the center and side vents in the
dashboard. Pressing the , A/C,
or any of the mode buttons cancels
MAX A/C. 105
74
/
CONT INUED
If equipped
If equipped
Vents, Heating, and A/C
Fan Control Dial
T emperature Control Dial
Air Conditioning (A/C) Button Recirculation Button
MAX A/C Button Rear Window Def ogger
Button
Mode Control
Features
115
�����—�
���—�����y�
�������������y���
�(�+���������y���
�����y