Page 7 of 303
�Î
�Î
�Î
�Î �Î
�Î
�Î
�Î
If equipped
:
Your Vehicle at a Glance
Your Vehicle at a Glance
3
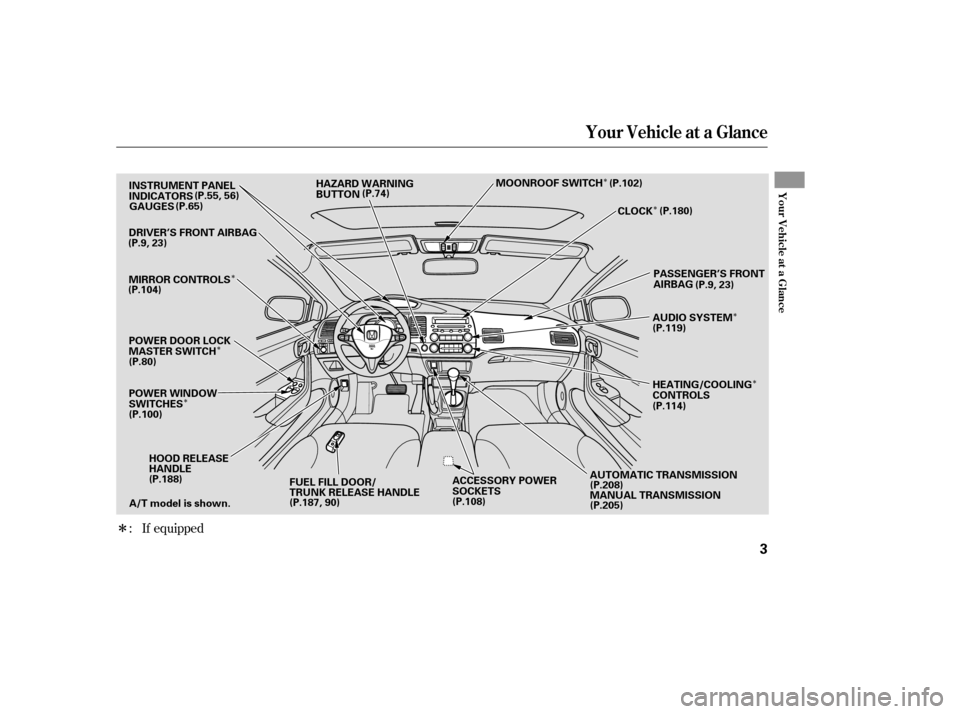
HOOD RELEASE
HANDLE
AUTOMATIC TRANSMISSION
MANUAL TRANSMISSION
GAUGES
INSTRUMENT PANEL
INDICATORS
HAZARD WARNING
BUTTON
(P.9, 23)
(P.9, 23)
ACCESSORY POWER
SOCKETS
DRIVER’S FRONT AIRBAG
FUEL FILL DOOR/
TRUNK RELEASE HANDLE PASSENGER’S FRONT
AIRBAG
A/T model is shown. (P.55, 56)
(P.65)
(P.104) (P.80)
(P.100) (P.188) (P.187, 90) (P.108)(P.208)
(P.205)(P.114)
(P.119)
(P.74)
MIRROR CONTROLS
POWER DOOR LOCK
MASTER SWITCH
POWER WINDOW
SWITCHES HEATING/COOLING
CONTROLS
AUDIO SYSTEM
CLOCK
MOONROOF SWITCH (P.102)
(P.180)
�����—�����—�
�
�y�
�������������y���
�(�+���������y���������y
Page 53 of 303
�Î
�Î
�Î
�Î
�Î �Î�Î
�Î
If equipped
:
Control L ocations
54
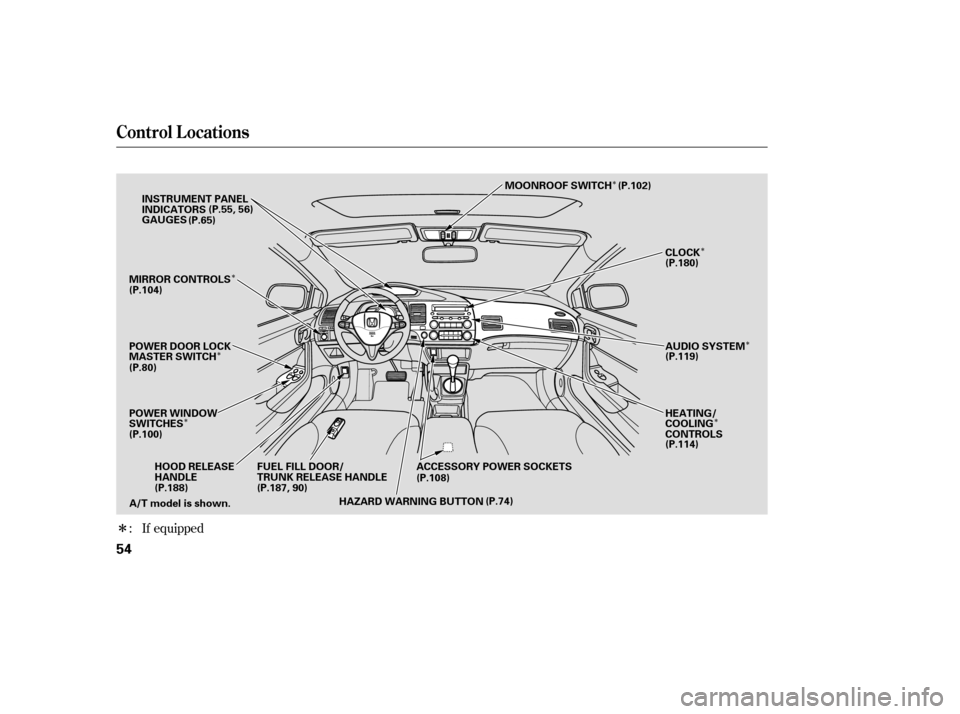
A/T model is shown. INSTRUMENT PANEL
INDICATORS
ACCESSORY POWER SOCKETS
HOOD RELEASE
HANDLE FUEL FILL DOOR/
TRUNK RELEASE HANDLE
HAZARD WARNING BUTTON
GAUGES
(P.55, 56)
(P.65)
(P.104)
(P.80)
(P.100) (P.188) (P.187, 90) (P.108)
(P.74) (P.114)
(P.119)
(P.180)
MOONROOF SWITCH
MIRROR CONTROLS
POWER DOOR LOCK
MASTER SWITCH
POWER WINDOW
SWITCHES HEATING/COOLING
CONTROLS
AUDIO SYSTEM
CLOCK
(P.102)
�����—�����—�
�
�y�
����
��������y���
�(�+���������y���������y
Page 113 of 303

Turn this dial to increase or decrease
the fan speed and airflow.
Turning this dial clockwise increases
the temperature of the airflow.
This button turns the air
conditioning on and of f . The
indicatorinthebuttonisonwhen
the A/C is on.When the recirculation indicator is
on, air f rom the vehicle’s interior is
sent throughout the system again.
When the indicator is off, air is
brought in f rom the outside of the
vehicle (fresh air mode).
The outside air intakes f or the
heating and cooling system are at
the base of the windshield. Keep this
area clear of leaves and other debris.
Thesystemshouldbeleftinfresh
air mode under almost all conditions.
Keeping the system in recirculation
mode, particularly with the A/C of f ,
can cause the windows to fog up.
Switch to recirculation mode when
driving through dusty or smoky
conditions, then return to fresh air
mode.
Airf low is divided between
the vents in the dashboard and the
f loor vents. Air flows from the center
and corner vents in the dashboard.
Use the mode control buttons to
select the vents air flows from. Some
air will f low f rom the dashboard
corner vents in all modes.
On some models, this button also
operates the heated outside mirrors
(see page ).
This button turns the rear window
def ogger of f and on (see page ).
The system automatically
turns on the A/C and switches to
recirculation mode. Air f lows f rom
the center and side vents in the
dashboard. Pressing the , A/C,
or any of the mode buttons cancels
MAX A/C. 105
74
/
CONT INUED
If equipped
If equipped
Vents, Heating, and A/C
Fan Control Dial
T emperature Control Dial
Air Conditioning (A/C) Button Recirculation Button
MAX A/C Button Rear Window Def ogger
Button
Mode Control
Features
115
�����—�
���—�����y�
�������������y���
�(�+���������y���
�����y
Page 167 of 303
 button until the
displayed time begins to blink, then
release the button.
Change the hours by pressing the H
(preset 1) button until the numbers
advance")
To set the time, press the CLOCK
(AM, AM/FM) button until the
displayed time begins to blink, then
release the button.
Change the hours by pressing the H
(preset 1) button until the numbers
advance to the desired time. Change
the minutes by pressing the M
(preset 2) button until the numbers
advance to the desired time.
Press the CLOCK (AM, AM/FM)
button again to enter the set time.
You can quickly set the time to the
nearest hour. If the displayed time is
bef ore the half hour, pressing the
CLOCK (AM, AM/FM) button until
you hear a beep, then pressing the R
(preset 3) button sets the clock back
to the previous hour. If the displayed
time is af ter the half hour, the clock
sets f orward to the beginning of the
next hour.For example: 1:06 will reset to 1:00
1:52 will reset to 2:00
The navigation system receives
signals f rom the global positioning
system (GPS), and the displayed time is updated automatically by the
GPS. Ref er to the navigation system
manual f or how to adjust the time.
On models with navigation system
On models without navigation system
Setting the Clock
180
CLOCK BUTTON
H (HOUR)
BUTTON M (MINUTE)
BUTTONR (RESET)
BUTTON
H (HOUR)
BUTTONR (RESET)
BUTTON
M (MINUTE)
BUTTON
U.S. LX, and Canadian DX, DX-G
and LX models
CLOCK BUTTON EX, EX-L and Si models
�����—�����—�
�
�y�
�������������y���
�(�+���������y���
�����y
Page 214 of 303

If Honda antif reeze/coolant is not
available, you may use another
major-brand non-silicate coolant as a
temporaryreplacement.Makesureit
is a high-quality coolant
recommended f or aluminum engines.
Continued use of any non-Honda
coolant can result in corrosion,
causing the cooling system to
malf unction or f ail. Have the cooling
system f lushed and ref illed with
Honda antif reeze/coolant as soon as
possible.
If the reserve tank is completely
empty, you should also check the
coolant level in the radiator.Make sure the engine and radiator
are cool.
Relieve any pressure in the cooling
system by turning the radiator cap
counterclockwise, without
pressing down.
1. 2.
CONT INUED
Engine Coolant
Maint enance
239
RADIATOR CAP
DX, Canadian DX-G, LX, EX, EX-LRemoving the radiator cap
while the engine is hot can
cause the coolant to spray out,
seriously scalding you.
Always let the engine and
radiator cool down before
removing the radiator cap.
�����—�����—�
�
�y�
������
������y���
�(�+���������y���������y
Page 215 of 303
Pour coolant into the reserve tank.
Fill it to half way between the MAX
and MIN marks. Put the cap back
on the reserve tank.
Do not add any rust inhibitors or
other additives to your vehicle’s
cooling system. They may not be
compatible with the coolant or
engine components.
The coolant level should be up to
the base of the f iller neck. Add
coolant if it is low.
Pourthecoolantslowlyand
caref ully so you do not spill any.
Clean up any spill immediately; it
could damage components in the
engine compartment.
Put the radiator cap back on, and
tighten it fully.
Remove the radiator cap by
pushing down and turning
counterclockwise.
3.
4. 5.6.
Engine Coolant
240
Si
SiRESERVE TANK
RADIATOR CAP RESERVE TANK
DX, Canadian DX-G, LX, EX, EX-L
�����—�����—�
�
�y�
������
������y���
�(�+���������y���������y
Page 225 of 303
Push the electrical connector back
onto the bulb. Make sure it is on
all the way.
Turn on the headlights to test the
new bulb.
Insert the new bulb into the hole,
and turn it one-quarter turn
clockwise to lock it in place.
Remove the bulb by turning it
about one-quarter turn
counterclockwise.
Remove the electrical connector
f rom the bulb by pushing on the
tab to unlock it, then slide the
connector of f the bulb.
(Driver’s side)
Put the tube back in the clips and
install the reserve tank back in
place, making sure its bottom tab
is in the holder.
2. 3. 4. 5.6. 7.
CONT INUED
Lights
Maint enance
247
TAB
BULB
CONNECTOR
HOLDER
�����—�����—�
�
�y�
�������������y���
�(�+���������y���������y
Page 226 of 303

To change the driver’s side bulb,
start the engine, turn the steering
wheel all the way to the right, and
turn of f the engine. To change the
passenger’s side bulb, turn the
steering wheel to the lef t. Remove the electrical connectorf rom the bulb by pushing on the
tab to unlock it, then slide the
connector of f the bulb.Remove the bulb f rom the
headlight assembly by turning it
one-quarter turn counterclockwise.
Insert the new bulb into the hole,
and turn it one-quarter turn
clockwise to lock it in place.
Push the electrical connector back
onto the bulb. Make sure it is on
all the way.
Turn on the headlights to test the
new bulb.
Use a Phillips-head screwdriver to
remove the screw from the inner
f ender, and pull the inner f ender
cover back. Reinstall the inner f ender cover.
Then reinstall the screw and
tighten it securely.
2.
1.
3.4. 5.6.7. 8.
Lights
L ow Beam Headlight
248
SCREW
BULB
ELECTRICAL CONNECTOR
�����—�����—�
�
�y�
�������������y���
�(�+���������y���������y