Page 59 of 303
The inf ormation display in the
instrument panel shows you the
engine oil lif e and maintenance
service items when the ignition
switch is in the ON (II) position. This
inf ormation helps to keep you aware
of the periodic maintenance your
vehicle needs f or continued trouble-
f ree driving. Ref er to page f or
more inf ormation.
If the system still detects a leak in
your vehicle’s evaporative emissions
system, the malf unction indicator
lamp (MIL) comes on. If the f uel f ill
cap was not already tightened, turn
the engine of f , and check or
retighten the f uel f ill cap until it
clicks at least once. The MIL should
go off after several days of normal
driving once the cap is tightened or
replaced. If the MIL does not go of f ,
have your vehicle inspected by a
dealer. For more inf ormation, see
page .
282 225
Maintenance Minder
Gauges
Inst rument s and Cont rols
69
�����—�����—�
�
�y�
����
��������y���
�(�+���������y���������y
Page 60 of 303
The inf ormation display in the
instrument panel shows you the
engine oil lif e and maintenance
service items when the ignition
switch is in the ON (II) position. This
inf ormation helps to keep you aware
of the periodic maintenance your
vehicle needs f or continued trouble-
f ree driving. Ref er to page f or
more inf ormation.
If the system still detects a leak in
your vehicle’s evaporative emissions
system, the malf unction indicator
lamp (MIL) comes on. If the f uel f ill
cap was not already tightened, turn
the engine of f , and check or
retighten the f uel f ill cap until it
clicks at least once. The MIL should
go off after several days of normal
driving once the cap is tightened or
replaced. If the MIL does not go of f ,
have your vehicle inspected by a
dealer. For more inf ormation, see
page .
282 225
Maintenance Minder
Gauges
Inst rument s and Cont rols
69
�����—�����—�
�
�y�
����
��������y���
�(�+���������y���������y
Page 125 of 303

Depending on where you drive, you
may experience reception problems.
Interf erence can be caused by any of
these conditions:Driving on the north side of a
large commercial truck on an
east/west road.
Driving in tunnels.
Driving on a road beside a vertical
wall, steep clif f , or hill to the south
of you.
Driving on the lower level of a
multi-tiered road.
Driving on a single lane road
alongside dense trees taller than
50 ft. (15 m) to the south of you.
Driving on the north side of an
east/west mountain road.
Large items carried on a roof rack.
There may be other geographic
situations that could af f ect XM radio
reception. If your XM Radio service has expired
or you purchased your vehicle f rom
a previous owner, you can listen to a
sampling of the broadcasts available
on XM Satellite Radio. With the
ignition switch in the ACCESSORY
(I) or ON (II) position, push the
power/volume knob to turn on the
audio system and press the AUX
button. A variety of music types and
styles will play.
If you decide to purchase XM
satellite radio service, contact XM
Radio at , or at
1-800-852-9696. You will need to give
them your radio I.D. number and
your credit card number. To get your
radio I.D. number, turn the TUNEknob until ‘‘0’’ appears in the display.
Your I.D. will appear in the display.
After you’ve registered with XM
Radio, keep your audio system in the
satellite radio mode while you wait
f or activation. This should take about
30 minutes.
While waiting f or activation, make
sure your vehicle remains in an open
area with good reception. Once your
audio system is activated, you’ll be
able to listen to XM radio broadcasts.
XM Radio will continue to send an
activation signal to your vehicle f or
at least 12 hours from the activation
request. If the service has not been
activated after 36 hours, contact XM
Radio.As required by the FCC:
Changes or modif ications not expresslyapproved by the party responsible f or
compliance could void the user’sauthority to operate the equipment.
www.xmradio.com
Receiving Satellite Radio Service
Audio System (Models without navigation system)
Features
129
�����—�����—�
�
�y�
�������������y���
�(�+���������y���
�����y
Page 133 of 303

Depending on where you drive, you
may experience reception problems.
Interf erence can be caused by any of
these conditions:Driving on the north side of a
large commercial truck on an
east/west road.
Driving in tunnels.
Driving on a road beside a vertical
wall, steep clif f , or hill to the south
of you.
Driving on the lower level of a
multi-tiered road.
Driving on a single lane road
alongside dense trees taller than
50 ft. (15 m) to the south of you. After you’ve registered with XM
Radio, keep your audio system in the
satellite radio mode while you wait
f or activation. This should take about
30 minutes.
Driving on the north side of an
east/west mountain road.
If you decide to purchase XM
Satellite Radio service, contact XM
Radio at , or at
1-800-852-9696. You will need to give
them your radio I.D. number and
your credit card number. To get your
radio I.D. number, press the TUNE bar until ‘‘0’’ appears in the display.
Your I.D. will appear in the display.
Large items carried on a roof rack.
There may be other geographic
situations that could af f ect XM radio
reception. While waiting f or activation, make
sure your vehicle remains in an open
area with good reception. Once your
audio system is activated, you’ll be
able to listen to XM radio broadcasts.
XM Radio will continue to send an
activation signal to your vehicle f or
at least 12 hours from the activation
request. If the service has not been
activated after 36 hours, contact XM
Radio.
If your XM Radio service has expired
or you purchased your vehicle f rom
a previous owner, you can listen to a
sampling of the broadcasts available
on XM Satellite Radio. With the
ignition switch in the ACCESSORY
(I) or ON (II) position, push the
power/volume knob to turn on the
audio system and press the CD/XM
button. A variety of music types and
styles will play.As required by the FCC:
Changes or modif ications not expresslyapproved by the party responsible f or
compliance could void the user’sauthority to operate the equipment.
www.xmradio.com
Receiving Satellite Radio Service
Audio System (Models with navigation system)
Features
147
�����—�����—�
�
�y�
�������������y���
�(�+���������y���
�����y
Page 172 of 303

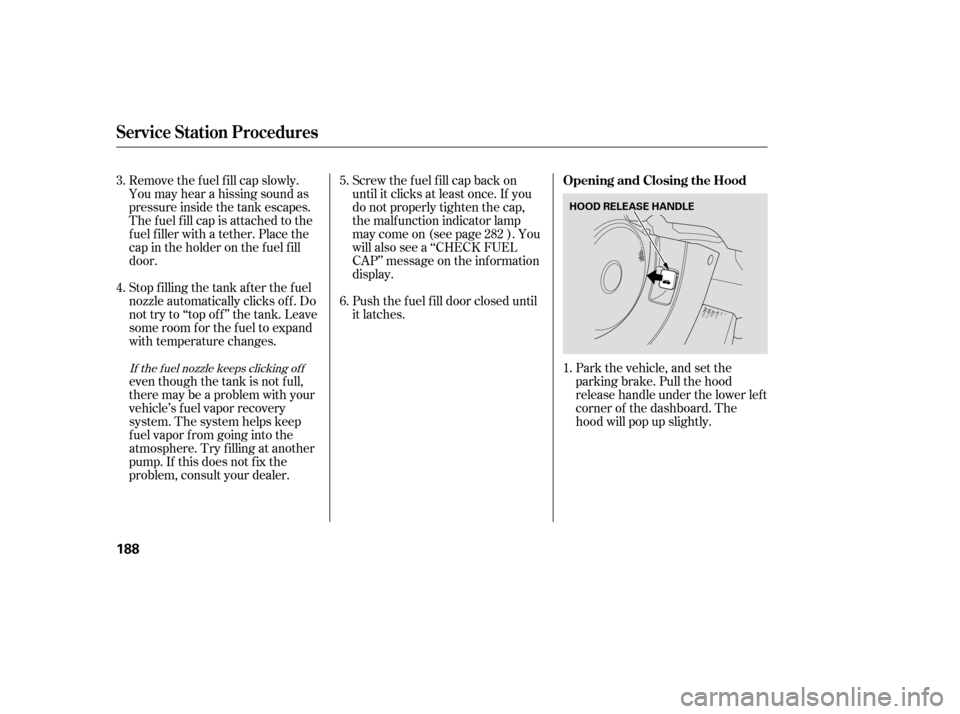
Park the vehicle, and set the
parking brake. Pull the hood
release handle under the lower lef t
corner of the dashboard. The
hood will pop up slightly.
Screw the f uel f ill cap back on
until it clicks at least once. If you
do not properly tighten the cap,
the malf unction indicator lamp
maycomeon(seepage ).You
will also see a ‘‘CHECK FUEL
CAP’’ message on the inf ormation
display.
Push the f uel f ill door closed until
it latches.
Remove the f uel f ill cap slowly.
You may hear a hissing sound as
pressure inside the tank escapes.
The fuel fill cap is attached to the
f uel f iller with a tether. Place the
cap in the holder on the f uel f ill
door.
Stop f illing the tank af ter the f uel
nozzle automatically clicks of f . Do
not try to ‘‘top off’’ the tank. Leave
some room f or the f uel to expand
with temperature changes.
even though the tank is not f ull,
there may be a problem with your
vehicle’s fuel vapor recovery
system. The system helps keep
f uel vapor f rom going into the
atmosphere. Try f illing at another
pump. If this does not f ix the
problem, consult your dealer.
1.
5. 6.
4.
3.
282If the f uel nozzle keeps clicking of f
Service Station Procedures
Opening and Closing the Hood
188
HOOD RELEASE HANDLE
�����—�����—�
�
�y�
�������������y���
�(�+���������y���
�����y
Page 173 of 303

Wait a f ew minutes af ter turning the
engine of f bef ore you check the oil.
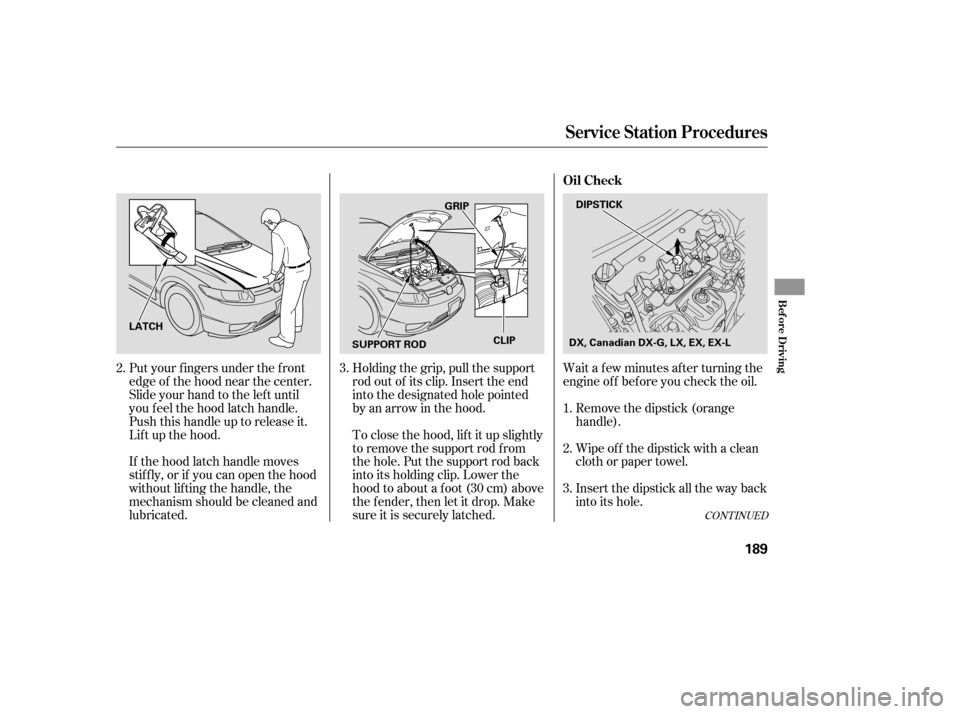
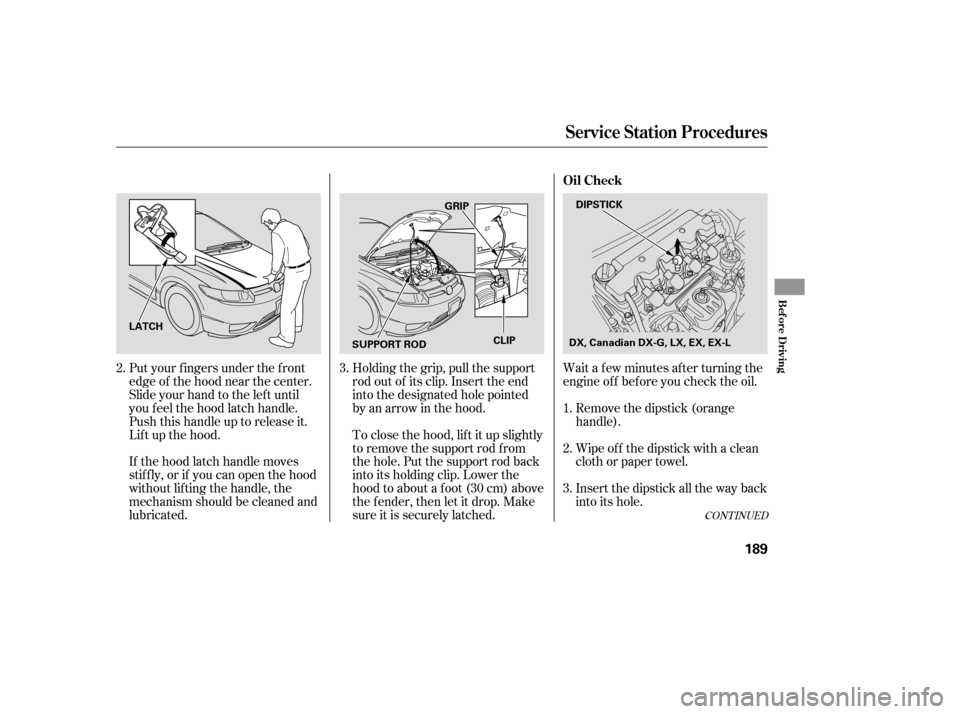
Put your f ingers under the f ront
edge of the hood near the center.
Slide your hand to the lef t until
you f eel the hood latch handle.
Push this handle up to release it.
Lif t up the hood.
If the hood latch handle moves
stif f ly, or if you can open the hood
without lifting the handle, the
mechanism should be cleaned and
lubricated. To close the hood, lif t it up slightly
to remove the support rod f rom
the hole. Put the support rod back
into its holding clip. Lower the
hood to about a f oot (30 cm) above
the fender, then let it drop. Make
sure it is securely latched.Remove the dipstick (orange
handle).
Wipe of f the dipstick with a clean
cloth or paper towel.
Insert the dipstick all the way back
into its hole.
Holding the grip, pull the support
rod out of its clip. Insert the end
into the designated hole pointed
by an arrow in the hood.
3.
1. 2.
3.
2.
CONT INUED
Service Station Procedures
Oil Check
Bef ore Driving
189
DIPSTICK
CLIP
LATCH GRIP
SUPPORT ROD DX, Canadian DX-G, LX, EX, EX-L
�����—�����—�
�
�y�
���������
���y���
�(�+���������y���
�����y
Page 174 of 303

Wait a f ew minutes af ter turning the
engine of f bef ore you check the oil.
Put your f ingers under the f ront
edge of the hood near the center.
Slide your hand to the lef t until
you f eel the hood latch handle.
Push this handle up to release it.
Lif t up the hood.
If the hood latch handle moves
stif f ly, or if you can open the hood
without lifting the handle, the
mechanism should be cleaned and
lubricated. To close the hood, lif t it up slightly
to remove the support rod f rom
the hole. Put the support rod back
into its holding clip. Lower the
hood to about a f oot (30 cm) above
the fender, then let it drop. Make
sure it is securely latched.Remove the dipstick (orange
handle).
Wipe of f the dipstick with a clean
cloth or paper towel.
Insert the dipstick all the way back
into its hole.
Holding the grip, pull the support
rod out of its clip. Insert the end
into the designated hole pointed
by an arrow in the hood.
3.
1. 2.
3.
2.
CONT INUED
Service Station Procedures
Oil Check
Bef ore Driving
189
DIPSTICK
CLIP
LATCH GRIP
SUPPORT ROD DX, Canadian DX-G, LX, EX, EX-L
�����—�����—�
�
�y�
���������
���y���
�(�+���������y���
�����y
Page 175 of 303
Remove the dipstick again, and
check the level. It should be
between the upper and lower
marks.If it is near or below the lower mark,
see on page .
4.
234
Service Station Procedures
A dding Engine Oil
190
LOWER MARK
UPPER MARK Si
Si DIPSTICK
UPPER MARK
LOWER MARK
DX, Canadian DX-G, LX, EX, EX-L
�����—�����—�
�
�y�
���������
���y���
�(�+���������y���
�����y