2008 GREAT WALL FLORID steering wheel
[x] Cancel search: steering wheelPage 123 of 281

Downloaded from www.Manualslib.com manuals search engine GWFLORID Maintenance Manual116
3. Examine the front hub flange plate surface runout.
Examining methods are the same as the methods used
during disassembly. Plate surface runout should not exceed
0.03 mm.
4. Examine the front hub bearing assembly's starting
torque.
Examining methods are the same as the methods used during
disassembly. Put the SST on the wheel bolts which are at the
symmetrical locations. Put a dial torque wrench on the SST to
slowly rotate the flange's flange assembly (45°/4s), which re-
quires a starting torque range of 0.1-0.3 N·m
5. Install the snap ring for hole 72.
Use a bent nose retaining ring caliper for holes to install the
snap ring for hole 72 at the steering knuckle's retaining ring
mounting position.
6. Install the steering knuckle's front hub bearing and
front hub flange assembly.
7. Install the front brake disc cover.
Install the front brake disc cover on the steering knuckle, and
tighten the bolt to the set torque.
Tightening torque: 9±2 N·m
SST
8. Install the front brake disc.
Page 124 of 281

Downloaded from www.Manualslib.com manuals search engine 117Brake System
9. Examine the front brake disc plate surface runout.
When measuring, tighten the two wheel nut's symmetrical
locations. The front brake disc's brake linings runout on the
two sides should be less than 0.11 mm.
10. Install the brake caliper assembly.
Install the brake caliper on the steering knuckle, and tighten
the bolt according to the set torque.
Tightening torque: 100±10 N·m
Page 142 of 281

Downloaded from www.Manualslib.com manuals search engine 135Steering System
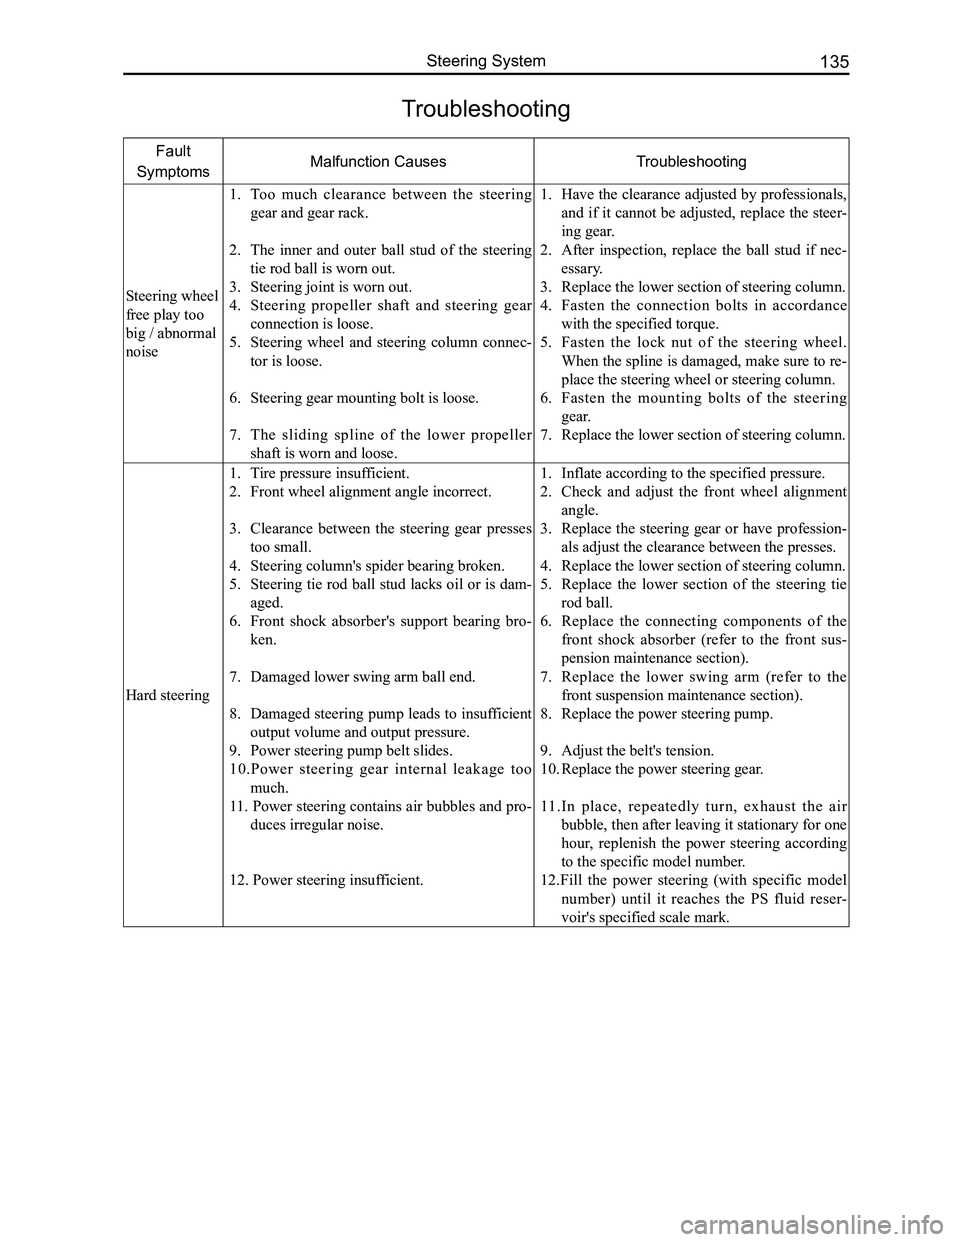
Troubleshooting
Fault
SymptomsMalfunction CausesTroubleshooting
Steering wheel
free play too
big / abnormal
noise
1. Too much clearance between the steering
gear and gear rack.
2. The inner and outer ball stud of the steering
tie rod ball is worn out.
3. Steering joint is worn out.
4. Steering propeller shaft and steering gear
connection is loose.
5. Steering wheel and steering column connec-
tor is loose.
6. Steering gear mounting bolt is loose.
7. The sliding spline of the lower propeller
shaft is worn and loose.
1. Have the clearance adjusted by professionals,
and if it cannot be adjusted, replace the steer-
ing gear.
2. After inspection, replace the ball stud if nec-
essary.
3. Replace the lower section of steering column.
4. Fasten the connection bolts in accordance
with the specified torque.
5. Fasten the lock nut of the steering wheel.
When the spline is damaged, make sure to re-
place the steering wheel or steering column.
6. Fasten the mounting bolts of the steering
gear.
7. Replace the lower section of steering column.
Hard steering
1. Tire pressure insufficient.
2. Front wheel alignment angle incorrect.
3. Clearance between the steering gear presses
too small.
4. Steering column's spider bearing broken.
5. Steering tie rod ball stud lacks oil or is dam-
aged.
6. Front shock absorber's support bearing bro-
ken.
7. Damaged lower swing arm ball end.
8. Damaged steering pump leads to insufficient
output volume and output pressure.
9. Power steering pump belt slides.
10.Power steering gear internal leakage too
much.
11. Power steering contains air bubbles and pro-
duces irregular noise.
12. Power steering insufficient.
1. Inflate according to the specified pressure.
2. Check and adjust the front wheel alignment
angle.
3. Replace the steering gear or have profession-
als adjust the clearance between the presses.
4. Replace the lower section of steering column.
5. Replace the lower section of the steering tie
rod ball.
6. Replace the connecting components of the
front shock absorber (refer to the front sus-
pension maintenance section).
7. Replace the lower swing arm (refer to the
front suspension maintenance section).
8. Replace the power steering pump.
9. Adjust the belt's tension.
10. Replace the power steering gear.
11.In place, repeatedly turn, exhaust the air
bubble, then after leaving it stationary for one
hour, replenish the power steering according
to the specific model number.
12.Fill the power steering (with specific model
number) until it reaches the PS fluid reser-
voir's specified scale mark.
Page 143 of 281

Downloaded from www.Manualslib.com manuals search engine GWFLORID Maintenance Manual136
Fault
SymptomsMalfunction CausesTroubleshooting
Poor steering
return
Straight
movement
stability poor
1. Tire pressure insufficient.
2. Wheel counterweight falls off or other fac-
tors cause extremely poor wheel balance.
3. Lower swing arm's rubber bushing is too old,
big difference between the left and right's
rigidity.
4. The front shock absorber's support bearing
and lower swing arm ball lacks sufficient lu-
brications.
5. The four wheels' positional parameters incor-
rect.
6. Steering gear's gear rack meshing condition
worsens and causes intense reverse resis-
tance.
7. Steering column bearing and spider bearing
damaged.
8. Power steering pump's oil supply insuffi-
cient.
9. Inner portion of the steering gear's control
valve performance degradation.
1. Inflate according to the specified pressure.
2. Recalibrate the wheel's dynamic balance.
3. Replace the lower swing arm.
4. Fill with grease of the specified model num-
ber.
5. Re-measure and adjust the four wheels' posi-
tional parameters.
6. Replace the steering gear.
7. Replace the steering column assembly.
8. Replace the power steering pump.
9. Replace the power steering gear.
Page 144 of 281

Downloaded from www.Manualslib.com manuals search engine 137Steering System
Steering System Maintenance
Structure Introduction
The steering wheel has an airbag module which should only be inspected and repaired by a professional. The
steering column's upper section adopts a steel deformation and energy absorbing crumple structure which
ensures collision protection for the driver. The lower section uses a high precision sliding spline structure,
which can effectively eliminate structural interference caused by body deformation. The steering column angle
is adjustable, which can more easily adapt to the driver, and at the same time possesses reasonable reverse
efficiency to ensure the driver has a good feel for the road. Steering sys\
tem is as shown below:
Steering column assembly removal and
installation
1. Remove the airbag.
(a) Disconnect the battery's negative cable, and wait for
one minute before canceling the airbags function in
order to avoid unnecessary injury.
(b) To ensure steering column's proper installation, during
the entire removal process, the front tires must keep
straight.
(c) Remove the two hexagon screws and the airbag module.
Hexagon screw
Steering wheel
Steering column
Steering propeller shaft
PS fluid reservoir
Power steering pumpBelt
Power steering gearSteering combination pipe
Steering propeller shaft connector jacket assembly
Steering dust cover
Steering protection plate
Page 145 of 281

Downloaded from www.Manualslib.com manuals search engine GWFLORID Maintenance Manual138
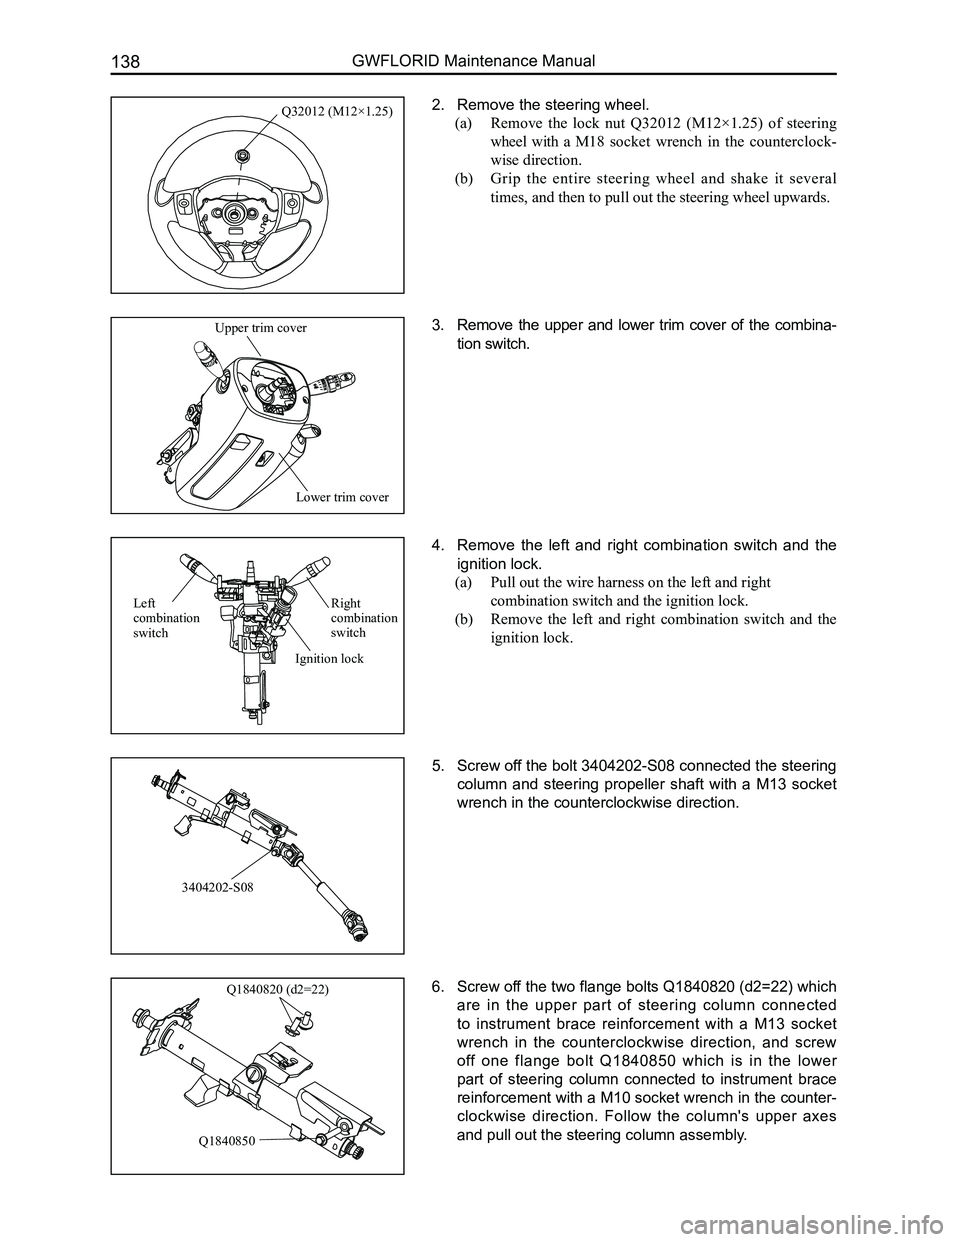
2. Remove the steering wheel.
(a) Remove the lock nut Q32012 (M12×1.25) of steering
wheel with a M18 socket wrench in the counterclock-
wise direction.
(b) Grip the entire steering wheel and shake it several
times, and then to pull out the steering wheel upwards.
3. Remove the upper and lower trim cover of the combina-
tion switch.
4. Remove the left and right combination switch and the
ignition lock.
(a) Pull out the wire harness on the left and right
combination switch and the ignition lock.
(b) Remove the left and right combination switch and the
ignition lock.
5. Screw off the bolt 3404202-S08 connected the steering
column and steering propeller shaft with a M13 socket
wrench in the counterclockwise direction.
6. Screw off the two flange bolts Q1840820 (d2=22) which
are in the upper part of steering column connected
to instrument brace reinforcement with a M13 socket
wrench in the counterclockwise direction, and screw
off one flange bolt Q1840850 which is in the lower
part of steering column connected to instrument brace
reinforcement with a M10 socket wrench in the counter-
clockwise direction. Follow the column's upper axes
and pull out the steering column assembly.
Q32012 (M12×1.25)
Lower trim cover
Upper trim cover
3404202-S08
Q1840820 (d2=22)
Q1840850
Right combination switch
Left combination switch
Ignition lock
Page 146 of 281

Downloaded from www.Manualslib.com manuals search engine 139Steering System
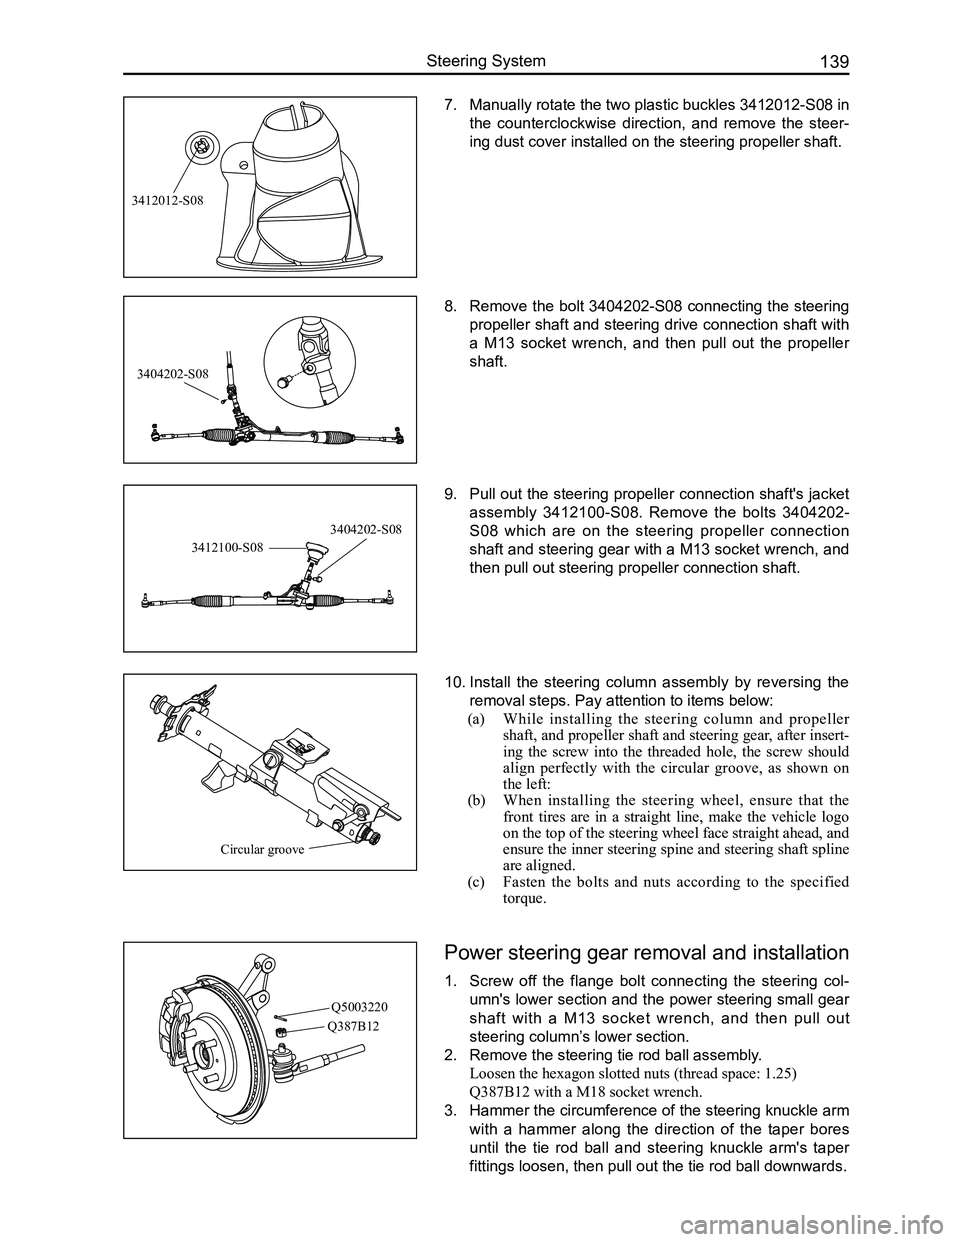
7. Manually rotate the two plastic buckles 3412012-S08 in
the counterclockwise direction, and remove the steer-
ing dust cover installed on the steering propeller shaft.
8. Remove the bolt 3404202-S08 connecting the steering
propeller shaft and steering drive connection shaft with
a M13 socket wrench, and then pull out the propeller
shaft.
9. Pull out the steering propeller connection shaft's jacket
assembly 3412100-S08. Remove the bolts 3404202-
S08 which are on the steering propeller connection
shaft and steering gear with a M13 socket wrench, and
then pull out steering propeller connection shaft.
10. Install the steering column assembly by reversing the
removal steps. Pay attention to items below:
(a) While installing the steering column and propeller
shaft, and propeller shaft and steering gear, after insert-
ing the screw into the threaded hole, the screw should
align perfectly with the circular groove, as shown on
the left:
(b) When installing the steering wheel, ensure that the
front tires are in a straight line, make the vehicle logo
on the top of the steering wheel face straight ahead, and
ensure the inner steering spine and steering shaft spline
are aligned.
(c) Fasten the bolts and nuts according to the specified
torque.
3412012-S08
Circular groove
3412100-S08
3404202-S08
Power steering gear removal and installation
1. Screw off the flange bolt connecting the steering col-
umn's lower section and the power steering small gear
shaft with a M13 socket wrench, and then pull out
steering column’s lower section.
2. Remove the steering tie rod ball assembly.
Loosen the hexagon slotted nuts (thread space: 1.25)
Q387B12 with a M18 socket wrench.
3. Hammer the circumference of the steering knuckle arm
with a hammer along the direction of the taper bores
until the tie rod ball and steering knuckle arm's taper
fittings loosen, then pull out the tie rod ball downwards.
Q5003220
Q387B12
3404202-S08
Page 148 of 281

Downloaded from www.Manualslib.com manuals search engine 141Steering System
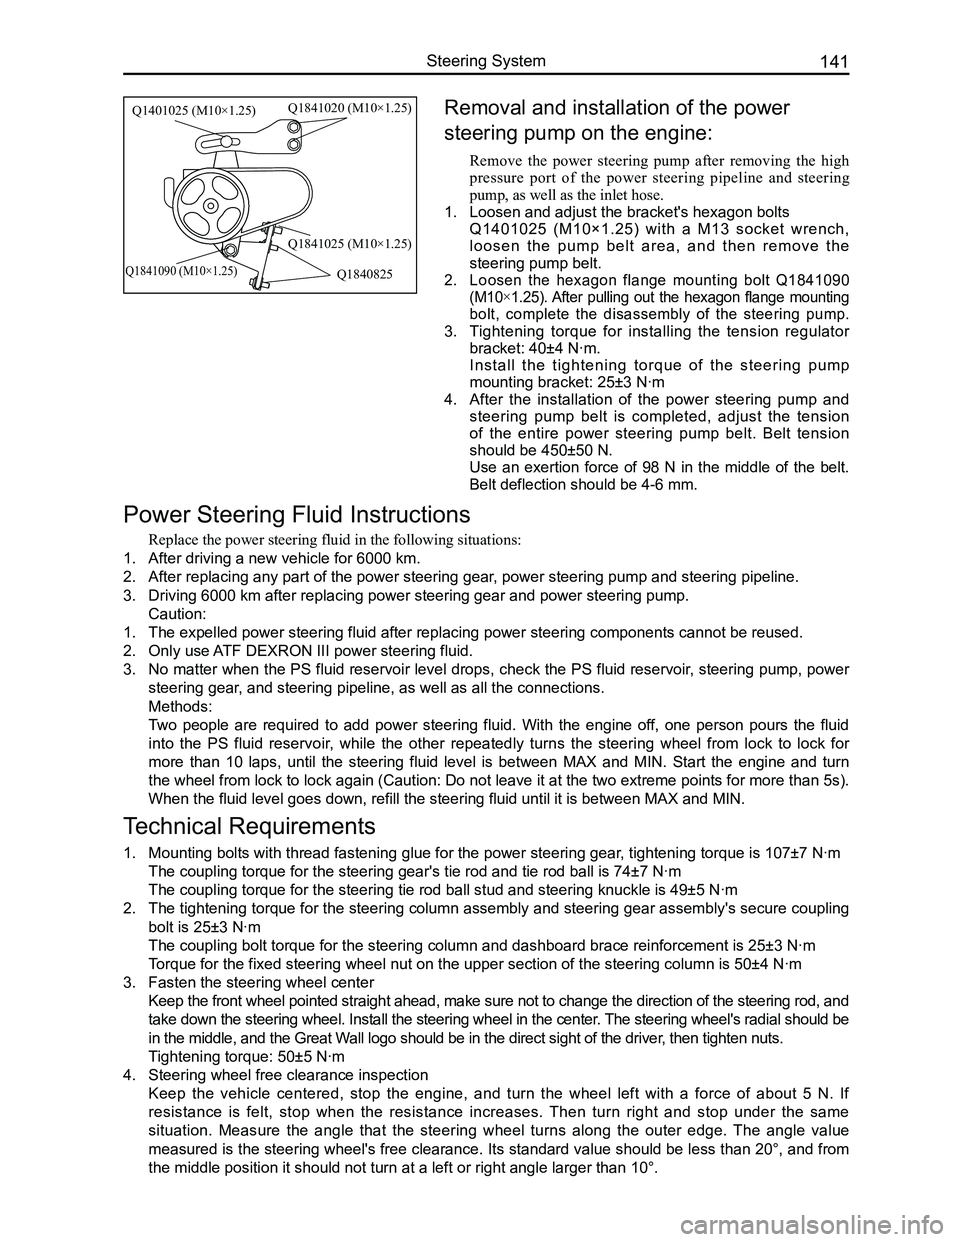
Removal and installation of the power
steering pump on the engine:
Remove the power steering pump after removing the high
pressure port of the power steering pipeline and steering
pump, as well as the inlet hose.
1. Loosen and adjust the bracket's hexagon bolts
Q1401025 (M10×1.25) with a M13 socket wrench,
l o o s e n t h e p u m p b e l t a r e a , a n d t h e n r e m o v e t h e
steering pump belt.
2. Loosen the hexagon flange mounting bolt Q1841090
(M10×1.25). After pulling out the hexagon flange mounting
bolt, complete the disassembly of the steering pump.
3. Tightening torque for installing the tension regulator
bracket: 40±4 N·m.
Install the tightening torque of the steering pump
mounting bracket: 25±3 N·m
4. After the installation of the power steering pump and
steering pump belt is completed, adjust the tension
of the entire power steering pump belt. Belt tension
should be 450±50 N.
Use an exertion force of 98 N in the middle of the belt.
Belt deflection should be 4-6 mm.
Power Steering Fluid Instructions
Replace the power steering fluid in the following situations:
1. After driving a new vehicle for 6000 km.
2. After replacing any part of the power steering gear, power steering pump and steering pipeline.
3. Driving 6000 km after replacing power steering gear and power steering p\
ump.
Caution:
1. The expelled power steering fluid after replacing power steering compone\
nts cannot be reused.
2. Only use ATF DEXRON III power steering fluid.
3. No matter when the PS fluid reservoir level drops, check the PS fluid reservoir, steering pump, power
steering gear, and steering pipeline, as well as all the connections.
Methods:
Two people are required to add power steering fluid. With the engine off, one person pours the fluid
into the PS fluid reservoir, while the other repeatedly turns the steering wheel from lock to lock for
more than 10 laps, until the steering fluid level is between MAX and MIN. Start the engine and turn
the wheel from lock to lock again (Caution: Do not leave it at the two extreme points for more than 5s).
When the fluid level goes down, refill the steering fluid until it is be\
tween MAX and MIN.
Technical Requirements
1. Mounting bolts with thread fastening glue for the power steering gear, tightening torque is 107±7 N·m
The coupling torque for the steering gear's tie rod and tie rod ball is \
74±7 N·m
The coupling torque for the steering tie rod ball stud and steering knuc\
kle is 49±5 N·m
2. The tightening torque for the steering column assembly and steering gear assembly's secure coupling
bolt is 25±3 N·m
The coupling bolt torque for the steering column and dashboard brace rei\
nforcement is 25±3 N·m
Torque for the fixed steering wheel nut on the upper section of the steer\
ing column is 50±4 N·m
3. Fasten the steering wheel center
Keep the front wheel pointed straight ahead, make sure not to change the direction of the steering rod, and
take down the steering wheel. Install the steering wheel in the center. The steering wheel's radial should be
in the middle, and the Great Wall logo should be in the direct sight of the driver, then tighten nuts.
Tightening torque: 50±5 N·m
4. Steering wheel free clearance inspection
Keep the vehicle centered, stop the engine, and turn the wheel left with a force of about 5 N. If
resistance is felt, stop when the resistance increases. Then turn right and stop under the same
situation. Measure the angle that the steering wheel turns along the outer edge. The angle value
measured is the steering wheel's free clearance. Its standard value should be less than 20°, and from
the middle position it should not turn at a left or right angle larger t\
han 10°.
Q1401025 (M10×1.25)Q1841020 (M10×1.25)
Q1841025 (M10×1.25)
Q1840825Q1841090 (M10×1.25)