2008 GEELY MK battery
[x] Cancel search: batteryPage 311 of 416

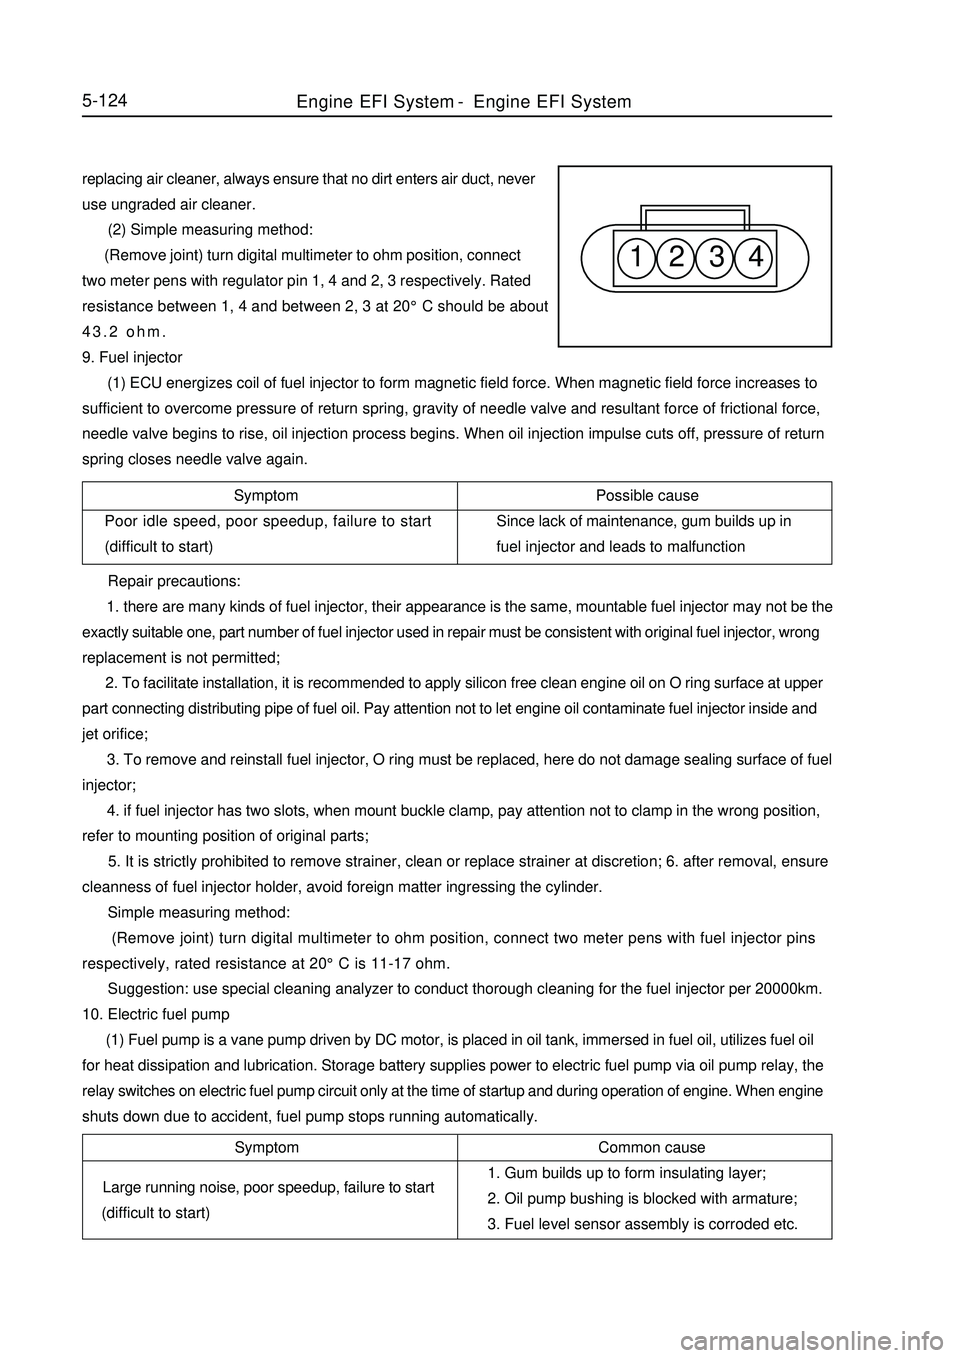
1 2 3 45-124replacing air cleaner, always ensure that no dirt enters air duct, never
use ungraded air cleaner.
(2) Simple measuring method:
(Remove joint) turn digital multimeter to ohm position, connect
two meter pens with regulator pin 1, 4 and 2, 3 respectively. Rated
resistance between 1, 4 and between 2, 3 at 20°C should be about
43.2 ohm.
9. Fuel injector
(1) ECU energizes coil of fuel injector to form magnetic field force. When magnetic field force increases to
sufficient to overcome pressure of return spring, gravity of needle valve and resultant force of frictional force,
needle valve begins to rise, oil injection process begins. When oil injection impulse cuts off, pressure of return
spring closes needle valve again.
Symptom
Poor idle speed, poor speedup, failure to start
(difficult to start)Possible cause
Since lack of maintenance, gum builds up in
fuel injector and leads to malfunction
Repair precautions:
1. there are many kinds of fuel injector, their appearance is the same, mountable fuel injector may not be the
exactly suitable one, part number of fuel injector used in repair must be consistent with original fuel injector, wrong
replacement is not permitted;
2. To facilitate installation, it is recommended to apply silicon free clean engine oil on O ring surface at upper
part connecting distributing pipe of fuel oil. Pay attention not to let engine oil contaminate fuel injector inside and
jet orifice;
3. To remove and reinstall fuel injector, O ring must be replaced, here do not damage sealing surface of fuel
injector;
4. if fuel injector has two slots, when mount buckle clamp, pay attention not to clamp in the wrong position,
refer to mounting position of original parts;
5. It is strictly prohibited to remove strainer, clean or replace strainer at discretion; 6. after removal, ensure
cleanness of fuel injector holder, avoid foreign matter ingressing the cylinder.
Simple measuring method:
(Remove joint) turn digital multimeter to ohm position, connect two meter pens with fuel injector pins
respectively, rated resistance at 20°C is 11-17 ohm.
Suggestion: use special cleaning analyzer to conduct thorough cleaning for the fuel injector per 20000km.
10. Electric fuel pump
(1) Fuel pump is a vane pump driven by DC motor, is placed in oil tank, immersed in fuel oil, utilizes fuel oil
for heat dissipation and lubrication. Storage battery supplies power to electric fuel pump via oil pump relay, the
relay switches on electric fuel pump circuit only at the time of startup and during operation of engine. When engine
shuts down due to accident, fuel pump stops running automatically.Symptom
Large running noise, poor speedup, failure to start
(difficult to start)Common cause
1. Gum builds up to form insulating layer;
2. Oil pump bushing is blocked with armature;
3. Fuel level sensor assembly is corroded etc.Engine EFI System-Engine EFI System
Page 313 of 416

Engine ECU5-126as to avoid damaging electronic control unit.
(1) Simple measuring method:
(Remove joint) turn digital multimeter to ohm position, connect two meter pens with primary winding pinsrespectively, rated resistance at 2 0°C is 0. 4-0. 6 ohm for 2X2 type; on secondary winding, 11-15k ohm for 2x2 type.13. Electronic control unit ECU
Possible cause
Electric overload of externally connected
device leads to burnout of components inside
ECU and results in malfunction Symptom
Unsteady idle speed, poor speedup, failure to start, too high
idle, tail gas overproof, difficult to start, malfunction of air
conditioner, malfunction of fuel injector control, flameout
Repair precautions:
1. Don't remove ECU at discretion during repair;
2. ECU may be removed more than 1 minute after removing storage battery head;
3. Store removed ECU properly;
4. It is prohibited to attach any circuit onto connecting wire of ECU.
Simple measuring method:
1. (Connect joint) use engine data K-line to read engine trouble record;
2. (Remove joint) check whether ECU connecting wire is in good condition or not, mainly check whether ECU
power supply grounded circuit is normal or not;
3. Check whether external sensor works normally, whether output signal is credible, whether circuit is in good
condition;
4. Check whether actuator works normally, whether its circuit is in good condition;
5. Finally replace ECU to conduct test.
Judgment principle: "two interchange principle" ---interchange ECU, interchange fault symptom.III. Diagnostic system Description:
When engine ECU detects a trouble, engine trouble warning lamp on instrument will illuminate. In addition,
relevant diagnostic code will be recorded in ECU memory. Connect handheld tester with diagnostic interface on
automobile, read various data from automobile ECU. Connect handheld tester with diagnostic interface. Technical
personnel may also read fault code via blinking of instrument fault warning lamp.Engine EFI System-
Engine EFI System
Page 315 of 416

No
1
2
3
4
5
6
7
8
9
10
11
12
13
14
15
16
17
18
19
20
21
22
23
24
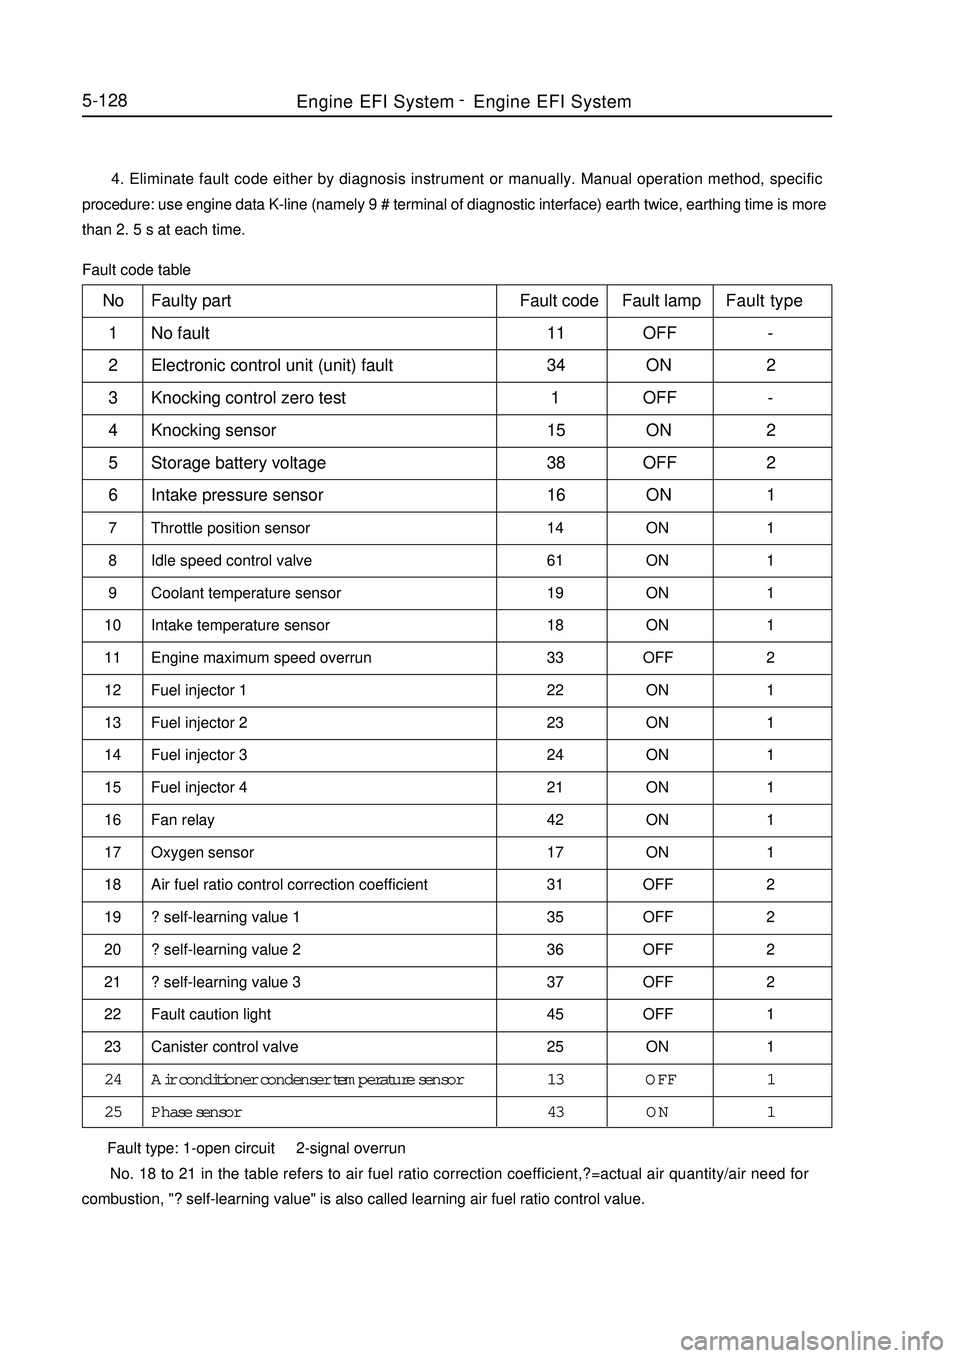
255-128 4. Eliminate fault code either by diagnosis instrument or manually. Manual operation method, specific
procedure: use engine data K-line (namely 9 # terminal of diagnostic interface) earth twice, earthing time is more
than 2. 5 s at each time.
Fault code tableFaulty part
No fault
Electronic control unit (unit) fault
Knocking control zero test
Knocking sensor
Storage battery voltage
Intake pressure sensor
Throttle position sensor
Idle speed control valve
Coolant temperature sensor
Intake temperature sensor
Engine maximum speed overrun
Fuel injector 1
Fuel injector 2
Fuel injector 3
Fuel injector 4
Fan relay
Oxygen sensor
Air fuel ratio control correction coefficient
? self-learning value 1
? self-learning value 2
? self-learning value 3
Fault caution light
Canister control valve
Air conditioner condenser temperature sensor
Phase sensorFault code
11
34
1
15
38
16
14
61
19
18
33
22
23
24
21
42
17
31
35
36
37
45
25
13
43Fault lamp
OFF
ON
OFF
ON
OFF
ON
ON
ON
ON
ON
OFF
ON
ON
ON
ON
ON
ON
OFF
OFF
OFF
OFF
OFF
ON
OFF
ONFault type
-
2
-
2
2
1
1
1
1
1
2
1
1
1
1
1
1
2
2
2
2
1
1
1
1
Fault type: 1-open circuit 2-signal overrun
No. 18 to 21 in the table refers to air fuel ratio correction coefficient,?=actual air quantity/air need for
combustion, "? self-learning value" is also called learning air fuel ratio control value.Engine EFI System-
Engine EFI System
Page 324 of 416

Section 2 Remote TransmitterI. Replacement of remote transmitter battery Note:
Be very careful during operation, so as to avoid damaging
electronic components in the remote transmitter. When replacing the
battery, don't bend or contaminate electric pole, otherwise poor
contact might occur.1
2
3 ( 3 ) Disconnect the connector
Repair precautions:
If a new centralized controller is replaced, it must be encoded again, only in this way could remote controller
use it normally.
We may adopt the method of replacing centralized controller to determine whether there is any fault.5-137Centralized Controller System-Remote Transmitter 1. Unclench the remote transmitter housing with flat-tip screw
driver or similar tool.
2.press down the battery edge and take out the battery.
3.When replacing, please use CR2032 lithium battery or the same
class product.Ensure the new battery with anode upward.The re-
mote transmitter housing must be firmly encased.
After replacing the battery, check the remote transmitter operates
normally,
Page 326 of 416

(1) Check conductibility of the switch.
Standard
Switch position Terminal Result
On driver side
On front passenger side
Left rear
Right rear
Window locking switchUP 12--13 ON
DOWN12---14 ON
UP 12---5 ON
DOWN12---6 ON
UP 12---9 ON
DOWN12---10 ON
UP 12---1 ON
DOWN12---2 ON
Lock12---3 ON
Unlock12---3 OFFResult
Indicator lamp
illuminates If it does not meet stipulation, replace this switch.
(2) Check indicator lamp on glass riser switch on driver side
Storage battery may be connected with terminal of indicator
lamp directly (as shown in the figure)
Standard
If it does not meet stipulation, replace this switch.
3. Other window glass riser switches (passenger side, left rear, right rear)Door Glass Regulating and Power Door Lock Control-
Door Glass Regulating System5-137Connecting condition
Battery positive - terminal 11
Battery negative - terminal 12Other glass regulator switches
Page 327 of 416

Measuring condition
On driver side,
rear right side
On front passen-
ger side, rear left
sideClockwise
Anticlockwise
Clockwise
Anticlockwise Battery positive -1
Battery negative -2
Battery positive -2
Battery negative -1
Battery positive -2
Battery negative -1
Battery positive -1
Battery negative -2 If it does not meet stipulation, replace this switch.
4. Check door glass riser motor
Notes:
(1) Detect door glass riser motor on driver side and on right rear
side following the same steps.
(2) Detect door glass riser motor on front passenger side and on
left rear side following the same steps.
(3) Connect door glass riser motor terminal with storage
battery, check operation of the motor.
StandardSwitch position Terminal Result
UP 5-7 ON
DOWN 5-8 ONConnecting condition Result
Battery positive - terminal 4
Battery negative - terminal 2 (1) Check conductibility of the switch.
Standard
If it does not meet stipulation, replace this switch.
(2) Check indicator lamp on switch
StandardDoor Glass Regulating and Power Door Lock Control-
Door Glass Regulating System5-140Indicator lamp illumi-
natesStipulationsDriver side, right rear side
Driving
shaft
Anticlockwise
Clockwise
Front passenger side, left rear side
Clockwise
Anticlockwise
Driving shaft
Page 329 of 416

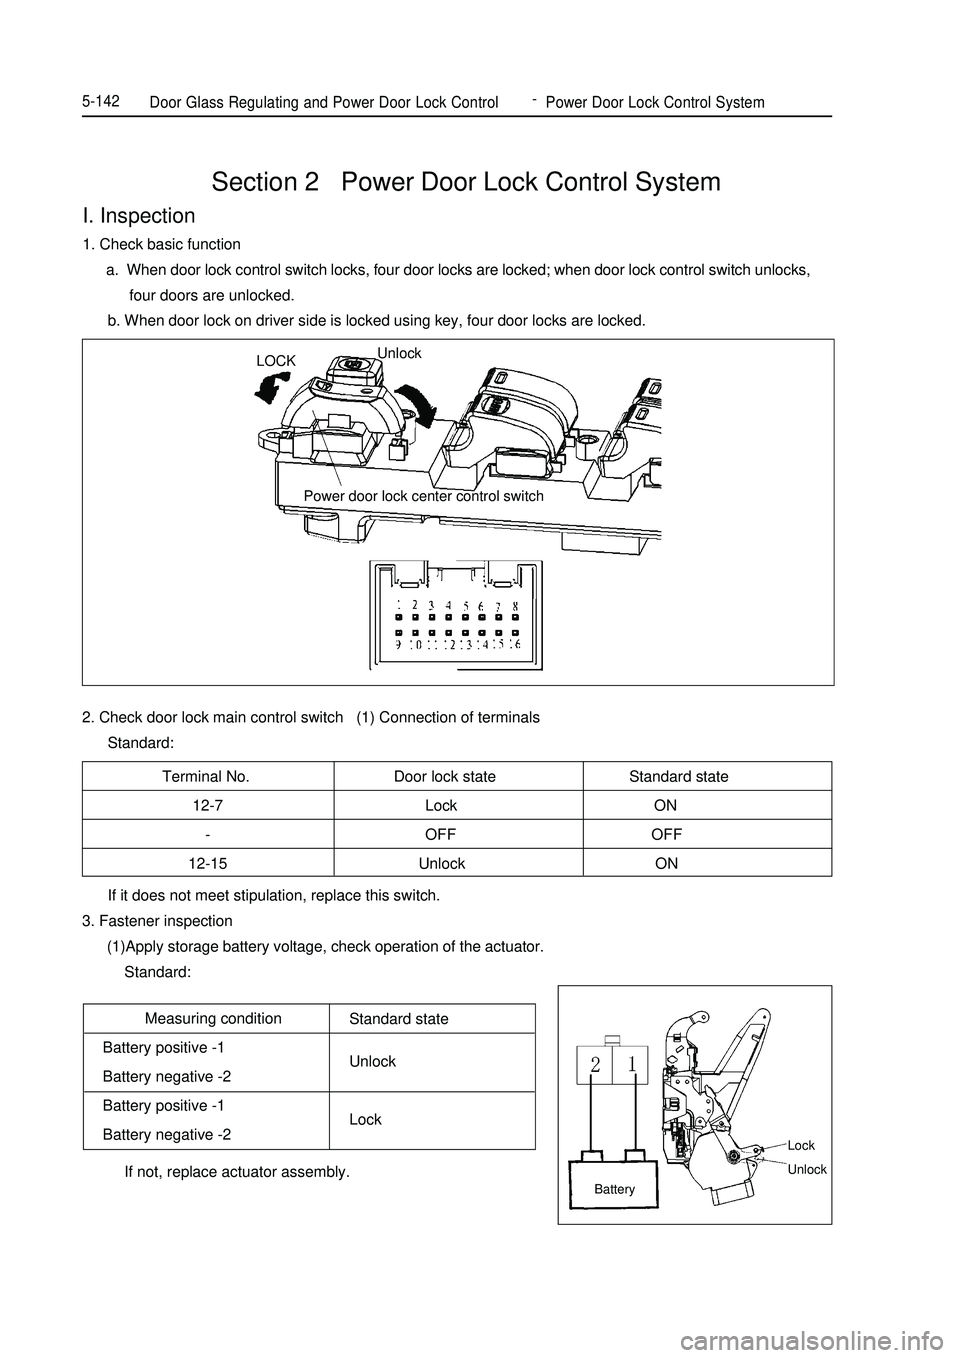
2. Check door lock main control switch (1) Connection of terminals
Standard:Section 2 Power Door Lock Control SystemI. Inspection1. Check basic function
a. When door lock control switch locks, four door locks are locked; when door lock control switch unlocks,
four doors are unlocked.
b. When door lock on driver side is locked using key, four door locks are locked.Terminal No. Door lock state Standard state
12-7 Lock ON
- OFF OFF
12-15 Unlock ONMeasuring condition
Battery positive -1
Battery negative -2
Battery positive -1
Battery negative -2Door Glass Regulating and Power Door Lock Control-
Power Door Lock Control System5-142 If it does not meet stipulation, replace this switch.
3. Fastener inspection
(1)Apply storage battery voltage, check operation of the actuator.
Standard:
If not, replace actuator assembly.Standard state
Unlock
LockLOCKUnlock
Power door lock center control switchBatteryLock
Unlock
Page 335 of 416

Detach and Mount Front Seat BeltI.Component View40~6040~60
Pulley cover
Lower trim20 Buckle assy.40~60 Front seat assy.Front seat belt
assy. Trim Remote adjuster assy.
for seat beltFront doorsill shieldFront door frame
weather stripRear door frame
weather strip
Rear doorsill shield
N.
m :Specified torque47Interior & Exterior Trim and Accessory
-Front Seat Belt6-6II. Belt replacement
Notes: Installation is basically the reverse of removal and different operation(s) in the process of installation,
if any, will be pointed out specifically.
1. Remove the negative terminal of battery;
2. Detach the front seat assembly;
Loosen the front lock bolt and remove the buckle assembly from inside the front seat;
3. Use the screwdriver to detach the center pillar lower trim; Cut two clips and 4 buckles and remove the trim;