Page 261 of 416

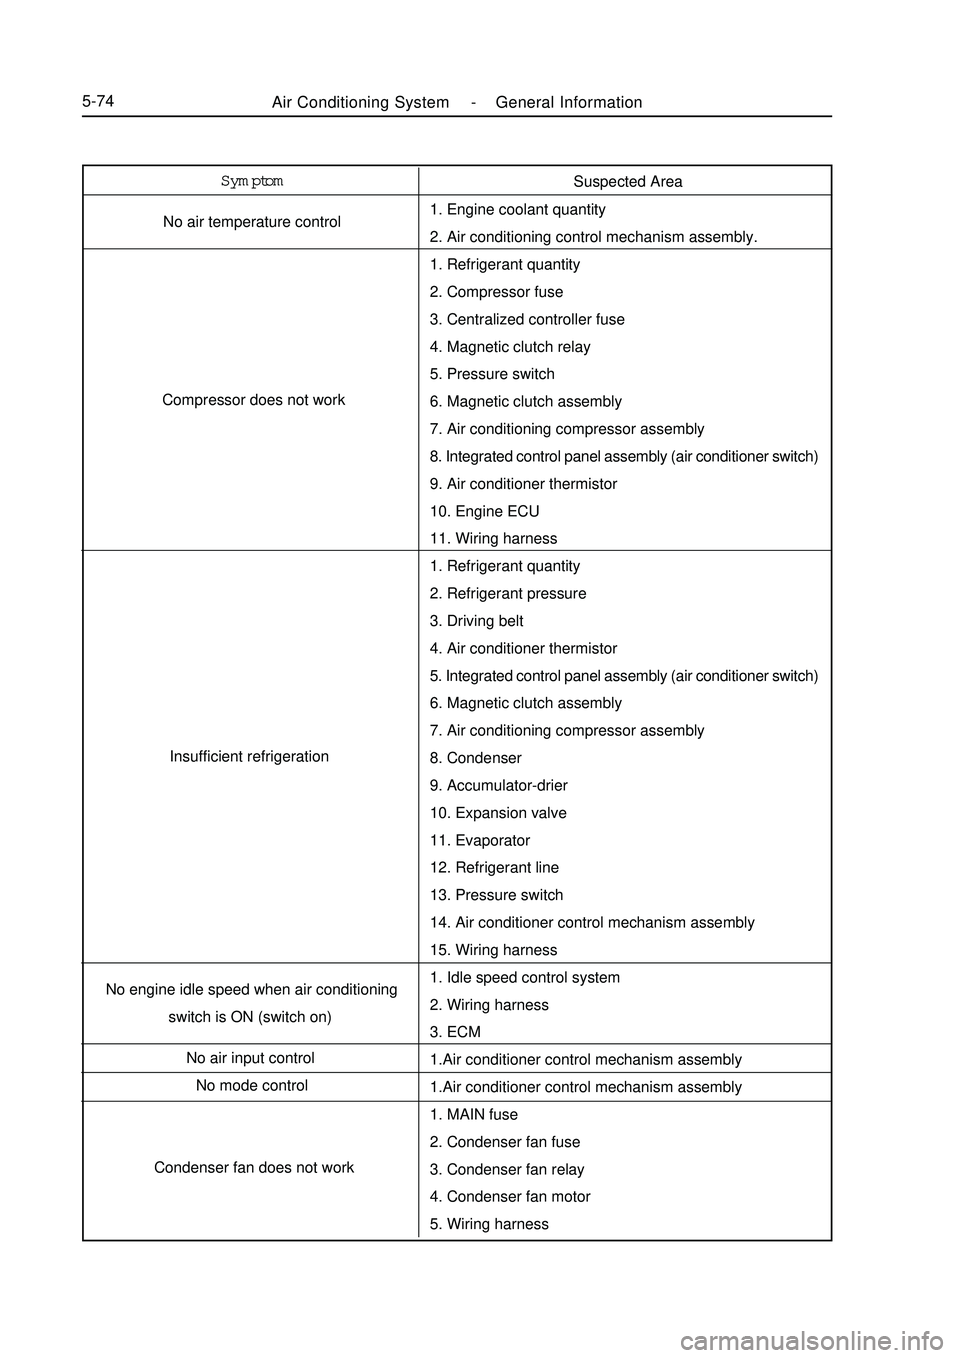
Air Conditioning System -General Information5-74Symptom
No air temperature control
Compressor does not work
Insufficient refrigeration
No engine idle speed when air conditioning
switch is ON (switch on)
No air input control
No mode control
Condenser fan does not workSuspected Area
1. Engine coolant quantity
2. Air conditioning control mechanism assembly.
1. Refrigerant quantity
2. Compressor fuse
3. Centralized controller fuse
4. Magnetic clutch relay
5. Pressure switch
6. Magnetic clutch assembly
7. Air conditioning compressor assembly
8. Integrated control panel assembly (air conditioner switch)
9. Air conditioner thermistor
10. Engine ECU
11. Wiring harness
1. Refrigerant quantity
2. Refrigerant pressure
3. Driving belt
4. Air conditioner thermistor
5. Integrated control panel assembly (air conditioner switch)
6. Magnetic clutch assembly
7. Air conditioning compressor assembly
8. Condenser
9. Accumulator-drier
10. Expansion valve
11. Evaporator
12. Refrigerant line
13. Pressure switch
14. Air conditioner control mechanism assembly
15. Wiring harness
1. Idle speed control system
2. Wiring harness
3. ECM
1.Air conditioner control mechanism assembly
1.Air conditioner control mechanism assembly
1. MAIN fuse
2. Condenser fan fuse
3. Condenser fan relay
4. Condenser fan motor
5. Wiring harness
Page 273 of 416
Section 4 Heater, Ventilation and Air ConditioningComponent View INo. 2 coolant TankNo.1 coolant Pipe Dual Steel Wire Circlip
Exhaust Pipe Exhaust Pipe Seal
RingSeal Ring A/C Head Unit AssemblyAir Conditioning System -Heater, Ventilation and Air Conditioning5-86
Page 275 of 416
Overhaul1. Drain the coolant (refer to Coolant for details).
2. Disconnect A/C pipeline assembly.
(1) Remove the bolt, disconnect A/C pipeline assembly
(2) Remove 2 O-rings form the A/C pipeline assembly.
Notice: O-ring is a non-reusable part.
3. Disconnect the water pipe assembly connecting the heater core.
Loosen the dual steel wire circlip, disconnect the water pipe
connecting the heater core.
4. Remove console assembly
Refer to Interior Trim: Removal of the Console Assembly
5. Remove central cross member assembly
(1) Unscrew the wire harness clip and screw.
(2) Remove the nut and bolt.
(3) Remove cross member assembly.
6. Remove A/C lower left and right air outlet pipe
(1) Unscrew the two clips, disconnect the A/C lower left air outlet
pipe.
(2) Unscrew the two clips, disconnect the A/C lower right air
outlet pipe.5-88clip clipclip
screw,nut and
boltAir Conditioning System ¡ª¡ªHeater, Ventilation and Air Conditioning
Page 281 of 416
Section 7 Compressor AssemblyComponent ViewReplacement1. System drains coolant (refer to Coolant for details)
2. Remove multi-wedge belt (refer to Multi-wedge Belt (A/C Compressor to Crankshaft Pulley for details)).Multi-Wedge Belt 4PK820Tensioner Assembly
Compressor Support
Hexagonal Bolt Spring and
Plate Washer Set (3 Pcs)Hexagonal Bolt
Spring and Plate
Washer Set
Compressor
Assembly
Hexagonal Bolt M8 x105Air Conditioning System -Compressor Assembly5-943. Disconnect the suction vent
(1) Remove the bolt, disconnect the suction vent.
(2) Remove the O-ring from the suction vent.
4. Disconnect the exhaust vent
(1) Remove the bolt, disconnect the exhaust vent.
(2) Remove the O-ring from the exhaust vent.
Notice:
Use vinyl tape seal all the interfaces of the disconnected
parts to avoid entry of water and foreign objects.
O ring is a non-reusable part.Suction port Discharge
port
Page 283 of 416
Section 8 Condenser Fan Motor and Condenser AssemblyOn-board Inspection1. check condenser assembly
(1) if the radiator in the condenser is dirty, wash it with clean water and dry it with compressed air.
(2) if the radiator in the condenser is distorted, use the proper tool to correct it.
2. check the condenser for coolant leakage.
(1) use the leakage tester to check the connection area of the pipeline for leakage.
(2) If there is leakage, check the connector set bolt for tightening condition.Component Viewcondenser fan upper cushion
condenser fan
motor assembly
condenser as-
sembly
condenser lower
cushion condenser fan lower
cushioncondenser upper cushionAir Conditioning System -Condenser Fan Motor and Condenser Assembly5-96
Page 284 of 416
Overhaul1. Drain coolant (refer to Coolant for details).
2. Remove condenser fan motor assembly
(1) Disconnect condenser fan motor wire harness connector.
(2) Unscrew 1 bolt, remove condenser fan motor assembly.
3. Disconnect the liquid tube
(1) Remove the bolt, disconnect the liquid tube from the condenser.
(2) Remove the Oring from the liquid tube.
4. Disconnect the high and low pressure pipe assembly
(1) Remove the bolt, disconnect the high and low pressure tube
assembly from the condenser.
(2) Remove the Oring from the high and low pressure tube
assembly.
Notice: Use vinyl tape seal all the interfaces of the disconnected
parts to avoid entry of water and foreign objects.
5. Remove engine hood lock assembly
(1) remove the bolt, remove engine hood lock assemblyAir Conditioning System -Condenser Fan Motor and Condenser Assembly5-97
Page 308 of 416

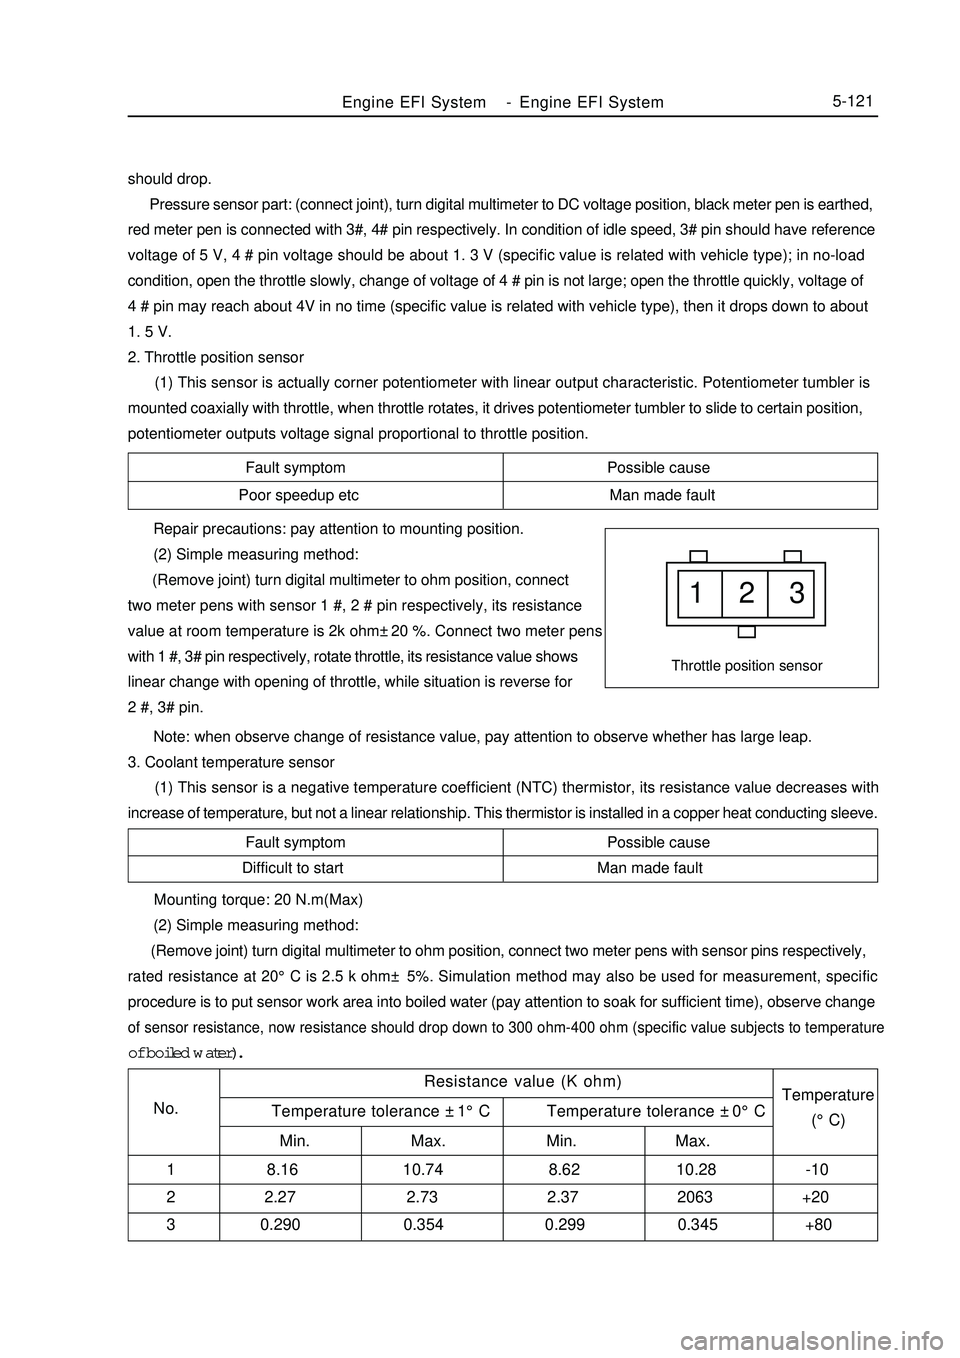
Fault symptom Possible cause
Poor speedup etc Man made fault1 2 3Throttle position sensorFault symptom Possible cause
Difficult to start Man made fault Repair precautions: pay attention to mounting position.
(2) Simple measuring method:
(Remove joint) turn digital multimeter to ohm position, connect
two meter pens with sensor 1 #, 2 # pin respectively, its resistance
value at room temperature is 2k ohm±20 %. Connect two meter pens
with 1 #, 3# pin respectively, rotate throttle, its resistance value shows
linear change with opening of throttle, while situation is reverse for
2 #, 3# pin.
Note: when observe change of resistance value, pay attention to observe whether has large leap.
3. Coolant temperature sensor
(1) This sensor is a negative temperature coefficient (NTC) thermistor, its resistance value decreases with
increase of temperature, but not a linear relationship. This thermistor is installed in a copper heat conducting sleeve.Engine EFI System-Engine EFI System5-121should drop.
Pressure sensor part: (connect joint), turn digital multimeter to DC voltage position, black meter pen is earthed,
red meter pen is connected with 3#, 4# pin respectively. In condition of idle speed, 3# pin should have reference
voltage of 5 V, 4 # pin voltage should be about 1. 3 V (specific value is related with vehicle type); in no-load
condition, open the throttle slowly, change of voltage of 4 # pin is not large; open the throttle quickly, voltage of
4 # pin may reach about 4V in no time (specific value is related with vehicle type), then it drops down to about
1. 5 V.
2. Throttle position sensor
(1) This sensor is actually corner potentiometer with linear output characteristic. Potentiometer tumbler is
mounted coaxially with throttle, when throttle rotates, it drives potentiometer tumbler to slide to certain position,
potentiometer outputs voltage signal proportional to throttle position. Mounting torque: 20 N.m(Max)
(2) Simple measuring method:
(Remove joint) turn digital multimeter to ohm position, connect two meter pens with sensor pins respectively,rated resistance at 20°C is 2.5 k ohm± 5%. Simulation method may also be used for measurement, specificprocedure is to put sensor work area into boiled water (pay attention to soak for sufficient time), observe changeof sensor resistance, now resistance should drop down to 300 ohm-400 ohm (specific value subjects to temperatureof boiled water).
Resistance value (K ohm)
No.Temperature
(°C) Temperature tolerance ±1°C Temperature tolerance ±0°C
Min. Max. Min. Max.
1 8.16 10.74 8.62 10.28 -10
2 2.27 2.73 2.37 2063 +20
3 0.290 0.354 0.299 0.345 +80
Page 315 of 416

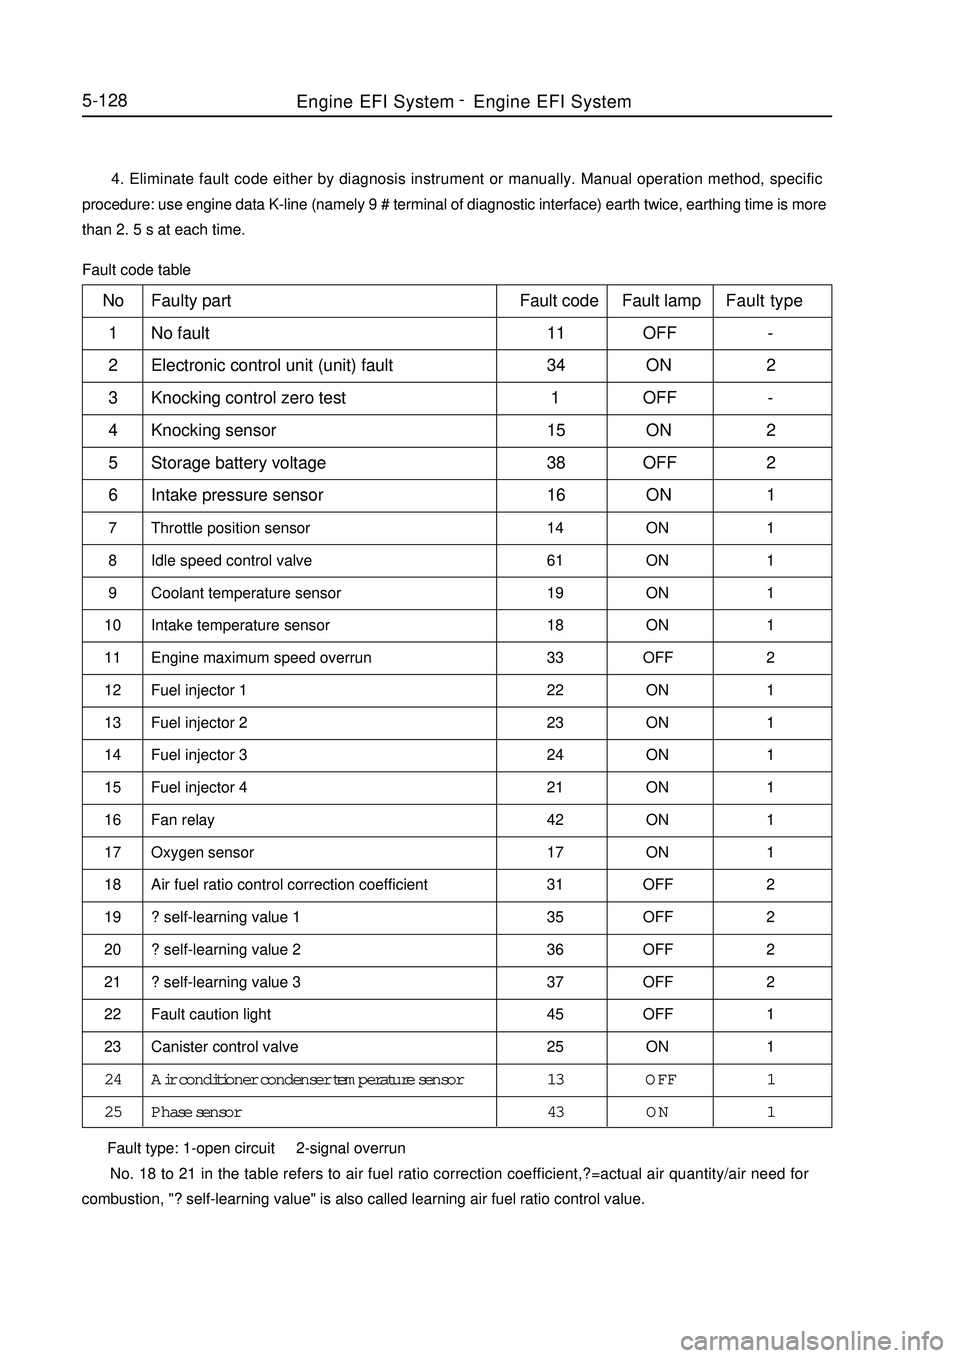
No
1
2
3
4
5
6
7
8
9
10
11
12
13
14
15
16
17
18
19
20
21
22
23
24
255-128 4. Eliminate fault code either by diagnosis instrument or manually. Manual operation method, specific
procedure: use engine data K-line (namely 9 # terminal of diagnostic interface) earth twice, earthing time is more
than 2. 5 s at each time.
Fault code tableFaulty part
No fault
Electronic control unit (unit) fault
Knocking control zero test
Knocking sensor
Storage battery voltage
Intake pressure sensor
Throttle position sensor
Idle speed control valve
Coolant temperature sensor
Intake temperature sensor
Engine maximum speed overrun
Fuel injector 1
Fuel injector 2
Fuel injector 3
Fuel injector 4
Fan relay
Oxygen sensor
Air fuel ratio control correction coefficient
? self-learning value 1
? self-learning value 2
? self-learning value 3
Fault caution light
Canister control valve
Air conditioner condenser temperature sensor
Phase sensorFault code
11
34
1
15
38
16
14
61
19
18
33
22
23
24
21
42
17
31
35
36
37
45
25
13
43Fault lamp
OFF
ON
OFF
ON
OFF
ON
ON
ON
ON
ON
OFF
ON
ON
ON
ON
ON
ON
OFF
OFF
OFF
OFF
OFF
ON
OFF
ONFault type
-
2
-
2
2
1
1
1
1
1
2
1
1
1
1
1
1
2
2
2
2
1
1
1
1
Fault type: 1-open circuit 2-signal overrun
No. 18 to 21 in the table refers to air fuel ratio correction coefficient,?=actual air quantity/air need for
combustion, "? self-learning value" is also called learning air fuel ratio control value.Engine EFI System-
Engine EFI System
Page:
< prev 1-8 9-16 17-24