2008 GEELY FC fuel pump
[x] Cancel search: fuel pumpPage 6 of 419

Brief introduction on Geely model “FC”
Basic parameters...................................................
1
Maintenance period
Regular maintenance items...................................
4
Table on maintenance period at normal conditions5
Table on maintenance period at severe conditions..
7
Engine control system
EFI system.............................................................
8
On-vehicle inspection........................................
8
Inspection..........................................................
9
Throttle body assembly........................................
13Removing, installing and disassembling, assembling...13
Fuel
Fuel system..........................................................
14
Precautions......................................................
14
On-vehicle inspection......................................
16
Inspection........................................................
17
Injection nozzle assembly....................................
18
Replacement...................................................
18
Fuel pump assembly...........................................
20Removing, installing and disassembling, assembling....20
Fuel tank assembly.............................................
21Removing, installing and disassembling, assembling.....21
Exhaust gas control
Exhaust gas control system...............................
23
On-vehicle inspection......................................
23
Inspection........................................................
25
Engine mechanism
Engine assembly..................................................
26Inspection........................................................
26
Drive belt..............................................................
29
Replacement...................................................
29
Valve clearance....................................................
30
Adjustment......................................................
30
Engine assembly.................................................
36
Replacement...................................................
36
Timing chain assembly.......................................
45
Replacement...................................................
45
Camshaft.............................................................
52
Replacement...................................................
52
Crankshaft front oil seal assembly.....................
60
Replacement...................................................
60
Crankshaft rear oil seal assembly......................
62
Replacement...................................................
62
Cylinder cover gasket components.....................
63
Replacement...................................................
63
Exhaust
Exhaust pipe assembly........................................
65Removing, installing and disassembling, assembling.....65
Cooling
Cooling system....................................................
66
On-vehicle inspection......................................
66
Inspection........................................................
66
Cooling fan system..............................................
68
On-vehicle inspection......................................
68
Inspection........................................................
68
Water pump assembly........................................
69
Replacement...................................................
69
Temperature regulator components...................
71
Replacement...................................................
71
Radiator with electronic fan assembly................
72Contents
Page 25 of 419
FuelFuel systemPrecautions1. Before repairing fuel system, uncouple battery negative (-) wire at first.
2. When operating on fuel system, do not smoke or repair near fire area.
3. Do not let gasoline come into contact with rubber or leather parts.
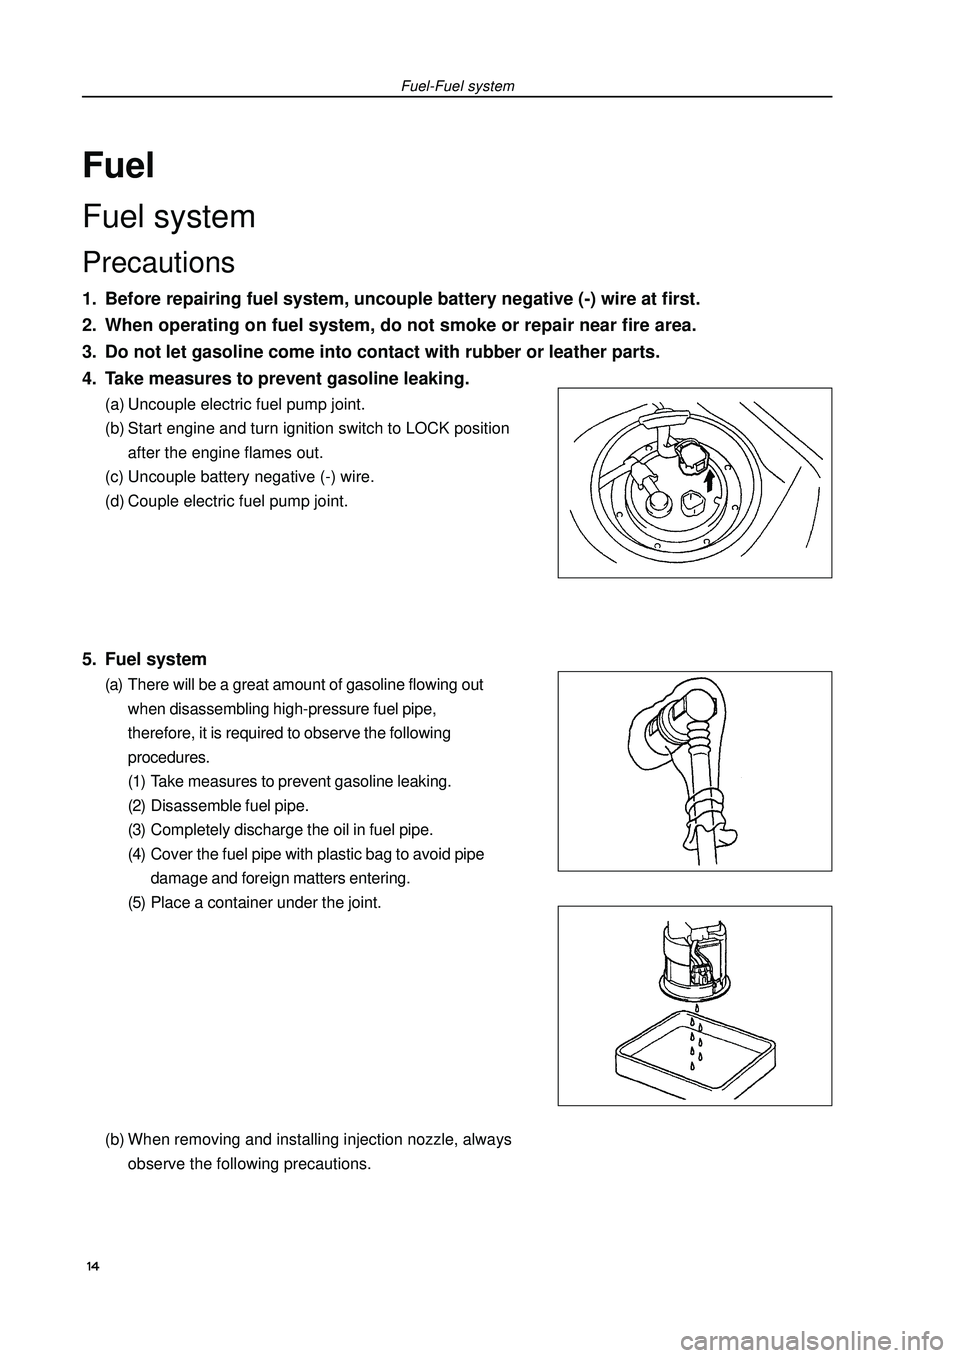
4. Take measures to prevent gasoline leaking.(a) Uncouple electric fuel pump joint.
(b) Start engine and turn ignition switch to LOCK position
after the engine flames out.
(c) Uncouple battery negative (-) wire.
(d) Couple electric fuel pump joint.5. Fuel system(a) There will be a great amount of gasoline flowing out
when disassembling high-pressure fuel pipe,
therefore, it is required to observe the following
procedures.
(1) Take measures to prevent gasoline leaking.
(2) Disassemble fuel pipe.
(3) Completely discharge the oil in fuel pipe.
(4) Cover the fuel pipe with plastic bag to avoid pipe
damage and foreign matters entering.
(5) Place a container under the joint.
(b) When removing and installing injection nozzle, always
observe the following precautions.Fuel-Fuel system 14
Page 26 of 419
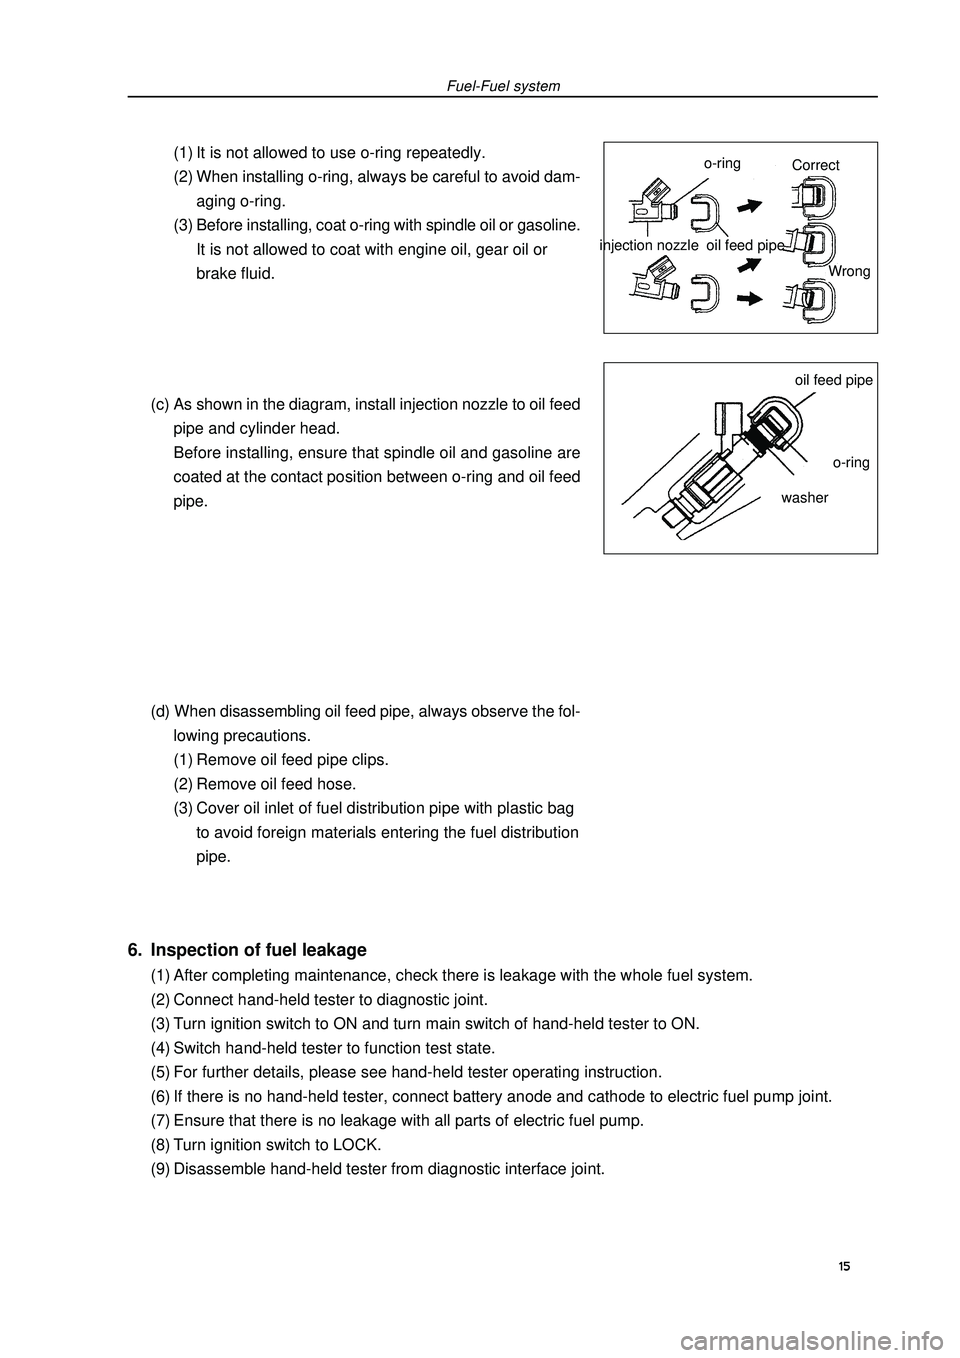
Fuel-Fuel system(1) It is not allowed to use o-ring repeatedly.
(2) When installing o-ring, always be careful to avoid dam-
aging o-ring.
(3) Before installing, coat o-ring with spindle oil or gasoline.
It is not allowed to coat with engine oil, gear oil or
brake fluid.
(c) As shown in the diagram, install injection nozzle to oil feed
pipe and cylinder head.
Before installing, ensure that spindle oil and gasoline are
coated at the contact position between o-ring and oil feed
pipe.
(d) When disassembling oil feed pipe, always observe the fol-
lowing precautions.
(1) Remove oil feed pipe clips.
(2) Remove oil feed hose.
(3) Cover oil inlet of fuel distribution pipe with plastic bag
to avoid foreign materials entering the fuel distribution
pipe.injection nozzle6. Inspection of fuel leakage(1) After completing maintenance, check there is leakage with the whole fuel system.
(2) Connect hand-held tester to diagnostic joint.
(3) Turn ignition switch to ON and turn main switch of hand-held tester to ON.
(4) Switch hand-held tester to function test state.
(5) For further details, please see hand-held tester operating instruction.
(6) If there is no hand-held tester, connect battery anode and cathode to electric fuel pump joint.
(7) Ensure that there is no leakage with all parts of electric fuel pump.
(8) Turn ignition switch to LOCK.
(9) Disassemble hand-held tester from diagnostic interface joint.15o-ringoil feed pipeoil feed pipeo-ringwasherCorrect
Wrong
Page 27 of 419
On-vehicle inspection1. Inspection of fuel pump function(a) Connect hand-held tester to diagnostic joint.
(b) Turn ignition switch to ON and turn main switch of hand-
held tester to ON.
Note: do not start the engine.
(c) Switch hand-held tester to function test state.
(d) For further details, please see hand-held tester operating
instruction.
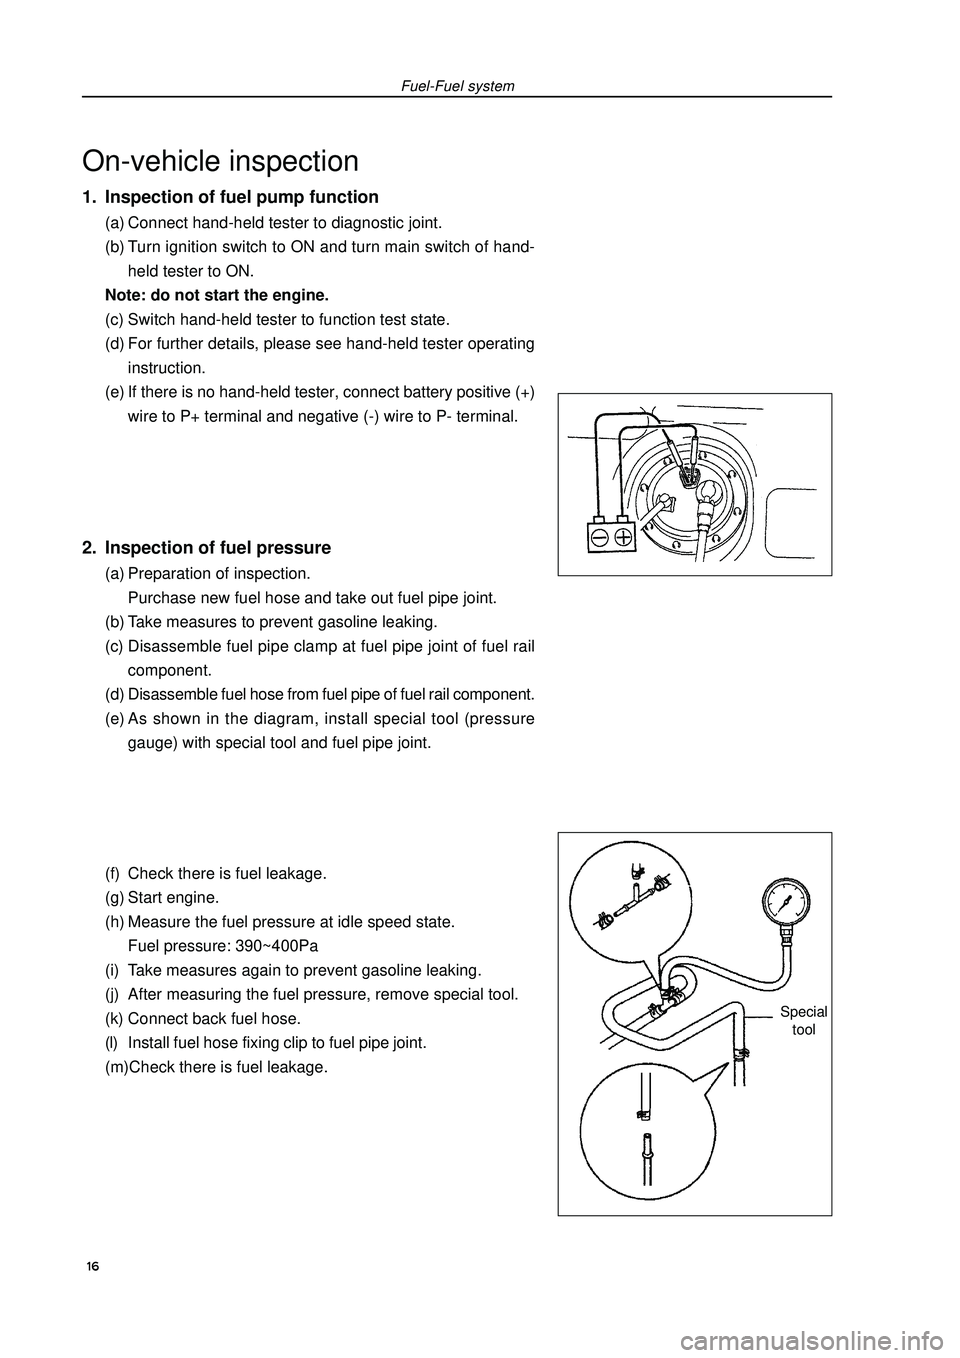
(e) If there is no hand-held tester, connect battery positive (+)
wire to P+ terminal and negative (-) wire to P- terminal.2. Inspection of fuel pressure(a) Preparation of inspection.
Purchase new fuel hose and take out fuel pipe joint.
(b) Take measures to prevent gasoline leaking.
(c) Disassemble fuel pipe clamp at fuel pipe joint of fuel rail
component.
(d) Disassemble fuel hose from fuel pipe of fuel rail component.
(e) As shown in the diagram, install special tool (pressure
gauge) with special tool and fuel pipe joint.
(f) Check there is fuel leakage.
(g) Start engine.
(h) Measure the fuel pressure at idle speed state.
Fuel pressure: 390~400Pa
(i) Take measures again to prevent gasoline leaking.
(j) After measuring the fuel pressure, remove special tool.
(k) Connect back fuel hose.
(l) Install fuel hose fixing clip to fuel pipe joint.
(m)Check there is fuel leakage.Fuel-Fuel systemSpecial
tool 16
Page 29 of 419
![GEELY FC 2008 Workshop Manual Fuel-Injection nozzle assemblyInjection nozzle assemblyReplacement1. Take measures to prevent gasoline leaking.
2. Remove engine plastic hood components.
3. Uncouple engine wire harness [4G18-3724100] GEELY FC 2008 Workshop Manual Fuel-Injection nozzle assemblyInjection nozzle assemblyReplacement1. Take measures to prevent gasoline leaking.
2. Remove engine plastic hood components.
3. Uncouple engine wire harness [4G18-3724100]](/manual-img/58/57161/w960_57161-28.png)
Fuel-Injection nozzle assemblyInjection nozzle assemblyReplacement1. Take measures to prevent gasoline leaking.
2. Remove engine plastic hood components.
3. Uncouple engine wire harness [4G18-3724100].(a) Remove injection nozzle joint.
(b) Remove exhaust gas hose.4. Remove fuel pipe assembly(a) Loosen oil feed hose clips.
(b) Pull oil feed hose away from fuse distribution pipe.
Notes:�zCheck there is dirt on fuel pipe and its joint before removing, and clean it off in the case of dirt.�zIt is only allowed to remove with hands.�zCheck there are foreign matters with the removed fuel pipe seal surface, and clean them off in the
case of foreign matters.�zCover the fuel pipe with plastic bag to avoid pipe damage and foreign matters entering.5. Remove fuel pipe assemblyRemove 2 bolts and oil feed pipe (together with injection nozzle).6. Remove injection nozzle components.Pull out 4 injection nozzles from oil feed pipe.7. Install injection nozzle components.Coat a thin layer of gasoline on o-ring and rotate left and right to push injection nozzle into oil feed pipe.
Notes:
�zBe careful not to rotate o-ring.
�zCheck injection nozzle could rotate smoothly after it is installed, and if not replace with new o-ring.8. Install fuel hose assembly.Install fuel hose to oil feed pipe.
Notes:
�zCheck there are damage or foreign matters in the binding site of fuel pipe.
�zAfter installing, pull the fuel pump with hands to check the fuel pipe is bound firmly with joint. 18
Page 30 of 419
![GEELY FC 2008 Workshop Manual Fuel-Injection nozzle assembly9. Install fuel rail component [4G18-1112110].(a) Check injection nozzle o-ring and replace if there is damage.
(b) Install isolator on cylinder head.
(c) Install fuel ra GEELY FC 2008 Workshop Manual Fuel-Injection nozzle assembly9. Install fuel rail component [4G18-1112110].(a) Check injection nozzle o-ring and replace if there is damage.
(b) Install isolator on cylinder head.
(c) Install fuel ra](/manual-img/58/57161/w960_57161-29.png)
Fuel-Injection nozzle assembly9. Install fuel rail component [4G18-1112110].(a) Check injection nozzle o-ring and replace if there is damage.
(b) Install isolator on cylinder head.
(c) Install fuel rail component together with injection nozzle.
Torque:(d) Install fuel pipe fixing clip.
Torque: m10. Check the function of electric fuel pump and check there is fuel leakage.
19
Page 31 of 419
Fuel - Fuel pump assemblyFuel pump assemblyRemoving, installing and disassembling, assembling1. Take measures to prevent gasoline leaking
2. Remove rear seat cushion assembly
3. Remove rear floor repairing hole cover
4. Remove No. 2 fuel evaporation assemblyNotes:
�zCheck there is contaminant looked like dirt around the joint before operating and clean it off in the
case of contaminant.
�zBe careful of the contaminant looked like dirt, because fast-joint depends on o-ring to seal fuel pipe
and joint.
�zDo not perform this operation with tools.
�zDo not bend or distort nylon hose.
�zCover the joint with plastic bag after removing the fuel hose.
�zWhen the joint is stuck with fuel pipe, clip the hose with fingers and rotate carefully to release the
hose, and then remove it.5. Remove fuel tank main fuel hose and oil return pipe assemblyNotes:
�zCheck there is contaminant looked like dirt around the joint before operating and clean it off in the
case of contaminant.
�zBe careful of the contaminant looked like dirt, because fast-joint depends on o-ring to seal fuel pipe
and joint.
�zDo not perform this operation with tools.
�zDo not bend or distort nylon hose.
�zCover the joint with plastic bag after removing the fuel hose.
�zWhen the joint is stuck with fuel pipe, clip the hose with fingers and rotate carefully to release the
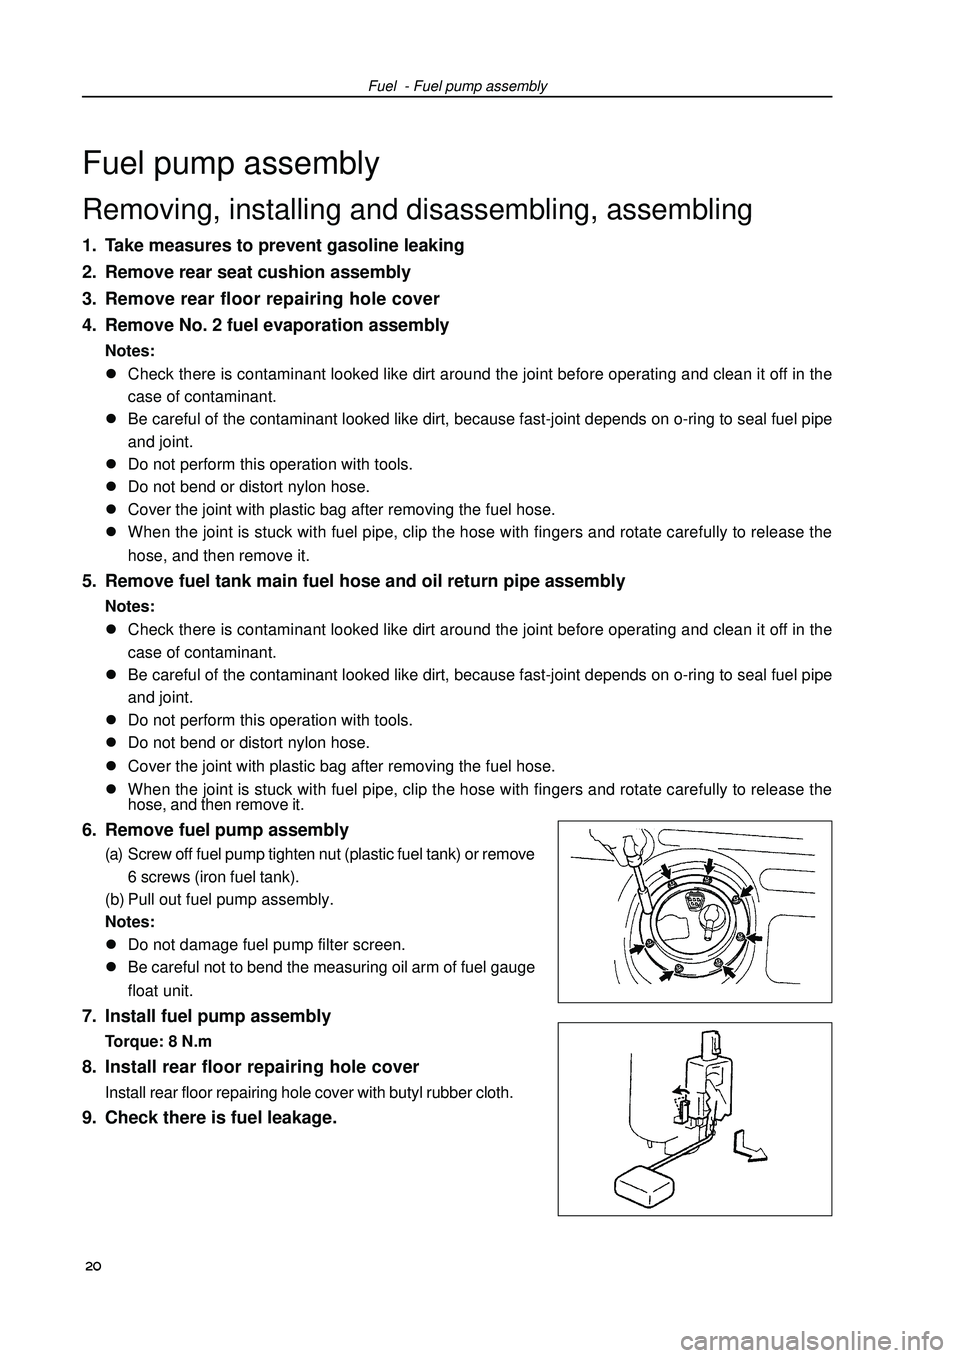
hose, and then remove it.6. Remove fuel pump assembly(a) Screw off fuel pump tighten nut (plastic fuel tank) or remove
6 screws (iron fuel tank).
(b) Pull out fuel pump assembly.
Notes:
�zDo not damage fuel pump filter screen.
�zBe careful not to bend the measuring oil arm of fuel gauge
float unit.7. Install fuel pump assemblyTorque: 8 N.m8. Install rear floor repairing hole coverInstall rear floor repairing hole cover with butyl rubber cloth.9. Check there is fuel leakage. 20
Page 32 of 419
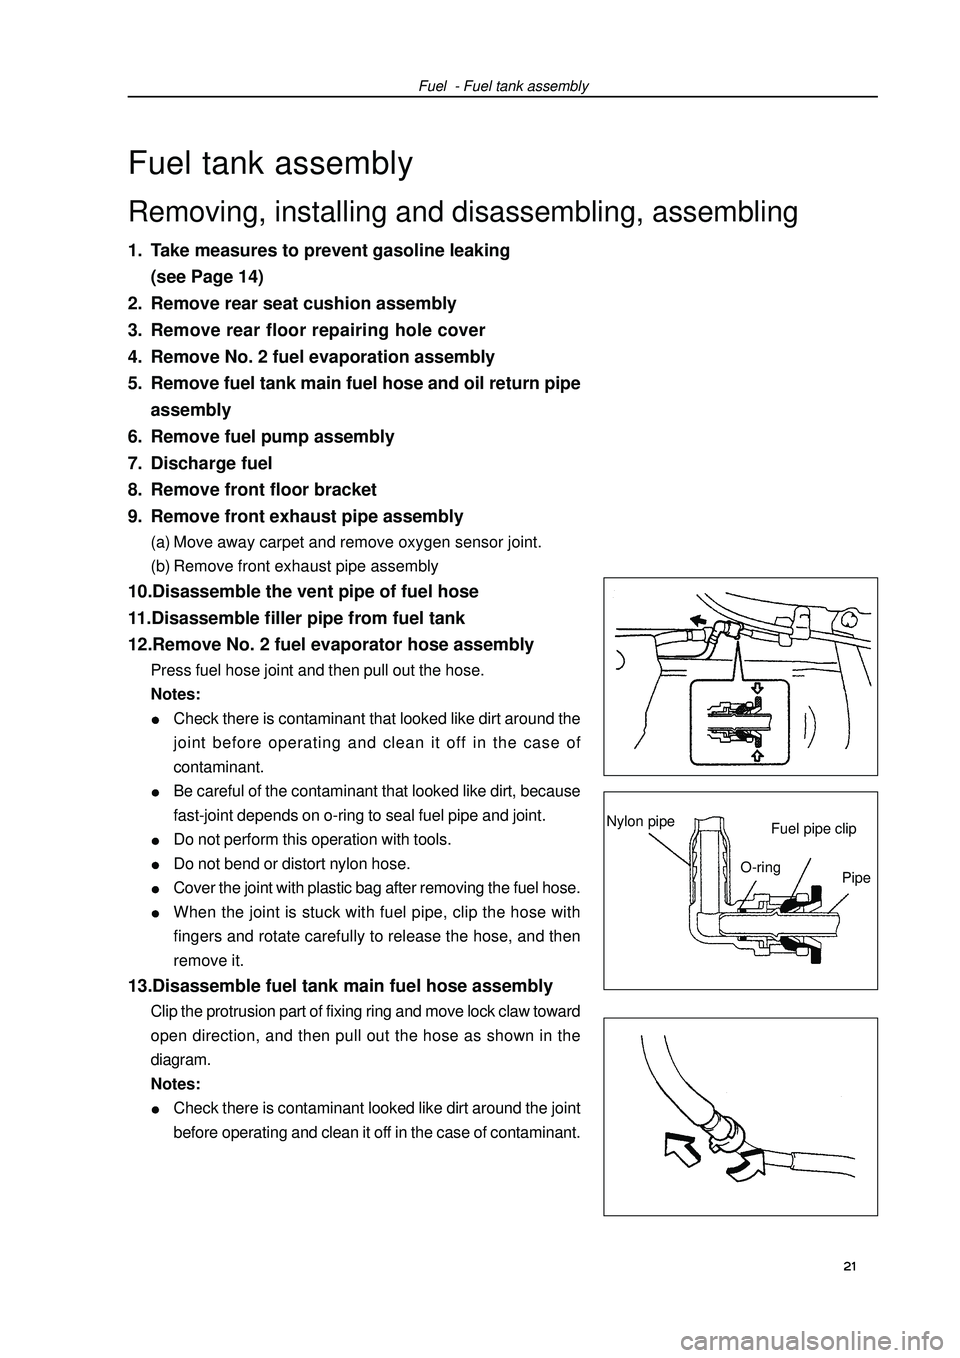
Fuel - Fuel tank assemblyFuel tank assembly1. Take measures to prevent gasoline leaking
(see Page 14)
2. Remove rear seat cushion assembly
3. Remove rear floor repairing hole cover
4. Remove No. 2 fuel evaporation assembly
5. Remove fuel tank main fuel hose and oil return pipe
assembly
6. Remove fuel pump assembly
7. Discharge fuel
8. Remove front floor bracket
9. Remove front exhaust pipe assembly(a) Move away carpet and remove oxygen sensor joint.
(b) Remove front exhaust pipe assembly10.Disassemble the vent pipe of fuel hose
11.Disassemble filler pipe from fuel tank
12.Remove No. 2 fuel evaporator hose assemblyPress fuel hose joint and then pull out the hose.
Notes:Check there is contaminant that looked like dirt around the
joint before operating and clean it off in the case of
contaminant.Be careful of the contaminant that looked like dirt, because
fast-joint depends on o-ring to seal fuel pipe and joint.Do not perform this operation with tools.Do not bend or distort nylon hose.Cover the joint with plastic bag after removing the fuel hose.When the joint is stuck with fuel pipe, clip the hose with
fingers and rotate carefully to release the hose, and then
remove it.13.Disassemble fuel tank main fuel hose assemblyClip the protrusion part of fixing ring and move lock claw toward
open direction, and then pull out the hose as shown in the
diagram.
Notes:Check there is contaminant looked like dirt around the joint
before operating and clean it off in the case of contaminant. 21 Removing, installing and disassembling, assemblingFuel pipe clipNylon pipeO-ring
Pipe