Page 175 of 392

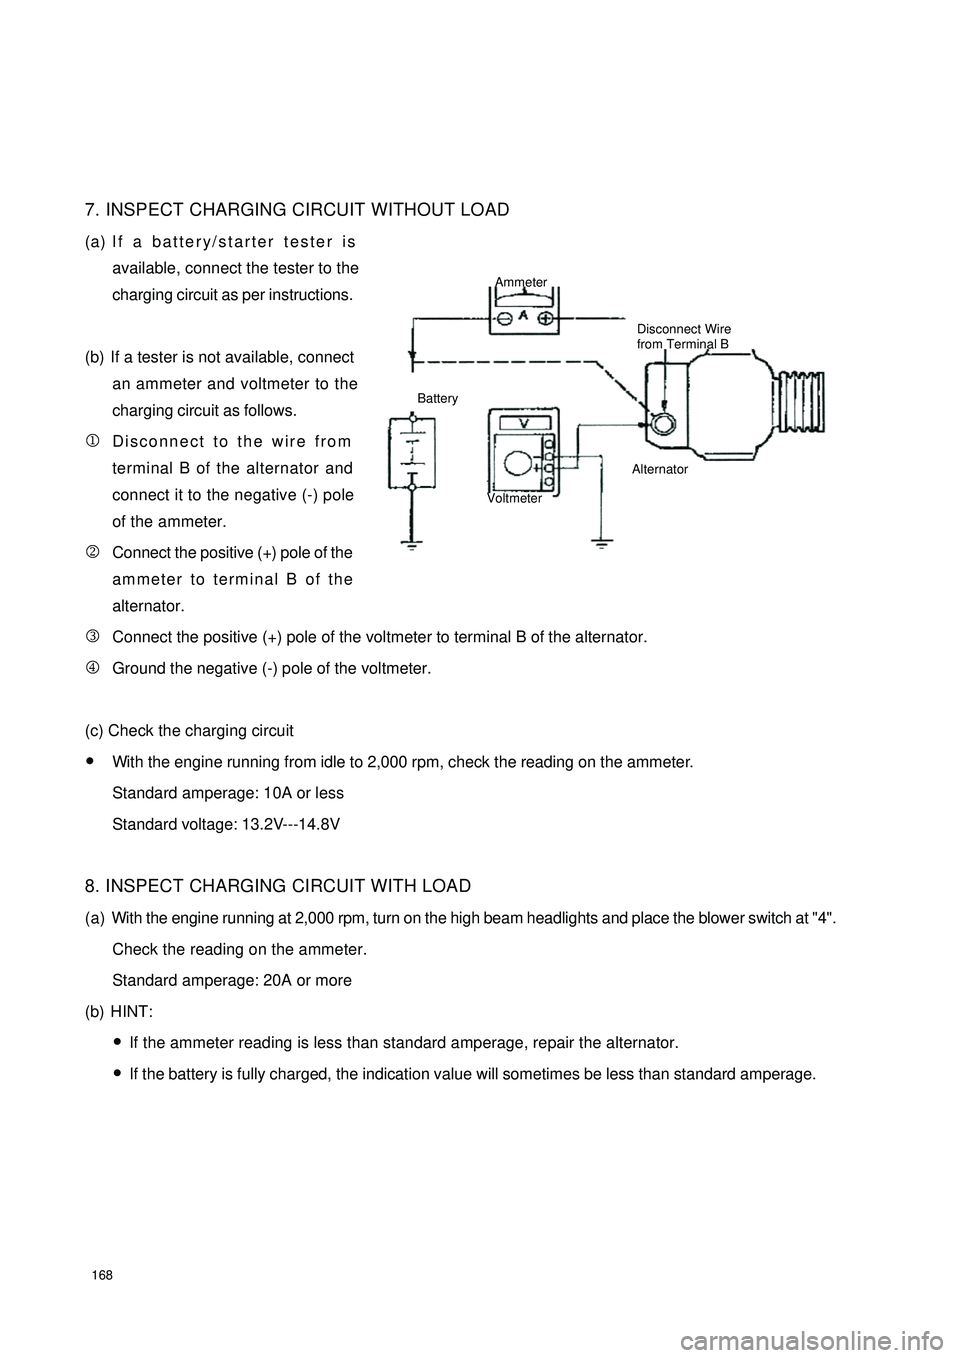
1687. INSPECT CHARGING CIRCUIT WITHOUT LOAD
(a) If a battery/starter tester is
available, connect the tester to the
charging circuit as per instructions.
(b) If a tester is not available, connect
an ammeter and voltmeter to the
charging circuit as follows.
1Disconnect to the wire from
terminal B of the alternator and
connect it to the negative (-) pole
of the ammeter.
2Connect the positive (+) pole of the
ammeter to terminal B of the
alternator.
3Connect the positive (+) pole of the voltmeter to terminal B of the alternator.
4Ground the negative (-) pole of the voltmeter.
(c) Check the charging circuit
�yWith the engine running from idle to 2,000 rpm, check the reading on the ammeter.
Standard amperage: 10A or less
Standard voltage: 13.2V---14.8V
8. INSPECT CHARGING CIRCUIT WITH LOAD
(a) With the engine running at 2,000 rpm, turn on the high beam headlights and place the blower switch at "4".
Check the reading on the ammeter.
Standard amperage: 20A or more
(b) HINT:
�yIf the ammeter reading is less than standard amperage, repair the alternator.
�yIf the battery is fully charged, the indication value will sometimes be less than standard amperage.Ammeter
Disconnect Wire
from Terminal B
Battery
VoltmeterAlternator
Page 178 of 392
171Chapter 3 Combination Meter SystemSection 1 Circuit Diagram of Combination Meter and Location of
Multi-pin Plug-in TerminalI. CIRCUIT DIAGRAM OF CONBINATION METERSpeed Signal
Ground The Sensor
Revolution SignalWater Temperature SignaFuel Level GaugeTachometer
SpeedometerWater
Temperature Gauge
Feul Level Gauge
OdometerHigh Beam Lamp
Rear Defrost Lamp
Rear Defog Lamp
Backlight
Water Temperature WarningPower Steering
Fuel WarningCharge
Brake Fluid
Oil Pressure
Engine Malfunction
Driver's seat belt
Park Brake
SRS(main)
SRS(sub)
Page 205 of 392

198Chapter 5 Light SystemSection 1 Survey of Light SystemI. COMPOSITION1. Front combination lamp assembly: turn signal lamp, high beam, low beam, head lamp, front position lamp.
2. Rear combination lamp: turn signal lamp, back-up lamp, rear fog lamp, tail lamp, brake lamp, retro reflector.
3. Front fog lamp
4. Side turn signal lamp
5. High mounted stop lamp
6. Rear trunk lamp
7. License plate lamp
8. Interior dome lamp
9. Rear row reading lamp
10. Door lampshield and bulb assemblyII. NOTES FOR REPAIR1. NOTES WHEN REPAIRING ELECTRICAL EQUIPMENTS
(a) Disconnect the battery ground cable.
2. Notes when replacing a headlamp bulb
(a) Before replacing a halogen bulb, turn the headlamp OFF to make it cool.
(b) When installing a new halogen bulb, do not touch the glass part of the bulb with bare hands.
(c) If there is oil stain on the surface of halogen bulb (headlamp and front fog lamp) when the lamps are
turned ON, its service life will be shortened.
(d) Halogen bulbs (headlamp and front fog lamp) have pressurized gas inside and require special handling.
They can explode if dropped to ground.The glass fragments will splash up.
(e) When replacing, make sure to use the bulbs with the same power, same model.
(f) After the bulb is installed, make the lamp holder tight.
Page 213 of 392
2069. LICENSE PLATE LAMP
10. REAR TRUNK LAMPII. LIGHT SYSTEM FAULTS INSPECTION1. HEADLAMP COMBINATION SWITCH ASSEMBLYSymptom Suspec te d Area
1. Bulb
2. H a rne ss Lic ense plate la mp does not light (Ta il la mp is
norma l) Headlamp Combination Switch Range IllustrationTurn
SwitchLeft Turn
Straight Run
Right TurnLamp
Switch Horn
High Beam
Dipped BeamLamp HandleFog Light Handle
Front Fog Lamp
Front Fog Lamp
Front Fog LampFront And Rear
Fog Lamp
Front And Rear
Fog LampHeadlamp
Headlamp
HeadlampPosition Lamp
Position Lamp
Position Lamp99
9
9
999
5BB1
5BB2
5BB35BB1
9NB4
9NB1 9NB5Symptom Suspec te d Area
1 .
Bulb
2 .
R e a r t r unk la mp s w it c h
3 .
Harness Re ar trunk la mp does not light (Room la mp is
norma l)
Page 219 of 392
212II.INSTALLATION1. Install the electrical connector of the headlamp assembly.
2. Install the headlamp assembly and the 3 mounting bolts.
3. Install the front bumper.
4. Adjust the condition of the vehicle.
5. Adjust the headlamp beam.III.HEADLAMP BULB REPLACEMENT1 - LOW BEAM DUST COVER 2 - HIGH BEAM DUST COVER 3 - TURN SIGNAL LAMP DUST
COVER 4 - HEADLAMP HOLDER
1. Replace the high and low beam bulbs
�y Turn and remove the dust cover counter-clockwise
�y Pull out the bulb plug
�y Press and release the wire clip
�y Pull out the lamp-holder, and remove the bulb
�y Replace the bulb
2. Replace the turn signal lamp bulbs
�y Remove the 3 screws on the dust cover with screwdriver
�yTurn the lamp-holder counter-clockwise. Pull out the lamp-holder, and remove the bulb
�yReplace the bulb
3. Replace the headlamp bulbs
�yTurn the lamp-holder counter-clockwise. Pull out the lamp-holder, remove the bulb, and replace the
bulb.1 2 3 4