Page 14 of 254

GETTING TO KNOW YOUR CAR
13
A CODE card fig. 5is provided with
the keys. This CODE card bears the
electronic code used by the Fiat
Dealershipswhenever the vehicle
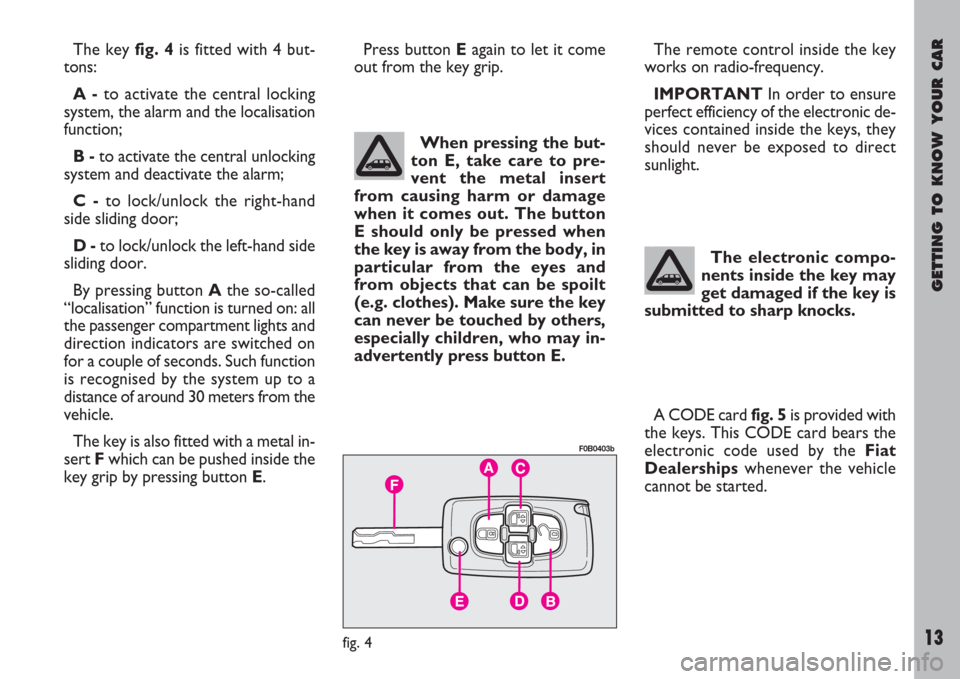
cannot be started. The key fig. 4is fitted with 4 but-
tons:
A -to activate the central locking
system, the alarm and the localisation
function;
B -to activate the central unlocking
system and deactivate the alarm;
C -to lock/unlock the right-hand
side sliding door;
D -to lock/unlock the left-hand side
sliding door.
By pressing button Athe so-called
“localisation” function is turned on: all
the passenger compartment lights and
direction indicators are switched on
for a couple of seconds. Such function
is recognised by the system up to a
distance of around 30 meters from the
vehicle.
The key is also fitted with a metal in-
sert Fwhich can be pushed inside the
key grip by pressing button E.The remote control inside the key
works on radio-frequency.
IMPORTANTIn order to ensure
perfect efficiency of the electronic de-
vices contained inside the keys, they
should never be exposed to direct
sunlight. When pressing the but-
ton E, take care to pre-
vent the metal insert
from causing harm or damage
when it comes out. The button
E should only be pressed when
the key is away from the body, in
particular from the eyes and
from objects that can be spoilt
(e.g. clothes). Make sure the key
can never be touched by others,
especially children, who may in-
advertently press button E.The electronic compo-
nents inside the key may
get damaged if the key is
submitted to sharp knocks.
fig. 4
F0B0403b
Press button Eagain to let it come
out from the key grip.
Page 23 of 254

GETTING TO KNOW YOUR CAR
22
CENTRAL DOOR LOCKING
SYSTEM
From the outside
With the doors closed: insert and
turn the key in the lock of one of the
front doors.
From the inside
With the doors closed: press button
C-fig. 19placed next to the front ceil-
ing lamp.
Pressing or lifting one of the rear sill
buttons only locks or unlocks the par-
ticular door involved.
IMPORTANTIf one of the doors
is not shut properly or there is a fail-
ure in the system, the central locking
feature will not work and the direc-
tion indicators will not flash; after
some attempts, the device stops
working for around 20 seconds. In
these 20 seconds, the door can be
locked or unlocked manually without
the electrical system coming into play.
After the 20-second period, the con-
trol unit is ready to receive commands
once more.
If the reason for the malfunction has
been removed, the device will start to
work properly again. If not, it will cut
out once more.“Door open” alarm
If, with engine running, one of the
doors is not shut properly, the multi-
function display will show a dedicat-
ed message and the buzzer will sound.
SUPER DOOR LOCK
(where fitted)
To engage the super door lock using
the remote control, press button A-
fig. 8once and then press it again
within 5 seconds. After the first click
they will click again to signal that they
have been engaged.
To activate the super door lock with
the key, place it in the lock and hold
it in the locking position for a few sec-
onds until you hear the second click
indicating that the doors have been
locked.
This operation is necessary if you do
not wish to engage the electronic
alarm.When the super door
lock has been activated it
is impossible to open the
doors even from the inside; for
this reason do not use the super
door lock when there are pas-
sengers in the vehicle.
The super door lock is deactivated
when the doors are unlocked with a
key or remote control by pressing the
pushbutton B-fig. 8.
Page 103 of 254

GETTING TO KNOW YOUR CAR
102
CEILING LIGHT UNITS
All the ceiling lights come on for a
limited time, i.e. they turn on and off
gradually.
Ceiling light operation
All the ceiling lights come on auto-
matically when the doors are opened
with the remote control or when the
key is introduced in the door lock. Af-
ter some seconds, the lights will go out
gradually, without opening the doors.
When the door lock button on the
remote control is pressed for a long
time, the so-called “localisation” func-
tion is activated: all the ceiling lights
in the passenger compartment come
on together with the direction indi-
cators. This function is recognised by
the system up to a distance of about
30 meters from the vehicle. If the ignition key is turned to S(or
removed) the first row ceiling light
comes on. It will stay on only for a lim-
ited time and will go out gradually.
When one of the front doors is
opened, the central ceiling light, with-
out the spot lights, and the puddle
lights on the doors come on. They re-
main lit for a set time and after a cou-
ple of seconds the door have been
closed, they go off gradually. When the
engine is started, the lights will go off
progressively after a couple of seconds.
When one of the rear doors is
opened the central ceiling light, with-
out the spot lights, come on. It re-
mains lit for a set time and after a cou-
ple of seconds the door have been
closed, it goes off gradually.When the tailgate is opened the lug-
gage compartment lights come on
(one or two lights according to the
model). The lights will go off gradual-
ly when the tailgate is closed.
Front ceiling light fig. 137
The front ceiling light includes a cen-
tral light and two side spot lights with
relative control switch.
By operating buttons A, B, Cthe
lights are turned on singularly.
fig. 137
F0B0429b
Page 179 of 254

IN AN EMERGENCY
178
IF THE BATTERY
IS FLAT
First of all, read the “Car mainte-
nance” section for steps to be taken
to avoid the battery running down and
to ensure it has a long life.
IMPORTANTBattery recharging
procedure is given as information on-
ly since this operation shall be only
performed at a Fiat Dealership.
RECHARGING THE BATTERY
You are advised to recharge the bat-
tery slowly for a period of approxi-
mately 24 hours at a low amperage.
Charging for too long could damage
the battery.
Proceed as follows:
1)disconnect the terminal from the
battery negative pole.IMPORTANTIf the vehicle is
equipped with an alarm, switch it off
with the remote control.
2)Connect the charger cables to the
battery terminals.
3) Turn on the charger.
4)When you have finished, turn the
charger off before disconnecting the
battery.
5)Reconnect the cables to the bat-
tery terminals. Make sure the polari-
ty is correct.
The liquid in the battery
is poisonous and corro-
sive. Do not let it touch
the skin or eyes. Recharging the
battery should be done in a well-
ventilated area away from naked
flames or possible sources of
sparks: explosion and fire risk.Do not attempt to
charge a frozen battery: it
must firstly be thawed,
otherwise it may burst. If freez-
ing has occurred, the battery
should be checked by skilled per-
sonnel to make sure that the in-
ternal elements are not damaged
and that the body is not cracked,
with the risk of leaking poisonous
and corrosive acid.
JUMP STARTING
See “Jump starting” in this chapter.