Page 177 of 254

IN AN EMERGENCY
176
FUSEBOX IN THE ENGINE COMPARTMENT fig. 39
1
2
3
4
5
6
7
8
9
10
11
12
13
14
15
17
1810A
15A
10A
10A
10A
15A
20A
20A
15A
15A
10A
10A
15A
10A
30A
30A
40AReverse light switch, Xenon lights, electric fan controls, engine coolant level,
heated diesel filter, preheating spark plugs,
speed control system, air debit gauge
Fuel pump, exhaust gas recirculation and turbo-compressor control system
ABS, ESP
Keyed service power supply, for main electronic control unit
Particulate filtering system
Front fog lights
Headlight washers
Relay power supply for main electronic control unit, electric fan relay controls ,
diesel pressure adjusting solenoid valve and exhaust gas
recirculation
Left dipped beam headlight, headlight beam corrector
Right dipped beam headlight
Left main beam headlight
Right main beam headlight
Horn
Windscreen wiper pump - rear window wiper
Lambda sensor, injectors, spark plugs, canister solenoid valve,
injection pump solenoid valve
Windscreen wiper
Additional fans
Page 178 of 254
IN AN EMERGENCY
177
The following MAXI-FUSES are also contained in this fusebox:
MAXI-FUSE
MAXI-FUSE
MAXI-FUSE
MAXI-FUSE
MAXI-FUSE
MAXI-FUSE
MAXI-FUSE
MAXI-FUSE 50A
50A
30A
60A
70A
30A
40A
50AElectric fan (second speed)
ABS, ESP
ESP electric fan
Main electronic control unit power supply 1
Main electronic control unit power supply 2
Electric fan (first speed)
Fiat CODE system
Climate control system additional fans
Page 179 of 254

IN AN EMERGENCY
178
IF THE BATTERY
IS FLAT
First of all, read the “Car mainte-
nance” section for steps to be taken
to avoid the battery running down and
to ensure it has a long life.
IMPORTANTBattery recharging
procedure is given as information on-
ly since this operation shall be only
performed at a Fiat Dealership.
RECHARGING THE BATTERY
You are advised to recharge the bat-
tery slowly for a period of approxi-
mately 24 hours at a low amperage.
Charging for too long could damage
the battery.
Proceed as follows:
1)disconnect the terminal from the
battery negative pole.IMPORTANTIf the vehicle is
equipped with an alarm, switch it off
with the remote control.
2)Connect the charger cables to the
battery terminals.
3) Turn on the charger.
4)When you have finished, turn the
charger off before disconnecting the
battery.
5)Reconnect the cables to the bat-
tery terminals. Make sure the polari-
ty is correct.
The liquid in the battery
is poisonous and corro-
sive. Do not let it touch
the skin or eyes. Recharging the
battery should be done in a well-
ventilated area away from naked
flames or possible sources of
sparks: explosion and fire risk.Do not attempt to
charge a frozen battery: it
must firstly be thawed,
otherwise it may burst. If freez-
ing has occurred, the battery
should be checked by skilled per-
sonnel to make sure that the in-
ternal elements are not damaged
and that the body is not cracked,
with the risk of leaking poisonous
and corrosive acid.
JUMP STARTING
See “Jump starting” in this chapter.
Page 180 of 254
IN AN EMERGENCY
179
JACKING THE CAR
WITH THE JACK
See “If a tyre is punctured”, in this
chapter.
Please note:
– the jack requires no adjustments;
– the jack cannot be repaired. If it
breaks it must be replaced with a new
jack;
– no other tool, apart from the han-
dle shown in this chapter, can be fit-
ted to the jack.An incorrectly posi-
tioned jack may cause the
vehicle to fall. Do not use
the jack to lift loads exceeding
that indicated on the label at-
tached to the jack itself.WITH A SHOP JACK
Front
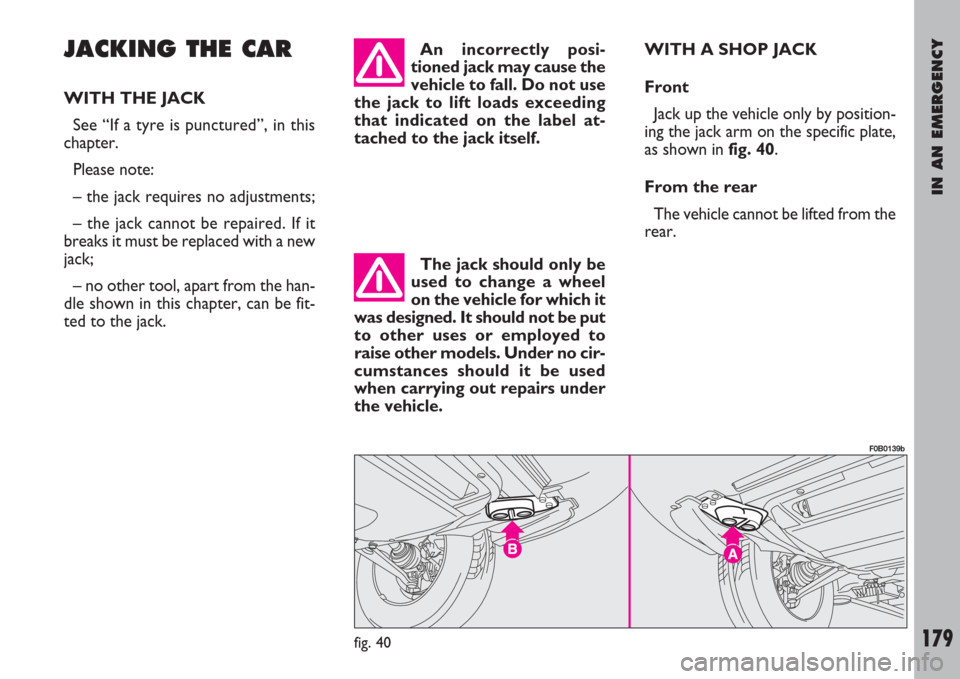
Jack up the vehicle only by position-
ing the jack arm on the specific plate,
as shown in fig. 40.
From the rear
The vehicle cannot be lifted from the
rear.
The jack should only be
used to change a wheel
on the vehicle for which it
was designed. It should not be put
to other uses or employed to
raise other models. Under no cir-
cumstances should it be used
when carrying out repairs under
the vehicle.
fig. 40
F0B0139b
Page 181 of 254
IN AN EMERGENCY
180
WITH AN ARM HOIST
Jack up the vehicle by arranging the
ends of the arms in the areas shown
in fig. 41:
A- front arm;
B- rear arm.TOWING THE CAR
A tow hitch is provided with the car
and is placed in the engine compart-
ment.
To fasten the tow hitch:
– open the bonnet (see the instruc-
tions given in the “Bonnet” paragraph
of “Getting to know your car” chapter);
– remove the tow hitch A-fig. 42
from its supports B;– remove cap Cclipped on the front
fig. 43or rear bumper fig. 44;
– fasten the hitch Aon the thread-
ed pin.
fig. 41
F0B0043b
fig. 42
F0B0044bfig. 43
F0B0156b
fig. 44
F0B0157b
Page 182 of 254

IN AN EMERGENCY
181
Before fastening the tow
hitch clean the threaded
housing accurately. Be-
fore starting to tow, make sure
the tow hitch is well fastened on
the threaded pin.While the vehicle is be-
ing towed with the engine
off, remember that the
brake pedal and steering will re-
quire more effort as you no
longer have the benefit of the
power brakes and power steer-
ing. Do not use flexible cables to
tow. Avoid jerking. Whilst tow-
ing, ensure that the coupling to
the vehicle does not damage the
surrounding components.IMPORTANTFor versions with
automatic gearbox, make sure the
gear is in neutral position (N) and pro-
ceed as described for vehicles with
mechanical gearbox. If the gear cannot
be put in neutral position (N) do not
tow the vehicle and contact a Fiat
Dealership.
Before starting to tow,
turn the ignition key to M
and then to S. Do not re-
move the key. If the key is re-
moved, the steering lock engages
automatically which prevents the
wheels being turned.
When towing the vehi-
cle, you must comply
with the specific traffic
regulations regarding the tow
hitch and how to tow on the
road.
Do not start the engine
when being towed.
Page 183 of 254

IN AN EMERGENCY
182
IF AN ACCIDENT OCCURS
– It is important to keep calm.
– If you are not directly involved in
the accident, stop at least ten meters
away from the accident.
– If you are on a motorway do not
obstruct the emergency lane with
your car.
– Turn off the engine and turn on the
hazard lights.
– At night, illuminate the scene of the
accident with your headlights.
– Act carefully, you must not risk be-
ing run over.
– Mark the accident by putting the
red triangle at the regulatory distance
from the car where it can be clearly
seen.
– Call for rescue making the infor-
mation you give as accurate as you can.
One the motorway use the special col-
umn-mounted emergency phones.– In pile-ups on the motorway, par-
ticularly when visibility is bad, there is
a high risk of other vehicles running in-
to those already stopped. Get out of
the car immediately and take refuge
behind the guard-rail.
– Remove the ignition keys from the
vehicles involved.
– If you can smell petrol or other
chemicals, do not smoke and make
sure all cigarettes are extinguished.
– Use a fire extinguisher, blanket, sand
or earth to put out fires no matter how
small they are. Never use water.
– If the doors are blocked, do not at-
tempt to smash the windscreen to get
out of the car. It is made of layered
glass and is very hard. Side and rear
window are much more easily broken.IF ANYONE IS INJURED
– Never leave the injured person
alone. The obligation to provide as-
sistance exists even for those not di-
rectly involved in the accident.
– Do not congregate around the in-
jured person.
– Reassure the injured person that
help is on its way and will arrive soon.
Stay close by to calm him/her down in
case of panic.
– Unfasten or cut seat belts holding
injured parties.
– Do not give an injured person any-
thing to drink.
– Do not move an injured person un-
less the following situations arise.
– Pull the injured person from the
car only if it risks catching fire, it is
sinking in water or is likely to fall over
a cliff or similar. Do not pull his/her
arms or legs, do not bend the head
and, as far as possible, keep the body
horizontal.
Page 184 of 254
IN AN EMERGENCY
183
FIRST-AID KIT fig. 45
The first-aid kit must at least contain:
– sterile gauze, to cover and clean
wounds;
– bandages of various sizes;
– medicated plasters of various sizes;
– a plaster tape;
– a pack of cotton wool;
– a bottle of disinfectant;
– a pack of tissues;
– a pair of round-nose scissors;
– pincers;
– two haemostatic loops.It is a good idea to keep a fire extin-
guisher and blanket in the car in addi-
tion to the first-aid kit.
The first-aid kit and the fire extin-
guisher are included in the Lineacces-
sori Fiat range.
fig. 45
F0B0198b