2008 FIAT QUBO technical specifications
[x] Cancel search: technical specificationsPage 125 of 202

124
SAFETY
MAINTENANCE
AND CARE
TECHNICAL
SPECIFICATIONS
INDEX
DASHBOARDAND CONTROLS
STARTING
AND DRIVING
WARNING
LIGHTS AND
MESSAGES
IN AN
EMERGENCY
❒Fully expand the jack and lift the vehi-
cle until the wheel is a few centimetres
above ground level. When turning the
jack handle, make sure that it rotates
freely without risking to injure your
hand by rubbing it against the ground.
Even the moving components of the
jack (screws and joints) can cause in-
juries; do not touch them. If you be-
come fouled with lubricating grease,
clean yourself thoroughly.❒Unscrew the fastening bolts and remove
the wheel.
❒Make sure the contact surfaces be-
tween the spare wheel and hub are
clean so that the fastening bolts will not
come loose.
fig. 7F0T0124mfig. 9F0T0126mfig. 8F0T0125m
❒Start expanding the jack so that it par-
tially opens fig. 7. Then, position it un-
der the vehicle near the reference
grooves A-fig. 8close to the wheel to
be replaced.
❒Expand the jack until groove A-fig. 9on
the jack correctly matches the lower
profile Bon the side frame.
❒Warn anybody nearby that the vehicle
is about to be lifted. They must stay
clear and not touch the vehicle until it
is back on the ground.
119-150 Fiorino GB 1ed 21-10-2008 15:05 Pagina 124
Page 126 of 202

125
SAFETY
MAINTENANCE
AND CARE
TECHNICAL
SPECIFICATIONS
INDEX
DASHBOARDAND CONTROLS
STARTING
AND DRIVING
WARNING
LIGHTS AND
MESSAGES
IN AN
EMERGENCY
❒fit the standard wheel by inserting the
first stud B-fig. 10for two threads in
the hole closest to the inflation valve A;
❒fit the wheel cap, making the symbol
C(on the back of the cap) coincide with
the inflation valve and fit the other three
bolts;
❒fasten bolts using the wrench provided;
❒retract the jack until the vehicle rests
on the ground and pull the jack out.
❒use the wrench provided to tighten the
bolts completely in a criss-cross fashion
following the numerical sequence shown
in fig. 11.After tyre replacement
❒Fasten the toothed support on the
drilled wheel by means of the 2 screws
(insert the support from outside the
wheel). Rehook the metallic retaining
cable in the specific seat and reinsert
the protection cap A-fig. 12.
❒Check replaced wheel positioning un-
der the floor (the lifting system is sup-
plied with a clutch to limit the end of
the stroke). Incorrect positioning may
jeopardise safety.
❒Lift again the wheel tightening again the
lock boltA-fig. 4.❒Put the jack and tools back in the tool
box.
❒Position the tool box in the boot.
❒Secure the box using the retention
straps.
fig. 10F0T0282mfig. 11
4
1
3
2
F0T0293mfig. 12F0T0170m
119-150 Fiorino GB 1ed 21-10-2008 15:05 Pagina 125
Page 127 of 202

126
SAFETY
MAINTENANCE
AND CARE
TECHNICAL
SPECIFICATIONS
INDEX
DASHBOARDAND CONTROLS
STARTING
AND DRIVING
WARNING
LIGHTS AND
MESSAGES
IN AN
EMERGENCY
QUICK TYRE REPAIR
KIT AUTOMATIC
FIX & GO
The automatic fast tyre repair kit Fix & Go
is placed in a container in the boot.
The tyre repair kit fig. 13includes:
❒a cylinder A containing sealant which is
fitted with:
– filling tube B;
– an adhesive label Cbearing the words
“max. 80 km/h”, to be attached in an
easy-to-see position for the driver (on
the dashboard) after tyre repair;
❒a compressor Dcomplete with a pres-
sure gauge and connections;
❒an instruction brochure (see fig. 14) to
be utilised for prompt and proper use
of the fast repair kit and to be handed
over to the personnel who will be in
charge of handling the repaired tyre;
❒a pair of safety gloves located in the side
space of the compressor;
❒adapters for inflating different elements.
The Fix & Go kit container also includes
some spare fuses.
fig. 13F0T0129mfig. 14F0T0130m
Give the instruction brochure
to the personnel who will be
in charge of repairing the tyre using
the kit.
WARNING
The kit cannot be used to re-
pair damage to the tyre side-
wall. Do not use the fast repair kit if
the tyre is damaged as the vehicle has
run a flat tyre.
WARNING
If the wheel rim is damaged
(the channel is so deformed
as to cause an air leakage) it cannot
be repaired. Do not remove the for-
eign body (screw or nail) from the tyre.
WARNINGIn the event of a puncture
caused by foreign bodies, it is
possible to repair tyres show-
ing damages on the track or
shoulder up to max 4 mm diameter.
119-150 Fiorino GB 1ed 21-10-2008 15:05 Pagina 126
Page 128 of 202

127
SAFETY
MAINTENANCE
AND CARE
TECHNICAL
SPECIFICATIONS
INDEX
DASHBOARDAND CONTROLS
STARTING
AND DRIVING
WARNING
LIGHTS AND
MESSAGES
IN AN
EMERGENCY
IMPORTANT INFORMATION:
The sealing fluid of the fast tyre repair kit
is effective with external temperatures be-
tween –20 °C and +50 °C.
INFLATION PROCEDURE
Do not operate the com-
pressor for longer than 20
consecutive minutes. Risk of over-
heating. The fast repair kit is not suit-
able for permanent repairs. The tyres
may only be repaired temporarily.
WARNING
Put on the safety gloves pro-
vided together with the fast
tyre repair kit.
WARNING
The cylinder contains ethyl-
ene glycol. Contains latex:
may cause an allergic reaction.
Harmful if swallowed. Irritates the
eyes. May cause sensitization by in-
halation or contact. Avoid contact
with your eyes, skin and clothes. In
the event of contact, wash immedi-
ately with plenty of water. Do not in-
duce vomiting if swallowed. Rinse
your mouth and drink plenty of wa-
ter. Call a doctor immediately. Keep
away from children. The product
must not be used by asthmatics. Do
not breath in the vapours during in-
sertion and suction. Call a doctor im-
mediately if allergic reactions are not-
ed. Store the cylinder in the specific
compartment, away from sources of
heat. The sealing fluid will expire. Re-
place the cylinder containing the
sealant after the expiration date.
WARNING
Do not dispose of the cylinder
and contained sealant in the
environment. Dispose of them
according to the national and
local laws in force.
fig. 15F0T0190m
❒Ensure that the handbrake is up.
Remove the tyre valve cap, extract the
flexible filler tube A-fig. 15and fasten
the ring Bonto the tyre valve;
119-150 Fiorino GB 1ed 21-10-2008 15:05 Pagina 127
Page 129 of 202

128
SAFETY
MAINTENANCE
AND CARE
TECHNICAL
SPECIFICATIONS
INDEX
DASHBOARDAND CONTROLS
STARTING
AND DRIVING
WARNING
LIGHTS AND
MESSAGES
IN AN
EMERGENCY
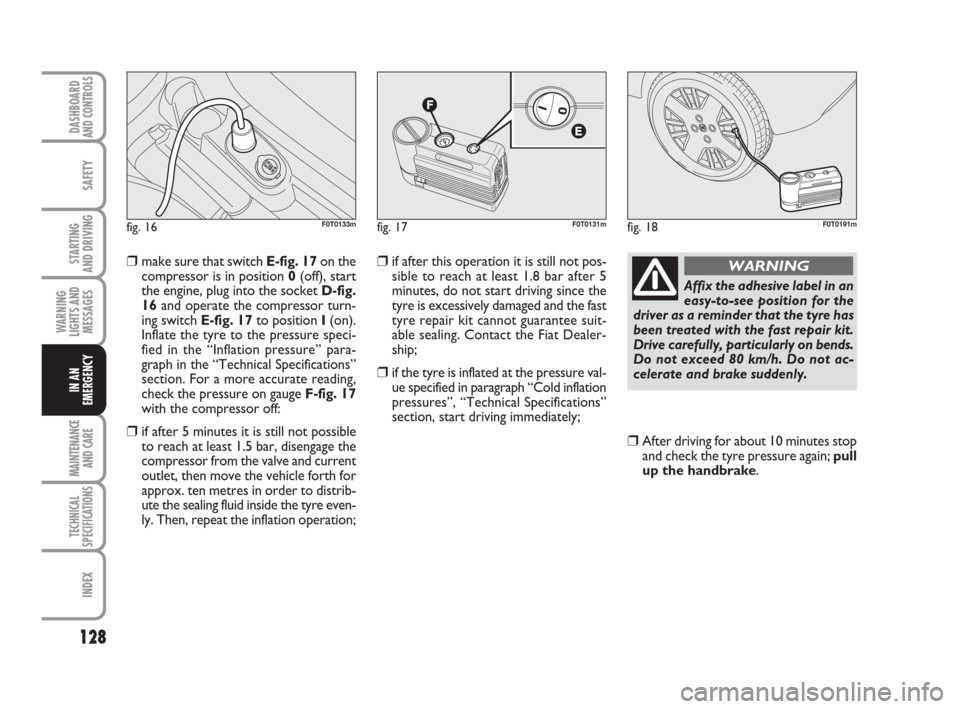
❒make sure that switch E-fig. 17on the
compressor is in position 0(off), start
the engine, plug into the socket D-fig.
16and operate the compressor turn-
ing switch E-fig. 17to position I(on).
Inflate the tyre to the pressure speci-
fied in the “Inflation pressure” para-
graph in the “Technical Specifications”
section. For a more accurate reading,
check the pressure on gauge F-fig. 17
with the compressor off:
❒if after 5 minutes it is still not possible
to reach at least 1.5 bar, disengage the
compressor from the valve and current
outlet, then move the vehicle forth for
approx. ten metres in order to distrib-
ute the sealing fluid inside the tyre even-
ly. Then, repeat the inflation operation;
❒if after this operation it is still not pos-
sible to reach at least 1.8 bar after 5
minutes, do not start driving since the
tyre is excessively damaged and the fast
tyre repair kit cannot guarantee suit-
able sealing. Contact the Fiat Dealer-
ship;
❒if the tyre is inflated at the pressure val-
ue specified in paragraph “Cold inflation
pressures”, “Technical Specifications”
section, start driving immediately;
❒After driving for about 10 minutes stop
and check the tyre pressure again; pull
up the handbrake.
fig. 16F0T0133mfig. 17F0T0131mfig. 18F0T0191m
Affix the adhesive label in an
easy-to-see position for the
driver as a reminder that the tyre has
been treated with the fast repair kit.
Drive carefully, particularly on bends.
Do not exceed 80 km/h. Do not ac-
celerate and brake suddenly.
WARNING
119-150 Fiorino GB 1ed 21-10-2008 15:05 Pagina 128
Page 130 of 202

129
SAFETY
MAINTENANCE
AND CARE
TECHNICAL
SPECIFICATIONS
INDEX
DASHBOARDAND CONTROLS
STARTING
AND DRIVING
WARNING
LIGHTS AND
MESSAGES
IN AN
EMERGENCY
❒If at least 1.8 bar pressure is read, re-
store proper pressure (with engine
running and handbrake on) and restart.
❒Drive with the utmost care to the near-
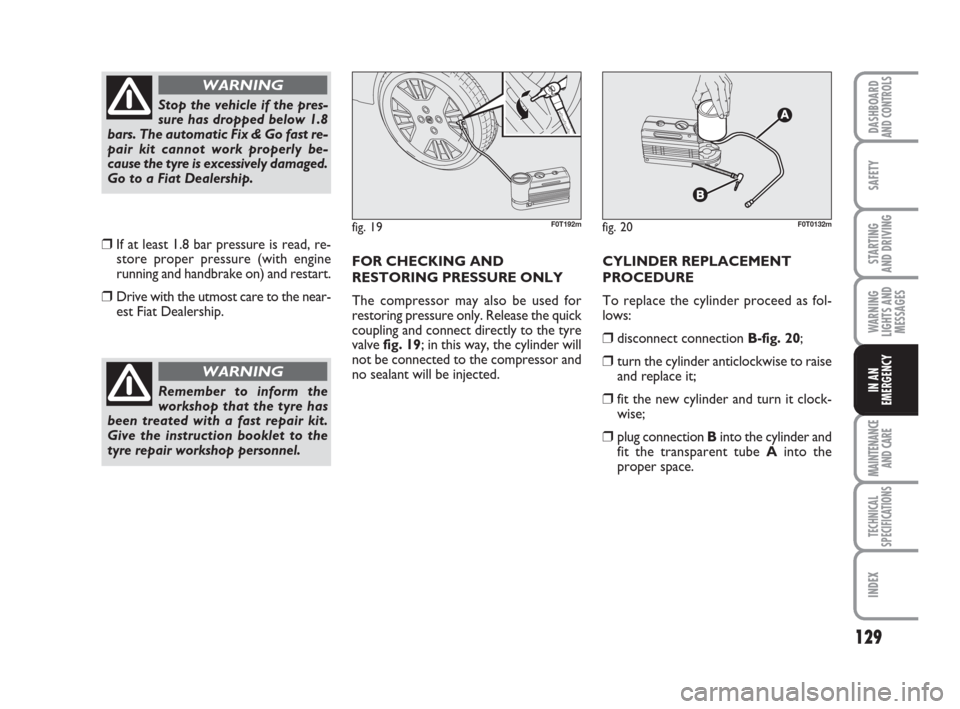
est Fiat Dealership.FOR CHECKING AND
RESTORING PRESSURE ONLY
The compressor may also be used for
restoring pressure only. Release the quick
coupling and connect directly to the tyre
valve fig. 19; in this way, the cylinder will
not be connected to the compressor and
no sealant will be injected. CYLINDER REPLACEMENT
PROCEDURE
To replace the cylinder proceed as fol-
lows:
❒disconnect connection B-fig. 20;
❒turn the cylinder anticlockwise to raise
and replace it;
❒fit the new cylinder and turn it clock-
wise;
❒plug connection Binto the cylinder and
fit the transparent tube Ainto the
proper space.
Stop the vehicle if the pres-
sure has dropped below 1.8
bars. The automatic Fix & Go fast re-
pair kit cannot work properly be-
cause the tyre is excessively damaged.
Go to a Fiat Dealership.
WARNING
Remember to inform the
workshop that the tyre has
been treated with a fast repair kit.
Give the instruction booklet to the
tyre repair workshop personnel.
WARNING
fig. 19F0T192mfig. 20F0T0132m
119-150 Fiorino GB 1ed 21-10-2008 15:05 Pagina 129
Page 131 of 202

130
SAFETY
MAINTENANCE
AND CARE
TECHNICAL
SPECIFICATIONS
INDEX
DASHBOARDAND CONTROLS
STARTING
AND DRIVING
WARNING
LIGHTS AND
MESSAGES
IN AN
EMERGENCY
WHEN NEEDING
TO CHANGE A BULB
GENERAL INSTRUCTIONS
❒Before changing a bulb check the con-
tacts for oxidation.
❒Burnt bulbs must be replaced by oth-
ers of the same type and power.
❒Always check the height of the head-
light beam after changing a bulb.
❒When a bulb is not working, check that
the corresponding fuse is intact before
replacing it: refer to the “If a fuse
blows” paragraph in this section for the
location of fuses.IMPORTANT A slight misting may appear
on the internal surface of the headlight:
this does not indicate a fault. It is a natur-
al event caused by the low temperature
and the degree of humidity in the air. It will
rapidly disappear when the headlights are
switched on. The presence of drops inside
the headlights indicates infiltration of wa-
ter. Go to a Fiat Dealership.
Modifications or repairs to
the electrical system that are
not carried out properly or do not
take the system technical specifica-
tions into account can cause mal-
functions leading to the risk of fire.
WARNING
Halogen bulbs contain pres-
surised gas which may cause
small fragments of glass to be pro-
jected outwards if the bulb is broken.
WARNING
Halogen lamps must be han-
dled holding the metallic part
only. Touching the transpar-
ent part of the bulb with your
fingers may reduce the intensity of the
emitted light and even compromise du-
ration of the lamp. In case of acciden-
tal contact, rub the lamp with a cloth
and spirit and leave to dry.
If possible, we recommend
that you let the Fiat Dealer-
ship replace the bulbs. Prop-
er operation and orientation
of the external lights are essential for
the safety of the running vehicle, and
for avoiding legal sanctions.
119-150 Fiorino GB 1ed 21-10-2008 15:05 Pagina 130
Page 132 of 202

131
SAFETY
MAINTENANCE
AND CARE
TECHNICAL
SPECIFICATIONS
INDEX
DASHBOARDAND CONTROLS
STARTING
AND DRIVING
WARNING
LIGHTS AND
MESSAGES
IN AN
EMERGENCY
BULB TYPES fig. 21
Various types of bulbs are fitted to your
vehicle.
A All glass bulb: clipped into place. Pull
to extract.
B Bayonet bulbs: to remove this type
of bulb from its holder, press the bulb
and turn it anticlockwise.
fig. 21F0T0022m
C Cylindrical bulbs: release from the
contacts to extract.
D Halogen bulbs: release the fastening
clip from the corresponding seat to re-
move the bulb.
E Halogen bulbs: release the fastening
clip from the corresponding seat to re-
move the bulb.
119-150 Fiorino GB 1ed 21-10-2008 15:05 Pagina 131