2008 FIAT GRANDE PUNTO belt
[x] Cancel search: beltPage 25 of 242

Day
YearMonth
English
Español
Deutsch
Français Português
Italiano
Polski
Nederland
Example:
fig. 22 Example:
MENU
ESC
briefly press
button
Briefly press button MENU ESCto start surfing from
the standard screen. To surf the menu use buttons
+or –.
NoteFor safety reasons, when the car is running, it is
possible to access only the reduced menu (for setting
the “Speed Beep”). When the car is stationary access
to the whole menu is enabled.
F0M1000g
MENU
ESC
briefly press
button
+
–
+
–
– +
+
–
+–
–
–
+
+
++ ––––
++ +
– –+ +
–
EXIT MENUSPEED BEEPRAIN SENSOR
SET TIME
SET DATE
SEE RADIO
AUTOCLOSE
UNITS
LANGUAGE BUZZER VOLUME BUTTON VOL. BELT BUZZER (
*) SERVICEPASSENGER BAG
(*) This function can be only displayed after deactivating the S.B.R. system (at Fiat Dealership).
–
+
TRIP B DATA
24
SAFETY
DEVICES
CORRECT USE
OF THE CAR
WARNING
LIGHTS AND
MESSAGES
IN AN
EMERGENCY
CAR
MAINTENANCE
TECHNICAL
SPECIFICATIONS
INDEX
DASHBOARD
AND CONTROLS
001-036 Punto GDX GB 31-07-2008 17:35 Pagina 24
Page 28 of 242

27
SAFETY
DEVICES
CORRECT USE
OF THE CAR
WARNING
LIGHTS AND
MESSAGES
IN AN
EMERGENCY
CAR
MAINTENANCE
TECHNICAL
SPECIFICATIONS
INDEX
DASHBOARD
AND CONTROLS
Example:Day
YearMonthEnglish
Portugês
Español
Français
Deutsch
Italiano
BELT BUZZER (where required)RAIN SENSOR
(where provided)
TRIP B DATA
SET DATE
FIRST PAGE
SEE RADIO
AUTOCLOSE
UNITS LANGUAGE BUZZER VOLUME BUTTON VOL.
MODE
briefly press
button
MENU
ESC
briefly press
button
fig. 25a
SERVICE
F0M1034g
SET TIME SPEED BEEP
EXIT MENU
PASSENGER AIRBAG
Nederlands
Briefly press button MENU ESCto start surfing from the stan-
dard screen. To surf the menu use buttons +or –. Note For
safety reasons, when the car is running, it is possible to access
only the reduced menu (for setting “Dimmer” and “Speed Beep”).
When the car is stationary access to the whole menu is enabled.
On cars provided with Connect Nav+ many functions are dis-
played on the navigator display.
001-036 Punto GDX GB 31-07-2008 17:35 Pagina 27
Page 33 of 242

32
SAFETY
DEVICES
CORRECT USE
OF THE CAR
WARNING
LIGHTS AND
MESSAGES
IN AN
EMERGENCY
CAR
MAINTENANCE
TECHNICAL
SPECIFICATIONS
INDEX
DASHBOARD
AND CONTROLS
Adjusting the button volume
(Button Vol.)
With this function the volume of the
roger-beep accompanying the activation
of buttons MENU ESC, +and –can be
adjusted according to 8 levels.
To adjust the volume proceed as follows:
– briefly press button MENU ESC: the
previously set volume “level” will flash on
the display;
– press button +or –for setting;
– briefly press button MENU ESCto go
back to the menu screen or press the but-
ton for long to go back to the standard
screen without storing settings.S.B.R. buzzer reactivation
(Belt Buzzer) (where required)
This function can be only displayed after
Fiat Dealership has deactivated the S.B.R.
system (see paragraph “S.B.R. system” in
section “Safety devices”).
Scheduled Servicing (Service)
Through this function it is possible to dis-
play information connected to proper car
servicing.
Proceed as follows:
– briefly press button MENU ESC: ser-
vice in km or mi, according to previous
setting, will be displayed (see paragraph
“Units”);
– briefly press button MENU ESCto go
back to the menu screen or press the but-
ton for long to go back to the standard
screen.NoteThe “Service schedule” includes car
maintenance every 30,000 km (or 18,000
mi); this is shown automatically, with the
ignition key at MAR, starting from 2,000
km (or 1,240 mi) from this deadline and
it is shown again every 200 km (or 124
mi). Below 200 km servicing indications
are displayed more frequently. Service in-
dications will be displayed km or mi ac-
cording to previous unit setting. When a
programmed maintenance interval
(coupon) is near to come, turning the ig-
nition key to MAR, the display will show
the message “Service” followed by the
number of km/mi to go before car servic-
ing. Contact a Fiat Dealership to carry out
any service operation provided by the
“Service schedule” and to reset the dis-
play.
001-036 Punto GDX GB 31-07-2008 17:35 Pagina 32
Page 37 of 242

36
SAFETY
DEVICES
CORRECT USE
OF THE CAR
WARNING
LIGHTS AND
MESSAGES
IN AN
EMERGENCY
CAR
MAINTENANCE
TECHNICAL
SPECIFICATIONS
INDEX
DASHBOARD
AND CONTROLS
Seat height adjustment
(where provided) fig. 27
Move lever Bupwards or downwards to
achieve the required height.
IMPORTANT Adjustment must be car-
ried out only seated in the relevant seat.
Back rest angle adjustment fig. 27
Turn knob C.
FRONT SEATS
fig. 27F0M0055m
Only make adjustments
when the car is stationary.
WARNING
Moving the seat backwards or
forwards fig. 27
Lift the lever Aand push the seat forwards
or backwards: in the driving position the
arms should rest on the rim of the steer-
ing wheel.
Once you have released the
lever, check that the seat is
firmly locked in the runners by trying
to move it back and forth. Failure to
lock the seat in place could result in
the seat moving suddenly and the dri-
ver losing control of the car.
WARNING
For maximum safety, keep
the back of your seat up-
right, lean back into it and make sure
the seat belt fits closely across your
chest and hips.
WARNING
Upholstery of your car has
been designed to withstand
wear deriving from common
use of the car. You are how-
ever recommended to avoid strong
and/or continuous scratching with
clothing accessories such as metallic
buckles, studs, Velcro fastenings and
the like, since these items cause cir-
cumscribed stress of the cover fabric
that could lead to yarn breaking, and
damage the cover as a consequence.fig. 28F0M0057m
Tilting the back rest
(3-door versions) fig. 28
Pull handle Aupwards, the back rest will
tilt and the seat can slide forward by push-
ing the back rest.
Bringing back the back rest the seat will
return to its original position (mechani-
cal memory).
Check that the seat is firm-
ly locked in the runners by
trying to move it back and forth.
WARNING
001-036 Punto GDX GB 31-07-2008 17:35 Pagina 36
Page 85 of 242

84
SAFETY
DEVICES
CORRECT USE
OF THE CAR
WARNING
LIGHTS AND
MESSAGES
IN AN
EMERGENCY
CAR
MAINTENANCE
TECHNICAL
SPECIFICATIONS
INDEX
DASHBOARD
AND CONTROLS
EXTENDING THE BOOT
Partial extension
(where provided)
(1/3 or 2/3) fig. 99
The boot can be partially (1/3 or 2/3) or
totally extended splitting the rear seat.
Proceed as follows:
❒lower completely the rear seat head re-
straints;
❒ check that the seat belt is not twisted;❒tilt cushions as shown by the arrow fig.
97;
❒use handles Aor B-fig. 98to unlock
respectively the left or right section of
the backrest and then guide the back-
rest onto the cushion.
The boot extension to the right makes it
possible to carry two passengers on the
rear seat left-hand side. The boot exten-
sion to the left makes it possible to carry
one passenger on the rear seat right-hand
side.
fig. 97 F0M0096mfig. 98F0M0097m
fig. 99F0M0137m
Total extension fig. 100
Tilt the rear seat completely to obtain
maximum boot extension.
Proceed as follows:
❒lower completely the rear seat head re-
straints;
❒check that the seat belt is not twisted;
❒tilt cushions as shown by the arrow fig.
97;
❒lift handles Aand B-fig. 100to release
the backrests and guide them onto the
cushion.
IMPORTANT If after tilting the rear seat,
you have to remove the rear parcel shelf,
position it as shown in fig. 102.
fig. 100F0M0098m
037-087 Punto GDX GB 31-07-2008 17:25 Pagina 84
Page 86 of 242

85
SAFETY
DEVICES
CORRECT USE
OF THE CAR
WARNING
LIGHTS AND
MESSAGES
IIN AN
EMERGENCY
CAR
MAINTENANCE
TECHNICAL
SPECIFICATIONS
INDEX
DASHBOARD
AND CONTROLS
fig. 103F0M0101m
fig. 102F0M0099mfig. 101F0M0221mfig. 104F0M0222m
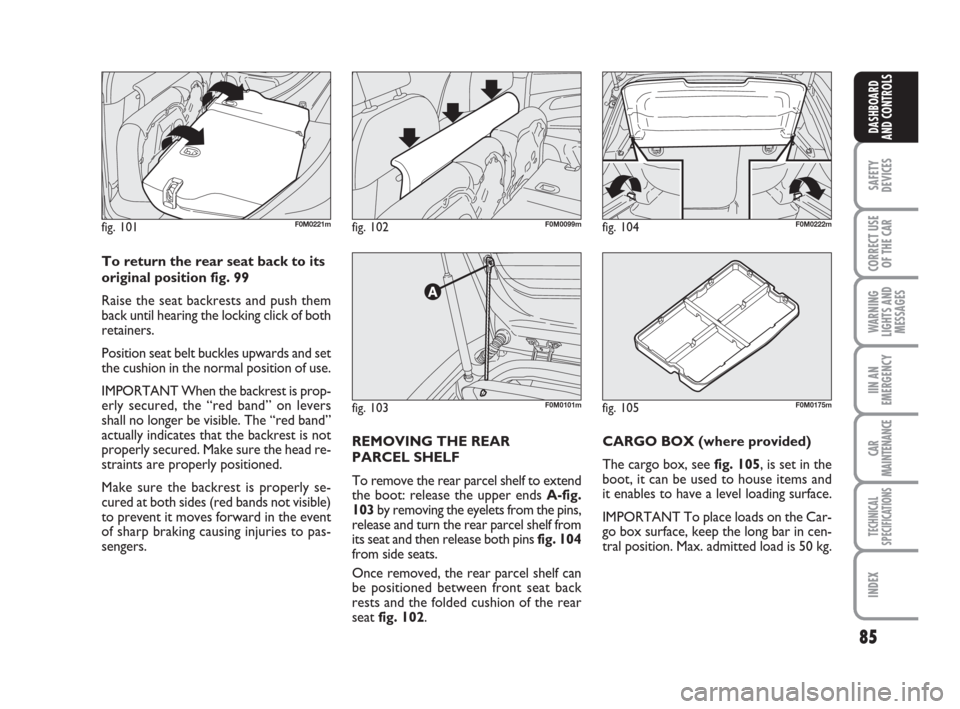
REMOVING THE REAR
PARCEL SHELF
To remove the rear parcel shelf to extend
the boot: release the upper ends A-fig.
103by removing the eyelets from the pins,
release and turn the rear parcel shelf from
its seat and then release both pins fig. 104
from side seats.
Once removed, the rear parcel shelf can
be positioned between front seat back
rests and the folded cushion of the rear
seat fig. 102.CARGO BOX (where provided)
The cargo box, see fig. 105, is set in the
boot, it can be used to house items and
it enables to have a level loading surface.
IMPORTANT To place loads on the Car-
go box surface, keep the long bar in cen-
tral position. Max. admitted load is 50 kg. To return the rear seat back to its
original position fig. 99
Raise the seat backrests and push them
back until hearing the locking click of both
retainers.
Position seat belt buckles upwards and set
the cushion in the normal position of use.
IMPORTANT When the backrest is prop-
erly secured, the “red band” on levers
shall no longer be visible. The “red band”
actually indicates that the backrest is not
properly secured. Make sure the head re-
straints are properly positioned.
Make sure the backrest is properly se-
cured at both sides (red bands not visible)
to prevent it moves forward in the event
of sharp braking causing injuries to pas-
sengers.
fig. 105F0M0175m
037-087 Punto GDX GB 31-07-2008 17:25 Pagina 85
Page 110 of 242

109
CORRECT USE
OF THE CAR
WARNING
LIGHTS AND
MESSAGES
IN AN
EMERGENCY
CAR
MAINTENANCE
TECHNICAL
SPECIFICATIONS
INDEX
DASHBOARD
AND CONTROLS
SAFETY
DEVICES
SEAT BELTS ........................................................................... 110
S.B.R. SYSTEM ....................................................................... 111
PRETENSIONERS.................................................................. 112
CARRYING CHILDREN SAFELY...................................... 115
PRESETTING FOR MOUNTING THE
“UNIVERSAL ISOFIX” CHILD RESTRAINT SYSTEM ..... 120
FRONT AIR BAGS................................................................ 121
SIDE AIR BAGS .................................................................... 124
SS S
A A
F F
E E
T T
Y Y
D D
E E
V V
I I
C C
E E
S S
109-126 Punto GDX GB 31-07-2008 17:26 Pagina 109
Page 111 of 242

110
CORRECT USE
OF THE CAR
WARNING
LIGHTS AND
MESSAGES
IN AN
EMERGENCY
CAR
MAINTENANCE
TECHNICAL
SPECIFICATIONS
IINDEX
DASHBOARD
AND CONTROLS
SAFETY
DEVICES
When the car is parked on a steep slope
the reel mechanism may block; this is nor-
mal. The reel mechanism prevents the
webbing coming out when it is jerked or
if the car brakes sharply, in a collision or
when cornering at high speeds.
The rear seat is fitted with inertial seat
belts with three anchor points and reel.Rear seat belts shall be worn as shown in
fig. 2.
SEAT BELTS
USING THE SEAT BELTS fig. 1
The belt should be worn keeping the chest
straight and rested against the seat back.
To fasten the seat belts, take hold the
tongue Aand insert it into the buckle B,
until hearing the locking click.
At removal, if it jams, let it rewind for a
short stretch, then pull it out again with-
out jerking.
To unfasten the seat belts, press button
C. Guide the seat belt with your hand
while it is rewinding, to prevent it from
twisting.
Through the reel, the belt automatically
adapts to the body of the passenger wear-
ing it, allowing freedom of movement.
fig. 1F0M0040mfig. 2F0M0041m
Never press button C-fig. 1
when travelling.
WARNING
109-126 Punto GDX GB 31-07-2008 17:26 Pagina 110