2008 DODGE RAM 3500 GAS wheel torque
[x] Cancel search: wheel torquePage 209 of 554
27. Transmission Oil Temperature Warning Light
(Automatic Transmissions Only)
This light indicates that there is excessive trans-
mission fluid temperature that might occur
with severe usage such as trailer towing. It may
also occur when operating the vehicle in a high
torque converter slip condition, such as 4-wheel-drive
operation (e.g., snow plowing, off- road operation). If this
light comes on, stop the vehicle and run the engine at idle
or faster, with the transmission in NEUTRAL until the
light goes off.
28. Odometer/Trip Odometer Button
Press this button to toggle between the odometer and the
trip odometer display. Holding the button in resets the
trip odometer reading when in trip mode.
29. Fuel Gauge
Shows level of fuel in tank when ignition switch is in the
ON position.30. Low Fuel Warning Light
When the fuel level drops to 1/16 tank, the fuel
symbol will light and a single chime will sound.
NOTE:If your vehicle is equipped with an overhead
console module (CMTC), it is possible for DTE to display
ªLO FUELº before the low fuel warning light turns on in
the instrument cluster. This could occur because the low
fuel warning is set to a specified fuel tank volume and
DTE is an estimated distance calculation based on vehicle
fuel economy and remaining fuel tank volume.
Vehicle fuel tank volumes are as follows:
²26 gal (98 L) - 1500 short box models
²34 gal (128 L) - 1500/2500/3500 short box models
²35 gal (132 L) - 1500/2500/3500 long box models
UNDERSTANDING YOUR INSTRUMENT PANEL 207
4
Page 328 of 554
Traction Control System (TCS)
The TCS system monitors the amount of wheel spin of
each of the driven wheels. If wheel spin is detected, brake
pressure is applied to the slipping wheel(s), and engine
power is reduced to provide enhanced acceleration and
stability. A feature of the TCS system functions similar to
a limited-slip differential and controls the wheel spin
across a driven axle. If one wheel on a driven axle is
spinning faster than the other, the system will apply the
brake of the spinning wheel. This will allow more engine
torque to be applied to the wheel that is not spinning.
This feature remains active even if TCS and ESP are in the
ªPartial Offº mode. Refer to ªESP (Electronic Stability
Program)º in this Section of this manual. This brake
pressure modulation transfers drive torque from slipping
to non-slipping wheels to provide optimal forward trac-
tion.
BAS (Brake Assist System)
The BAS is designed to optimize the vehicle's braking
capability during emergency braking maneuvers. The
BAS system detects an emergency braking situation by
sensing the rate and amount of brake application and
then applies optimum pressure to the brakes. The system
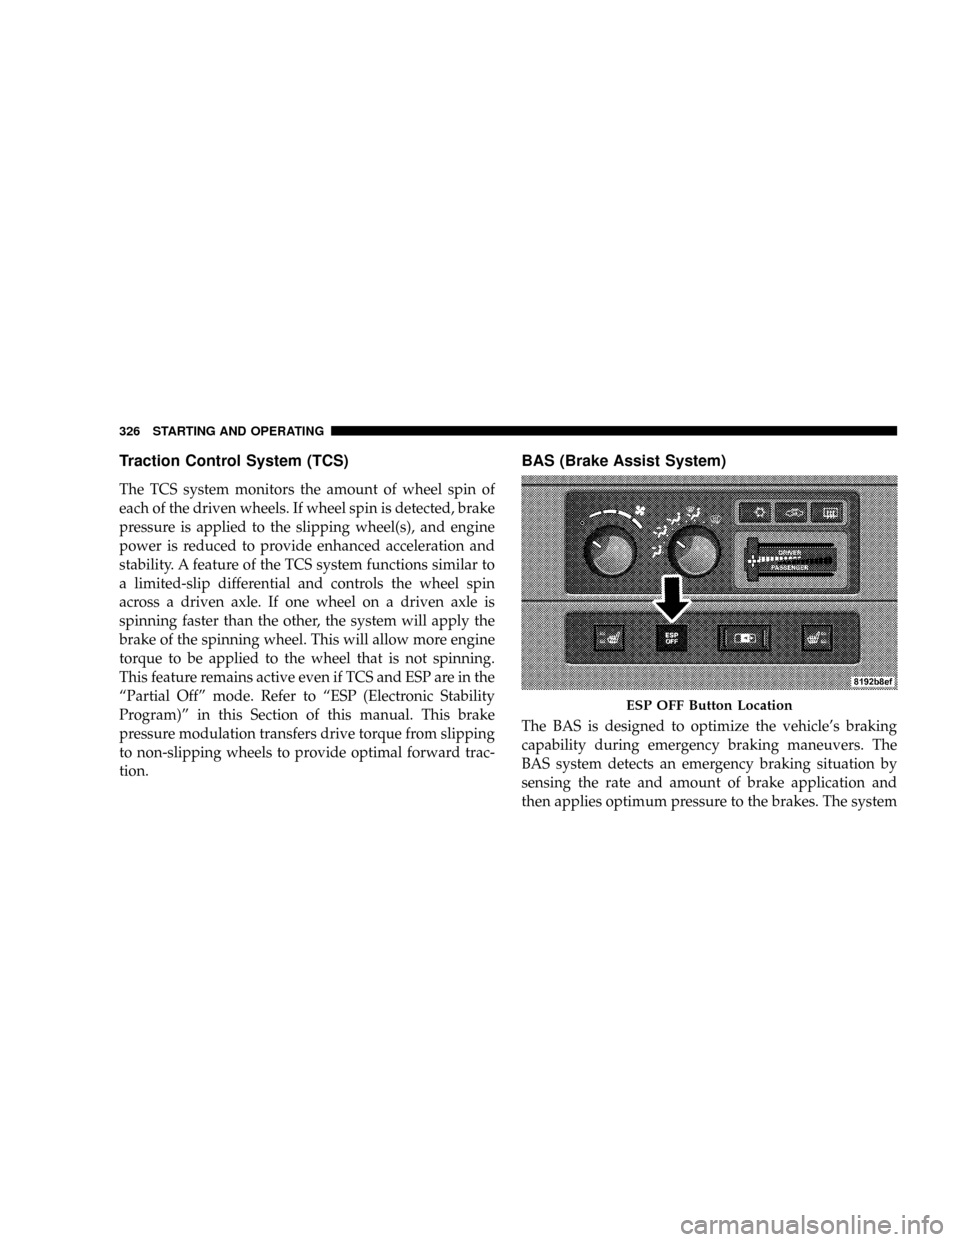
ESP OFF Button Location
326 STARTING AND OPERATING
Page 337 of 554
ESP Partial Off
This mode is entered by momentarily depressing the
9ESP OFFº switch. When in9Partial Off9mode, the TCS
portion of ESP, except for the ªlimited slipº feature
described in the TCS section, has been disabled and the
9ESP/TCS Indicator Light9will be illuminated. All other
stability features of ESP function normally. This mode is
intended to be used if the vehicle is in deep snow, sand,
or gravel conditions and more wheel spin than ESP
would normally allow is required to gain traction. To
turn ESP on again, momentarily depress the9ESP OFFº
switch. This will restore the normal ªESP Onº mode of
operation.
NOTE:To improve the vehicle's traction when driving
with snow chains, or starting off in deep snow, sand or
gravel, it may be desirable to switch to the ªPartial Offº
mode by pressing the ESP switch. Once the situation
requiring ESP to be switched to the ªPartial Offº mode isovercome, turn ESP back on by momentarily depressing
the ªESP Control Switchº. This may be done while the
vehicle is in motion.
WARNING!
In the Partial Off mode, the engine torque reduction
and stability features are desensitized. Therefore, the
enhanced vehicle stability offered by ESP is
unavailable.
All 4WD vehicles in Auto and 4HI Modes can also
choose the following ESP operating mode. This is
the only ESP operating mode in 4LO:
Full Off
This mode is intended for off-road use when ESP stability
features could inhibit vehicle maneuverability due to trail
conditions. This mode is entered by depressing and
STARTING AND OPERATING 335
5
Page 430 of 554

²Connect the jack tube extension and wheel wrench.
Before raising the wheel off the ground, make sure
that the jack will not damage surrounding truck
parts and adjust the jack position as required.
NOTE:If the 2500/3500 bottle jack will not lower by
turning the dial (thumbwheel) by hand, it may be neces-
sary to use the jack drive tube in order to lower the jack.
4. By rotating the wheel wrench clockwise, raise the
vehicle until the wheel just clears the surface.
WARNING!
Raising the vehicle higher than necessary can make
the vehicle unstable and cause an accident. It could
slip off the jack and hurt someone near it. Raise the
vehicle only enough to remove the tire.5. Remove the wheel nuts and pull the wheel off. Install
the spare wheel and wheel nuts with the cone shaped end
of the nuts toward the wheel on 1500/2500/3500 single
rear-wheel (SRW) models. On 3500 dual rear-wheel mod-
els (DRW) the lug nuts are a two-piece assembly with a
flat face. Lightly tighten the nuts. To avoid risk of forcing
the vehicle off the jack, do not fully tighten the nuts until
the vehicle has been lowered.
6. Using the wheel wrench, finish tightening the nuts
using a crisscross pattern. Correct nut tightness is 135 ft
lbs (183 N´m) torque for 1500/2500/3500 single-rear
wheel (SRW) models, and 145 ft lbs (197 N´m) for 3500
dual rear-wheel models. If in doubt about the correct
tightness, have them checked with a torque wrench by
your authorized dealer or at a service station.
428 WHAT TO DO IN EMERGENCIES
Page 434 of 554
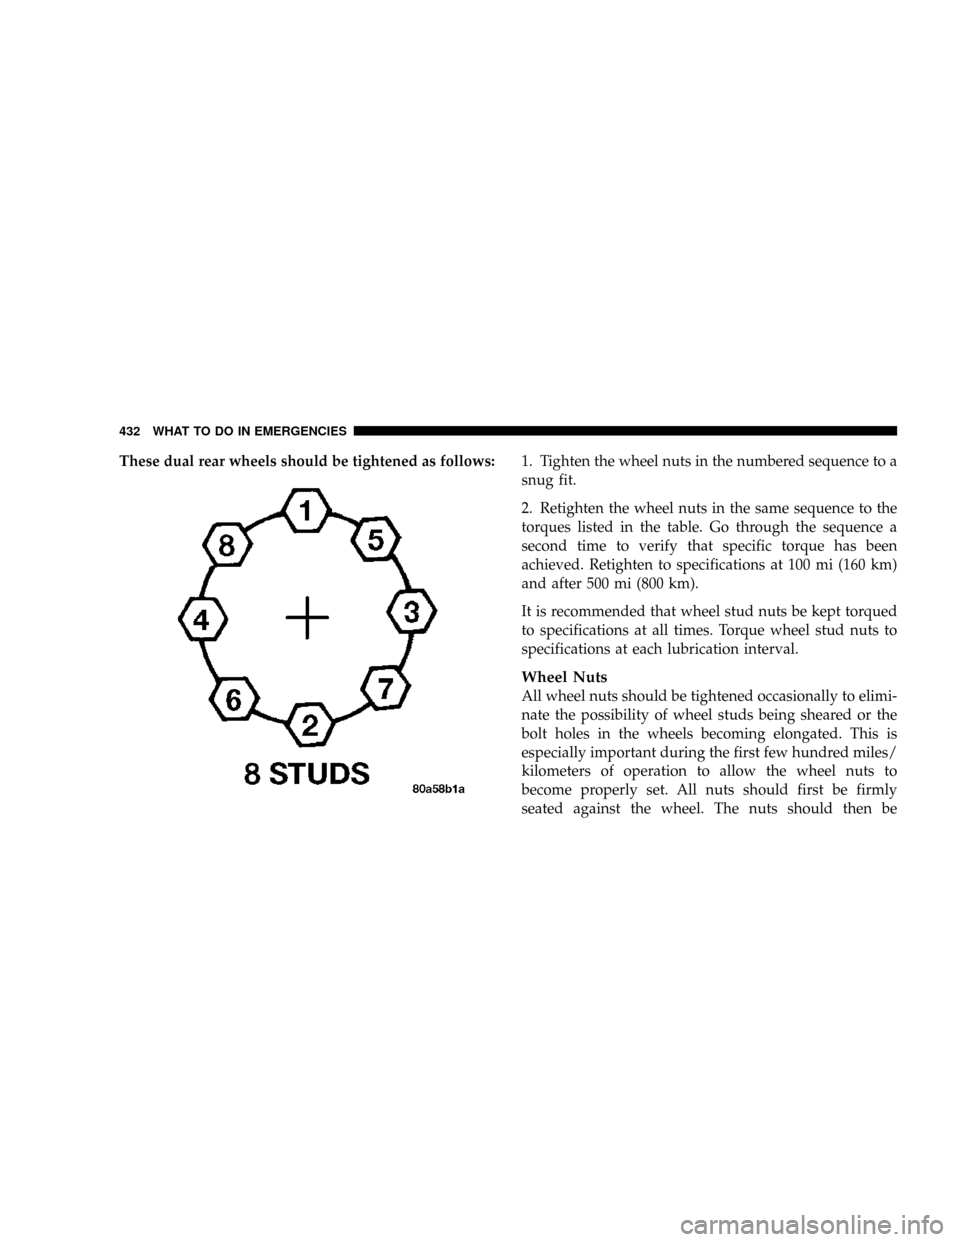
These dual rear wheels should be tightened as follows:1. Tighten the wheel nuts in the numbered sequence to a
snug fit.
2. Retighten the wheel nuts in the same sequence to the
torques listed in the table. Go through the sequence a
second time to verify that specific torque has been
achieved. Retighten to specifications at 100 mi (160 km)
and after 500 mi (800 km).
It is recommended that wheel stud nuts be kept torqued
to specifications at all times. Torque wheel stud nuts to
specifications at each lubrication interval.
Wheel Nuts
All wheel nuts should be tightened occasionally to elimi-
nate the possibility of wheel studs being sheared or the
bolt holes in the wheels becoming elongated. This is
especially important during the first few hundred miles/
kilometers of operation to allow the wheel nuts to
become properly set. All nuts should first be firmly
seated against the wheel. The nuts should then be
432 WHAT TO DO IN EMERGENCIES
Page 435 of 554
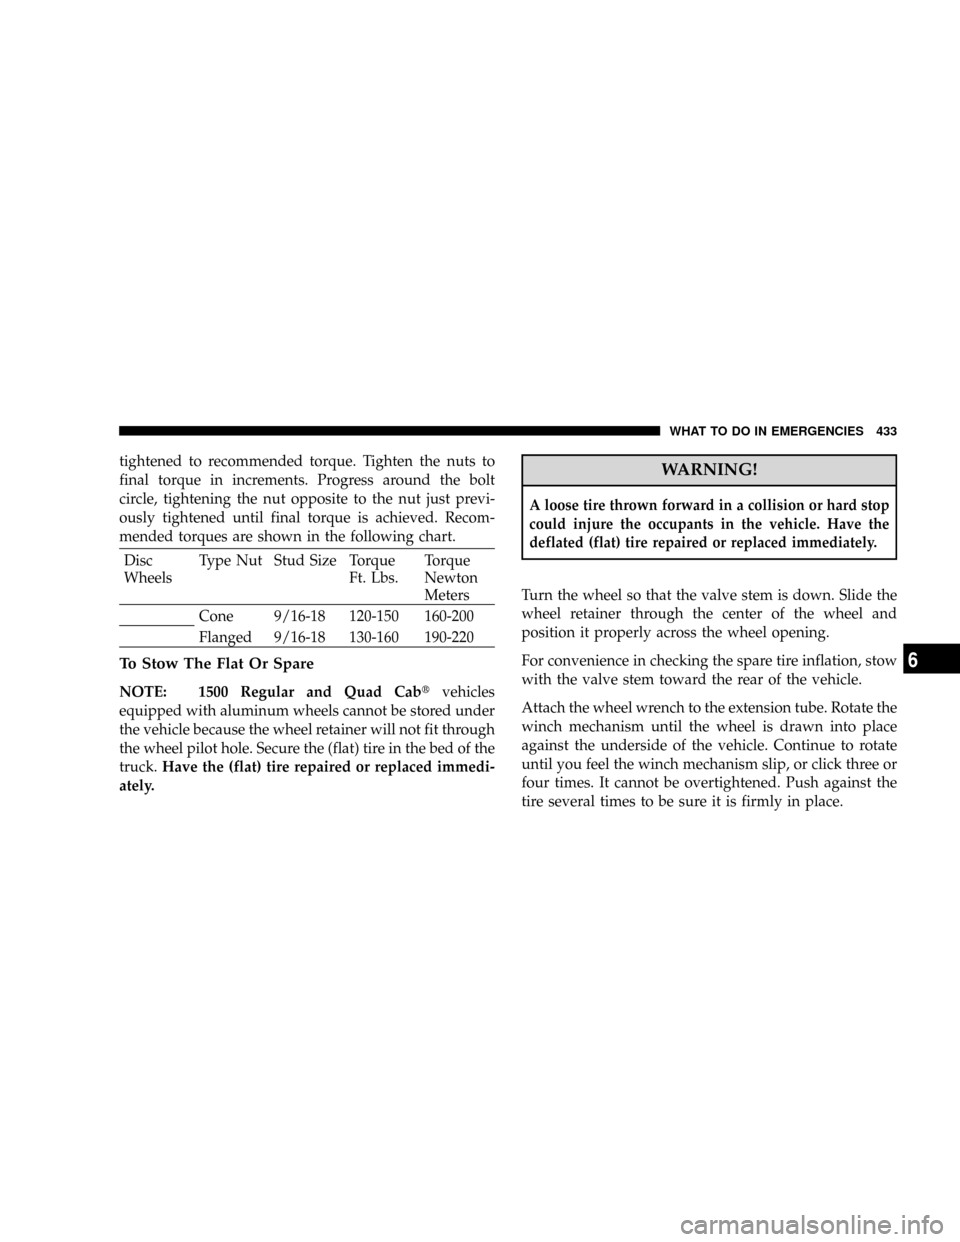
tightened to recommended torque. Tighten the nuts to
final torque in increments. Progress around the bolt
circle, tightening the nut opposite to the nut just previ-
ously tightened until final torque is achieved. Recom-
mended torques are shown in the following chart.
Disc
WheelsType Nut Stud Size Torque
Ft. Lbs.Torque
Newton
Meters
Cone 9/16-18 120-150 160-200
Flanged 9/16-18 130-160 190-220
To Stow The Flat Or Spare
NOTE: 1500 Regular and Quad Cabtvehicles
equipped with aluminum wheels cannot be stored under
the vehicle because the wheel retainer will not fit through
the wheel pilot hole. Secure the (flat) tire in the bed of the
truck.Have the (flat) tire repaired or replaced immedi-
ately.
WARNING!
A loose tire thrown forward in a collision or hard stop
could injure the occupants in the vehicle. Have the
deflated (flat) tire repaired or replaced immediately.
Turn the wheel so that the valve stem is down. Slide the
wheel retainer through the center of the wheel and
position it properly across the wheel opening.
For convenience in checking the spare tire inflation, stow
with the valve stem toward the rear of the vehicle.
Attach the wheel wrench to the extension tube. Rotate the
winch mechanism until the wheel is drawn into place
against the underside of the vehicle. Continue to rotate
until you feel the winch mechanism slip, or click three or
four times. It cannot be overtightened. Push against the
tire several times to be sure it is firmly in place.
WHAT TO DO IN EMERGENCIES 433
6
Page 550 of 554
Spinning............................ 353
Tread Wear Indicators................... 353
Wheel Mounting....................... 423
Wheel Nut Torque..................... 428
Tongue Weight/Trailer Weight.............. 390
Torque Converter Clutch.................. 288
Tow Hooks, Emergency................... 438
Towing............................... 385
24-Hour Towing Assistance............... 104
Disabled Vehicle....................... 439
Guide.............................. 390
Recreational.......................... 406
Weight.............................. 390
Towing Assistance....................... 104
Traction.............................. 314
Traction Control......................206,326
Trailer Sway Control (TSC)................. 337
Trailer Towing.......................... 385
Cooling System Tips.................... 399Hitches............................. 389
Minimum Requirements................. 392
Mirrors...........................89,400
Trailer and Tongue Weight................ 390
Wiring.............................. 396
Trailer Towing Guide..................... 390
Trailer Weight.......................... 390
Transaxle
Automatic............................ 12
Manual.............................. 14
Transfer Case........................... 475
Electronically Shifted.................298,306
Fluid............................... 511
Transmission
Automatic........................283,476
Fluid............................... 511
Maintenance.......................... 476
Manual.....................279,288,291,476
Shifting..........................282,291
548 INDEX
Page 551 of 554
Transmitter, Garage Door Opener (HomeLinkt) . . 156
Tread Wear Indicators.................... 353
Trip Computer.......................... 149
Trip Odometer.......................199,207
Turn Signals...................139,196,495,499
UConnectt(Hands-Free Phone).............. 91
Underhood Fuses........................ 489
Uniform Tire Quality Grades................ 528
Universal Transmitter..................... 156
Variance, Compass....................... 155
Vehicle Identification Number (VIN)............ 7
Vehicle Loading......................344,381
Vehicle Modifications/Alterations.............. 7
Vehicle Storage......................... 493
Video Entertainment SystemŸ
(Rear Seat Video System).................. 251
Voltmeter............................. 196Warning Lights
(Instrument Cluster Description)............. 196
Warnings and Cautions..................... 6
Warranty Information..................... 526
Washers, Windshield..................142,463
Washing Vehicle......................... 484
Water
Driving Through...................... 315
Wheel Alignment and Balance............... 356
Wheel and Wheel Trim.................... 486
Wheel and Wheel Trim Care................ 486
Wheel Cover........................... 429
Wheel Mounting........................ 423
Wheel Nut Torque....................428,432
Wind Buffeting.......................34,166
Window Fogging........................ 269
Windows.............................. 32
Power............................... 32
Rear Sliding.......................... 183
INDEX 549
10