2008 DODGE RAM 3500 DIESEL headlamp
[x] Cancel search: headlampPage 82 of 527
mSeats................................115
N40-20-40 Front Seat....................116
NReclining Seats.......................117
NAdjustable Head Restraints..............118
NManual Rotary Lumbar Support Adjustment Ð
If Equipped.........................119
NPower Seats Ð If Equipped..............119
NRear Seat Features Ð Mega Cab Models.....121
NHeated Seats Ð If Equipped.............126
mTo Open And Close The Hood.............127
mLights...............................129
NInterior Lights.......................129
NBattery Saver........................130
NHeadlamp Delay......................131NHeadlights, Parking Lights, Panel Lights.....131
NDaytime Running Lights (Canada Only And
Fleet Vehicles)........................132
NLights-On Reminder...................132
NFog Lights Ð If Equipped...............132
NCargo Light Ð If Equipped..............133
NMultifunction Control Lever..............133
mWindshield Wipers And Washers............135
NWindshield Wipers....................135
NWindshield Washers...................136
mTilt Steering Column....................137
mDriver Adjustable Pedals Ð If Equipped......138
NAdjustment.........................139
80 UNDERSTANDING THE FEATURES OF YOUR VEHICLE
Page 132 of 527
Courtesy and dome lights are turned on when the front
doors are opened, when the dimmer control (rotating
wheel on the right side of the switch) is rotated to the
upward detent position, or if equipped, when the UN-
LOCK button is pressed on the key fob. When a door is
open and the interior lights are on, rotating the dimmer
control all the way down to the OFF detent will cause all
the interior lights to go out. This is also known as the
9Party9mode because it allows the doors to stay open for
extended periods of time without discharging the vehi-
cle's battery.
The brightness of the instrument panel lighting can be
regulated by rotating the dimmer control up (brighter) or
down (dimmer). When the headlights are ON you can
supplement the brightness of the odometer, trip odom-
eter, radio and overhead console by rotating the control
up until you hear a click. This feature is termed the
ªParadeº mode and is useful when headlights are re-
quired during the day.Mega Cabt/Quad Cabtmodels may have an optional
switched dome lamp that may be operated by pressing
the lens.
Battery Saver
To protect the life of your vehicle's battery, load shedding
is provided for both the interior and exterior lights.
If the ignition is OFF and any door is left ajar for 10
minutes or the dimmer control is rotated upwards for 10
minutes, the interior lights will automatically turn off.
If the headlamps remain on while the ignition is cycled
OFF, the exterior lights will automatically turn off after
eight minutes. If the headlamps are turned on and left on
for eight minutes while the ignition is OFF, the exterior
lights will automatically turn off.
NOTE:Battery saver mode is cancelled if the ignition is
ON.
130 UNDERSTANDING THE FEATURES OF YOUR VEHICLE
Page 133 of 527
Headlamp Delay
To aid in your exit, your vehicle is equipped with a
headlamp delay that will leave the headlamps on for 90
seconds. This delay is initiated when the ignition is
turned OFF while the headlamp switch is ON, and then
the headlamp switch is cycled OFF. Headlamp delay can
be cancelled by either turning the headlamp switch ON
then OFF, or by turning the ignition ON.
Headlights, Parking Lights, Panel Lights
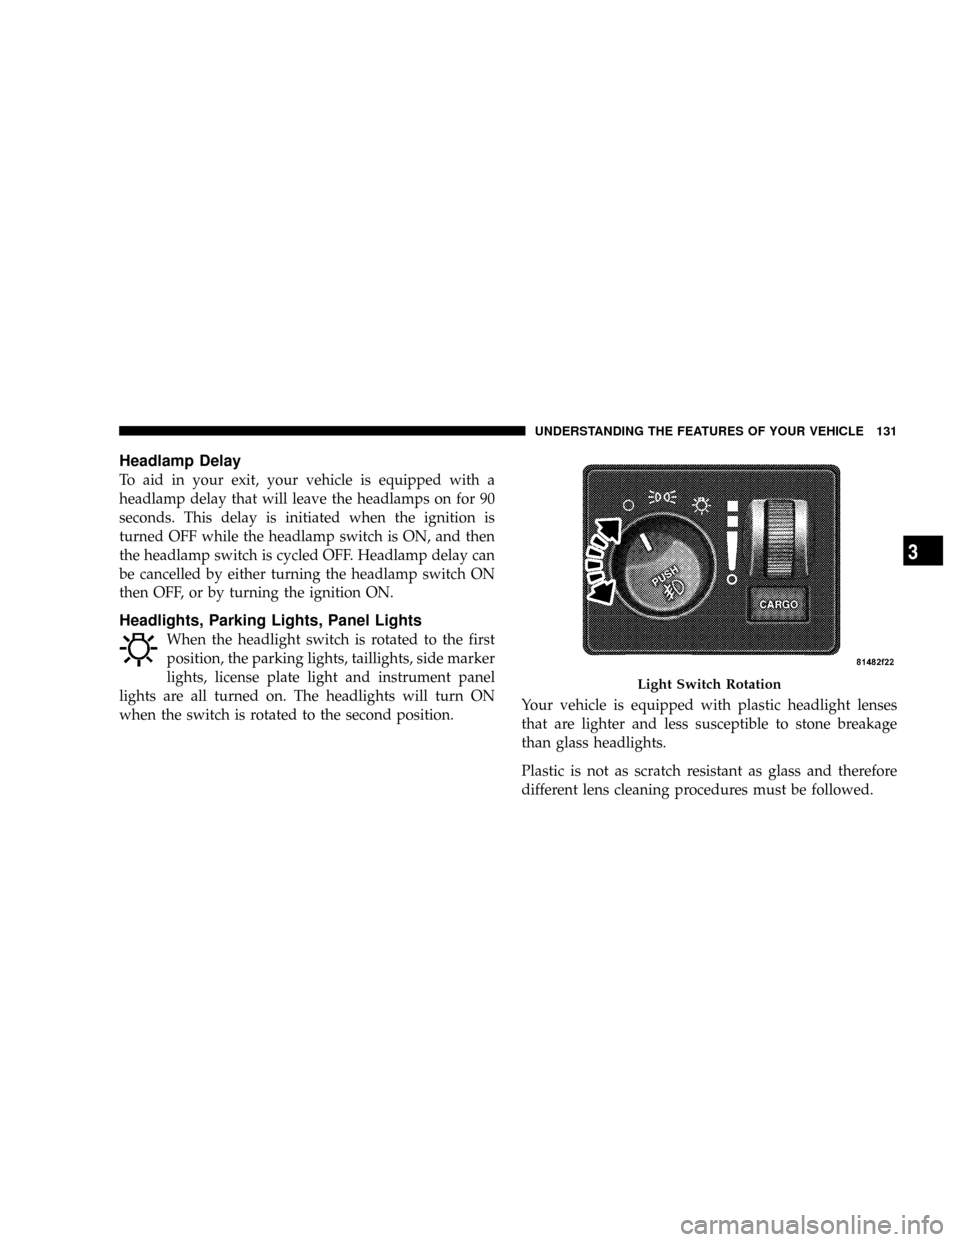
When the headlight switch is rotated to the first
position, the parking lights, taillights, side marker
lights, license plate light and instrument panel
lights are all turned on. The headlights will turn ON
when the switch is rotated to the second position.Your vehicle is equipped with plastic headlight lenses
that are lighter and less susceptible to stone breakage
than glass headlights.
Plastic is not as scratch resistant as glass and therefore
different lens cleaning procedures must be followed.
Light Switch Rotation
UNDERSTANDING THE FEATURES OF YOUR VEHICLE 131
3
Page 151 of 527
NOTE:If this feature is enabled, the headlamps will be
on during the engine pre-heat and cold crank; therefore,
it is recommended that the feature be disabled when
overnight ambient temperature is at or below 20ÉF (-7ÉC)
to prevent excessive drain on batteries during cold crank-
ing.
²ªUNIT IN > US/METRICº ± The EVIC and odometer
display can be changed between English and Metric
units of measure. To make your selection, press and
release the RESET button until ªUSº or ªMETRICº
appears.
²ªCOMPASS VARIANCE > 8º ± Press the RESET
button to change the compass variance setting. For
additional information, refer to ªCompass Varianceº
in this section.
²ªCOMPASS CALIBRATE > YESº ± Press the RESET
button to calibrate the compass. For additional infor-
mation, refer to ªCompass Calibrateº in this section.
Compass/Temperature Button
Pressing the Compass/Temperature button
will return the display to the normal compass/
temperature display.
NOTE:Temperature accuracy can be affected from heat
soak. For best accuracy, the vehicle should be driven at a
speed greater than 25 mph (40 km/h) for several min-
utes.
Automatic Compass Calibration
This compass is self-calibrating, which eliminates the
need to set the compass manually. When the vehicle is
new, the compass may appear erratic and the EVIC will
display ªCALº until the compass is calibrated. You may
also calibrate the compass by completing one or more
360É turns (in an area free from large metal or metallic
objects) until the ªCALº message displayed in the EVIC
turns off. The compass will now function normally.
UNDERSTANDING THE FEATURES OF YOUR VEHICLE 149
3
Page 277 of 527
²Voltmeter Operation:
1. The voltmeter may show a gauge fluctuation if
certain engine temperatures are below 66ÉF (19ÉC).
This cycling operation is caused by the post-heat cycle
of the intake manifold heater system. The number of
cycles and the length of the cycling operation is
controlled by the engine control module. Post-heat
operation can run for several minutes, and then the
electrical system and voltmeter needle will stabilize.
2. The cycling action will cause temporary dimming of
the headlamps, interior lamps, and also a noticeable
reduction in blower motor speed.
Cold Weather Precautions
Operation in ambient temperature below 32ÉF (0ÉC) may
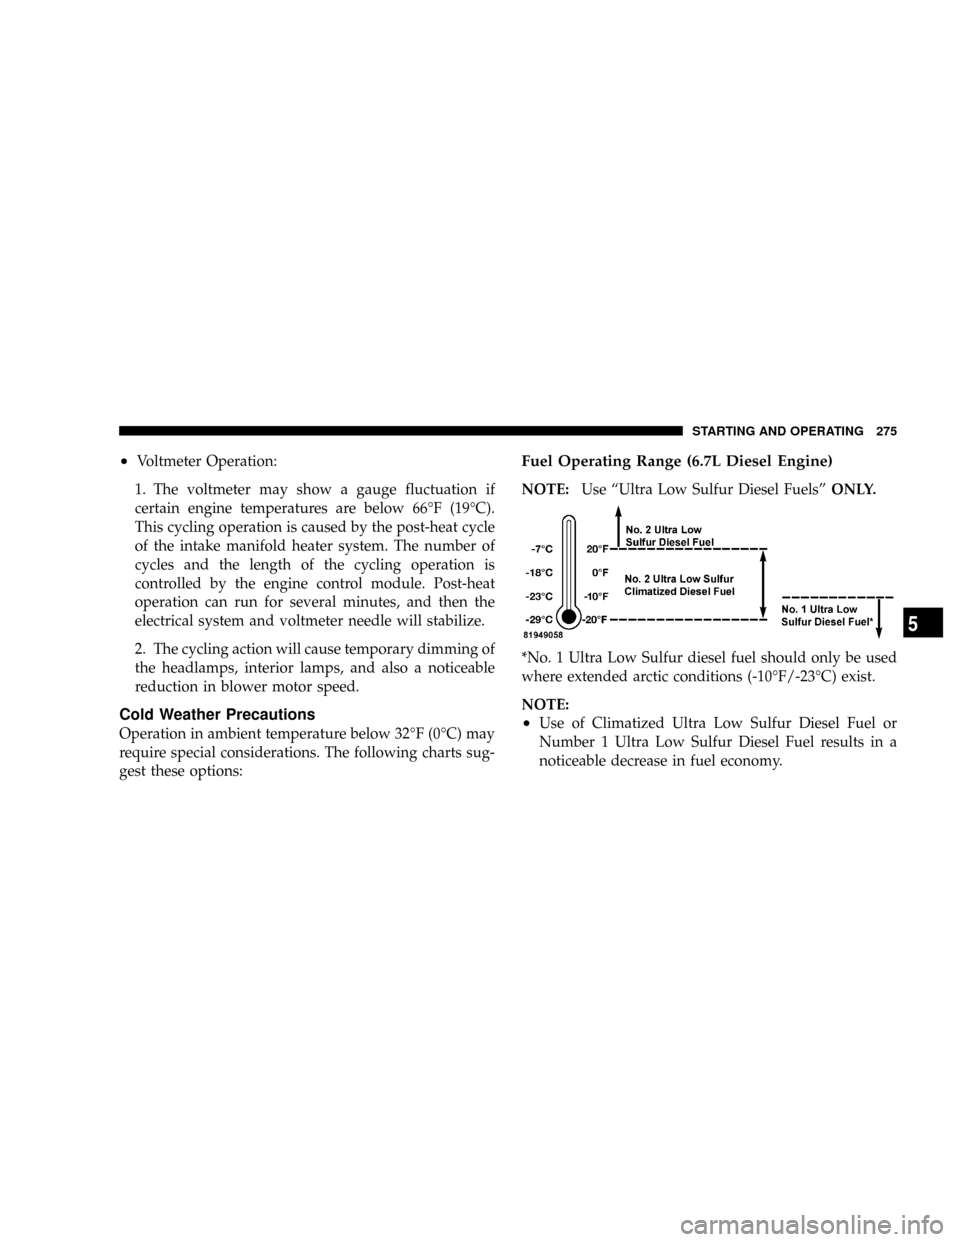
require special considerations. The following charts sug-
gest these options:
Fuel Operating Range (6.7L Diesel Engine)
NOTE:Use ªUltra Low Sulfur Diesel FuelsºONLY.
*No. 1 Ultra Low Sulfur diesel fuel should only be used
where extended arctic conditions (-10ÉF/-23ÉC) exist.
NOTE:
²Use of Climatized Ultra Low Sulfur Diesel Fuel or
Number 1 Ultra Low Sulfur Diesel Fuel results in a
noticeable decrease in fuel economy.
STARTING AND OPERATING 275
5
Page 278 of 527
²Climatized Ultra Low Sulfur Diesel Fuel is a blend of
Number 2 Ultra Low Sulfur and Number 1 Ultra Low
Sulfur Diesel Fuels which reduces the temperature at
which wax crystals form in fuel.
NOTE:The engine requires the use ofªUltra Low
Sulfur Diesel Fuelº. Use of incorrect fuel could result in
engine and exhaust system damage. Refer to Fuel Re-
quirements in this section for further details on fuel
recommendations.
Engine Block Heater
The engine block heater warms engine coolant and
permits quicker starts in cold weather. Connect the heater
cord to a ground±fault interrupter protected 110±115 volt
AC electrical outlet with a grounded, three-wire exten-
sion cord.
The engine block heater cord is routed under the hood to
the right side and can be located just behind the grille
near the headlamp.NOTE:The engine block heater cord is a factory in-
stalled option. If your vehicle is not equipped, heater
cords are available from your authorized Mopartdealer.
The block heater must be plugged in at least one hour to
have an adequate warming effect on the coolant.
WARNING!
Remember to disconnect the cord before driving.
Damage to the 110±115 volt electrical cord could
cause electrocution.
NOTE:The block heater will require 110 Volts AC and
6.5 Amps to activate the heater element.
276 STARTING AND OPERATING
Page 349 of 527
Light will turn OFF, as long as no tire pressure is below
the low-pressure warning limit in any of the four active
road tires. The vehicle may need to be driven for up to 10
minutes above 15 mph (25 km/h) in order for the TPMS
to receive this information.
General Information
This device complies with part 15 of the FCC rules and
RSS 210 of Industry Canada. Operation is subject to the
following conditions:
²This device may not cause harmful interference.
²This device must accept any interference received,
including interference that may cause undesired op-
eration.
The tire pressure sensors are covered under one of the
following licenses:
United States.....................KR5S120123
Canada........................2671-S120123
ENGINE RUNAWAY
WARNING!
In case of engine runaway due to flammable fumes
from gasoline spills or turbocharger oil leaks being
sucked into the engine, do the following to help
avoid personal injury and/or vehicle damage:
1. Shut off engine ignition switch.
2. Using a CO
2or dry chemical type fire extin-
guisher, direct the spray from the fire extinguisher
into the grille on the passenger side so that the spray
enters the engine air intake.
The inlet for the engine air intake is located behind
the passenger side headlamp and receives air
through the grille.
STARTING AND OPERATING 347
5