Page 242 of 527
2. To show the GPS clock, select ªDisplayed Clock: GPS
Clockº and press ENTER.
3. To adjust the time zone, Select ªTime Zoneº and press
ENTER. Select the appropriate time zone and press
ENTER.
4. To turn daylight savings on or off, select ªDaylight
Savingsº and press ENTER. Select ªOnº or ªOffº and
press ENTER.
5. Select DONE to exit from the clock setting mode. Press
ENTER to save your changes. If you press CANCEL or
NAV then your changes will not be saved.
User Defined Clock
If you wish to set the clock to a time different than the
system clock, you can manually adjust the time by
choosing the ªUser Defined Clockº option.
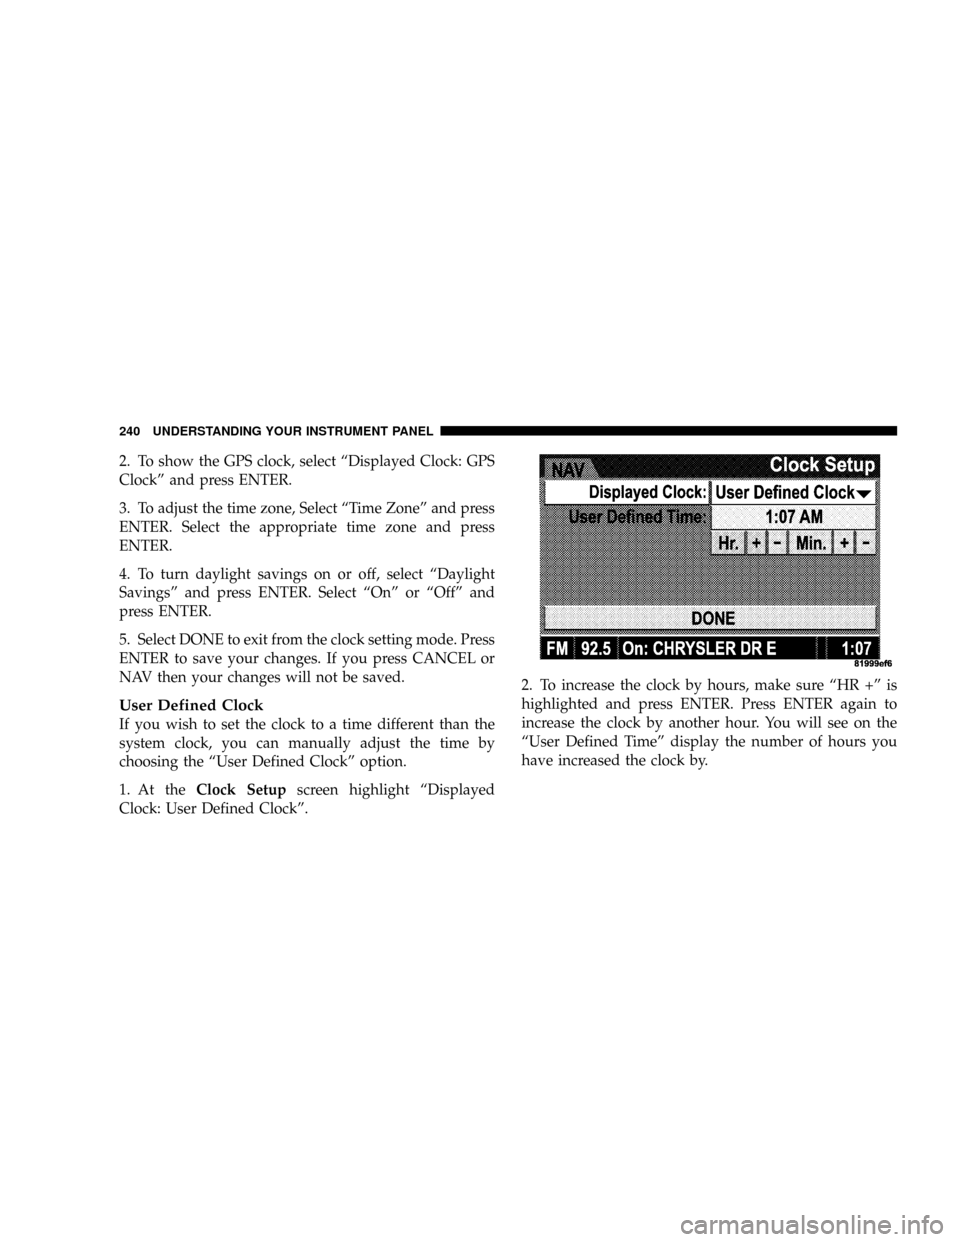
1. At theClock Setupscreen highlight ªDisplayed
Clock: User Defined Clockº.2. To increase the clock by hours, make sure ªHR +º is
highlighted and press ENTER. Press ENTER again to
increase the clock by another hour. You will see on the
ªUser Defined Timeº display the number of hours you
have increased the clock by.
240 UNDERSTANDING YOUR INSTRUMENT PANEL
Page 246 of 527
Press and release the SCAN button (if equipped) to
automatically change channels every seven seconds. The
radio will pause on each channel for seven seconds
before moving on to the next channel. The word9SCAN9
will appear in the display between each channel change.
Press the SCAN button a second time to stop the search.
NOTE:Channels that may contain objectionable content
can be blocked. Contact Sirius Customer Care at 888-539-
7474 to discuss options for channel blocking or unblock-
ing. Please have your ESN/SID information available.
Storing And Selecting Preset Channels
In addition to the 12 AM and 12 FM preset stations, you
may also commit 12 satellite stations to pushbutton
memory. These satellite channel preset stations will not
erase any AM or FM preset memory stations. Follow the
memory preset procedures that apply to your radio.
Using The PTY (Program Type) Button Ð If
Equipped
Follow the PTY button instructions that apply to your
radio.
PTY Button SCAN
When the desired program type is obtained, press the
SCAN button within five seconds. The radio will play
seven seconds of the selected channel before moving to
the next channel of the selected program type. Press the
SCAN button a second time to stop the search.
NOTE:Pressing the SEEK or SCAN button, while
performing a music type scan, will change the channel by
one and stop the search. Pressing a preset memory button
during a music type scan will call up the memory
channel and stop the search.
244 UNDERSTANDING YOUR INSTRUMENT PANEL
Page 254 of 527
Air Conditioning and Heating Ð If Equipped
Air Conditioning Operation
To turn on the Air Conditioning, set the fan
control at any speed and press the snowflake
button located at the right of the control panel.
Conditioned air will be directed through theoutlets selected by the mode control. A light in the
snowflake button shows that the air conditioning is on.
Press the button a second time to turn the air condition-
ing off.
Slight changes in engine speed or power may be noticed
when the air conditioning compressor is on. This is a
normal occurrence as the compressor will cycle on and
off to maintain comfort and increase fuel economy.
The mode control (at the right of the
control panel) can be set in any of the
following positions:
Air Conditioning And Heating
252 UNDERSTANDING YOUR INSTRUMENT PANEL
Page 261 of 527
Circulation
The cab is designed with features to promote outside air
circulation. There are grilles in the cab back panel. These
are air exhausters that provide the means for regular
exchange of cab air.
Side window demisters direct airflow specifically to the
window glass to help prevent interior fogging of the
glass. They are located in the extreme outside upper
edges of the instrument panel. The demisters also pro-
vide extra air ducts for circulation. They are in operation
whenever the Floor, Mix or Defrost modes are in use.
NOTE:When you turn off the engine you may hear a
hissing sound from under the hood for a short period of
time. This is a normal condition that occurs if the air
conditioning system has been on. It is not an indication of
a problem with the air conditioning system.
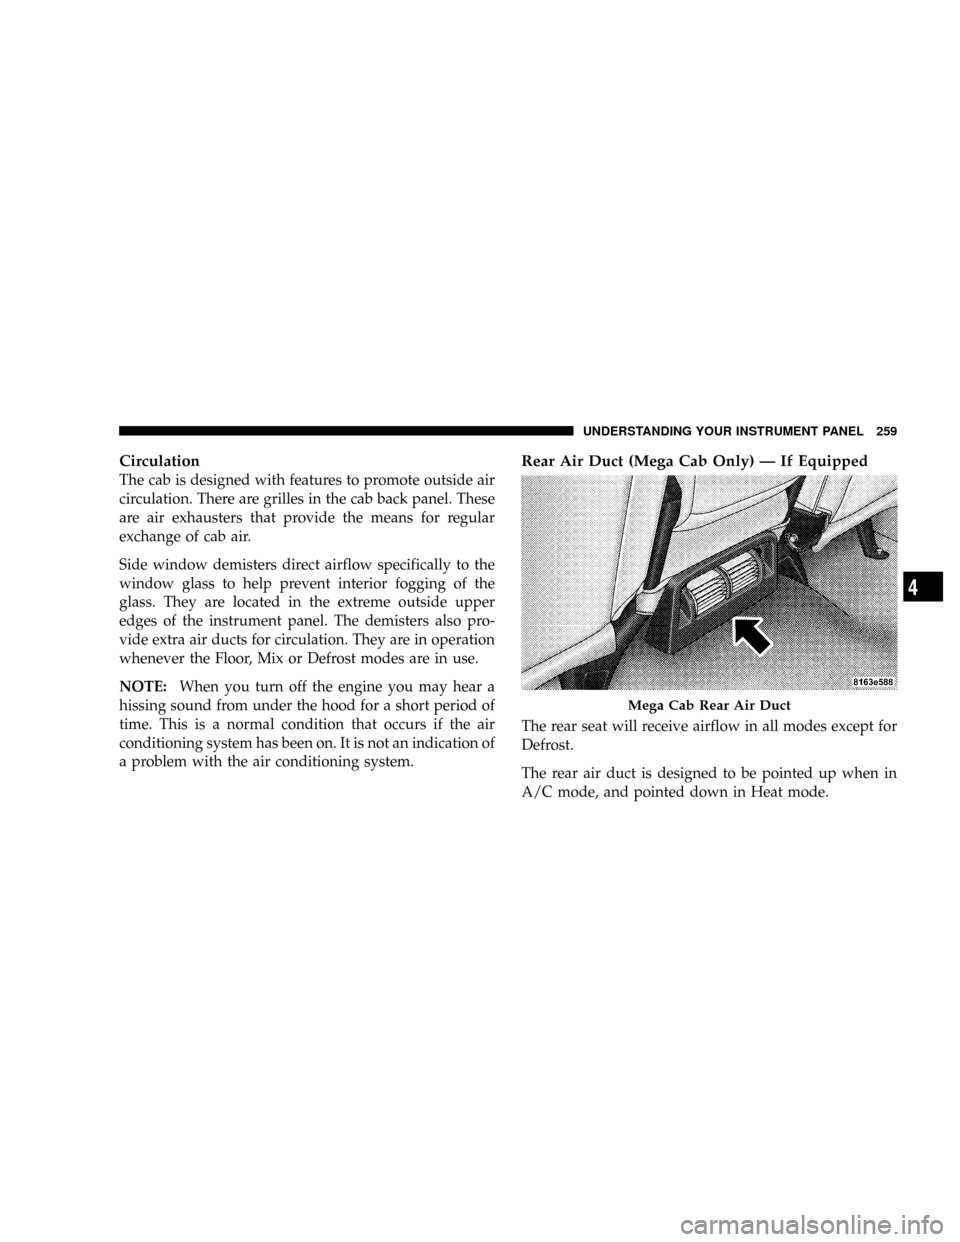
Rear Air Duct (Mega Cab Only) Ð If Equipped
The rear seat will receive airflow in all modes except for
Defrost.
The rear air duct is designed to be pointed up when in
A/C mode, and pointed down in Heat mode.
Mega Cab Rear Air Duct
UNDERSTANDING YOUR INSTRUMENT PANEL 259
4
Page 371 of 527
The automatic transmission fluid and filter should be
changed if you REGULARLY tow a trailer for more than
45 minutes of continuous operation. See Maintenance
Schedule in section 8 of this manual for transmission
fluid change intervals.
NOTE:Check the automatic transmission fluid level
before towing.
Towing Tips Ð Tow/Haul (If Equipped)
To reduce potential for automatic transmission overheat-
ing, turn the ªTOW HAULº feature ON when driving in
hilly areas or downshift the transmission (using the
Auto-6 [ERS] switch).
Towing Tips Ð Electronic Speed Control (If
Equipped)
þ
Don't use in hilly terrain or with heavy loads.
þWhen using the speed control, if you experience speed
drops greater than 10 mph (16 km/h), disengage until
you can get back to cruising speed.
þUse speed control in flat terrain and with light loads to
maximize fuel efficiency.
Towing Tips Ð Cooling System
To reduce potential for engine and transmission over-
heating, take the following actions:
þCity Driving
When stopped for short periods of time, put transmission
in neutral and increase engine idle speed.
þHighway Driving
Reduce speed.
þAir Conditioning
Turn off temporarily.
STARTING AND OPERATING 369
5
Page 389 of 527
NOTE:The winch mechanism is designed for use with
the jack extension tube only. Use of an air wrench or other
power tools is not recommended and can damage the
winch.
Tire Changing Procedure
WARNING!
Getting under a jacked-up vehicle is dangerous. The
vehicle could slip off the jack and fall on you. You
could be crushed. Never get any part of your body
under a vehicle that is on a jack. Never start or run
the engine while the vehicle is on a jack. If you need
to get under a raised vehicle, take it to a service center
where it can be raised on a lift.Do not raise this vehicle using a bumper jack. The jack is
designed as a tool for changing tires on this vehicle only.
It is not recommended that the jack be used for service
purposes or to lift more than one wheel at a time.
Preparations
Park the vehicle on a firm level surface, avoiding ice or
slippery areas. Set the parking brake and place the gear
selector in PARK (automatic transmission) or REVERSE
(manual transmission). On four-wheel drive vehicles,
shift the transfer case to the ª4Lº position.
WARNING!
Do not attempt to change a tire on the side of the
vehicle close to moving traffic. Pull far enough off
the road to avoid the danger of being hit when
operating the jack or changing the wheel.
WHAT TO DO IN EMERGENCIES 387
6
Page 421 of 527
Engine Air Cleaner Filter (6.7L Diesel Engines)
CAUTION!
All air entering the engine intake must be filtered.
The abrasive particles in unfiltered air will cause
rapid wear to engine components.
The condition of the air cleaner filter is monitored by the
Engine Control Module. The Electronic Vehicle Informa-
tion Center (EVIC) will display SERVICE AIR FILTER
when service is required.
Do not remove the top of the air filter housing to
inspect the filter element on your diesel engine under
normal operating conditions.
The EVIC message SERVICE AIR FILTER could be dis-
played periodically. This is because engine air flow
requirements change based on driving conditions. As thefilter becomes more restrictive and air flow requirements
increase the EVIC message SERVICE AIR FILTER will be
displayed. The message may not be displayed in subse-
quent drive cycles if the same conditions are not met. The
air filter element should be replaced within 250 miles
from the first time this message is displayed to ensure
proper engine operation during all driving conditions.
The air filter housing on your vehicle may also come
equipped with a Filter MinderŸ. This is an air flow
restriction gauge that will indicate when the filter ele-
ment needs to be replaced.
CAUTION!
Driving with a restricted air filter can cause engine
damage.
MAINTAINING YOUR VEHICLE 419
7
Page 437 of 527
Exhaust System
The best protection against carbon monoxide entry into
the vehicle body is a properly maintained engine exhaust
system.
Whenever a change is noticed in the sound of the exhaust
system, when exhaust fumes can be detected inside the
vehicle, or when the underside or rear of the vehicle is
damaged, have a competent mechanic inspect the com-
plete exhaust system and adjacent body areas for broken,
damaged, deteriorated, or mispositioned parts. Open
seams or loose connections could permit exhaust fumes
to seep into the passenger compartment. In addition,
inspect the exhaust system each time the vehicle is raised
for lubrication or oil change. Replace as required.WARNING!
Exhaust gases can injure or kill you. They contain
carbon monoxide (CO) which is colorless and odor-
less. Breathing it can make you unconscious and can
eventually poison you. To avoid breathing CO, fol-
low the preceding safety tips.
Exhaust System Rubber Isolator and Loop-Type
Hanger Ð If Equipped
Inspect surfaces whenever the vehicle is hoisted for
rubber to metal separation or deep cracks. If, excessively
deep localized cracks are present, or any part of the
exhaust system abnormally contacts the underbody hard-
ware, the isolator and/or hanger should be replaced.
MAINTAINING YOUR VEHICLE 435
7