Page 343 of 531
²A slight drop or fall away of the brake pedal at the end
of the stop.
WARNING!
²The Anti-Lock Brake System contains sophisti-
cated electronic equipment that may be suscep-
tible to interference caused by improperly in-
stalled or high output radio transmitting
equipment. This interference can cause possible
loss of anti-lock braking capability. Installation of
such equipment should be performed by qualified
professionals.
²Pumping of the Anti-Lock Brakes will diminish
their effectiveness and may lead to an accident.
Pumping makes the stopping distance longer. Just
press firmly on your brake pedal when you need
to slow down or stop.
WARNING!
²The Anti-Lock Brake System cannot prevent acci-
dents, including those resulting from excessive
speed in turns, following another vehicle too
closely, or hydroplaning. Only a safe, attentive,
and skillful driver can prevent accidents.
²The capabilities of an ABS-equipped vehicle must
never be exploited in a reckless or dangerous
manner which could jeopardize the user's safety
or the safety of others.
All vehicle wheels and tires must be the same size and
type, and tires must be properly inflated to produce
accurate signals for the computer.
STARTING AND OPERATING 341
5
Page 344 of 531
Anti-Lock Brake Light
The ABS light monitors the Anti-Lock System.
The light will come on when the ignition
switch is turned to the ON position and may
stay on for as long as four seconds.
If the ABS light remains on or comes on while driving, it
indicates that the Anti-Lock portion of the brake system
is not functioning and that service is required. However,
the conventional brake system will continue to operate
normally if the BRAKE warning light is not on.
If the ABS light is on, the brake system should be serviced
as soon as possible to restore the benefits of anti-lock
brakes. If the ABS light does not come on when the
ignition switch is turned to the ON position, have the
bulb repaired as soon as possible.
If both the Brake Warning Light and the ABS Light
remain on, the ABS and Electronic Brake Force Distribu-
tion (EBD) systems are not functioning. Immediate repairto the ABS system is required. Consult with your autho-
rized dealer service center as soon as possible.
ELECTRONIC BRAKE CONTROL SYSTEMS
Your vehicle is equipped with an advanced electronic
brake control system that includes TCS (Traction Control
System), BAS (Brake Assist System) and ESP (Electronic
Stability Program). These systems complement the Anti-
Lock Brake System (ABS) by optimizing the vehicle
braking capability during emergency braking maneu-
vers.
Traction Control System (TCS)
This system monitors the amount of wheel spin of each of
the driven wheels. If wheel spin is detected, brake
pressure is applied to the slipping wheel(s) and engine
power is reduced to provide enhanced acceleration and
stability. A feature of the TCS system functions similar to
a limited slip differential and controls the wheel spin
across a driven axle. If one wheel on a driven axle is
342 STARTING AND OPERATING
Page 346 of 531
Brake Assist System (BAS)
The BAS is designed to optimize the vehicle's braking
capability during emergency braking maneuvers. The
system detects an emergency braking situation by sens-
ing the rate and amount of brake application and then
applies optimum pressure to the brakes. This can help
reduce braking distances. The BAS complements the
Anti-Lock Brake System (ABS). Applying the brakes very
quickly results in the best BAS assistance. To receive the
benefit of the system, you must apply continuous brak-
ing pressure during the stopping sequence. Do not
reduce brake pedal pressure unless braking is no longer
desired. Once the brake pedal is released, the BAS is
deactivated.WARNING!
²BAS (Brake Assist System) cannot prevent the
natural laws of physics from acting on the vehicle,
nor can it increase the traction afforded by prevail-
ing road conditions.
²BAS cannot prevent accidents, including those
resulting from excessive speed in turns, driving on
very slippery surfaces, or hydroplaning. Only a
safe, attentive, and skillful driver can prevent
accidents.
²The capabilities of a BAS-equipped vehicle must
never be exploited in a reckless or dangerous
manner which could jeopardize the user's safety
or the safety of others.
344 STARTING AND OPERATING
Page 353 of 531
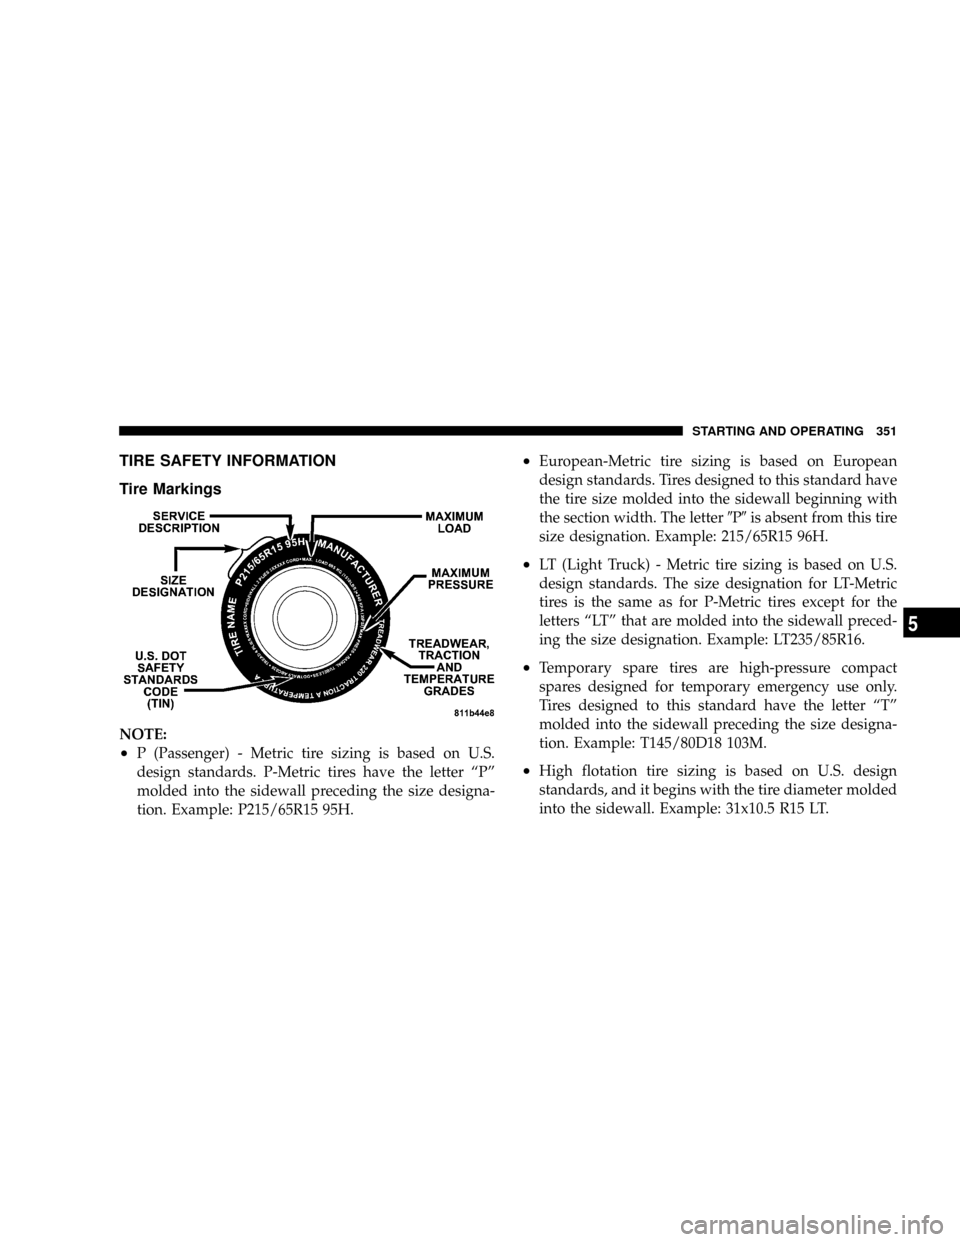
TIRE SAFETY INFORMATION
Tire Markings
NOTE:
²P (Passenger) - Metric tire sizing is based on U.S.
design standards. P-Metric tires have the letter ªPº
molded into the sidewall preceding the size designa-
tion. Example: P215/65R15 95H.
²European-Metric tire sizing is based on European
design standards. Tires designed to this standard have
the tire size molded into the sidewall beginning with
the section width. The letter9P9is absent from this tire
size designation. Example: 215/65R15 96H.
²LT (Light Truck) - Metric tire sizing is based on U.S.
design standards. The size designation for LT-Metric
tires is the same as for P-Metric tires except for the
letters ªLTº that are molded into the sidewall preced-
ing the size designation. Example: LT235/85R16.
²Temporary spare tires are high-pressure compact
spares designed for temporary emergency use only.
Tires designed to this standard have the letter ªTº
molded into the sidewall preceding the size designa-
tion. Example: T145/80D18 103M.
²High flotation tire sizing is based on U.S. design
standards, and it begins with the tire diameter molded
into the sidewall. Example: 31x10.5 R15 LT.
STARTING AND OPERATING 351
5
Page 355 of 531
Tire Sizing Chart
HA symbol indicating the range of speeds at which a tire can carry a load corresponding to its load
index under certain operating conditions
The maximum speed corresponding to the speed symbol should only be achieved under specified
operating conditions (i.e., tire pressure, vehicle loading, road conditions, and posted speed limits)
(....blank....(
²Absence of any text on the sidewall of the tire indicates a Standard Load (SL) Tire
²Extra Load (XL) = Extra load (or reinforced) tire
²Light Load = Light load tire
²C, D, E = Load range associated with the maximum load a tire can carry at a specified pressure
Maximum
LoadMaximum load indicates the maximum load this tire is designed to carry
Maximum
PressureMaximum pressure indicates the maximum permissible cold tire inflation pressure for this tire
STARTING AND OPERATING 353
5
Page 420 of 531
4. When the compact spare tire/cover assembly is clear
of the vehicle, stand the tire/cover assembly upright and
remove the wheel spacer by squeezing the two retaining
tabs together.5. There are two jack engagement locations on each side
of the vehicle body. These locations are on the sill flange
of the vehicle body.
NOTE:Rear jack location is between a pair of down-
standing tabs on the sill flange of the vehicle body.
Front jack location is on the sill flange of the vehicle body
and aligns with the front door edge.
Squeezing Winch Retainer Tabs
418 WHAT TO DO IN EMERGENCIES
Page 425 of 531
2. Assemble the winch handle extensions to form the
Spare Tire Hook and pull the wheel spacer from under
the vehicle.
3. Turn the compact spare tire so that the valve stem is
down and place the tire into the spare tire cover assem-
bly. Slide the wheel spacer through the center of the
wheel and spare tire cover assembly so that the two
retainer tabs snap out and engage the spare tire cover on
the opposite side.
CAUTION!
The compact spare tire cover assembly must be used
when the compact spare tire is stored. Failure to use
this cover could drastically reduce the life of the
compact spare tire.
WARNING!
Verify that 'both' retainer tabs of the wheel spacer
have been properly extended through the center of
the wheel and spare tire cover assembly. Failure to
properly engage both retainer tabs could result in
loss of the spare tire & cover assembly, which will
cause vehicle damage and may cause loss of control
of the vehicle.
4. Using the winch ªTº handle, rotate the drive nut to the
right until the compact spare tire/cover assembly is
drawn into place against the underside of the vehicle.
5. Continue to rotate the nut to the right until you hear
the winch mechanism click three times. It cannot be
overtightened. Check under the vehicle to ensure the
compact spare tire/cover assembly is positioned cor-
rectly against the underside of the vehicle.
WHAT TO DO IN EMERGENCIES 423
6
Page 452 of 531
4. Disengage the two retaining tabs that secure the filter
cover to the HVAC housing and remove the cover.
5. Remove the A/C Air Filter by pulling it straight out of
the housing.6. Install the A/C Air Filter with the arrow on the filter
pointing toward the floor. When installing the filter
cover, make sure the retaining tabs fully engage the
cover.
CAUTION!
The A/C Air Filter is labeled with an arrow to
indicate airflow direction through the filter. Failure
to properly install the filter will result in the need to
replace it more often.
7. Rotate the glove box door back into position.
A/C Air Filter Replacement
450 MAINTAINING YOUR VEHICLE