Page 275 of 494

NOTE:If a malfunction occurs, the system will trap the
key in the ignition cylinder to warn you that this safety
feature is inoperable. The engine can be started and
stopped, but the key cannot be removed until you obtain
service.
ELECTRONICALLY CONTROLLED AUTOMATIC
TRANSAXLE
The electronically controlled transaxle provides a precise
shift schedule. The transaxle electronics are self-
calibrating; therefore, the first few shifts on a new vehicle
may be somewhat abrupt. This is a normal condition, and
precision shifts will develop within a few hundred miles.
GEAR RANGES
PARK
PARK supplements the parking brake by locking the
transaxle. The engine can be started in this range. Never
attempt to use PARK while vehicle is in motion. Apply
parking brake when leaving vehicle in this range.When parking on a flat surface, place the selector lever in
the PARK position first, and then apply the parking
brake.
When parking on a hill, it is important to set the parking
brake before placing the selector lever in PARK, other-
wise the load on the transaxle locking mechanism may
make it difficult to move the selector out of PARK. As an
added precaution, turn the front wheels toward the curb
on a downhill grade and away from the curb on an uphill
grade.
WARNING!
Never use PARK position on an Automatic Transaxle
as a substitute for the parking brake. Always apply
parking brake fully when parked to guard against
vehicle movement and possible injury or damage.
STARTING AND OPERATING 273
5
Page 276 of 494

CAUTION!
DO NOT race the engine when shifting from PARK
or NEUTRAL positions into another gear range as
this can damage the drivetrain.
REVERSE
Use this range for moving the vehicle rearward. Shift into
this range only after the vehicle has come to a complete
stop.
NEUTRAL
Engine may be started in this range.
WARNING!
Do not coast in NEUTRAL and never turn off the
ignition to coast down a hill. These are unsafe
practices that limit your response to changing traffic
or road conditions. You might lose control of the
vehicle and have an accident.
DRIVE/OVERDRIVE — Six-Speed Transaxle
This range should be used for most city and highway
driving, it provides the smoothest upshifts, downshifts,
and best fuel economy. However, use the AutoStick�
mode and select the[5]range when frequent transaxle
shifting occurs while using the DRIVE/OVERDRIVE
range, such as when operating the vehicle under heavy
loading conditions, (i.e., in hilly terrain, traveling into
strong head winds or while towing heavy trailers). Under
274 STARTING AND OPERATING
Page 278 of 494
driving, cold slippery conditions, mountain driving,
trailer towing, and many other situations.AUTOSTICK�OPERATION
By placing the gear selector lever one shift-level below
the DRIVE position, it can be moved from side to side.
This allows the driver to select a higher or lower range of
gears. Moving the gear selector lever to the Left (-)
triggers a downshift and to the Right (+) an upshift. The
gear position will display in the instrument cluster on the
transaxle range indicator.
NOTE:In Autostick�mode, the transaxle will only shift
up or down when the driver moves the gear selector
lever to the Right (+) or Left (-).
AutoStick�is deactivated when the lever is shifted from
the AutoStick (+/-) position into the DRIVE position.
AutoStick�Gear Selector Lever
276 STARTING AND OPERATING
Page 280 of 494

NOTE:If the light remains on with the parking brake
released, a brake system malfunction is indicated. Have
the brake system serviced by an authorized dealer im-
mediately.
NOTE:If the parking brake is applied while the vehicle
is moving, a chime will sound to alert the driver. The
chime will sound up to 10 times or until the vehicle has
returned to a stop.
Before leaving the vehicle, make sure that the parking
brake is fully applied and the gear selector is in the PARK
position.
To release the parking brake, slightly pull up the handle
while pushing the lock button, and guide the lever
downward to its stop. The brake warning light in the
instrument cluster should go out.
NOTE:The parking brake lever will not release unless
the lever is pulled up slightly past its applied position.Operation with an Automatic Transaxle
When parking on a flat surface, place the gear selector
lever in the PARK position first, and then apply the
parking brake.
NOTE:When parking on a hill, it is important to set the
parking brakeBEFOREplacing the gear selector in
PARK, otherwise the load on the automatic transaxle
locking mechanism may make it difficult to move the
selector out of PARK. As an added precaution, turn the
front wheels toward the curb on a downhill grade and
away from the curb on an uphill grade.
Operation with a Manual Transaxle — If Equipped
Place the gear selector in REVERSE. As an added precau-
tion, when parking on a hill, turn the front wheels toward
the curb on a downhill grade and away from the curb on
an uphill grade.
278 STARTING AND OPERATING
Page 302 of 494

4) the cold tire inflation pressures for the front, rear
and spare tires.
Loading
The vehicle maximum load on the tire must not exceed
the load carrying capacity of the tire on your vehicle. You
will not exceed the tire’s load carrying capacity if you
adhere to the loading conditions, tire size, and cold tire
inflation pressures specified on the “Tire and Loading
Information” placard and in the “Vehicle Loading” sec-
tion of this manual.
NOTE:Under a maximum loaded vehicle condition,
gross axle weight ratings (GAWR’s) for the front and rear
axles must not be exceeded. For further information on
GAWR’s, vehicle loading, and trailer towing, refer to the
“Vehicle Loading” section of this manual.
To determine the maximum loading conditions of your
vehicle, locate the statement “The combined weight of
occupants and cargo should never exceed XXX kg or XXXlbs.” on the Tire and Loading Information placard. The
combined weight of occupants, cargo/luggage and
trailer tongue weight (if applicable) should never exceed
the weight referenced here.
Steps for Determining Correct Load Limit
1. Locate the statement “The combined weight of occu-
pants and cargo should never exceed XXX pounds” on
your vehicle’s placard.
2. Determine the combined weight of the driver and
passengers that will be riding in your vehicle.
3. Subtract the combined weight of the driver and pas-
sengers from XXX kilograms or XXX pounds.
4. The resulting figure equals the available amount of
cargo and luggage load capacity. For example, if “XXX”
amount equals 1400 lbs. and there will be five 150 lb.
300 STARTING AND OPERATING
Page 303 of 494

passengers in your vehicle, the amount of available cargo
and luggage load capacity is 650 lbs. (since 5 x 150 = 750,
and 1400 – 750 = 650 lbs.)
5. Determine the combined weight of luggage and cargo
being loaded on the vehicle. That weight may not safely
exceed the available cargo and luggage load capacity
calculated in Step 4.
6. If your vehicle will be towing a trailer, load from your
trailer will be transferred to your vehicle. Consult this
manual to determine how this reduces the available
cargo and luggage load capacity of your vehicle.NOTE:The following table shows examples on how to
calculate total load, cargo/luggage and towing capacities
of your vehicle with varying seating configurations and
number and size of occupants. This table is for illustra-
tion purposes only and may not be accurate for the
seating and load carry capacity of your vehicle.
NOTE:For the following example the combined weight
of occupants and cargo should never exceed 865 lbs.
(392 Kg).
STARTING AND OPERATING 301
5
Page 339 of 494

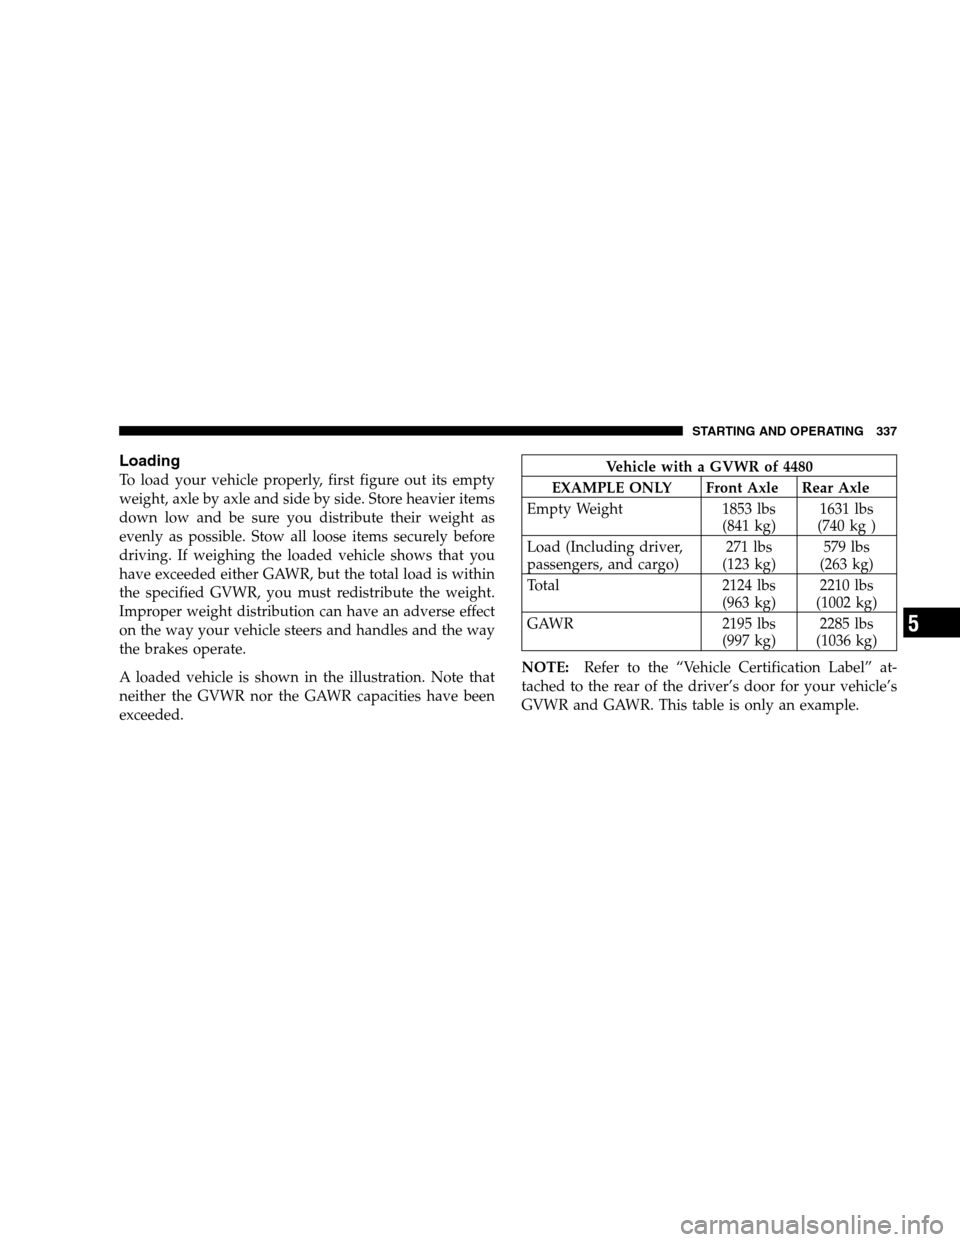
Loading
To load your vehicle properly, first figure out its empty
weight, axle by axle and side by side. Store heavier items
down low and be sure you distribute their weight as
evenly as possible. Stow all loose items securely before
driving. If weighing the loaded vehicle shows that you
have exceeded either GAWR, but the total load is within
the specified GVWR, you must redistribute the weight.
Improper weight distribution can have an adverse effect
on the way your vehicle steers and handles and the way
the brakes operate.
A loaded vehicle is shown in the illustration. Note that
neither the GVWR nor the GAWR capacities have been
exceeded.Vehicle with a GVWR of 4480
EXAMPLE ONLY Front Axle Rear Axle
Empty Weight 1853 lbs
(841 kg)1631 lbs
(740 kg )
Load (Including driver,
passengers, and cargo)271 lbs
(123 kg)579 lbs
(263 kg)
Total 2124 lbs
(963 kg)2210 lbs
(1002 kg)
GAWR 2195 lbs
(997 kg)2285 lbs
(1036 kg)
NOTE:Refer to the “Vehicle Certification Label” at-
tached to the rear of the driver’s door for your vehicle’s
GVWR and GAWR. This table is only an example.
STARTING AND OPERATING 337
5
Page 340 of 494

TRAILER TOWING
In this section, you will find safety tips and information
on limits to the type of towing you can reasonably do
with your vehicle. Before towing a trailer, carefully
review this information to tow your load as efficiently
and safely as possible.
To maintain warranty coverage, follow the requirements
and recommendations in this manual concerning ve-
hicles used for trailer towing.
If you have any questions or concerns after reviewing
this section, please consult your dealer to for full details
on the towing capabilities of the vehicle.
Common Towing Definitions
The following trailer towing related definitions will assist
you in understanding the following information:
Gross Vehicle Weight Rating (GVWR)
The GVWR is the total allowable weight of your vehicle.
This includes driver, passengers, cargo, and tongue
weight. The total load must be limited so that you do not
exceed the GVWR.
Gross Trailer Weight (GTW)
The gross trailer weight (GTW) is the weight of the trailer
plus the weight of all cargo, consumables and equipment
(permanent or temporary) loaded in or on the trailer in its
�loaded and ready for operation�condition. The recom-
mended way to measure GTW is to put your fully loaded
trailer on a vehicle scale. The entire weight of the trailer
must be supported by the scale.
338 STARTING AND OPERATING