Page 104 of 494
•After the�Ready�prompt and the following beep, say
�Emergency�and the UConnect�system will instruct
the paired cellular phone to call the emergency num-
ber. This feature is only supported in the U.S.
NOTE:The emergency number dialed is based on the
country where the vehicle is purchased (911 for the U.S.
and Canada and 060 for Mexico). The number dialed may
not be applicable with the available cellular service and
area.
The UConnect�system does slightly lower your chances
of successfully making a phone call as to that for the cell
phone directly.
Your phone must be turned on and paired to the
UConnect�system to allow use of this vehicle feature in
emergency situations, when the cell phone has network
coverage and stays paired to the UConnect�system.Towing Assistance
If you need towing assistance:
•Press the PHONE button to begin.
•After the�Ready�prompt and the following beep, say
�Towing Assistance.�
NOTE:The Towing Assistance number dialed is based
on the country where the vehicle is purchased (1-800-528-
2069 for the U.S., 1-877-213-4525 for Canada, 55-14-3454
for Mexico City and 1-800-712-3040 for outside Mexico
City in Mexico).
Please refer to the 24-Hour “Towing Assistance” cover-
age details in the Warranty Information Booklet and on
the 24–Hour Towing Assistance Card.
Paging
To learn how to page, refer to�Working with Automated
Systems.�Paging works properly except for pagers of
102 UNDERSTANDING THE FEATURES OF YOUR VEHICLE
Page 117 of 494
Voice Commands
Primary Alternate(s)
language
list names
list phones
mobile
mute
mute off
new entry
no
pager
pair a phone
phone pairing pairing
phonebook phone book
previous
record again
redialVoice Commands
Primary Alternate(s)
return to main menu return or main menu
select phone select
send
set up phone settings or phone
set up
towing assistance
transfer call
UConnect�Tutorial
try again
voice training
work
yes
UNDERSTANDING THE FEATURES OF YOUR VEHICLE 115
3
Page 133 of 494
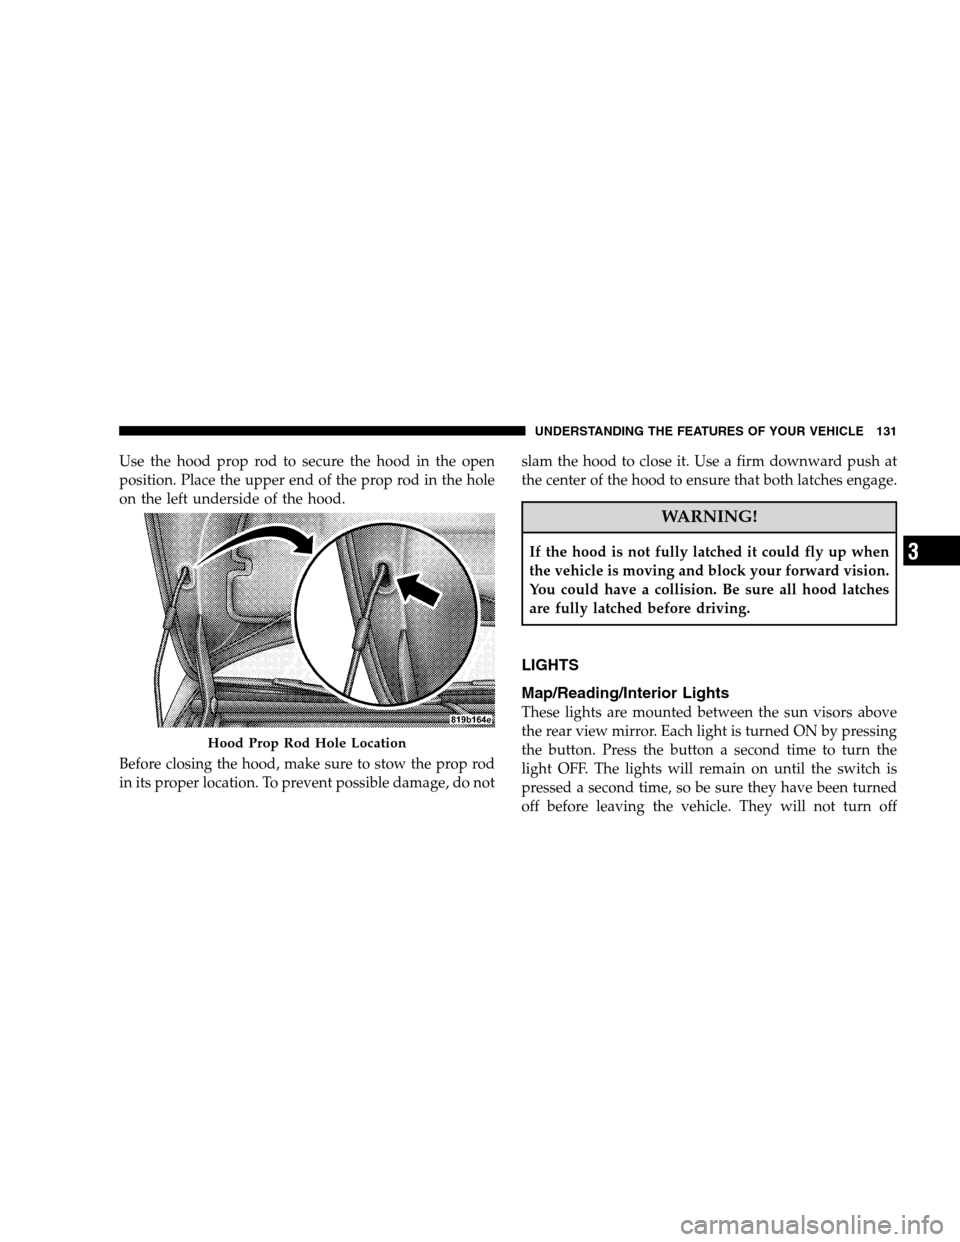
Use the hood prop rod to secure the hood in the open
position. Place the upper end of the prop rod in the hole
on the left underside of the hood.
Before closing the hood, make sure to stow the prop rod
in its proper location. To prevent possible damage, do notslam the hood to close it. Use a firm downward push at
the center of the hood to ensure that both latches engage.
WARNING!
If the hood is not fully latched it could fly up when
the vehicle is moving and block your forward vision.
You could have a collision. Be sure all hood latches
are fully latched before driving.
LIGHTS
Map/Reading/Interior Lights
These lights are mounted between the sun visors above
the rear view mirror. Each light is turned ON by pressing
the button. Press the button a second time to turn the
light OFF. The lights will remain on until the switch is
pressed a second time, so be sure they have been turned
off before leaving the vehicle. They will not turn off
Hood Prop Rod Hole Location
UNDERSTANDING THE FEATURES OF YOUR VEHICLE 131
3
Page 136 of 494
Passing Light / Flash to Pass
You can signal another vehicle with your headlights by
lightly pulling the Multifunction Control Lever toward
you. This will cause the headlights to turn on at high
beam and remain on until the lever is released.
NOTE:If the Multifunction Control Lever is held in the
flash to pass position for more than 15 seconds, the high
beams will shut off. If this occurs, wait 30 seconds for the
next flash to pass operation.
Daytime Running Lights (DRL) — If Equipped
The high beam lights will come on as DRL at DRL
intensity (lower), whenever the ignition is on, the engine
is running, the headlight switch is off, the parking brake
is off, the turn signal is off, and the gear select lever is in
any position except PARK.NOTE:On this vehicle, the DRLwill automatically turn
off when the turn signal is in operation and automatically
turn back on when the turn signal is not operating.
Lights On Reminder
If the headlights or parking lights are on after the ignition
is turned OFF, a chime will sound to alert the driver
when the driver’s door is opened.
Fog Lights — If Equipped
The front fog light switch is on the Multifunction
Control Lever. To activate the front fog lights, turn
on the parking lights or the low beam headlights
and pull out the end of the control lever.
134 UNDERSTANDING THE FEATURES OF YOUR VEHICLE
Page 138 of 494
If either light remains on and does not flash, or there is a
very fast flash rate, check for a defective outside light
bulb. If an indicator fails to light when the lever is
moved, it would suggest that the fuse or indicator bulb is
defective.
Highbeam/Lowbeam Select Switch
Push the Multifunction Control Lever away from you to
switch the headlights to HIGH beam. Pull the Lever
toward you, to switch the headlights back to Low beam.
WINDSHIELD WIPERS AND WASHERS
The wipers and washers are operated by a switch
on the control lever. The lever is located on the
right side of the steering column.
Highbeam Functions
136 UNDERSTANDING THE FEATURES OF YOUR VEHICLE
Page 142 of 494

Windshield Washers
To use the washer, pull the Windshield Wiper/Washer
Control lever toward you and hold it for as long as
washer spray is desired.
If you activate the washer while the wiper control is in
the delay range, the wipers will operate in low speed for
two wipe cycles after releasing the lever and then resume
the intermittent interval previously selected.
If you activate the washer while the wiper control is in
the OFF position, the wipers will operate for two wipe
cycles and then turn OFF.
Adding Washer Fluid
The fluid reservoir for the windshield washers is located
in the engine compartment. Be sure to check the fluid
level in the reservoir at regular intervals. Fill the reservoir
with windshield washer solvent (not radiator antifreeze)
and operate the system for a few seconds to flush out theresidual water. Refer to the appropriate engine diagram
in Section 7 “Maintaining Your Vehicle” for the location
of the reservoir.
WARNING!
Commercially available windshield washer solvents
are flammable. They could ignite and burn you. Care
must be exercised when filling or working around
the washer solution.
TILT/TELESCOPING STEERING COLUMN
This feature allows you to tilt the steering column
upward or downward. It also allows you to lengthen or
shorten the steering column. The tilt/telescoping control
handle is located below the steering wheel at the end of
the steering column.
140 UNDERSTANDING THE FEATURES OF YOUR VEHICLE
Page 145 of 494
TO SET AT THE DESIRED SPEED:
When the vehicle has reached the desired speed, push
down on the lever and release SET DECEL. The vehicle
will operate at the selected speed.
NOTE:
•The vehicle must be traveling at least 25 mph (40
km/h) for the speed control to set.
•The vehicle should be traveling at a steady speed and
on level ground before pushing downthe SET DECEL
lever.
TO DEACTIVATE:
A soft tap on the brake pedal, pulling the speed control
lever toward you CANCEL, or normal brake pressure
while slowing the vehicle will deactivate speed control
without erasing the set speed memory. Pushing in the
ON/OFF button (in the end of the lever) or turning off
the ignition switch erases the set speed memory.
TO RESUME SPEED:
To resume a previously set speed, push upward on the
RESUME ACCEL lever and release. Resume can be used
at any speed above 20 mph (32 km/h).
TO VARY THE SPEED SETTING:
When the speed control is ON, speed can be increased by
pushing up and holding RESUME ACCEL. Release the
lever when the desired speed is reached, and the new
speed will be set.
Pushing up and quickly releasing the RESUME ACCEL
lever will result in a 1 mph (2 km/h) speed increase. Each
time the lever is pushed upwards and quickly released.
To decrease speed while speed control is ON, push down
and hold SET DECEL. Release the lever when the desired
speed is reached, and the new speed will be set.
UNDERSTANDING THE FEATURES OF YOUR VEHICLE 143
3
Page 174 of 494
INSTRUMENT CLUSTER DESCRIPTIONS
1. Fuel Gauge
When the ignition switch is in the ON position, the
pointer will show the level of fuel remaining in the
fuel tank.
2. Fuel Door Reminder
This is a reminder that the Fuel Filler Door is
located on the left side of the vehicle.
3. Temperature Gauge
The temperature gauge shows engine coolant tem-
perature. Any reading below the red area of the
gauge shows that the engine cooling system is
operating properly. The gauge pointer may show a
higher than normal temperature when driving in hot
weather, up mountain grades, in heavy stop and go
traffic, or when towing a trailer.If the pointer rises to theH(red) mark, the instrument
cluster will sound a chime. Pull over and stop the vehicle.
Idle the vehicle with the air conditioner turned off until
the pointer drops back into the normal range. If the
pointer remains on theH(red) mark, turn the engine off
immediately and call for service.
There are steps that you can take to slow down an
impending overheat condition. If your air conditioning is
on, turn it off. The air conditioning system adds heat to
the engine cooling system and turning off the A/C
removes this heat. You can also turn the Temperature
control to maximum heat, the Mode control to Floor and
the Fan control to High. This allows the heater core to act
as a supplement to the radiator and aids in removing heat
from the engine cooling system.
4. Speedometer
Indicates vehicle speed.
172 UNDERSTANDING YOUR INSTRUMENT PANEL