Page 87 of 494
MIRRORS
INSIDE DAY/NIGHT MIRROR — IF EQUIPPED
Adjust the mirror to center on the view through the rear
window. A two-point pivot system allows for horizontal
and vertical mirror adjustment.Annoying headlight glare can be reduced by moving the
small control under the mirror to the night position
(toward rear of vehicle). The mirror should be adjusted
while set in the day position (toward windshield).
Adjusting Rear View Mirror
UNDERSTANDING THE FEATURES OF YOUR VEHICLE 85
3
Page 88 of 494
AUTOMATIC DIMMING MIRROR — IF EQUIPPED
This mirror will automatically adjust for annoying head-
light glare from vehicles behind you. Push in the button
on the face of the mirror to activate the dimming feature.
Automatic Dimming Mirror — If Equipped
1 - Auto Mirror Sensor4 - Passenger Map Light
Switch
2 - Driver Map Light Switch 5 - Auto Mirror ON LED
3 - Auto Mirror On/Off Switch 86 UNDERSTANDING THE FEATURES OF YOUR VEHICLE
Page 90 of 494
ADJUSTING SIDEVIEW MIRRORS
Outside Mirror — Driver’s Side
Adjust the outside mirror to center on the adjacent lane of
traffic, with a slight overlap of the view obtained on the
inside mirror.
Outside Mirror — Passenger’s Side
Adjust the convex outside mirror so you can just see the
side of your vehicle in the part of the mirror closest to the
vehicle.
WARNING!
Vehicles and other objects seen in the right side
convex mirror will look smaller and farther away
than they really are. Relying too much on your right
side mirror could cause you to collide with another
vehicle or other object. Use your inside mirror when
judging the size or distance of a vehicle seen in this
convex mirror.
Mirror Directions
88 UNDERSTANDING THE FEATURES OF YOUR VEHICLE
Page 91 of 494

ILLUMINATED VANITY MIRRORS — IF EQUIPPED
An illuminated vanity mirror is on each sun visor. To use
the mirror, rotate the sun visor down and swing the
mirror cover upward. The lights will turn on automati-
cally. Closing the mirror cover turns off the lights.
HANDS-FREE COMMUNICATION (UConnect�)—
IF EQUIPPED
NOTE: The sales code RER radio contains an inte-
grated Hands-Free Communication (UConnect�) sys-
tem. Refer to your “Navigation User’s Manual” for
UConnect�system operating instructions for this radio.
UConnect�is a voice-activated, hands-free, in-vehicle
communications system. UConnect�allows you to dial a
phone number with your cellular phone using simple
voice commands (e.g.,�Call”�“Mike”�”Work�or�Dial”
�“248-555-1212�). Your cellular phone’s audio is trans-
mitted through your vehicle’s audio system; the system
will automatically mute your radio when using the
UConnect�system.
NOTE:The UConnect�system requires a cellular phone
equipped with the Bluetooth��Hands-Free Profile,�Ve r -
sion 0.96 or higher. See the UConnect�website for
supported phones.
Illuminated Vanity Mirror
UNDERSTANDING THE FEATURES OF YOUR VEHICLE 89
3
Page 104 of 494

•After the�Ready�prompt and the following beep, say
�Emergency�and the UConnect�system will instruct
the paired cellular phone to call the emergency num-
ber. This feature is only supported in the U.S.
NOTE:The emergency number dialed is based on the
country where the vehicle is purchased (911 for the U.S.
and Canada and 060 for Mexico). The number dialed may
not be applicable with the available cellular service and
area.
The UConnect�system does slightly lower your chances
of successfully making a phone call as to that for the cell
phone directly.
Your phone must be turned on and paired to the
UConnect�system to allow use of this vehicle feature in
emergency situations, when the cell phone has network
coverage and stays paired to the UConnect�system.Towing Assistance
If you need towing assistance:
•Press the PHONE button to begin.
•After the�Ready�prompt and the following beep, say
�Towing Assistance.�
NOTE:The Towing Assistance number dialed is based
on the country where the vehicle is purchased (1-800-528-
2069 for the U.S., 1-877-213-4525 for Canada, 55-14-3454
for Mexico City and 1-800-712-3040 for outside Mexico
City in Mexico).
Please refer to the 24-Hour “Towing Assistance” cover-
age details in the Warranty Information Booklet and on
the 24–Hour Towing Assistance Card.
Paging
To learn how to page, refer to�Working with Automated
Systems.�Paging works properly except for pagers of
102 UNDERSTANDING THE FEATURES OF YOUR VEHICLE
Page 125 of 494
Reclining Bucket Seats
The recliner control is on the side of the seat. To recline,
lean forward slightly before lifting the lever, then lean
back to the desired position and release the lever. Lean
forward and lift the lever to return the seatback to its
normal position.WARNING!
•Adjusting a seat while the vehicle is moving is
dangerous. The sudden movement of the seat
could cause you to lose control. The seat belt might
not be properly adjusted and you could be injured.
Adjust the seat only while the vehicle is parked.
•Do not ride with the seatback reclined so that the
shoulder belt is no longer resting against your
chest. In a collision you could slide under the seat
belt and be seriously or even fatally injured. Use
the recliner only when the vehicle is parked.
Seatback Adjustment
UNDERSTANDING THE FEATURES OF YOUR VEHICLE 123
3
Page 128 of 494
Heated Seats — If Equipped
This feature heats leather or cloth front driver and
passenger seats. The controls for the heated seats are
located in the center console above the climate controls.
There are indicator lights in the switches, which indicate
a low heat setting (one light lit) or high heat setting (two
lights lit).
Press the switch once to select high-level heating. Press
the switch a second time to select low-level heating. Press
the switch a third time to shut off the heating elements.
Heated Seat Switches
126 UNDERSTANDING THE FEATURES OF YOUR VEHICLE
Page 133 of 494

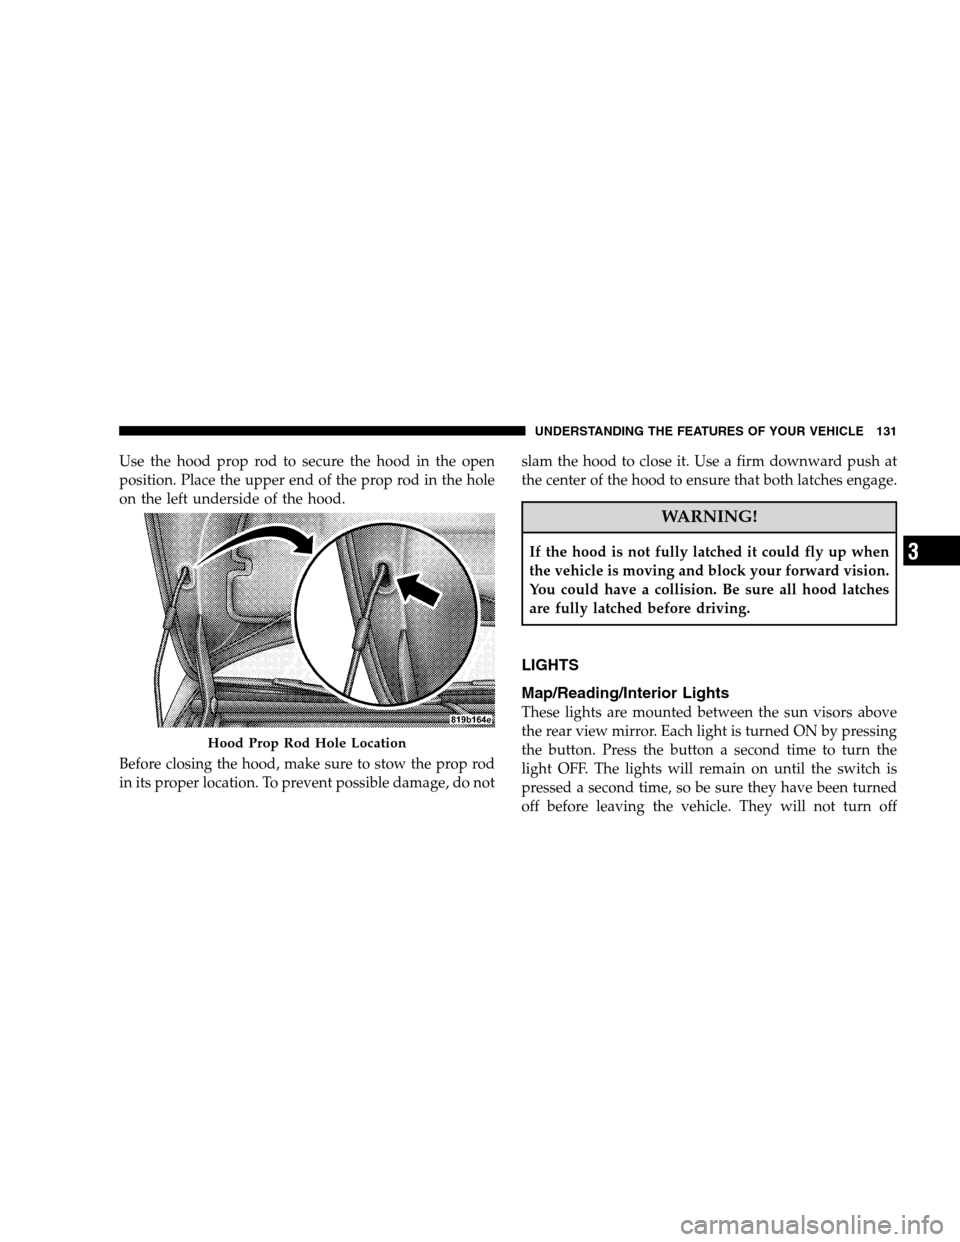
Use the hood prop rod to secure the hood in the open
position. Place the upper end of the prop rod in the hole
on the left underside of the hood.
Before closing the hood, make sure to stow the prop rod
in its proper location. To prevent possible damage, do notslam the hood to close it. Use a firm downward push at
the center of the hood to ensure that both latches engage.
WARNING!
If the hood is not fully latched it could fly up when
the vehicle is moving and block your forward vision.
You could have a collision. Be sure all hood latches
are fully latched before driving.
LIGHTS
Map/Reading/Interior Lights
These lights are mounted between the sun visors above
the rear view mirror. Each light is turned ON by pressing
the button. Press the button a second time to turn the
light OFF. The lights will remain on until the switch is
pressed a second time, so be sure they have been turned
off before leaving the vehicle. They will not turn off
Hood Prop Rod Hole Location
UNDERSTANDING THE FEATURES OF YOUR VEHICLE 131
3