Page 194 of 358

To improve the vehicle's traction when driving with
snow chains, or starting off in deep snow, sand, or gravel,
switch off the ESP by pressing the upper half of the ESP
switch. The ESP warning light will then be continuously
illuminated. With the ESP system switched off, the en-
gine torque reduction feature is cancelled. Therefore, the
enhanced vehicle stability offered by ESP is unavailable.
CAUTION!
Snow chains should never be used without the
recommended mud and snow (M+S) rated radial-ply
tires. Damage to your vehicle may result from such
usage.
ESP always operates under braking, even with the switch
in the OFF position.If one drive wheel loses traction and begins to spin, the
ESP system will apply the brake at the affected wheel
until the wheel regains sufficient traction. The traction
control engages at approximately 24 mph (40 km/h), and
switches off at 50 mph (80 km/h).
To return to the enhanced vehicle stability offered by ESP,
press the lower half of the switch (the ESP warning light
goes out).Anti-Lock Brake System (ABS)
The ABS gives increased vehicle stability and brake
performance under most braking conditions. The system
automatically ªpumpsº the brakes during severe braking
conditions to prevent wheel lock-up. The system operates
to prevent wheel lock-up and help avoid skidding on
slippery surfaces.
NOTE:The ABS improves steering control of the vehicle
during hard braking maneuvers.
192 STARTING AND OPERATING
Page 195 of 358

The ABS prevents the wheels from locking up above a
vehicle speed of approximately 5 mph (8 km/h) indepen-
dent of road surface conditions.
At the instant one of the wheels is about to lock up, a
slight pulsation can be felt in the brake pedal, indicating
that the ABS is in the regulating mode.
Keep firm and steady pressure on the brake pedal while
experiencing the pulsation. Continuous, steady brake
pedal pressure results in optimal braking power while
maintaining the ability to steer the vehicle.
In the case of an emergency brake maneuver, keep
continuous full pressure on the brake pedal. In this
manner only can the ABS be most effective.
On slippery road surfaces, the ABS will respond even
with light brake pedal pressure because of the increased
likelihood of locking wheels. The pulsating brake pedalcan be an indication of hazardous road conditions and
functions as a reminder to take extra care while driving.
WARNING!
Significant over- or under-inflation of tires, or mix-
ing sizes of front or rear tires or wheels on the vehicle
can reduce braking effectiveness. Maintain proper
tire pressure and always use the tires and wheels
specified in this manual for your vehicle.
The anti-lock brake system conducts a low-speed self-test
at about 12 mph (20 km/h). If you have your foot lightly
on the brake while this test is occurring, you may feel
slight pedal movement. The movement can be more
apparent on ice and snow. The anti-lock brake system
pump motor makes a low humming noise during opera-
tion, which is normal.
STARTING AND OPERATING 193
5
Page 196 of 358
WARNING!
Pumping of the brake pedal will diminish the effec-
tiveness of the anti-lock brakes and may lead to an
accident. Pumping makes the stopping distance
longer. Just press firmly on your brake pedal when
you need to slow down or stop.
NOTE:During severe braking conditions, a pulsing
sensation may occur and a clicking noise will be heard.
This is normal, indicating that the anti-lock brake system
is functioning.The ABS malfunction indicator light in the instrument
cluster comes on with the key in the ignition switch
turned to the ON/RUN position, and should go out with
the engine running. If the ABS light does not illuminate
briefly during this procedure, or remains on after the
engine is running, have the system checked by an autho-
rized dealer.
194 STARTING AND OPERATING
Page 197 of 358

When the ABS malfunction indicator light in the instru-
ment cluster comes on while the engine is running, it
indicates that the ABS has detected a malfunction and has
switched off. In this case, the brake system functions in
the usual manner, but without antilock assistance. With
the ABS malfunctioning, the BAS and ESP are also
switched off. Both malfunction indicator lights come on
with the engine running. If the charging voltage falls
below 10 volts, the malfunction indicator light comes on
and the ABS is switched off. When the voltage is above
this value again, the malfunction indicator light should
go out and the ABS is operational. If the malfunction
indicator light stays illuminated, have the system
checked at your authorized dealer as soon as possible.WARNING!
ABS cannot prevent the natural laws of physics from
acting on the vehicle, nor can it increase braking or
steering efficiency beyond that afforded by the con-
dition of the vehicle brakes and tires or the traction
afforded. The ABS cannot prevent accidents, includ-
ing those resulting from excessive speed in turns,
following another vehicle too closely, or hydroplan-
ing. Only a safe, attentive, and skillful driver can
prevent accidents. The capabilities of an ABS-
equipped vehicle must never be exploited in a reck-
less or dangerous manner which could jeopardize the
user's safety or the safety of others.
STARTING AND OPERATING 195
5
Page 200 of 358

TIRE SAFETY INFORMATION
TIRE MARKINGS
NOTE:
²P (Passenger) - Metric tire sizing is based on U.S.
design standards. P-Metric tires have the letter ªPº
molded into the sidewall preceding the size designa-
tion. Example: P215/65R15 95H.
²European-Metric tire sizing is based on European
design standards. Tires designed to this standard have
the tire size molded into the sidewall beginning with
the section width. The letter9P9is absent from this tire
size designation. Example: 215/65R15 96H.
²LT (Light Truck) - Metric tire sizing is based on U.S.
design standards. The size designation for LT-Metric
tires is the same as for P-Metric tires except for the
letters ªLTº that are molded into the sidewall preced-
ing the size designation. Example: LT235/85R16.
²Temporary spare tires are high-pressure compact
spares designed for temporary emergency use only.
Tires designed to this standard have the letter ªTº
molded into the sidewall preceding the size designa-
tion. Example: T145/80D18 103M.
²High flotation tire sizing is based on U.S. design
standards, and it begins with the tire diameter molded
into the sidewall. Example: 31x10.5 R15 LT.
198 STARTING AND OPERATING
Page 202 of 358

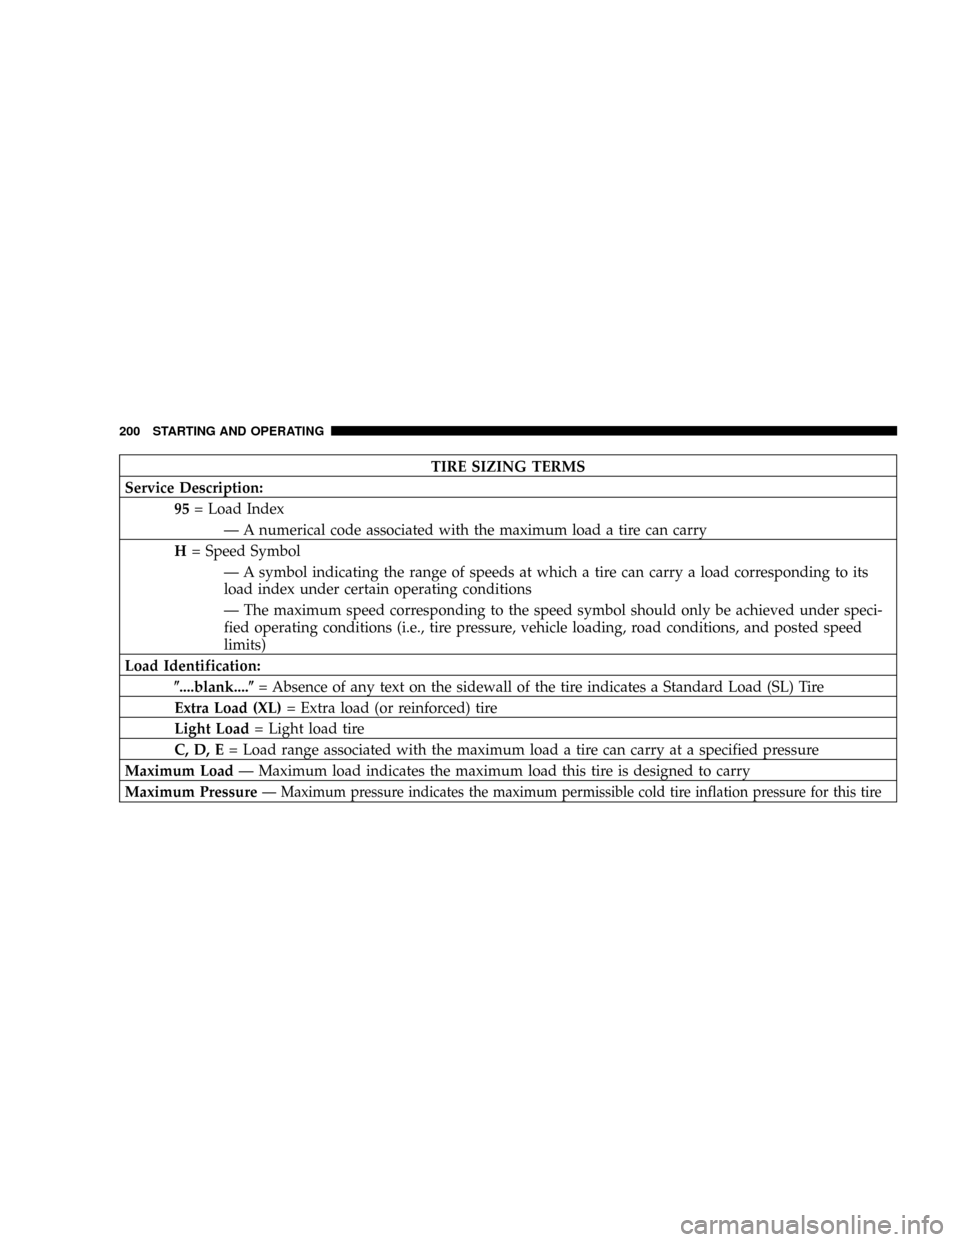
TIRE SIZING TERMS
Service Description:
95= Load Index
Ð A numerical code associated with the maximum load a tire can carry
H= Speed Symbol
Ð A symbol indicating the range of speeds at which a tire can carry a load corresponding to its
load index under certain operating conditions
Ð The maximum speed corresponding to the speed symbol should only be achieved under speci-
fied operating conditions (i.e., tire pressure, vehicle loading, road conditions, and posted speed
limits)
Load Identification:
(....blank....(= Absence of any text on the sidewall of the tire indicates a Standard Load (SL) Tire
Extra Load (XL)= Extra load (or reinforced) tire
Light Load= Light load tire
C, D, E= Load range associated with the maximum load a tire can carry at a specified pressure
Maximum LoadÐ Maximum load indicates the maximum load this tire is designed to carry
Maximum Pressure
Ð Maximum pressure indicates the maximum permissible cold tire inflation pressure for this tire
200 STARTING AND OPERATING
Page 237 of 358

WARNING!
Cuts or punctures larger than approximately 0.16 in. (4 mm),
tire damage caused by driving with extremely low tire
pressure or on a flat tire, or a damaged wheel can pose a
hazard while driving. TIREFIT should not be used in such
circumstances. Do not drive the vehicle under such circum-
stances. Contact your nearest authorized dealer for assis-
tance.
Take care not to allow the contents of TIREFIT to come in
contact with hair, eyes or clothing. TIREFIT is harmful if
inhaled, swallowed or absorbed through the skin: It causes
skin, eye and respiratory irritation. Any contact with eyes
or skin should be flushed immediately with plenty of
water. If clothing comes in contact with TIREFIT, change
clothing as soon as possible.
In case of allergic reaction or rash, consult a physician
immediately. Keep TIREFIT out of reach of children. If
swallowed, rinse mouth immediately with plenty of water
and drink plenty of water. Do not induce vomiting! Consult
a physician immediately.
Keep away from open flame or heat source.
Sealing tire with TIREFIT
1. Set the parking brake and turn on the hazard warning
flashers.
2. Move the transmission selector lever to the PARK
position (manual transmission to FIRST or REVERSE
gear) and turn off the engine.
3. Remove the TIREFIT kit and electric air pump from
the area below the cargo compartment carpet.
4. Open flap (2) on the electric air pump.
5. Pull the power plug (4) and air hose (5) along with the
pressure gauge out of the air pump housing.
6. Screw the air hose (5) onto the hose connection on the
TIREFIT sealant bottle (1).
7. Holding the sealant bottle by the top, insert it down-
wards into the recess (3) on the air pump.
WHAT TO DO IN EMERGENCIES 235
6
Page 299 of 358

The following methods are sufficient if the top is only
lightly soiled:
Dry Cleaning
Brush the dry top with a soft-bristled brush from front to
rear of the vehicle.
Wet Cleaning
Wash with clear water or with a mild detergent and an
ample supply of luke warm water by wiping with a
soft-bristled brush or sponge from front to rear. Then
rinse thoroughly with clear water.
Allow the top to dry before lowering. Vacuuming the top
with a wet/dry shop vacuum will decrease the top's
drying time, ensure removal of all dirt, and delete streaks
in the material. Multiple cleanings may be necessary to
remove stubborn stains. If stains persist, contact your
local dealership for further suggestions.
Weather Strip Care
Lubricate all top and door glass weather strips periodi-
cally with Mopar Weather Strip Lubricant (part number
4773427), to keep them soft and pliable.
FUSES
Underhood Accessory Fuse Block Fuses
The underhood accessory fuse block fuses are located
under the hood on the driver's side, between the brake
master cylinder and the left front fender.
To remove the lid, squeeze the tabs together located at the
front of the fusebox. Then lift the lid up by the tabs. The
lid will then slide off the top of the fuse box. To replace
the lid, place the two hinge-like tabs at the rear of the lid
under the tabs on the fusebox. Push down on the front of
the lid until the tabs at the front click.
MAINTAINING YOUR VEHICLE 297
7