2008 CHEVROLET HHR mirror
[x] Cancel search: mirrorPage 1 of 430

Seats and Restraint Systems........................... 1-1
Front Seats
............................................... 1-2
Rear Seats
..............................................1-10
Safety Belts
.............................................1-12
Child Restraints
.......................................1-33
Airbag System
.........................................1-57
Restraint System Check
............................1-72
Features and Controls..................................... 2-1
Keys
........................................................ 2-3
Doors and Locks
....................................... 2-9
Windows
.................................................2-15
Theft-Deterrent Systems
............................2-18
Starting and Operating Your Vehicle
...........2-21
Mirrors
....................................................2-39
OnStar
®System
......................................2-44
Storage Areas
.........................................2-47
Sunroof
..................................................2-52
Instrument Panel............................................. 3-1
Instrument Panel Overview
.......................... 3-4
Climate Controls
......................................3-23
Warning Lights, Gages, and Indicators
........3-28
Driver Information Center (DIC)
..................3-46
Audio System(s)
.......................................3-59Driving Your Vehicle....................................... 4-1
Your Driving, the Road, and Your Vehicle
..... 4-2
Towing
...................................................4-32
Service and Appearance Care.......................... 5-1
Service
..................................................... 5-3
Fuel
......................................................... 5-5
Checking Things Under the Hood
...............5-10
Headlamp Aiming
.....................................5-43
Bulb Replacement
....................................5-46
Windshield Wiper Blade Replacement
.........5-50
Tires
......................................................5-52
Appearance Care
...................................5-110
Vehicle Identi�cation
...............................5-118
Electrical System
....................................5-118
Capacities and Speci�cations
...................5-125
Maintenance Schedule..................................... 6-1
Maintenance Schedule
............................... 6-2
Customer Assistance Information.................... 7-1
Customer Assistance and Information
........... 7-2
Reporting Safety Defects
...........................7-13
Vehicle Data Recording and Privacy
...........7-16
Index................................................................ 1
2008 Chevrolet HHR Owner ManualM
Page 80 of 430
Mirrors...........................................................2-39
Manual Rearview Mirror.................................2-39
Automatic Dimming Rearview Mirror with
OnStar
®and Compass...............................2-39
Automatic Dimming Rearview Mirror with
Compass.................................................2-41
Outside Power Mirrors...................................2-43
Outside Convex Mirror...................................2-43
OnStar
®System.............................................2-44Storage Areas................................................2-47
Glove Box...................................................2-47
Cupholder(s)................................................2-47
Instrument Panel Storage...............................2-47
Floor Console Storage Area...........................2-47
Rear Storage Area........................................2-48
Rear Compartment Storage Panel/Cover..........2-48
Roof Rack System........................................2-50
Convenience Net..........................................2-51
Hideaway Rear Storage Bins..........................2-51
Sunroof.........................................................2-52
Section 2 Features and Controls
2-2
Page 95 of 430

Passenger Vehicle and HHR Panel
The window switches are located on the center console.
The passenger vehicle has switches for each rear
window located on each rear door.
To open a window, press the bottom of the switch.
To close a window, press the top of the switch.
The power windows operate when the ignition is RUN
or ACC (Accessory), or while in Retained Accessory
Power (RAP). SeeRetained Accessory Power (RAP) on
page 2-25.
HHR SS
The power window controls are located on each of the
side doors. The driver’s door also has switches that
control the passenger and rear windows.
Press the switch to lower the window. Pull up on the
front edge of the switch to raise the window.
The power windows work when the ignition has been
turned to ACCESSORY or RUN or when Retained
Accessory Power (RAP) is active. SeeRetained
Accessory Power (RAP) on page 2-25.
Express-Down Window
The driver’s window switch has an express-down
feature that allows the window to be lowered without
holding the switch. The switch is labeled AUTO. Press
the switch part way, and the driver’s window willopen a small amount. Press the switch down all the
way, release it, and the window will go down
automatically.
To stop the window while it is lowering, press and
release the top of, or pull up on the switch.
Window Lockout
o
(Window Lockout):Your vehicle has a lockout
feature to prevent rear seat passengers from operating
the windows. Press the lockout button, located with
the power window switches, to turn the feature on and
off. When the red band on the button is showing,
the lockout feature is off.
Sun Visors
To block out glare, swing down the visor(s). The sun
visors can also be detached from the center mount and
swung out to cover the side windows. They can also
be slid along the rod to cover different areas of the front
window.
Visor Vanity Mirrors
Your vehicle has visor vanity mirrors. Swing down the
sun visor and lift the cover to expose the mirror.
2-17
Page 117 of 430
Mirrors
Manual Rearview Mirror
When you are sitting in a comfortable driving position,
adjust the mirror so you can see clearly behind your
vehicle. Grip the mirror in the center to move it up
or down and side to side. The day/night adjustment
allows you to adjust the mirror to avoid glare from the
lamps behind you. Push the tab forward for daytime use
and pull it for nighttime use.
The mirror may have lights located on the bottom of the
mirror. Press the button next to each light to turn it
on or off.
Automatic Dimming Rearview Mirror
with OnStar
®and Compass
Your vehicle may have an automatic dimming rearview
mirror with OnStar®, compass, and map lights. The
compass automatically calibrates, or sets the driving
direction, as the vehicle is driven. The automatic
dimming feature enables the rearview mirror to sense
nighttime glare from vehicle headlamps from behind and
automatically dim to reduce the glare to a safe level.
The automatic dimming feature turns on each time the
vehicle is started.Press the buttons located at the bottom of the mirror to
turn the map lights on or off.
There are three additional buttons for the OnStar
®
system. See your dealer/retailer for more information on
the system and how to subscribe to OnStar®. See
OnStar®in the Index for more information.
O(On/Off):This is the on/off button for the automatic
dimming feature.
Automatic Dimming Mirror Operation
The automatic dimming mirror function is turned
on automatically each time the ignition is started. To
operate the automatic dimming mirror, do the following:
1. Make sure the green indicator light, located to
the left of the on/off button, is on. If it is not,
press and hold the on/off button until the green light
comes on.
2. Turn off the automatic dimming mirror function by
pressing and holding the on/off button until the
green indicator light turns off.
Compass Operation
Press the on/off button to turn the compass on or off.
The direction the vehicle is facing appears on the mirror.
2-39
Page 118 of 430
Compass Calibration
If a compass direction, (N for North for example) does not
appear, there may be a strong magnetic �eld interfering
with the compass. This can be caused by a magnetic
antenna mount, note pad holder, or similar objects. If the
word CAL appears in the compass window, the compass
may need to be reset or calibrated.
To calibrate the compass, do the following:
1. Make sure CAL is displayed on the mirror. If not,
press and hold the on/off button until CAL displays.
2. While CAL is displayed, drive the vehicle in circles
at 5 mph (8 km/h) or less until a direction appears
on the mirror.
Compass Variance
Compass variance is the difference between earth’s
magnetic north and true geographic north. If the mirror
is not adjusted for compass variance, the compass
could give false readings.
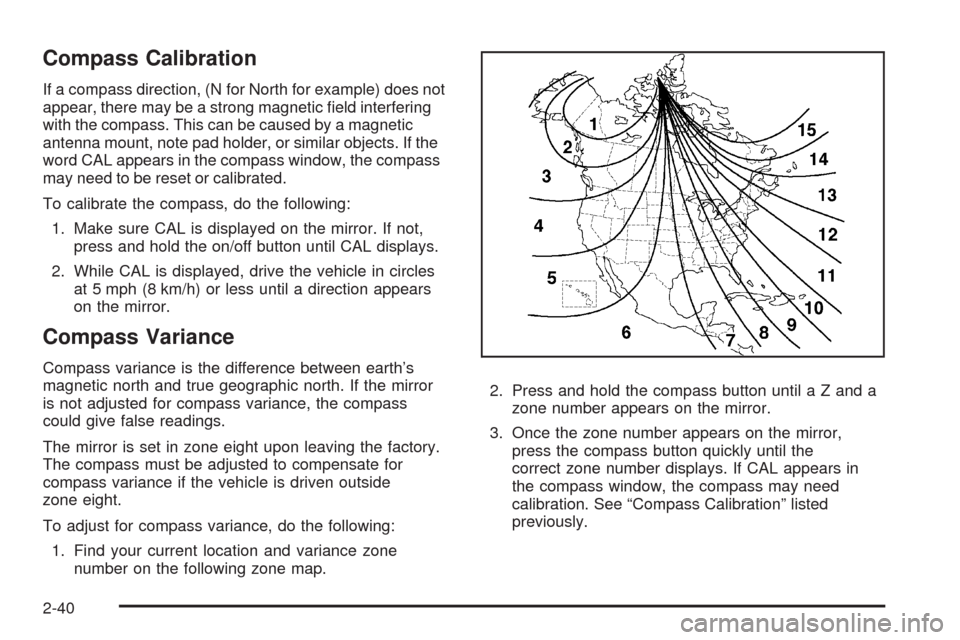
The mirror is set in zone eight upon leaving the factory.
The compass must be adjusted to compensate for
compass variance if the vehicle is driven outside
zone eight.
To adjust for compass variance, do the following:
1. Find your current location and variance zone
number on the following zone map.2. Press and hold the compass button until a Z and a
zone number appears on the mirror.
3. Once the zone number appears on the mirror,
press the compass button quickly until the
correct zone number displays. If CAL appears in
the compass window, the compass may need
calibration. See “Compass Calibration” listed
previously.
2-40
Page 119 of 430
Cleaning the Mirror
While cleaning the mirror, use a paper towel or similar
material dampened with glass cleaner. Do not spray
glass cleaner directly on the mirror as that may cause
the liquid cleaner to enter the mirror housing.
Automatic Dimming Rearview Mirror
with Compass
Your vehicle may have an automatic dimming rearview
mirror with a compass and map lights. The compass
feature enables the mirror to sense nighttime glare from
vehicle headlamps from behind and automatically
dim to reduce the glare to a safe level. The automatic
dimming feature turns on each time the vehicle is
started. Press the buttons located at the bottom of the
mirror to turn the map lights on or off.
O(On/Off):This is the on/off button for the automatic
dimming feature.
Automatic Dimming Mirror Operation
The automatic dimming mirror function is turned
on automatically each time the ignition is started. To
operate the automatic dimming mirror, do the following:
1. Make sure the green indicator light, located to the left
of the on/off button, is on. If it’s not, press the on/off
button until the green light comes on, indicating that
the mirror is in automatic dimming mode.
2. Turn off the automatic dimming mirror function by
pressing the on/off button until the green indicator
light turns off.
Compass Operation
Y
:This is the on/off button for the compass feature.
Press this button once to turn the compass on or off.
When the ignition and the compass feature are on, the
compass will show two character boxes for a few
seconds. After a few seconds, the mirror will display the
current compass direction.
2-41
Page 120 of 430
Compass Calibration
If after a few seconds the display does not show a
compass direction, (N for North for example), there may
be a strong magnetic �eld interfering with the compass.
Such interference may be caused by a magnetic
antenna mount, note pad holder, or similar object. If the
letter C or CAL appears in the compass window, the
compass may need to be reset or calibrated.
To calibrate the compass, do the following:
1. Make sure CAL is displayed in the display. If CAL is
not displayed, press and hold the compass button
until CAL is displayed.
2. While CAL is displayed, drive the vehicle in circles
at 5 mph (8 km/h) or less until the display reads a
direction.
Compass Variance
Compass variance is the difference between earth’s
magnetic north and true geographic north. If the mirror
is not adjusted for compass variance, the compass
could give false readings.
The mirror is set in zone eight upon leaving the factory.
It will be necessary to adjust the compass to
compensate for compass variance if the vehicle is
driven outside zone eight. Under certain circumstances,
such as a long distance, cross-country trip, it will be
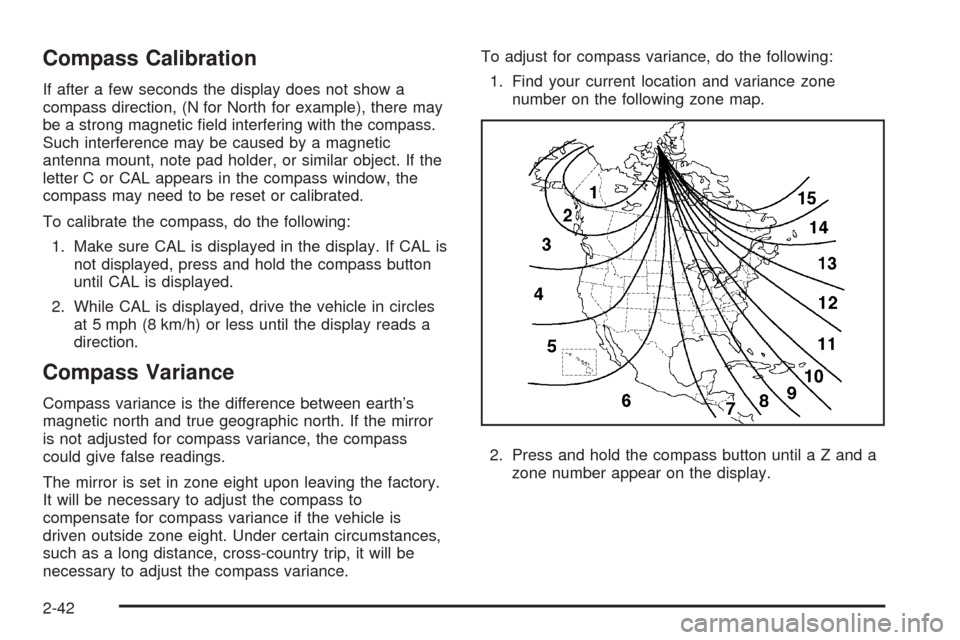
necessary to adjust the compass variance.To adjust for compass variance, do the following:
1. Find your current location and variance zone
number on the following zone map.
2. Press and hold the compass button until a Z and a
zone number appear on the display.
2-42
Page 121 of 430
3. Once the zone number appears on the display, press
the compass button quickly until you reach the
correct zone number. If C or CAL appears in the
compass window, the compass may need
calibration. See “Compass Calibration” listed
previously.
Outside Power Mirrors
The controls for the
outside power mirrors are
located on the driver’s
door armrest.
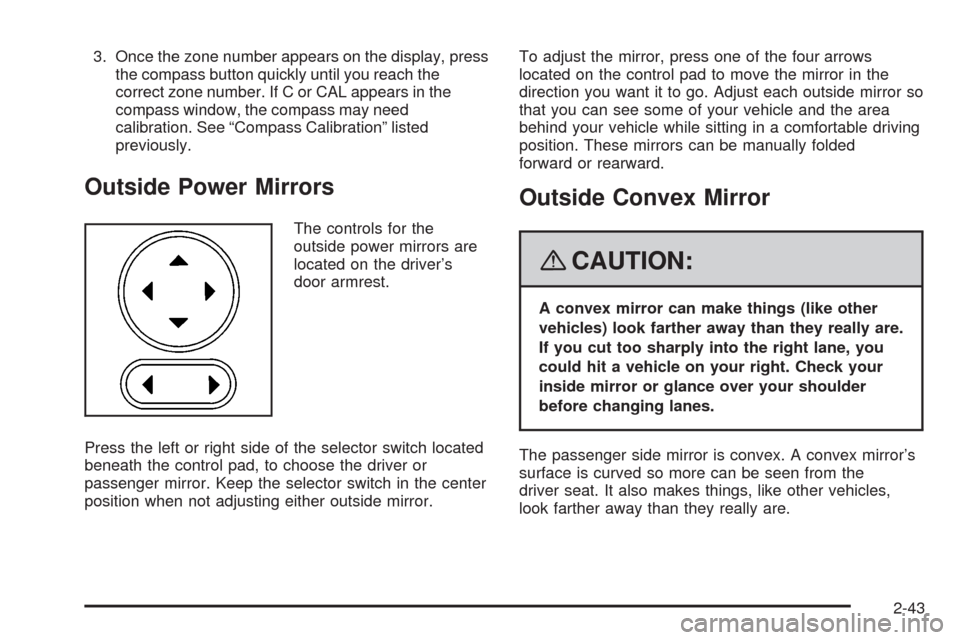
Press the left or right side of the selector switch located
beneath the control pad, to choose the driver or
passenger mirror. Keep the selector switch in the center
position when not adjusting either outside mirror.To adjust the mirror, press one of the four arrows
located on the control pad to move the mirror in the
direction you want it to go. Adjust each outside mirror so
that you can see some of your vehicle and the area
behind your vehicle while sitting in a comfortable driving
position. These mirrors can be manually folded
forward or rearward.
Outside Convex Mirror
{CAUTION:
A convex mirror can make things (like other
vehicles) look farther away than they really are.
If you cut too sharply into the right lane, you
could hit a vehicle on your right. Check your
inside mirror or glance over your shoulder
before changing lanes.
The passenger side mirror is convex. A convex mirror’s
surface is curved so more can be seen from the
driver seat. It also makes things, like other vehicles,
look farther away than they really are.
2-43