2008 CHEVROLET CORVETTE ignition
[x] Cancel search: ignitionPage 8 of 432
Heated Seats
On vehicles with heated seats, the buttons are located
on the center console.
The ignition must be on for this feature to work.
L:Press to turn the seat on at the high setting, and
twice to turn it to the low setting.
9:Press to turn the system off.
Memory Seat, Mirrors and Steering
Wheel
On vehicles with the memory package, the controls are
located on the driver’s door.
1:Saves the seating position for driver 1.
2:Saves the seating position for driver 2.
B:Recalls the easy exit position.
The numbers on the back of the keyless access
transmitters correspond to the numbers on the memory
buttons.To save seating positions in the memory:
1. Adjust the driver’s seat, both outside mirrors, and
the telescopic steering column to a comfortable
driving position.
2. Press and hold button 1 until two beeps let you know
that the position has been stored in the memory.
A second seating, mirror, and telescopic steering column
position can be set by repeating the above steps and
pressing button 2.
To recall a memory position:
On vehicles with an automatic transmission, press
and release the desired button.
If the vehicle is in PARK (P), a single beep sounds
and the memory position is recalled after a brief
delay.
If the vehicle is not in PARK (P), three beeps sound
and the memory position is not recalled.
On vehicles with a manual transmission, when the
vehicle is on, the parking brake needs to be set to
recall the memory position. Press and release
the desired button.
A single beep sounds and the memory position is
recalled after a brief delay.
If the vehicle is on and the parking brake is not set,
three beeps sound and the memory position is
not recalled.
1-4
Page 60 of 432

Servicing Your Airbag-Equipped
Vehicle
Airbags affect how your vehicle should be serviced.
There are parts of the airbag system in several places
around your vehicle. Your dealer/retailer and the service
manual have information about servicing your vehicle
and the airbag system. To purchase a service manual,
seeService Publications Ordering Information on
page 7-17.
{CAUTION:
For up to 10 seconds after the ignition is
turned off and the battery is disconnected, an
airbag can still in�ate during improper service.
You can be injured if you are close to an
airbag when it in�ates. Avoid yellow
connectors. They are probably part of the
airbag system. Be sure to follow proper
service procedures, and make sure the person
performing work for you is quali�ed to do so.
Adding Equipment to Your
Airbag-Equipped Vehicle
Q:Is there anything I might add to or change
about the vehicle that could keep the airbags
from working properly?
A:Yes. If you add things that change your vehicle’s
frame, bumper system, height, front end or side
sheet metal, they may keep the airbag system from
working properly. Changing or moving any parts of
the front seats, safety belts, the airbag sensing and
diagnostic module, steering wheel, instrument panel,
the inside review mirror, front sensors, or airbag
wiring can affect the operation of the airbag system.
In addition, your vehicle has a passenger sensing
system for the right front passenger’s position, which
includes sensors that are part of the passenger’s
seat. The passenger sensing system may not
operate properly if the original seat trim is replaced
with non-GM covers, upholstery or trim, or with GM
covers, upholstery or trim designed for a different
vehicle. Any object, such as an aftermarket seat
heater or a comfort enhancing pad or device,
1-56
Page 65 of 432
Keys...............................................................2-3
Keyless Access System...................................2-5
Keyless Access System Operation....................2-6
Doors and Locks............................................2-10
Door Locks..................................................2-10
Power Door Locks........................................2-12
Automatic Door Lock.....................................2-12
Programmable Automatic Door Unlock.............2-12
Lockout Protection........................................2-12
Hatch..........................................................2-13
Windows........................................................2-16
Power Windows............................................2-17
Sun Visors...................................................2-18
Theft-Deterrent Systems..................................2-18
Theft-Deterrent System..................................2-18
Immobilizer..................................................2-20
Immobilizer Operation....................................2-20
Starting and Operating Your Vehicle................2-21
New Vehicle Break-In....................................2-21
Front Air Dam..............................................2-21
Ignition Positions..........................................2-22Retained Accessory Power (RAP)...................2-23
Starting the Engine.......................................2-23
Automatic Transmission Operation...................2-26
Manual Transmission Operation......................2-30
Parking Brake..............................................2-32
Shifting Into Park (Automatic Transmission)......2-33
Shifting Out of Park......................................2-34
Parking the Vehicle (Manual Transmission).......2-35
Parking Over Things That Burn.......................2-35
Engine Exhaust............................................2-35
Running the Vehicle While Parked..................2-36
Mirrors...........................................................2-37
Automatic Dimming Rearview Mirror with
OnStar
®and Compass...............................2-37
Automatic Dimming Rearview Mirror with
Compass.................................................2-39
Outside Power Heated Mirrors........................2-41
Outside Automatic Dimming Mirror..................2-42
Outside Convex Mirror...................................2-42
OnStar
®System.............................................2-43
Universal Home Remote System......................2-46
Universal Home Remote System Operation......2-46
Section 2 Features and Controls
2-1
Page 68 of 432

The key, located inside the
keyless access transmitter,
can be used to lock and
unlock the glove box
and to open the
hatch/trunk lid if power to
the vehicle is lost. See
Hatch on page 2-13
for more information.
Press the button (A) near
the bottom of the keyless
access transmitter to
remove the key. Never pull
the key out without
pressing the button.This vehicle has a keyless access system with
pushbutton start. SeeIgnition Positions on page 2-22
for information on starting the vehicle.
Notice:If you ever lose your transmitter(s) and/or
key, it could be difficult to get into your vehicle.
You may even have to damage your vehicle to get
in. Be sure you have a spare transmitter and/or key.
If you are locked out of the vehicle, contact Roadside
Assistance. SeeRoadside Assistance Program on
page 7-8.
2-4
Page 71 of 432
Matching Transmitter(s) to Your
Vehicle
Each keyless access transmitter is coded to allow only
transmitters programmed to the vehicle to work. If a
transmitter is lost or stolen, a replacement can be
purchased and programmed by your dealer/retailer.
Your dealer/retailer can reprogram the vehicle so lost
or stolen transmitters no longer work with the vehicle.
Each vehicle can have a maximum of four transmitters
matched to it.
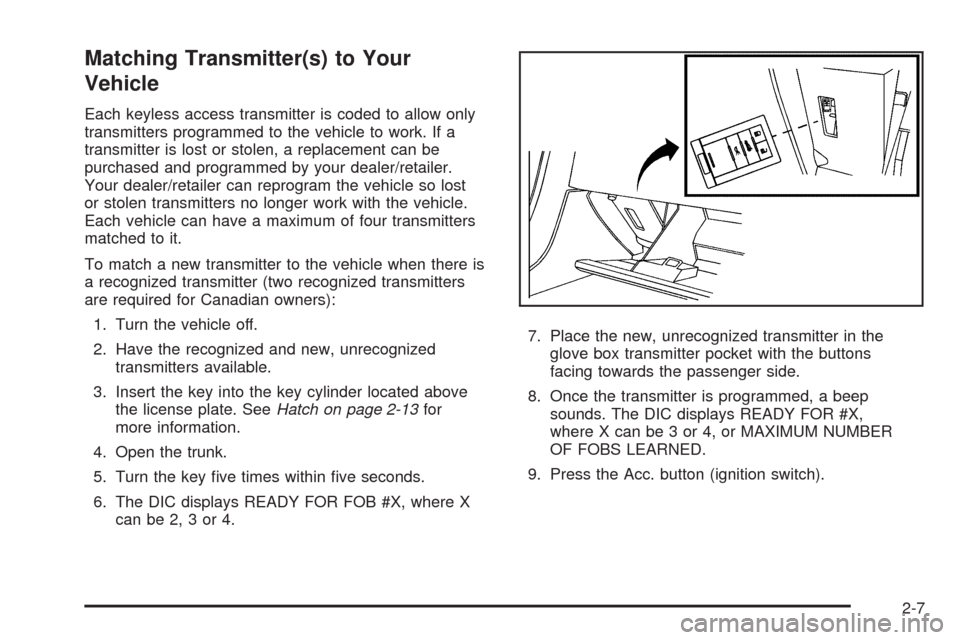
To match a new transmitter to the vehicle when there is
a recognized transmitter (two recognized transmitters
are required for Canadian owners):
1. Turn the vehicle off.
2. Have the recognized and new, unrecognized
transmitters available.
3. Insert the key into the key cylinder located above
the license plate. SeeHatch on page 2-13for
more information.
4. Open the trunk.
5. Turn the key �ve times within �ve seconds.
6. The DIC displays READY FOR FOB #X, where X
can be 2, 3 or 4.7. Place the new, unrecognized transmitter in the
glove box transmitter pocket with the buttons
facing towards the passenger side.
8. Once the transmitter is programmed, a beep
sounds. The DIC displays READY FOR #X,
where X can be 3 or 4, or MAXIMUM NUMBER
OF FOBS LEARNED.
9. Press the Acc. button (ignition switch).
2-7
Page 72 of 432
The Canadian immobilizer standard requires Canadian
owners to see their dealer/retailer for matching new
transmitters when two recognized transmitters are not
available. United States owners are permitted to match
a new transmitter to their vehicle when a recognized
transmitter is not available. The procedure requires
three ten minutes cycles to complete the matching
process.
1. Turn the vehicle off.
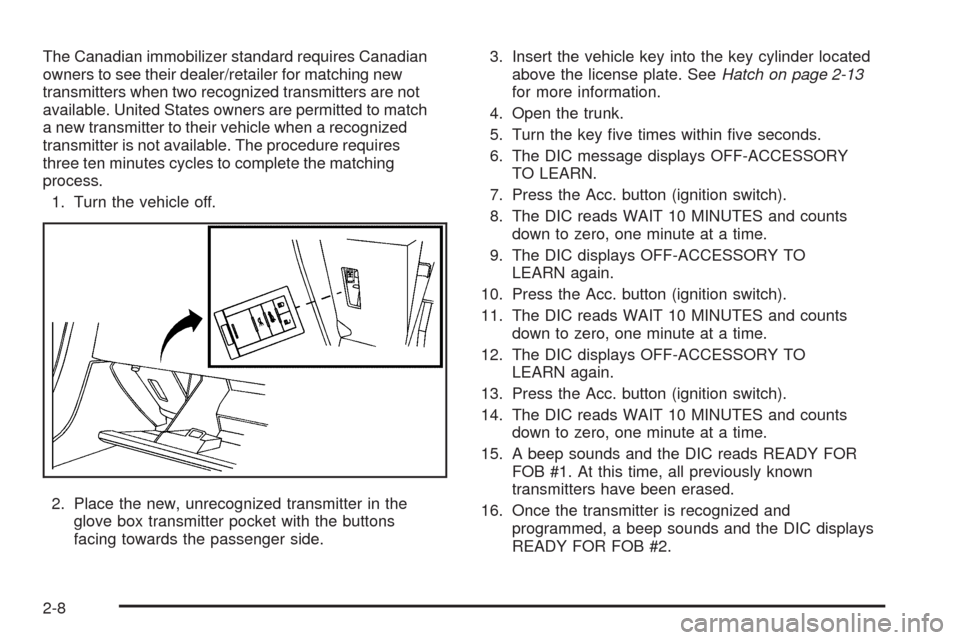
2. Place the new, unrecognized transmitter in the
glove box transmitter pocket with the buttons
facing towards the passenger side.3. Insert the vehicle key into the key cylinder located
above the license plate. SeeHatch on page 2-13
for more information.
4. Open the trunk.
5. Turn the key �ve times within �ve seconds.
6. The DIC message displays OFF-ACCESSORY
TO LEARN.
7. Press the Acc. button (ignition switch).
8. The DIC reads WAIT 10 MINUTES and counts
down to zero, one minute at a time.
9. The DIC displays OFF-ACCESSORY TO
LEARN again.
10. Press the Acc. button (ignition switch).
11. The DIC reads WAIT 10 MINUTES and counts
down to zero, one minute at a time.
12. The DIC displays OFF-ACCESSORY TO
LEARN again.
13. Press the Acc. button (ignition switch).
14. The DIC reads WAIT 10 MINUTES and counts
down to zero, one minute at a time.
15. A beep sounds and the DIC reads READY FOR
FOB #1. At this time, all previously known
transmitters have been erased.
16. Once the transmitter is recognized and
programmed, a beep sounds and the DIC displays
READY FOR FOB #2.
2-8
Page 73 of 432
If additional transmitters need programing, take
transmitter 1 out of the transmitter pocket and place
transmitter 2 in the pocket. Up to four transmitters can
be programmed. The DIC then displays MAXIMUM
NUMBER OF FOBS LEARNED and exits the
programming mode.
Press the Acc. button (ignition switch) when all the
transmitters are programmed.
Battery Replacement
If NO FOBS DETECTED displays on the DIC when you
try to start the vehicle, the battery is weak. Place the
transmitter in the glove box transmitter pocket with the
buttons facing towards the passenger side. Then, with
the vehicle in PARK (P) for an automatic transmission,
press the brake pedal and the START button. If the
vehicle has a manual transmission, press the clutch and
the START button. This starts the vehicle, however, it is
recommended that the battery be replaced as soon as
possible. The DIC may display FOB BATTERY LOW.
Notice:When replacing the battery, do not touch
any of the circuitry on the transmitter. Static
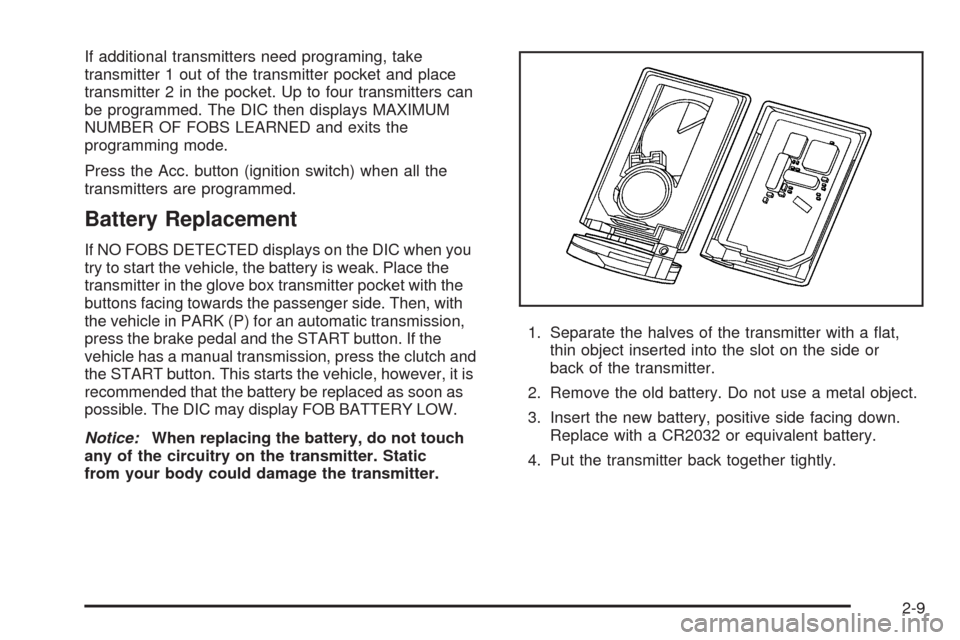
from your body could damage the transmitter.1. Separate the halves of the transmitter with a �at,
thin object inserted into the slot on the side or
back of the transmitter.
2. Remove the old battery. Do not use a metal object.
3. Insert the new battery, positive side facing down.
Replace with a CR2032 or equivalent battery.
4. Put the transmitter back together tightly.
2-9
Page 76 of 432
Power Door Locks
The power door lock switches are located on the doors.
There is an indicator light on the rear of the door
near the window.
K(Unlock):Press to unlock the doors.
When pressed, a beep sounds. If the door is closed
when pressed, the light �ashes twice. If the door is
open when pressed, the light �ashes.
Q(Lock):Press to lock the doors.
When pressed, a beep sounds. If the door is closed
when pressed, the light comes on for a few seconds,
then turns off. If the door is open when pressed, the
light stays on.
Automatic Door Lock
Your vehicle is programmed so that, when the doors are
closed, the ignition is on and the shift lever is moved
out of PARK (P) for automatic transmissions, or
when vehicle speed becomes faster than 8 mph
(13 km/h) for manual transmissions, both doors will lock.
If someone needs to get out while the vehicle is
running or not in PARK (P), have the person use the
power door unlock switch. When the door is closed
again, the doors will lock either when your foot is
removed from the brake or the vehicle speed becomes
faster than 8 mph (13 km/h).
Programmable Automatic Door
Unlock
Your vehicle is programmed so that when the shift
lever is moved into PARK (P) for automatic transmission
vehicles or when the ignition is turned off or is in
Retained Accessory Power (RAP) for manual
transmission vehicles, both doors will unlock.
With the vehicle stopped and the engine running,
door unlocking can be programmed through the
Driver Information Center (DIC). This allows the driver
to choose various unlock settings. For programming
information, seeDIC Vehicle Personalization on
page 3-75.
Lockout Protection
Your vehicle can be programmed to sound the horn
three times and unlock the driver door when both doors
are closed and there is a keyless access transmitter
inside the vehicle. When the driver door is opened,
a reminder chime will sound continuously. The vehicle
will remain locked only when at least one transmitter
has been removed from the vehicle and both doors are
closed. SeeDIC Vehicle Personalization on page 3-75.
2-12